Difference between revisions of "2Fort"
m |
(Undo edit by SonOfDiscordiA (Talk) (3705779) Overlinking) (Tag: Undo) |
||
| (452 intermediate revisions by more than 100 users not shown) | |||
| Line 1: | Line 1: | ||
| − | {{Map | + | {{Featured article tag}} |
| − | | | + | {{Other uses|this=the game map 2Fort|for=the town|Teufort (city)}} |
| − | | | + | {{Map infobox |
| − | | | + | | map-status = official |
| + | | map-game-type = Capture the Flag | ||
| + | | map-file-name = ctf_2fort | ||
| + | | map-image = Ctf 2fort bridge ss.png | ||
| + | | map-released = {{Patch name|10|10|2007|date-only=yes}} | ||
| + | | map-released-major = Launch | ||
| + | | map-environment = Farmland | ||
| + | | map-setting = Daylight, sunny | ||
| + | | map-has-deep-water = yes | ||
| + | | map-has-pyrovision = yes | ||
| + | | map-hazards = [[Environmental death#Drowning|Drowning]] | ||
| + | | map-pickups-health-small = 2 | ||
| + | | map-pickups-health-medium = 4 | ||
| + | | map-pickups-ammo-small = 2 | ||
| + | | map-pickups-ammo-medium = 4 | ||
}} | }} | ||
| − | ''' | + | {{Quotation|'''The Scout'''|Dis map ain't big enough for da two of us!|sound=Scout_dominationsct02.wav}} |
| − | + | '''2Fort''' is a [[Capture the Flag]] map and the subsequent remake of the ''[[Team Fortress Classic]]'' [[2Fort (Classic)|map of the same name]]; these maps are both based on the ''[[Team Fortress]]'' map [[2Fort5]]. 2Fort was the first official CTF map for ''[[Team Fortress 2]]'', and was one of the six initial maps included with the game's release. | |
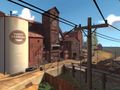
| − | + | Two similar forts face each other, separated by a [[:File:Unhappyreturns59.jpg|contaminated canal]] of deep [[water]]. A covered bridge spans the stream and battlements exist on each fort, providing excellent positions to assault oncoming players, particularly for [[Sniper]]s. Below the bridge, there lies a small water body, which can be used to access the sewers. | |
| − | + | To win, a team must repeatedly capture the opposing team's [[Intelligence]] by picking it up from deep within their fort and carrying it all the way to its own base until reaching the game's capture objective (3 captures on Valve servers), while preventing the enemy from achieving that same goal. | |
| − | + | There are three entrances into each fort, however, not all of them are accessible to every class. The primary entrances are the two openings on the ground level. There are short ramps leading up to each entrance, and the entrances converge under an open grate. These ramps allow defenders to attack intruders from above. The second entrance is through the sewers which run underneath each base. | |
| − | + | The entryway between the sewers and the base features a stairway and a pool of water; this area is a viable chokepoint. The third entrance is the battlements of each base, which can generally only be accessed by using special [[Jumping|jumping maneuvers]] as a [[Scout]], [[Soldier]], [[Pyro]], [[Demoman]], or [[Engineer]]. It can also be accessed by a [[Medic]] equipping the [[Quick-Fix]] who is healing a Soldier or Demoman. | |
| − | |||
| − | |||
| − | |||
| − | |||
| − | |||
| − | |||
| − | |||
| − | |||
| − | The | ||
| − | + | 2Fort's bases are the easiest to defend of all stock CTF maps due to the long, narrow, easily-blocked passages leading to and from the enemy team's flag room. Every capture requires a substantial amount of team coordination, especially when the player count is high. | |
| − | == | + | == Introduction video == |
| − | + | {{youtube|mZDtIjt1pJ0}} | |
| − | == | + | == Locations == |
| − | + | {{HelpfulOverviewNote}} | |
| − | === | + | === Outside locations === |
| − | The | + | *'''Bridge''': The bridge connecting the two forts. The bridge is covered, allowing mobile classes to get on top of it (such as with a [[Charging|shield charge]] or an explosive jump). It is possible for less mobile classes (such as Medic or Sniper) to get on the roof by jumping from the edge nearest to the window of the battlements. There are wooden poles on the side of the bridge which you can stand on, and there are a few holes in the roof of the Bridge, which allow for bullets and projectiles to pass through. |
| − | + | *'''Entrance''': After crossing the bridge, there are two ground entrances into the base. The "Entrance" extends from those two doorways into the base a short distance. From here, the layout of the entrance is a T-shape. Turning left brings the player to the stairs that lead down to the sewers, as well as the narrow corridor linking the Battlement Resupply room to both the entrance and the Courtyard (there is a trapdoor in the ceiling allowing players to drop down from the Resupply room). | |
| − | |||
| − | + | *'''Entrance side room''': Turning right from the entrance leads into a medium-sized room with a door at the opposite end which provides access to the courtyard. This room is heavily trafficked by both teams, as it is the most direct way to reach the courtyard from the main entrance. Engineers can set up small camps in here if the enemy is attempting to push through the entrance. In addition, because the room is large, it is often a hiding place for [[Spies]]. In many other parts of 2Fort, corridors are too narrow to provide much cover for an invisible Spy, but this room is an exception, allowing them to move through it undetected. | |
| − | |||
| − | + | *'''Battlements''': The Battlements are on the front of the second floor of each base and have a center "bunker" section. This section has large glass-less windows and is a roofed structure. The windows allow almost unbroken lines of sight into the area. The battlements are also often referred to as the "balcony," as well as the "Sniper ledge" or "Sniper deck", due to their main purpose as a camping area for Snipers. The ledges provide Snipers with an excellent view of most of the exterior of 2Fort, with the exception of the bridge and the water beneath it. The RED side has a ledge placed high enough to cause fall damage if walked off of, while the BLU side's ledge is not tall enough. | |
| − | |||
| − | == | + | <gallery widths=150px heights=80px> |
| − | + | File:Ctf 2fort bridge ss.png|Exterior of [[RED]] base | |
| + | File:CTF 2Fort BLU base.png|BLU base, view from the RED battlements | ||
| + | File:CTF 2Fort BluBase.png|Exterior of [[BLU]] base, including water and bridge | ||
| + | File:CTF 2Fort Water.png|Water below bridge, including sewer entrance | ||
| + | File:CTF RED battlements.png|RED battlements, same as BLU battlements | ||
| + | </gallery> | ||
| − | === | + | === Fort locations === |
| − | The | + | *'''Sewers''': The tunnels under each base, leading from the [[water]] beneath the bridge to the "Entrance", are generally referred to as "The Sewers". They have several sharp turns, creating numerous blind corners around which to fight. The sewers are generally used as a way of entering the enemy base free from the attention of the Snipers above. The narrowness of the sewers and the water makes it difficult for Spies to sneak past enemies who are also using the tunnels. |
| − | + | *'''Sewer room''': In each sewer, there is a room recessed into a corner in such a way that it is impossible to see the entire room from inside the tunnels. On the water-side of the room, the tunnel has two 90 degree bends, but on the base-side of the room, there is one long unbroken stretch of tunnel. The long tunnel provides a long-range line of sight between the room and the sewer exit. The rooms are often camped by Engineers, who use [[Teleporters]] to allow their team to quickly access the enemy base, or [[Sentry Gun]]s to prevent the opposing team from using that location. | |
| − | |||
| − | + | *'''Courtyard''': The Courtyard is the main means of transition between the ground floor and the second floor in each base. It is an enclosed, roofless space inside each base, next to the main spawn room and on the player's right when they come through the entrance. It is bounded on three sides by high ledges, and there are doors connecting to the spawn room, a staircase leading down to the Intelligence room on the second floor, and a door from the entrance and from the balcony spawn corridor on the ground floor. Two staircases allow access from below to the upper level. Engineers often use the space as a major defensive point, as it provides the only means of access to the Intelligence for most classes. By setting up a [[Sentry Gun]], an Engineer can successfully provide an effective defense against assaults on the intelligence, particularly if positioned so as to cover the Battlements' doorway. | |
| − | The | ||
| − | + | *'''Grate''': This is the small room with the grated floor right above the entrance of each base. It is connected directly to the upstairs area and, as a result, is often used by players to gain quick access to battles in the entrance. Demomen, Soldiers, Engineers, Scouts, and Pyros can jump up to the second story through this, providing another means of access to the second floor. Classes such as the Engineer and Demoman can also camp above the grate, limiting enemy access through the front entrance. Splash damage can be dealt through the grate. | |
| − | |||
| − | This is the room | + | *'''Upstairs''': This is the large room on the second floor, adjacent to the main resupply room. The Upstairs area has an exit to the Battlements, "Grate", "top of the Spiral", and "Courtyard". This room is heavily trafficked as it is a major crossroads on the map, connecting practically every area of the base. It is often used by Scouts who have jumped to the balcony, as it provides a direct route to the Intelligence via the spiral ramp. The Upstairs area is also commonly referred to as the "hay room" or "hayloft" (due to the large piles of hay on the floor,) or simply the "upstairs lobby". |
| − | == | + | <gallery widths=150px heights=80px perrow=4> |
| − | + | File:CTF 2Fort OutsideRedSpawn.png|Outside spawn, upstairs | |
| − | + | File:CTF 2Fort Courtyard.png|Courtyard | |
| − | + | File:CTF 2Fort LongHall.png|Downstairs, long hallway | |
| − | + | File:CTF 2Fort RedEntrance.png|[[RED]] base entrance | |
| − | + | File:CTF 2Fort Sewers.png|Sewers, below ground level | |
| + | </gallery> | ||
| − | === | + | === Main base locations === |
| − | + | *'''Spiral''': The Spiral ramp that leads from the Basement up and out of the base is one of only two access points to the Intelligence room. Like the Sewers, the Spiral is a narrow corridor with right-angle turns. This tends to result in close quarters fighting, and due to the confined space it is fairly easy to block enemy access with a [[Dispenser]], [[Sentry Gun]], or [[Heavy]]. At the top, the Spiral connects to the upstairs area via a small room in which there is a small [[Health pack]] and [[Ammo pack]], as well as two small corners in which Spies often hide. A direct line of sight can be drawn from the upstairs area along the top length of the Spiral, allowing [[Sniper]]s to eliminate enemies with the Intelligence as they climb the Spiral. | |
| − | + | *'''Stairs''': This area contains a long ramp running from the back of the courtyard into the basement. It is the other exit point for a stolen Intelligence. It is often called the "back stairs", "long stairs", "straight stairs", or simply "straight". It is also called the "L-Shaft", because it contained an elevator in previous incarnations of the 2Fort map. | |
| − | + | *'''Basement''': This is the space downstairs between the Spiral ramp and the Stairs. It leads to the Intelligence room and a third resupply point exists at the end nearest to the Stairs. However, no player ever respawns in that room after they die. There is a Health pack and Ammo box in the middle of the Basement - added in the {{Patch name|4|29|2008}}. The addition of these pickups has made camping the Intelligence harder and attacking the Intelligence slightly easier. | |
| − | + | [[File:TF2 2fort intel.png|164px|right|thumb|BLU Intel room]] | |
| − | |||
| − | |||
| − | |||
| − | |||
| − | + | *'''Intelligence room''': The Intelligence room has two entrances from the Basement. This is the primary defensive point of 2Fort, and as such, it is frequently camped, especially by Engineers. The Intelligence is on top of a desk in the opposite corner to both entrances. The layout of the room makes it very simple for campers to entrench themselves, and successfully removing them can be almost impossible without an [[ÜberCharge]]. | |
| − | === | + | <gallery widths=150px heights=80px perrow=4> |
| − | + | File:CTF BLU respawn 1.png|BLU main respawn, same as RED | |
| + | File:CTF BLU respawn 2.png|BLU secondary respawn, same as RED | ||
| + | File:CTF 2Fort SpiralEntrance.png|Spiral entrance to Intelligence | ||
| + | File:CTF 2Fort Downstairs.png|Basement, hub directly outside intel | ||
| + | File:CTF 2Fort Staircase.png|Straight stairs entrance to Intelligence | ||
| + | File:CTF 2fort REDIntelRoom.png|The RED Intelligence room | ||
| + | </gallery> | ||
| − | === | + | == Helpful overview == |
| + | [[File:2Fort overview with lines.png|left|2Fort's locations|600px]] | ||
| + | Please note the following: The BLU side shows the first floor while the RED side shows the second floor. | ||
| + | <big>1.Bridge | ||
| + | 2.Entrances | ||
| + | 3.Battlements | ||
| + | 4.Sewer exits | ||
| + | 5.Grate (not shown on the BLU side) | ||
| + | 6.Entrance side room shown on Blu and the Upstairs room just above it shown on Red | ||
| + | 7.Courtyard | ||
| + | 8.Stairs | ||
| + | 9.Basement | ||
| + | 10.Spiral | ||
| + | 11.Intelligence Room</big> | ||
| + | {{clr}} | ||
| − | + | == Strategy == | |
| + | {{Map strategy link|2Fort|main=yes}} | ||
| − | === | + | == Related achievements == |
| + | === {{Achiev type link|general}} === | ||
| + | {{Achievement table | ||
| + | | {{Show achievement|General|Powerhouse Offense}} | ||
| + | | {{Show achievement|General|World Traveler}} | ||
| + | }} | ||
| − | + | == Update history == | |
| + | {{Update history| | ||
| + | '''{{Patch name|2|14|2008}}''' | ||
| + | * Added a new timer to the HUD to show the value of mp_timelimit. This is useful if you're playing a timed match on 2Fort, where you only set a timelimit on the server and no other win conditions. | ||
| − | + | '''{{Patch name|4|29|2008}}''' ([[Gold Rush Update]]) | |
| − | + | * Added medium ammo and health to basement hallways. | |
| + | * Added small ammo and health to top of spiral. | ||
| + | * Fixed a clip brush exploit outside BLU Sniper deck. | ||
| + | * Fixed number "2" overlay on front of RED base not being assigned to the brush face. | ||
| − | + | '''{{Patch name|2|23|2010}}''' | |
| − | + | * Fixed BLU players being able to block the BLU spawn room doors to lock in teammates. | |
| + | * Moved the BLU team Sniper wall down to match the RED team Sniper wall. | ||
| − | + | '''{{Patch name|7|18|2011}}''' | |
| − | + | * {{Undocumented}} Added a "[[Grordbort's rockets|Grocket]]" to this map. | |
| − | + | '''{{Patch name|12|15|2011}}''' ([[Australian Christmas 2011]]) | |
| + | * {{undocumented}} Removed the Grocket from this map. | ||
| − | + | '''{{Patch name|6|28|2012}}''' | |
| + | * Fixed seeing through Sniper fences in 2Fort when using Pyrovision. | ||
| − | + | '''{{Patch name|8|10|2012}}''' | |
| − | + | * {{Undocumented}} Added a "[[Carrier Tank]]" to this map. | |
| − | + | '''{{Patch name|7|10|2013}}''' | |
| + | * Fixed building inside of spawn doors. | ||
| + | * Fixed clipping exploits on battlements. | ||
| + | * Fixed height of door leading to spiral stairs in BLU base so players can now crouch past a placed Dispenser. | ||
| + | * Cleaned up prop collision. | ||
| + | * Smoothed clipping on wagon wheel and other props. | ||
| − | + | '''{{Patch name|2|7|2014}}''' | |
| + | * Fixed a rendering bug on a silo prop in the skybox area for the BLU base. | ||
| − | + | '''{{Patch name|3|5|2014}}''' | |
| + | * Fixed collision on train-wheels prop outside BLU base. | ||
| + | * Fixed clipping on window ledges. | ||
| + | * Fixed collision on pipes in flag rooms. | ||
| + | * Fixed texture alignment on world map textures. | ||
| + | * Fixed clipping issue in the middle where BLU could stand in the sky. | ||
| − | + | '''{{Patch name|4|24|2014}}''' | |
| + | * Fixed players standing on conduits in flag rooms. | ||
| + | * Fixed players standing in sky over RED battlements.<ref>Actually [[BLU]] battlements.</ref> | ||
| + | * Fixed a missing face under the stairs in the BLU base ramp room that let players see enemies above. | ||
| + | * Fixed collision on props under stairs in RED's courtyard. | ||
| − | + | '''{{Patch name|9|10|2015}}''' | |
| + | * {{Undocumented}} Added [[saucers]] and posters to 2Fort. | ||
| − | + | '''{{Patch name|11|25|2015}}''' | |
| − | + | * {{Undocumented}} Removed Saucers and Posters from all maps. | |
| − | + | '''{{Patch name|5|11|2016}}''' | |
| − | + | * Updated {{code|ctf_2fort}} to fix a problem with cubemaps. | |
| − | + | }} | |
| − | |||
| − | |||
| − | |||
| − | |||
| − | |||
| − | |||
| − | |||
| − | |||
| − | |||
| − | |||
| − | |||
| − | |||
| − | |||
| − | |||
| − | |||
| − | |||
| − | |||
| − | |||
| − | |||
| − | |||
| − | |||
| − | |||
| − | * | ||
| − | |||
| − | |||
| − | |||
| − | |||
| − | == | + | == Bugs == |
| − | + | * Players can jump in and out of the Sniper battlement window frames when playing 2Fort on the Xbox 360 and PlayStation 3 version. | |
| − | * | + | * Players can stop the enemy team's spawn shutter doors from closing by moving into the shutter door before it closes. |
| − | |||
| − | |||
| − | ==== | + | == Trivia == |
| − | + | === 2Fort map === | |
| + | * In ''GameInformer'''s March 2010 issue, 2Fort was named #6 in their list of Top 10 FPS Multiplayer Maps, with Dust from ''Counter-Strike'' taking #1 (Issue 203, page 31). | ||
| + | * ''ripten.com'' listed 2Fort as the 8th best FPS multiplayer map, with Dust from ''Counter-Strike'' again taking first place<ref>[https://web.archive.org/web/20160126233404/http://www.ripten.com/2010/10/27/top-10-first-person-shooter-multiplayer-maps-of-all-time-brycew/ Top 10 First Person Shooter Multiplayer Maps of All Time], ripten, archived.</ref> | ||
| + | * A beta version of 2Fort can be seen in the [[Trailer 1|first]] and second ''Team Fortress 2'' trailer. | ||
| + | * 2Fort makes an appearance in ''[[w:Duke Nukem Forever|Duke Nukem Forever]]'' in the [https://store.steampowered.com/agecheck/app/57923/ ''Hail to the Icons Parody Pack''] DLC under the name "2Forts1Bridge". | ||
| + | * ''[[Meet the Spy]]'' takes place in a slightly modified version of 2Fort, adding the Alarm-O-Tron 5000 (seen in [[Double Cross]]) and doors to the Intelligence room. | ||
| + | * 2Fort appears in ''[[Worms: Reloaded]]'' as one of the forts. | ||
| − | === | + | === 2Fort facility === |
| − | + | * According to the ''[[Catch-Up]]'' comic, the 2Fort facility was built between 1850 and 1890.<ref>[https://www.teamfortress.com/catchup/#f=10 Catch-Up comic]</ref> | |
| − | == | + | === Teufort settlement === |
| − | + | [[File:Mannslandmap.png|right|200px|thumb|[[Map of Badlands]]]] | |
| − | + | {{Main|Teufort (city)}} | |
| − | + | * [[Teufort (city)|Teufort]] is a town somewhere in [[Badlands (region)|Badlands]], New Mexico, USA, with 2Fort on the outskirts. ''[[Unhappy Returns]]'' also revealed that the entire town is filled with "lead-poisoned idiots", as the mill (2Fort) the mercs have been fighting over has been [https://www.teamfortress.com/tf02_unhappy_returns/#f=58 leaking chemicals into the groundwater] for over a generation. | |
| − | * | + | ** The Soldier is implied to have severe lead poisoning from drinking the water in Teufort. |
| − | * | + | * That 2Fort is located at Teufort is attested to in [[Patches|updates]], [[comics]], and [[movies]]. Teufort is located in New Mexico according to the ''[[Meet the Director]]'' comic and other sources. |
| − | * | + | ** ''The Teufort Times'' newspaper found on the [https://www.teamfortress.com/war/part3/ Crafting, Saxton Hale Day] page during the [[WAR! Update]]. |
| − | * | + | ** The [[Teufort Tooth Kicker]]'s name refers directly to this. |
| + | ** Teufort has the nickname of "America's Gravel Basket" and has a population of 1280, as seen in ''Meet the Director''. | ||
| + | ** According to the [[Map of Badlands]], found during the [[Engineer Update]], Teufort is north of [[Dustbowl]] and east of [[Badwater Basin]]. | ||
| + | ** The BLU Scout, Soldier, and Spy prevented [[Non-player characters#Nicholas Crowder|Old Nick]] from kidnapping the children of Teufort in ''[[A Smissmas Story]]''. | ||
| − | + | == Gallery == | |
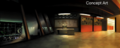
| + | === Concept Art === | ||
| + | <gallery> | ||
| + | File:2fortconcept blufortdesign.jpg|Сoncept of BLU fort exterior | ||
| + | File:2fortconcept bluoutside.jpg|Сoncept including sewer and bridge | ||
| + | File:2fortconcept redfortdesign.jpg|Сoncept of RED fort exterior | ||
| + | File:2fortconcept redoutside.jpg|Сoncept including sewer and bridge | ||
| + | File:2fortconcept basement.png|Сoncept of basement | ||
| + | File:2fortconcept intelroom.png|Сoncept of intelligence room | ||
| + | </gallery> | ||
| − | == | + | === Pre-release === |
| − | + | <gallery> | |
| + | File:Earlyfort.jpg|One of the first versions of 2fort | ||
| + | File:Team-fortress-2-20070413051119142.jpg|Early outside area | ||
| + | File:2fort_oldspawndoors.jpg|Early spawn doors in RED base | ||
| + | File:2fort_oldsewerentrance.png|Early sewer entrance in RED base | ||
| + | File:2fort earlybase in.jpg|Early basement interior in RED base. | ||
| + | File:Blu early basement.jpg|RED Spy, in BLU base. | ||
| + | </gallery> | ||
| − | + | === Promotional === | |
| − | + | <gallery> | |
| − | + | File:Worms reloaded tf2 engineer fort.jpg|[[Engineer]] and 2Fort as a playable fort in ''[[Worms: Reloaded]]'' | |
| − | + | </gallery> | |
| − | |||
| − | |||
| − | |||
| − | |||
| − | |||
| − | + | == See also == | |
| + | * [[List of maps]] | ||
| + | * [[:Category:2Fort images|Images of 2Fort]] | ||
| + | * [[Capture the Flag]] | ||
| + | * [[2Fort5|2Fort5 (Team Fortress)]] | ||
| + | * [[2Fort (Classic)]] | ||
| + | * [[2Fort Invasion]] | ||
| + | * [[Devtest]] | ||
| − | + | == References == | |
| − | == | + | <references/> |
| − | |||
| − | |||
| − | |||
| + | {{Maps Nav}} | ||
| − | + | [[Category:Quickplay maps]] | |
| − | |||
Latest revision as of 15:20, 27 May 2024
| 2Fort | |
|---|---|

| |
| Basic Information | |
| Map type: | Capture the Flag |
| File name: | ctf_2fort
|
| Released: | October 10, 2007 (Launch) |
| Variants: | 2Fort Invasion |
| Developer(s): | Valve |
| Map Info | |
| Environment: | Farmland |
| Setting: | Daylight, sunny |
| Hazards: | Drowning |
| Deep Water: | Yes |
| Pyrovision Support: | Yes |
| Map Items | |
| Map Photos | |
 | |
| Map Overview | |
 | |
| “ | Dis map ain't big enough for da two of us!
Click to listen
— The Scout
|
” |
2Fort is a Capture the Flag map and the subsequent remake of the Team Fortress Classic map of the same name; these maps are both based on the Team Fortress map 2Fort5. 2Fort was the first official CTF map for Team Fortress 2, and was one of the six initial maps included with the game's release.
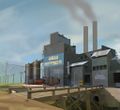
Two similar forts face each other, separated by a contaminated canal of deep water. A covered bridge spans the stream and battlements exist on each fort, providing excellent positions to assault oncoming players, particularly for Snipers. Below the bridge, there lies a small water body, which can be used to access the sewers.
To win, a team must repeatedly capture the opposing team's Intelligence by picking it up from deep within their fort and carrying it all the way to its own base until reaching the game's capture objective (3 captures on Valve servers), while preventing the enemy from achieving that same goal.
There are three entrances into each fort, however, not all of them are accessible to every class. The primary entrances are the two openings on the ground level. There are short ramps leading up to each entrance, and the entrances converge under an open grate. These ramps allow defenders to attack intruders from above. The second entrance is through the sewers which run underneath each base.
The entryway between the sewers and the base features a stairway and a pool of water; this area is a viable chokepoint. The third entrance is the battlements of each base, which can generally only be accessed by using special jumping maneuvers as a Scout, Soldier, Pyro, Demoman, or Engineer. It can also be accessed by a Medic equipping the Quick-Fix who is healing a Soldier or Demoman.
2Fort's bases are the easiest to defend of all stock CTF maps due to the long, narrow, easily-blocked passages leading to and from the enemy team's flag room. Every capture requires a substantial amount of team coordination, especially when the player count is high.
Contents
Introduction video
Locations
Note: If you are having trouble with finding the locations listed here, see the Helpful overview section to see their exact position marked on the map.
Outside locations
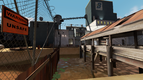
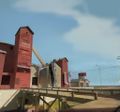
- Bridge: The bridge connecting the two forts. The bridge is covered, allowing mobile classes to get on top of it (such as with a shield charge or an explosive jump). It is possible for less mobile classes (such as Medic or Sniper) to get on the roof by jumping from the edge nearest to the window of the battlements. There are wooden poles on the side of the bridge which you can stand on, and there are a few holes in the roof of the Bridge, which allow for bullets and projectiles to pass through.
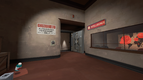
- Entrance: After crossing the bridge, there are two ground entrances into the base. The "Entrance" extends from those two doorways into the base a short distance. From here, the layout of the entrance is a T-shape. Turning left brings the player to the stairs that lead down to the sewers, as well as the narrow corridor linking the Battlement Resupply room to both the entrance and the Courtyard (there is a trapdoor in the ceiling allowing players to drop down from the Resupply room).
- Entrance side room: Turning right from the entrance leads into a medium-sized room with a door at the opposite end which provides access to the courtyard. This room is heavily trafficked by both teams, as it is the most direct way to reach the courtyard from the main entrance. Engineers can set up small camps in here if the enemy is attempting to push through the entrance. In addition, because the room is large, it is often a hiding place for Spies. In many other parts of 2Fort, corridors are too narrow to provide much cover for an invisible Spy, but this room is an exception, allowing them to move through it undetected.
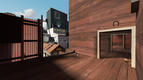
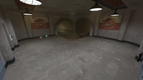
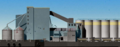
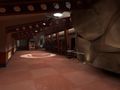
- Battlements: The Battlements are on the front of the second floor of each base and have a center "bunker" section. This section has large glass-less windows and is a roofed structure. The windows allow almost unbroken lines of sight into the area. The battlements are also often referred to as the "balcony," as well as the "Sniper ledge" or "Sniper deck", due to their main purpose as a camping area for Snipers. The ledges provide Snipers with an excellent view of most of the exterior of 2Fort, with the exception of the bridge and the water beneath it. The RED side has a ledge placed high enough to cause fall damage if walked off of, while the BLU side's ledge is not tall enough.
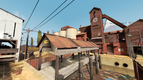
Exterior of RED base

BLU base, view from the RED battlements
Exterior of BLU base, including water and bridge

Water below bridge, including sewer entrance
RED battlements, same as BLU battlements


Fort locations
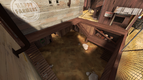
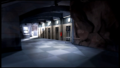
- Sewers: The tunnels under each base, leading from the water beneath the bridge to the "Entrance", are generally referred to as "The Sewers". They have several sharp turns, creating numerous blind corners around which to fight. The sewers are generally used as a way of entering the enemy base free from the attention of the Snipers above. The narrowness of the sewers and the water makes it difficult for Spies to sneak past enemies who are also using the tunnels.
- Sewer room: In each sewer, there is a room recessed into a corner in such a way that it is impossible to see the entire room from inside the tunnels. On the water-side of the room, the tunnel has two 90 degree bends, but on the base-side of the room, there is one long unbroken stretch of tunnel. The long tunnel provides a long-range line of sight between the room and the sewer exit. The rooms are often camped by Engineers, who use Teleporters to allow their team to quickly access the enemy base, or Sentry Guns to prevent the opposing team from using that location.
- Courtyard: The Courtyard is the main means of transition between the ground floor and the second floor in each base. It is an enclosed, roofless space inside each base, next to the main spawn room and on the player's right when they come through the entrance. It is bounded on three sides by high ledges, and there are doors connecting to the spawn room, a staircase leading down to the Intelligence room on the second floor, and a door from the entrance and from the balcony spawn corridor on the ground floor. Two staircases allow access from below to the upper level. Engineers often use the space as a major defensive point, as it provides the only means of access to the Intelligence for most classes. By setting up a Sentry Gun, an Engineer can successfully provide an effective defense against assaults on the intelligence, particularly if positioned so as to cover the Battlements' doorway.
- Grate: This is the small room with the grated floor right above the entrance of each base. It is connected directly to the upstairs area and, as a result, is often used by players to gain quick access to battles in the entrance. Demomen, Soldiers, Engineers, Scouts, and Pyros can jump up to the second story through this, providing another means of access to the second floor. Classes such as the Engineer and Demoman can also camp above the grate, limiting enemy access through the front entrance. Splash damage can be dealt through the grate.
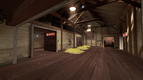
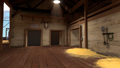
- Upstairs: This is the large room on the second floor, adjacent to the main resupply room. The Upstairs area has an exit to the Battlements, "Grate", "top of the Spiral", and "Courtyard". This room is heavily trafficked as it is a major crossroads on the map, connecting practically every area of the base. It is often used by Scouts who have jumped to the balcony, as it provides a direct route to the Intelligence via the spiral ramp. The Upstairs area is also commonly referred to as the "hay room" or "hayloft" (due to the large piles of hay on the floor,) or simply the "upstairs lobby".
Outside spawn, upstairs
Courtyard

Downstairs, long hallway

RED base entrance
Sewers, below ground level


Main base locations
- Spiral: The Spiral ramp that leads from the Basement up and out of the base is one of only two access points to the Intelligence room. Like the Sewers, the Spiral is a narrow corridor with right-angle turns. This tends to result in close quarters fighting, and due to the confined space it is fairly easy to block enemy access with a Dispenser, Sentry Gun, or Heavy. At the top, the Spiral connects to the upstairs area via a small room in which there is a small Health pack and Ammo pack, as well as two small corners in which Spies often hide. A direct line of sight can be drawn from the upstairs area along the top length of the Spiral, allowing Snipers to eliminate enemies with the Intelligence as they climb the Spiral.
- Stairs: This area contains a long ramp running from the back of the courtyard into the basement. It is the other exit point for a stolen Intelligence. It is often called the "back stairs", "long stairs", "straight stairs", or simply "straight". It is also called the "L-Shaft", because it contained an elevator in previous incarnations of the 2Fort map.
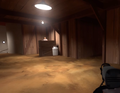
- Basement: This is the space downstairs between the Spiral ramp and the Stairs. It leads to the Intelligence room and a third resupply point exists at the end nearest to the Stairs. However, no player ever respawns in that room after they die. There is a Health pack and Ammo box in the middle of the Basement - added in the April 29, 2008 Patch. The addition of these pickups has made camping the Intelligence harder and attacking the Intelligence slightly easier.

- Intelligence room: The Intelligence room has two entrances from the Basement. This is the primary defensive point of 2Fort, and as such, it is frequently camped, especially by Engineers. The Intelligence is on top of a desk in the opposite corner to both entrances. The layout of the room makes it very simple for campers to entrench themselves, and successfully removing them can be almost impossible without an ÜberCharge.

BLU main respawn, same as RED

BLU secondary respawn, same as RED
Spiral entrance to Intelligence
Basement, hub directly outside intel

Straight stairs entrance to Intelligence

The RED Intelligence room


Helpful overview

Please note the following: The BLU side shows the first floor while the RED side shows the second floor.
1.Bridge
2.Entrances
3.Battlements
4.Sewer exits
5.Grate (not shown on the BLU side)
6.Entrance side room shown on Blu and the Upstairs room just above it shown on Red
7.Courtyard
8.Stairs
9.Basement
10.Spiral
11.Intelligence Room
Strategy
Related achievements
 General achievements
|
|


Update history
- Added a new timer to the HUD to show the value of mp_timelimit. This is useful if you're playing a timed match on 2Fort, where you only set a timelimit on the server and no other win conditions.
April 29, 2008 Patch (Gold Rush Update)
- Added medium ammo and health to basement hallways.
- Added small ammo and health to top of spiral.
- Fixed a clip brush exploit outside BLU Sniper deck.
- Fixed number "2" overlay on front of RED base not being assigned to the brush face.
- Fixed BLU players being able to block the BLU spawn room doors to lock in teammates.
- Moved the BLU team Sniper wall down to match the RED team Sniper wall.
- [Undocumented] Added a "Grocket" to this map.
December 15, 2011 Patch (Australian Christmas 2011)
- [Undocumented] Removed the Grocket from this map.
- Fixed seeing through Sniper fences in 2Fort when using Pyrovision.
- [Undocumented] Added a "Carrier Tank" to this map.
- Fixed building inside of spawn doors.
- Fixed clipping exploits on battlements.
- Fixed height of door leading to spiral stairs in BLU base so players can now crouch past a placed Dispenser.
- Cleaned up prop collision.
- Smoothed clipping on wagon wheel and other props.
- Fixed a rendering bug on a silo prop in the skybox area for the BLU base.
- Fixed collision on train-wheels prop outside BLU base.
- Fixed clipping on window ledges.
- Fixed collision on pipes in flag rooms.
- Fixed texture alignment on world map textures.
- Fixed clipping issue in the middle where BLU could stand in the sky.
- Fixed players standing on conduits in flag rooms.
- Fixed players standing in sky over RED battlements.[1]
- Fixed a missing face under the stairs in the BLU base ramp room that let players see enemies above.
- Fixed collision on props under stairs in RED's courtyard.
- [Undocumented] Added saucers and posters to 2Fort.
- [Undocumented] Removed Saucers and Posters from all maps.
- Updated
ctf_2fortto fix a problem with cubemaps.
Bugs
- Players can jump in and out of the Sniper battlement window frames when playing 2Fort on the Xbox 360 and PlayStation 3 version.
- Players can stop the enemy team's spawn shutter doors from closing by moving into the shutter door before it closes.
Trivia
2Fort map
- In GameInformer's March 2010 issue, 2Fort was named #6 in their list of Top 10 FPS Multiplayer Maps, with Dust from Counter-Strike taking #1 (Issue 203, page 31).
- ripten.com listed 2Fort as the 8th best FPS multiplayer map, with Dust from Counter-Strike again taking first place[2]
- A beta version of 2Fort can be seen in the first and second Team Fortress 2 trailer.
- 2Fort makes an appearance in Duke Nukem Forever in the Hail to the Icons Parody Pack DLC under the name "2Forts1Bridge".
- Meet the Spy takes place in a slightly modified version of 2Fort, adding the Alarm-O-Tron 5000 (seen in Double Cross) and doors to the Intelligence room.
- 2Fort appears in Worms: Reloaded as one of the forts.
2Fort facility
Teufort settlement

- Teufort is a town somewhere in Badlands, New Mexico, USA, with 2Fort on the outskirts. Unhappy Returns also revealed that the entire town is filled with "lead-poisoned idiots", as the mill (2Fort) the mercs have been fighting over has been leaking chemicals into the groundwater for over a generation.
- The Soldier is implied to have severe lead poisoning from drinking the water in Teufort.
- That 2Fort is located at Teufort is attested to in updates, comics, and movies. Teufort is located in New Mexico according to the Meet the Director comic and other sources.
- The Teufort Times newspaper found on the Crafting, Saxton Hale Day page during the WAR! Update.
- The Teufort Tooth Kicker's name refers directly to this.
- Teufort has the nickname of "America's Gravel Basket" and has a population of 1280, as seen in Meet the Director.
- According to the Map of Badlands, found during the Engineer Update, Teufort is north of Dustbowl and east of Badwater Basin.
- The BLU Scout, Soldier, and Spy prevented Old Nick from kidnapping the children of Teufort in A Smissmas Story.
Gallery
Concept Art
Сoncept of BLU fort exterior
Сoncept including sewer and bridge

Сoncept of RED fort exterior
Сoncept including sewer and bridge
Сoncept of basement
Сoncept of intelligence room


Pre-release

One of the first versions of 2fort
Early outside area
Early spawn doors in RED base
Early sewer entrance in RED base
Early basement interior in RED base.
RED Spy, in BLU base.


Promotional
Engineer and 2Fort as a playable fort in Worms: Reloaded

See also
- List of maps
- Images of 2Fort
- Capture the Flag
- 2Fort5 (Team Fortress)
- 2Fort (Classic)
- 2Fort Invasion
- Devtest
References
- ↑ Actually BLU battlements.
- ↑ Top 10 First Person Shooter Multiplayer Maps of All Time, ripten, archived.
- ↑ Catch-Up comic