Difference between revisions of "Swiftwater"
Senmithrarin (talk | contribs) m (switched developers from custom URL to steam id) |
GrampaSwood (talk | contribs) m (Please add a reference section next time, removed video as it confirms bug but also shows off how to gain an advantage. Reword) |
||
| (31 intermediate revisions by 19 users not shown) | |||
| Line 1: | Line 1: | ||
{{Update|Page contains a lot of outdated info.}} | {{Update|Page contains a lot of outdated info.}} | ||
{{Map infobox | {{Map infobox | ||
| − | | game-type | + | | map-status = community |
| − | | file-name | + | | map-game-type = Payload |
| + | | map-file-name = pl_swiftwater_final1 | ||
| map-image = Pl swiftwater.jpg | | map-image = Pl swiftwater.jpg | ||
| + | | map-released = {{Patch name|7|7|2016}} | ||
| + | | map-released-major = Meet Your Match Update | ||
| map-environment = Alpine | | map-environment = Alpine | ||
| map-setting = Daylight, sunny | | map-setting = Daylight, sunny | ||
| − | | map- | + | | map-stamp-link = https://steamcommunity.com/stats/TF2/leaderboards/1363091 |
| − | | map-health | + | | map-pickups-health-small = 14 |
| − | | map-health | + | | map-pickups-health-medium = 8 |
| − | | map-ammo | + | | map-pickups-health-large = 3 |
| − | | map-ammo | + | | map-pickups-ammo-small = 4 |
| − | | map-ammo | + | | map-pickups-ammo-medium = 7 |
| − | + | | map-pickups-ammo-large = 9 | |
| − | | map-bots = | + | | map-has-bots = yes |
}} | }} | ||
| − | '''Swiftwater''' is a single-stage [[ | + | '''Swiftwater''' is a [[Steam Workshop|community-created]] single-stage [[Payload]] map. The Alpine-styled map features 5 control points and encourages continuous pushing from [[BLU]] while trying to break [[RED]]'s defenses. |
| − | As displayed on a film projected inside BLU's spawn, BLU has been bottling water to make a quick profit. However, RED has caught onto this tactic and is poisoning BLU's water reserves from within the RED base, under the guise of its Red Planet Chemicals operation. Thus, BLU's objective is to push the bomb [[Payload#Carts|cart]] to RED's base, where it | + | As displayed on a film projected inside BLU's spawn, BLU has been bottling water to make a quick profit. However, RED has caught onto this tactic and is poisoning BLU's water reserves from within the RED base, under the guise of its Red Planet Chemicals operation. Thus, BLU's objective is to push the bomb [[Payload#Carts|cart]] to RED's base, where it detonates, destroying the base and ending their water poisoning plans. |
| − | Swiftwater was made an official map in the [[Meet Your Match Update]]. It is often used for [[competitive]] [[Highlander]] games. | + | Swiftwater was [https://steamcommunity.com/sharedfiles/filedetails/?id=473210550 contributed] to the Steam Workshop, and made an official map in the [[Meet Your Match Update]]. It is often used for [[competitive]] [[Highlander]] games. |
== Locations == | == Locations == | ||
| − | {{ | + | {{HelpfulOverviewNote}} |
| − | === | + | === Checkpoint 1 === |
| − | + | *'''Cart start''': The [[Cart]] starts on the left of [[BLU]] spawn in a small courtyard, called a "Meadow" by the cap point. | |
| − | The | + | *'''Ditch''': As the cart starts moving forward it crosses a bridge over a ditch which cuts the area of the first checkpoint in two. The ditch begins at the mouth of a large, grated pipe slightly left of this bridge and continues to the right until it reaches a small shack. There the ditch takes a 90-degree turn left and continues until it reaches another large, grated pipe leading into the barn, carving out an L-shape in the area of checkpoint A. Tall fencing surrounds portions of the top of the ditch, and a log crosses the ditch roughly at its corner. |
| + | |||
| + | *'''Shack''': There is a small shack positioned at the corner of the ditch, directly in front of the right-most BLU spawn door. It is initially open only from the side opposite of BLU spawn, with a shuttered door blocking the near side, and has open windows overlooking the ditch. | ||
| + | |||
| + | *'''Main House''': Once the cart crosses over the bridge, it takes a sharp S-bend to the left. It then climbs a slight incline before making a turn to the right. After this turn, the cart goes by a large, two-story house which occupies a significant portion of this area, referred to as "Main House". Atop the house sits a [[Sniper]]'s nest. | ||
| + | |||
| + | *'''Front yard''': The area in front of the Main House is called "The Front Yard". This yard is a common defensive spot for [[RED]] as there is a large fence with stairs attached which helps shield the Yard from BLU attacks while giving RED a vantage point. | ||
| + | |||
| + | *'''Checkpoint A''': After crossing the Front yard, the cart crosses a second bridge over the ditch. This bridge is the location of checkpoint A. Once captured, the shuttered shack door opens for BLU. | ||
<gallery widths=140px heights=80px> | <gallery widths=140px heights=80px> | ||
| − | File:Swiftwater cp1.jpg | The start of the map. | + | File:Swiftwater cp1.jpg |The start of the map. |
| − | File:Swiftwater cp1b.jpg| The common place for RED to set up defenses. | + | File:Swiftwater cp1b.jpg|The Front Yard, a common place for RED to set up defenses. |
| − | File:Swiftwater cp1c.jpg| | + | File:Swiftwater cp1c.jpg|The view of the ditch. |
</gallery> | </gallery> | ||
| − | === | + | === Checkpoint 2 === |
| − | + | *'''Tunnel''': As the cart finishes crossing the checkpoint bridge it now enters a tunnel. In the tunnel, the cart makes some wild twists and turns around corners before finally exiting the tunnel facing the same direction it faced when it originally started out at the beginning of the round. | |
| − | + | *'''Catwalks''': As the cart exits the tunnel it enters the "second area", another wide open area which contains the second checkpoint. The most prominent feature of this area is the Catwalks, tight wooden platforms hanging in the sky, connecting two main buildings of the second area: the Barn and the Sawmill. | |
| + | |||
| + | *'''Sawmill''': There is a large wooden building, right on the left of the first Red spawn. | ||
| + | |||
| + | *'''Red spawn''': The first Red spawn is positioned directly opposite of the tunnel exit, right across the second checkpoint. | ||
| + | |||
| + | *'''Barn''': A huge building on the right side of the second checkpoint and in a general middle position of the entire map. This building connects the first, second, and third checkpoints and the areas they reside in. | ||
| + | |||
| + | *'''Second checkpoint''': The second checkpoint is positioned on the left side of the Barn, right under one of the Catwalks. | ||
<gallery widths=140px heights=80px> | <gallery widths=140px heights=80px> | ||
| − | File:Swiftwater cp2a.jpg | These tunnels offer many flanking opportunities. | + | File:Swiftwater cp2a.jpg|These tunnels offer many flanking opportunities. |
| − | File:Swiftwater cp2b.jpg| Showing more of the tunnels. | + | File:Swiftwater cp2b.jpg|Showing more of the tunnels. |
</gallery> | </gallery> | ||
| − | === | + | === Checkpoint 3 === |
| − | + | *'''Silos''': Once the third checkpoint is captured, the cart starts rolling down a small incline, make an abrupt turn to the left and enter the area of the third checkpoint. In the middle of the now much more enclosed area are three tall silos springing up from the ground. | |
| + | |||
| + | *'''Checkpoint C''': The checkpoint C is itself positioned in between the three silos on its left side and the Red Front Area on its right side. | ||
| + | *'''Front Area''': There is a large area in front of the second Red spawn which is commonly used as a defensive holdout. | ||
<gallery widths=140px heights=80px> | <gallery widths=140px heights=80px> | ||
| − | File:Swiftwater cp3a.jpg | The narrow path of the cart. | + | File:Swiftwater cp3a.jpg|The narrow path of the cart. |
| − | File:Swiftwater cp3b.jpg| There are many sightlines onto the Payload track. | + | File:Swiftwater cp3b.jpg|There are many sightlines onto the Payload track. |
</gallery> | </gallery> | ||
| − | === | + | === Checkpoint 4 === |
| − | + | *'''Railway Building''': As the cart passes over the checkpoint C, it goes through a [[chokepoint]] and find itself in a much more open field. As it enters this field, it makes a turn to the right, hugging the walls of the previous RED spawn which is on its right and passing by a small building called the "Railway Building" on its left. | |
| + | |||
| + | *'''Wall''': After the cart climbs up an incline, it proceeds to make yet another turn, now to the left where it passes by a low, but long wall on its right. | ||
| − | + | *'''Corner house''': The cart peacefully cruises next to the aforementioned wall for some time. Once it reaches the wall's end, the cart makes a complete 180-degree turn in order to go around it, passing by yet another house called "The Corner House". | |
| + | |||
| + | *'''Checkpoint D''': Once it passes the Corner House, the cart only needs to go a few more meters to reach the fourth checkpoint which sits just before a steep decline. | ||
<gallery widths=140px heights=80px> | <gallery widths=140px heights=80px> | ||
| − | File:Swiftwater cp4a.jpg | This part of the map is very open. | + | File:Swiftwater cp4a.jpg|This part of the map is very open. |
| − | File:Swiftwater cp4b.jpg| A small close-quarters section. | + | File:Swiftwater cp4b.jpg|A small close-quarters section. |
</gallery> | </gallery> | ||
| − | === | + | === Checkpoint 5 === |
| − | + | *'''Steep decline''': After capturing checkpoint D (Red Base Entrance), the cart now starts descending downwards. | |
| − | + | *'''Battlements''': Once the cart completes its descend, it evens out on flat ground and past under the Battlements, a long building above it which stretches all the way from the topmost edge of the map, to the previous RED spawn. | |
| + | |||
| + | *'''Pit''': Going under the battlements puts the cart just a few meters from the Pit, the final checkpoint, and consequently the cart's final destination. | ||
| + | |||
| + | *'''Cliffs''':Surrounding the Pit from three of its sides are the cliffs. High and steep elevated position which serve as the final obstacle to BLU. | ||
<gallery widths=140px heights=80px> | <gallery widths=140px heights=80px> | ||
| − | File:Swiftwater cpf1.jpg | Entrance into the final stretch. | + | File:Swiftwater cpf1.jpg|Entrance into the final stretch. |
| − | File:Swiftwater cpf2.jpg| The final checkpoint. | + | File:Swiftwater cpf2.jpg|The final checkpoint. |
</gallery> | </gallery> | ||
| + | == Helpful overview == | ||
| + | [[File:Swiftwater overview with lines2.png|left|Swiftwater's locations|550px]] | ||
| + | <big>1.Front Yard | ||
| + | 2.Main House | ||
| + | 3.Ditch | ||
| + | 4.Shack | ||
| + | 5.Tunnel | ||
| + | 6.Sawmill | ||
| + | 7.Catwalks | ||
| + | 8.Front area | ||
| + | 9.Silos | ||
| + | 10.Railway Building | ||
| + | 11.Corner house | ||
| + | 12.Steep Decline | ||
| + | 13.Battlements | ||
| + | 14.Cliff | ||
| + | 15.Barn | ||
| + | Unmarked area on point C: Wall | ||
| + | |||
| + | Blue/red diagonal lines: BLU/RED first spawn | ||
| + | Blue/red double diagonal lines: BLU/RED second spawn | ||
| + | Blue/red double diagonal lines w/ a circle: BLU/RED third spawn | ||
| + | |||
| + | Yellow circle: First checkpoint | ||
| + | Green circle: Second checkpoint | ||
| + | Black circle: Third checkpoint | ||
| + | Pink circle: Fourth checkpoint | ||
| + | White circle: Last checkpoint and the Pit</big> | ||
| + | |||
| + | {{clr}} | ||
== Strategy == | == Strategy == | ||
| − | |||
{{main|Community Swiftwater strategy}} | {{main|Community Swiftwater strategy}} | ||
| Line 110: | Line 169: | ||
*Vastly increased frame rate.}} | *Vastly increased frame rate.}} | ||
| − | == | + | == Bugs == |
| − | * | + | * If a member of RED team is standing in the way of one of the spawn room gates as it deactivates, that player becomes stuck in place until they die. |
| + | * It is possible to shoot through one of the spawn windows with incredibly precise aim. | ||
| − | == | + | == Gallery == |
<gallery> | <gallery> | ||
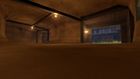
| − | File:Pl_swiftwater_frc40013.jpg | BLU team's first spawn. | + | File:Pl_swiftwater_frc40013.jpg|BLU team's first spawn. |
| − | File:Pl swiftwater frc70000.jpg | Side exit to BLU team's first spawn. | + | File:Pl swiftwater frc70000.jpg|Side exit to BLU team's first spawn. |
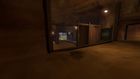
| − | File:Pl_swiftwater_frc40007.jpg | RED | + | File:Pl_swiftwater_frc40007.jpg|RED team's spawn interior. |
| − | File:Pl_swiftwater_frc40003.jpg | Area around the first capture point. | + | File:Pl_swiftwater_frc40003.jpg|Area around the first capture point. |
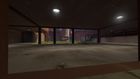
| − | File:Pl_swiftwater_frc40002.jpg | Area around the second capture point. | + | File:Pl_swiftwater_frc40002.jpg|Area around the second capture point. |
| − | File:Pl_swiftwater_frc40004.jpg | Area around the third capture point. | + | File:Pl_swiftwater_frc40004.jpg|Area around the third capture point. |
| − | File:Pl_swiftwater_frc40005.jpg | Path between the third and fourth capture point. | + | File:Pl_swiftwater_frc40005.jpg|Path between the third and fourth capture point. |
| − | File:Pl swiftwater frc70003.jpg | Interior of the building near last point. | + | File:Pl swiftwater frc70003.jpg|Interior of the building near the last point. |
| − | File:Pl swiftwater frc70002.jpg | Interior of the building near last point. | + | File:Pl swiftwater frc70002.jpg|Interior of the building near the last point. |
| − | File:Pl_swiftwater_frc40006.jpg | The area around last point. | + | File:Pl_swiftwater_frc40006.jpg|The area around the last point. |
| − | File: | + | File:Pl_swiftwater_frc40011.jpg|Advertisement for Red Planet Chemicals' toxic product, [[w:DDT|DDT]]. |
| − | File: | + | File:Swiftwater Workshop image.jpg|Steam Workshop thumbnail for Swiftwater. |
| + | </gallery> | ||
| + | |||
| + | Panels of "The Swift Plan" seen in BLU's first spawn on the map: | ||
| + | <gallery widths=130px heights=90px> | ||
| + | File:Projector new panel1.png|The first panel of The Swift Plan. | ||
| + | File:Projector new panel2.png|The second panel of The Swift Plan. | ||
| + | File:Projector new panel3.png|The third panel of The Swift Plan. | ||
| + | File:Projector new panel4.png|The fourth panel of The Swift Plan. | ||
</gallery> | </gallery> | ||
| − | {{ | + | {{Meet Your Match Update Nav}} |
{{Maps Nav}} | {{Maps Nav}} | ||
Latest revision as of 20:53, 13 February 2024
| “Gotta move that gear up!” This article may contain content that is out of date. You can help improve this article by updating the content as necessary. See the wiki style guide. Notes: Page contains a lot of outdated info. |
| Swiftwater | |
|---|---|

| |
| Basic Information | |
| Map type: | Payload |
| File name: | pl_swiftwater_final1
|
| Released: | July 7, 2016 Patch (Meet Your Match Update) |
| Developer(s): | Aaron "Schwa" McCallen Lemon |
| Map Info | |
| Environment: | Alpine |
| Setting: | Daylight, sunny |
| Bot support: | Yes |
| Map Items | |
| Map Overview | |
 | |
| Map Stamp | |
| Supporters Leaderboard | |
Swiftwater is a community-created single-stage Payload map. The Alpine-styled map features 5 control points and encourages continuous pushing from BLU while trying to break RED's defenses.
As displayed on a film projected inside BLU's spawn, BLU has been bottling water to make a quick profit. However, RED has caught onto this tactic and is poisoning BLU's water reserves from within the RED base, under the guise of its Red Planet Chemicals operation. Thus, BLU's objective is to push the bomb cart to RED's base, where it detonates, destroying the base and ending their water poisoning plans.
Swiftwater was contributed to the Steam Workshop, and made an official map in the Meet Your Match Update. It is often used for competitive Highlander games.
Contents
Locations
Note: If you are having trouble with finding the locations listed here, see the Helpful overview section to see their exact position marked on the map.
Checkpoint 1
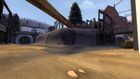
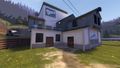
- Cart start: The Cart starts on the left of BLU spawn in a small courtyard, called a "Meadow" by the cap point.
- Ditch: As the cart starts moving forward it crosses a bridge over a ditch which cuts the area of the first checkpoint in two. The ditch begins at the mouth of a large, grated pipe slightly left of this bridge and continues to the right until it reaches a small shack. There the ditch takes a 90-degree turn left and continues until it reaches another large, grated pipe leading into the barn, carving out an L-shape in the area of checkpoint A. Tall fencing surrounds portions of the top of the ditch, and a log crosses the ditch roughly at its corner.
- Shack: There is a small shack positioned at the corner of the ditch, directly in front of the right-most BLU spawn door. It is initially open only from the side opposite of BLU spawn, with a shuttered door blocking the near side, and has open windows overlooking the ditch.
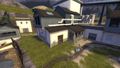
- Main House: Once the cart crosses over the bridge, it takes a sharp S-bend to the left. It then climbs a slight incline before making a turn to the right. After this turn, the cart goes by a large, two-story house which occupies a significant portion of this area, referred to as "Main House". Atop the house sits a Sniper's nest.
- Front yard: The area in front of the Main House is called "The Front Yard". This yard is a common defensive spot for RED as there is a large fence with stairs attached which helps shield the Yard from BLU attacks while giving RED a vantage point.
- Checkpoint A: After crossing the Front yard, the cart crosses a second bridge over the ditch. This bridge is the location of checkpoint A. Once captured, the shuttered shack door opens for BLU.

The start of the map.

The Front Yard, a common place for RED to set up defenses.
The view of the ditch.


Checkpoint 2
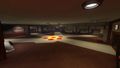
- Tunnel: As the cart finishes crossing the checkpoint bridge it now enters a tunnel. In the tunnel, the cart makes some wild twists and turns around corners before finally exiting the tunnel facing the same direction it faced when it originally started out at the beginning of the round.
- Catwalks: As the cart exits the tunnel it enters the "second area", another wide open area which contains the second checkpoint. The most prominent feature of this area is the Catwalks, tight wooden platforms hanging in the sky, connecting two main buildings of the second area: the Barn and the Sawmill.
- Sawmill: There is a large wooden building, right on the left of the first Red spawn.
- Red spawn: The first Red spawn is positioned directly opposite of the tunnel exit, right across the second checkpoint.
- Barn: A huge building on the right side of the second checkpoint and in a general middle position of the entire map. This building connects the first, second, and third checkpoints and the areas they reside in.
- Second checkpoint: The second checkpoint is positioned on the left side of the Barn, right under one of the Catwalks.
These tunnels offer many flanking opportunities.
Showing more of the tunnels.


Checkpoint 3
- Silos: Once the third checkpoint is captured, the cart starts rolling down a small incline, make an abrupt turn to the left and enter the area of the third checkpoint. In the middle of the now much more enclosed area are three tall silos springing up from the ground.
- Checkpoint C: The checkpoint C is itself positioned in between the three silos on its left side and the Red Front Area on its right side.
- Front Area: There is a large area in front of the second Red spawn which is commonly used as a defensive holdout.

The narrow path of the cart.
There are many sightlines onto the Payload track.


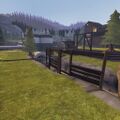
Checkpoint 4
- Railway Building: As the cart passes over the checkpoint C, it goes through a chokepoint and find itself in a much more open field. As it enters this field, it makes a turn to the right, hugging the walls of the previous RED spawn which is on its right and passing by a small building called the "Railway Building" on its left.
- Wall: After the cart climbs up an incline, it proceeds to make yet another turn, now to the left where it passes by a low, but long wall on its right.
- Corner house: The cart peacefully cruises next to the aforementioned wall for some time. Once it reaches the wall's end, the cart makes a complete 180-degree turn in order to go around it, passing by yet another house called "The Corner House".
- Checkpoint D: Once it passes the Corner House, the cart only needs to go a few more meters to reach the fourth checkpoint which sits just before a steep decline.

This part of the map is very open.

A small close-quarters section.


Checkpoint 5
- Steep decline: After capturing checkpoint D (Red Base Entrance), the cart now starts descending downwards.
- Battlements: Once the cart completes its descend, it evens out on flat ground and past under the Battlements, a long building above it which stretches all the way from the topmost edge of the map, to the previous RED spawn.
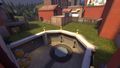
- Pit: Going under the battlements puts the cart just a few meters from the Pit, the final checkpoint, and consequently the cart's final destination.
- Cliffs:Surrounding the Pit from three of its sides are the cliffs. High and steep elevated position which serve as the final obstacle to BLU.

Entrance into the final stretch.

The final checkpoint.


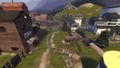
Helpful overview

1.Front Yard
2.Main House
3.Ditch
4.Shack
5.Tunnel
6.Sawmill
7.Catwalks
8.Front area
9.Silos
10.Railway Building
11.Corner house
12.Steep Decline
13.Battlements
14.Cliff
15.Barn
Unmarked area on point C: Wall
Blue/red diagonal lines: BLU/RED first spawn
Blue/red double diagonal lines: BLU/RED second spawn
Blue/red double diagonal lines w/ a circle: BLU/RED third spawn
Yellow circle: First checkpoint
Green circle: Second checkpoint
Black circle: Third checkpoint
Pink circle: Fourth checkpoint
White circle: Last checkpoint and the Pit
Strategy
Update history
July 7, 2016 Patch #1 (Meet Your Match Update)
- Swiftwater was added to the game.
- Fixed using the wrong thumbnail images for
pl_Swiftwater.
Changelog
Build 12 Changes
- Bug fixes
- Removed Rollback (from build 11)
Build 11 Changes
- Stage 1 layout significantly changed
- Added a CP before the final CP. More fighting takes place in courtyard now.
- Reduced amount of time awarded for CPs.
Build 7 Changes
- Tons of changes. Most important:
- Blue Spawn remade - doors not stay open on map start
- CP4 tweaked to give red an advantage again. Buildings in upper area have a Sniper vantage and a good shortcut behind blue.
- Fixed getting stuck in red spawning areas.
- Red can exit spawn anywhere after round starts.
Old Fixes
- Fixed Engy exploit at CP2
- New Red Spawn layout - more straightforward and should be less campable at cp3 and cp4. Shortened spawn times to compensate for slightly longer travel. (The changes should improve gameplay on insta spawn servers as well)
- New spawn exit from CP2 to prevent camping.
- Vastly increased frame rate.
Bugs
- If a member of RED team is standing in the way of one of the spawn room gates as it deactivates, that player becomes stuck in place until they die.
- It is possible to shoot through one of the spawn windows with incredibly precise aim.
Gallery
BLU team's first spawn.
Side exit to BLU team's first spawn.
RED team's spawn interior.
Area around the first capture point.
Area around the second capture point.
Area around the third capture point.
Path between the third and fourth capture point.
Interior of the building near the last point.
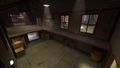
Interior of the building near the last point.
The area around the last point.

Advertisement for Red Planet Chemicals' toxic product, DDT.
Steam Workshop thumbnail for Swiftwater.


Panels of "The Swift Plan" seen in BLU's first spawn on the map:

The first panel of The Swift Plan.

The second panel of The Swift Plan.

The third panel of The Swift Plan.

The fourth panel of The Swift Plan.


| ||||||||||||||||||||||||||||||||||||||||||||||||||||||||||||||||