Difference between revisions of "Gravel Pit"
(→Trivia) |
BrazilianNut (talk | contribs) m |
||
| (48 intermediate revisions by 28 users not shown) | |||
| Line 1: | Line 1: | ||
{{Map infobox | {{Map infobox | ||
| − | | game-type = Control Point | + | | map-status = official |
| − | | file-name = cp_gravelpit | + | | map-game-type = Control Point |
| − | | map-image = Tf2 gravelpit.jpg | + | | map-file-name = cp_gravelpit |
| − | | map-environment = Industrial | + | | map-image = Tf2 gravelpit.jpg |
| − | | map-setting = Daylight, overcast | + | | map-released = {{Patch name|10|10|2007|date-only=yes}} |
| − | | map-pyrovision = | + | | map-released-major = Launch |
| − | | map-health | + | | map-environment = Industrial |
| − | | map-health | + | | map-setting = Daylight, overcast |
| − | | map-ammo | + | | map-has-pyrovision = yes |
| − | | map-ammo | + | | map-pickups-health-small = 6 |
| + | | map-pickups-health-medium = 1 | ||
| + | | map-pickups-ammo-small = 6 | ||
| + | | map-pickups-ammo-medium = 3 | ||
}} | }} | ||
| Line 16: | Line 19: | ||
'''Gravel Pit''' is an [[Control Point (game mode)#Attack/Defend|Attack/Defend Control Point]] map. It was one of the six maps included with ''Team Fortress 2''<nowiki>'</nowiki>s initial release. | '''Gravel Pit''' is an [[Control Point (game mode)#Attack/Defend|Attack/Defend Control Point]] map. It was one of the six maps included with ''Team Fortress 2''<nowiki>'</nowiki>s initial release. | ||
| − | + | In Gravel Pit, [[BLU]] must capture control points A and B before they can capture point C, the final point, though they can capture A and B in any order. Points A and B are directly accessible from the BLU base, while they must cross through one of them in order to reach point C. [[RED]]'s base is located near point C. | |
| − | |||
| − | |||
| − | |||
| − | |||
== Introduction video == | == Introduction video == | ||
| Line 26: | Line 25: | ||
== Locations == | == Locations == | ||
| − | + | {{HelpfulOverviewNote}} | |
| + | === Control Point A: The Radio Tower === | ||
| + | * '''Control Point''': Control Point A is to the left as the player exits the BLU base. The point is at the top of a hill, inside a building. There are two exits from the BLU tunnel to this area, and they allow access to the two ramps around the outside of the point. A Medium Health pack is under the Control Point. There are also two Medium Ammo boxes near the cap building, one to the front and one at the back of the CP building. From point A, there are tunnels that connect to points B and C. | ||
| + | |||
| + | * '''BLU Spawn Base''': Located on one side of the map, the BLU base has two exits - one to cap A and the other one to cap B. | ||
| + | |||
| + | * '''The A side Tunnel''': The tunnel which connects BLU's spawn yard and the A battlefield. The tunnels leading to the BLU base are accessible by [[Rocket jump|rocket]], grenade, or [[Jumping#Double Jump|double jump]]ing; they can also be entered by crouch-jumping onto the part of the wall jutting out next to the left entrance, then by crouch-jumping toward the left entrance while strafing right and turning right to barely land on the tunnel ledge. | ||
| − | + | * '''Valley''': The valley is the area between the two dirt paths which lead up to the control point building. There are numerous small buildings in this area. | |
| − | |||
| − | *''' | + | * '''Paths''': On both sides of the area are dirt paths which lead to the top of the area and the control point building. |
| − | + | ||
| − | + | * '''Radio Tower''': The radio tower houses the control point. It is atop the dirt paths at the far end of the valley. There are two floors, the bottom directly under the control point and the control point floor. On the side of the building is a set of stairs which lead to the control point from the valley. | |
| − | |||
| − | *'''Radio Tower | ||
<gallery widths=140px heights=90px perrow=5> | <gallery widths=140px heights=90px perrow=5> | ||
| Line 41: | Line 43: | ||
File:gpitAcap.png|Control point A | File:gpitAcap.png|Control point A | ||
File:gpitAtunnel.png| A Tunnel | File:gpitAtunnel.png| A Tunnel | ||
| − | File:gpitAentrances.png| A Tunnel | + | File:gpitAentrances.png| A Tunnel entrance |
File:GpitApath.png| Path up to A/C connector | File:GpitApath.png| Path up to A/C connector | ||
</gallery> | </gallery> | ||
| − | === | + | === Control Point B: The Radar === |
| − | + | * '''Control Point''': Control Point B is to the right as the player exits the BLU base. The point is in the large structure in the center of the area. | |
| − | *'''B Tunnel | + | * '''B side Tunnel''': There are two tunnels coming from the BLU base. The ''Short B'' is covered by a small house and a fence that partially obscures the BLU tunnel, and exits out next to the A/B connector. The ''Long B'' exits out on the far side of the B area. Both require players to rocket/grenade/double jump to access the tunnels from the Control Point side. Two ramps along the back wall give access to Control Point C. |
| − | *'''The Radar | + | |
| − | *'''Shadow Side | + | * '''The Radar''': The Radar is the building which houses the control point. It has two main entrances, the main entrance on the far side of the area atop a ramp, and the other on the C side atop two ramps. There are four windows, two on each side which are all accessible. The roof is a common spot for Soldiers or Demomen and contains a dropdown directly to the point. |
| − | *'''Balcony | + | |
| − | *'''A/B connector | + | * '''Shadow Side''': Next to the building, on the side opposite the B Tunnel exits is the Shadow Side, named for the building's shadow which is cast on it. |
| + | |||
| + | * '''Balcony''': Directly outside the C entrances is the Balcony. It's a high point which serves as a vantage point for most of the B area. There are two ramps on both sides which lead down to ground level. | ||
| + | |||
| + | * '''A/B connector''': Between the A and B areas is the A/B connector which is a tunnel which connects from BLU's A Tunnel exit to BLU's short B Tunnel exit. | ||
<gallery widths=140px heights=90px perrow=5> | <gallery widths=140px heights=90px perrow=5> | ||
| − | File:Cp gravelpit pointb. | + | File:Cp gravelpit pointb.png|Point house |
File:GpitB.png| Control point B | File:GpitB.png| Control point B | ||
File:gpitABconnector.png| A/B connector | File:gpitABconnector.png| A/B connector | ||
| Line 62: | Line 68: | ||
</gallery> | </gallery> | ||
| − | === | + | === Control Point C: The Laser Gun === |
| − | + | * '''Control Point''': Control Point C is past the first two points, and adjacent to the RED base. The tunnels leading to the other Control Points are on a higher level than the ground in this area. The Control Point is located at the top of the central structure. | |
| − | *'''RED Spawn Base | + | * '''RED Spawn Base''': Located directly adjacent to Control Point C, on the opposite side of the area from the tunnels to Control Points A and B. |
| − | *'''The Laser Tower | + | |
| − | *'''Catwalks | + | * '''The Laser Tower''': In the center of the area is the giant tower, which atop sits a laser gun. There are three floors to the tower. The first is accessible from ground level by a ramp, and from two bridges connecting to the catwalks. The second floor is accessible by two sets of ramps of which lead along the outside of the tower and one through it. The third floor is the top which contains the Control Point and a small room behind the point open on three of its sides. |
| − | *'''Ground Level | + | |
| + | * '''Catwalks''': All along the outside edge of the area are the catwalks. These are the metal walkways which are accessible via four entrances, two from the A/C connector tunnels and two from the B/C connector tunnels, and also accessible from two ramps outside the RED spawn. | ||
| + | |||
| + | * '''Ground Level''': Below the catwalks and surrounding the tower is the ground level. On the far side is an entrance which leads to the A/C connector tunnels. | ||
<gallery widths=140px heights=90px perrow=5> | <gallery widths=140px heights=90px perrow=5> | ||
| − | File:Gravel Pit Cap Point C. | + | File:Gravel Pit Cap Point C.png|Control Point |
File:GpitC.png| Tower overview | File:GpitC.png| Tower overview | ||
| − | File:Tf2 gravelpit. | + | File:Tf2 gravelpit.png|Area overview |
File:gpitACconnector.png |A/C Tunnel | File:gpitACconnector.png |A/C Tunnel | ||
File:Gpitredspawn.png | RED spawn room | File:Gpitredspawn.png | RED spawn room | ||
</gallery> | </gallery> | ||
| + | == Helpful overview == | ||
| + | [[File:Gravel Pit overview with lines.png|left|Gravel Pit's locations|575px]] | ||
| + | <big>1.B side Tunnel | ||
| + | 2.Radar building (And the Control point B too!) | ||
| + | 3.Shadow Side | ||
| + | 4.Balcony | ||
| + | 5.A/B Connector | ||
| + | 6.A side Tunnel | ||
| + | 7.Paths | ||
| + | 8.Valley | ||
| + | 9.Radio Tower (And the Control point A too!) | ||
| + | 10.Laser Tower (And the Control point C as well!) | ||
| + | 11.Ground Level</big> | ||
| + | |||
| + | {{clr}} | ||
== Strategy == | == Strategy == | ||
| − | {{ | + | {{map strategy link|Gravel Pit|main=yes|stub=yes}} |
| − | == Control Point | + | == Control Point timing == |
{{Control Point Timing/Official Map | MAP = Gravel Pit}} | {{Control Point Timing/Official Map | MAP = Gravel Pit}} | ||
== Related achievements == | == Related achievements == | ||
| − | === | + | === {{Achiev type link|general}} === |
{{Achievement table | {{Achievement table | ||
| 1 = {{Show achievement|General|Impossible Defense}} | | 1 = {{Show achievement|General|Impossible Defense}} | ||
| Line 92: | Line 116: | ||
== Update history == | == Update history == | ||
| + | {{Update history| | ||
| + | '''{{Patch name|1|25|2008}}''' | ||
| + | * Changed the scoring method in {{code|CP_GravelPit}} to score per capture rather than per round. | ||
| + | * Updated {{code|CP_GravelPit}} to fix all known [[exploits]]. | ||
| − | '''{{Patch name| | + | '''{{Patch name|8|2|2011}}''' |
| − | * | + | * * Updated the main menu backgrounds to include [[Granary (Control Point)|Granary]]<ref>Gravel Pit was added as a background instead of Granary</ref> and [[Upward]] |
| − | * | + | |
| + | '''{{Patch name|8|3|2011}}''' | ||
| + | * Fixed the new Gravel Pit backgrounds using the wrong filename. | ||
'''{{Patch name|2|14|2012}}''' | '''{{Patch name|2|14|2012}}''' | ||
| − | * Fixed z-fighting on the fan in the Red spawn building | + | * Fixed z-fighting on the fan in the Red spawn building. |
| − | * Fixed Red Engineers building inside their spawn room | + | * Fixed Red Engineers building inside their spawn room. |
| + | |||
| + | '''{{Patch name|7|10|2013}}''' | ||
| + | * Clipped roof of building over cap A. | ||
| + | * Removed healthpack under terrain. | ||
| + | * Added decals under health kits and ammo packs. | ||
| + | |||
| + | '''{{Patch name|9|10|2015}}''' | ||
| + | * {{Undocumented}} Added [[saucers]] and posters to Gravel Pit. | ||
| + | |||
| + | '''{{Patch name|11|25|2015}}''' | ||
| + | * {{Undocumented}} Removed Saucers and Posters from all maps. | ||
| + | }} | ||
== Bugs == | == Bugs == | ||
| − | * If a BLU Engineer builds a Teleporter | + | * If a BLU Engineer builds a [[Teleporters|Teleporter Exit]] in the BLU-only area outside the main spawn, it is possible for an enemy Spy to teleport into the BLU spawn. |
| + | * In BLU's main spawn, it is possible to get stuck behind the [[w:Utility pole|utility pole]] to the left of the exit toward point A. This happens because the ground is uneven, and the area behind the pole is lower than the rest. Players can still escape as certain classes using methods like explosive jumping, but others may have to commit suicide to escape. | ||
* When in [[Pyroland|Pyrovision]], Gravel Pit's sky is unaffected. | * When in [[Pyroland|Pyrovision]], Gravel Pit's sky is unaffected. | ||
| + | * A player from BLU can spam control point announcer dialogue for RED by crouch jumping on top of a barrel prop in the room under Control Point A.<ref>[https://www.youtube.com/watch?v=JFWGOE8J6Zc Video example.]</ref> | ||
| + | * Engineers are able to build inside of BLU's main spawn room. <ref>[https://www.youtube.com/watch?v=eAWsi6TYW_E&ab_channel=MN Video example.]</ref> | ||
| − | ==Trivia== | + | == Trivia == |
| − | *Gravel is #34 in the "Pits of America" stamp series.<ref>[ | + | * Gravel is #34 in the "Pits of America" stamp series.<ref>[https://www.teamfortress.com/sniper_vs_spy/day02_english.htm The Sniper Update - Day 2]</ref> |
| − | *Before their [[WAR! Update|war]], the RED Demoman and BLU Soldier went on the "Gravel Pits of America" scenic bus tour together. | + | * Before their [[WAR! Update|war]], the RED Demoman and BLU Soldier went on the "Gravel Pits of America" scenic bus tour together.<ref>[https://www.teamfortress.com/war/administrator/03.htm WAR! Comic, Page 3]</ref> |
| − | *The comic [[:File:07 comic large.jpg|''The Insult That Made a "Jarate Master" Out of Sniper'']] takes place in Gravel Pit. | + | * The comic [[:File:07 comic large.jpg|''The Insult That Made a "Jarate Master" Out of Sniper'']] takes place in Gravel Pit. |
| − | * | + | * According to the [[Map of Badlands|"Map of Badlands"]], Gravel Pit is westward of [[Badwater Basin]] and northeast of [[Well (Control Point)|Well]] (called "The Well"). A sea of gravel (called "The Gravel Sea" on the map) lies to the west. |
| − | + | * ''[[Meet the Demoman]]'' takes place in Gravel Pit, though the teams' roles are reversed - RED attacks while BLU defends. | |
| − | *''[[Meet the Demoman]]'' takes place in Gravel Pit, though the teams' roles are reversed - RED attacks while BLU defends. | ||
* Gravel Pit appears in ''[[Worms: Reloaded]]'' as one of the forts. | * Gravel Pit appears in ''[[Worms: Reloaded]]'' as one of the forts. | ||
| − | *The image of Gravel Pit that appears in the background of the | + | * The image of Gravel Pit that appears in the background of the [[main menu]] was actually supposed to be [[Granary]]. |
| − | *The company name "Gray Gravel Co." can be seen on the outside wall of the | + | * The company name "Gray Gravel Co." can be seen on the outside wall of the Control Point B building. Long after the map was released, this company was revealed to be owned by [[Gray Mann]], the long-forgotten brother of Blutarch and Redmond Mann.<ref>[https://www.teamfortress.com/shadowboxers/#f=21 Shadow Boxers]</ref> |
| + | * Gravel Pit was originally going to be called cp_bridge.<ref>[https://www.tfportal.de/?site=news_details&id=475 Interview with Robin Walker]</ref> | ||
== Gallery == | == Gallery == | ||
| Line 122: | Line 167: | ||
== See also == | == See also == | ||
| − | *[[Gravel Pit developer commentary]] | + | * [[Gravel Pit developer commentary]] |
| − | *[[Junction]] | + | * [[Coal Pit]] |
| + | * [[Junction]] | ||
| + | * [[Lava Pit]] | ||
== References == | == References == | ||
<references/> | <references/> | ||
| − | {{Maps | + | {{Maps Nav}} |
| + | |||
| + | [[Category:Quickplay maps]] | ||
Latest revision as of 13:52, 22 February 2024
| Gravel Pit | |
|---|---|

| |
| Basic Information | |
| Map type: | Control Point |
| File name: | cp_gravelpit
|
| Released: | October 10, 2007 (Launch) |
| Variants: | Smissmas and Halloween |
| Developer(s): | Valve |
| Map Info | |
| Environment: | Industrial |
| Setting: | Daylight, overcast |
| Pyrovision Support: | Yes |
| Map Items | |
| Map Photos | |
 | |
| Map Overview | |
 | |
| “ | Oi, lend us yer shovel, so I can dig yer grave!
Click to listen
— The Sniper to the Soldier
|
” |
Gravel Pit is an Attack/Defend Control Point map. It was one of the six maps included with Team Fortress 2's initial release.
In Gravel Pit, BLU must capture control points A and B before they can capture point C, the final point, though they can capture A and B in any order. Points A and B are directly accessible from the BLU base, while they must cross through one of them in order to reach point C. RED's base is located near point C.
Contents
Introduction video
Locations
Note: If you are having trouble with finding the locations listed here, see the Helpful overview section to see their exact position marked on the map.
Control Point A: The Radio Tower
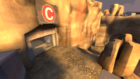
- Control Point: Control Point A is to the left as the player exits the BLU base. The point is at the top of a hill, inside a building. There are two exits from the BLU tunnel to this area, and they allow access to the two ramps around the outside of the point. A Medium Health pack is under the Control Point. There are also two Medium Ammo boxes near the cap building, one to the front and one at the back of the CP building. From point A, there are tunnels that connect to points B and C.
- BLU Spawn Base: Located on one side of the map, the BLU base has two exits - one to cap A and the other one to cap B.
- The A side Tunnel: The tunnel which connects BLU's spawn yard and the A battlefield. The tunnels leading to the BLU base are accessible by rocket, grenade, or double jumping; they can also be entered by crouch-jumping onto the part of the wall jutting out next to the left entrance, then by crouch-jumping toward the left entrance while strafing right and turning right to barely land on the tunnel ledge.
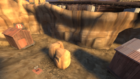
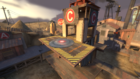
- Valley: The valley is the area between the two dirt paths which lead up to the control point building. There are numerous small buildings in this area.
- Paths: On both sides of the area are dirt paths which lead to the top of the area and the control point building.
- Radio Tower: The radio tower houses the control point. It is atop the dirt paths at the far end of the valley. There are two floors, the bottom directly under the control point and the control point floor. On the side of the building is a set of stairs which lead to the control point from the valley.
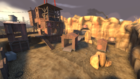
Valley overview
Control point A
A Tunnel
A Tunnel entrance
Path up to A/C connector


Control Point B: The Radar
- Control Point: Control Point B is to the right as the player exits the BLU base. The point is in the large structure in the center of the area.
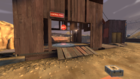
- B side Tunnel: There are two tunnels coming from the BLU base. The Short B is covered by a small house and a fence that partially obscures the BLU tunnel, and exits out next to the A/B connector. The Long B exits out on the far side of the B area. Both require players to rocket/grenade/double jump to access the tunnels from the Control Point side. Two ramps along the back wall give access to Control Point C.
- The Radar: The Radar is the building which houses the control point. It has two main entrances, the main entrance on the far side of the area atop a ramp, and the other on the C side atop two ramps. There are four windows, two on each side which are all accessible. The roof is a common spot for Soldiers or Demomen and contains a dropdown directly to the point.
- Shadow Side: Next to the building, on the side opposite the B Tunnel exits is the Shadow Side, named for the building's shadow which is cast on it.
- Balcony: Directly outside the C entrances is the Balcony. It's a high point which serves as a vantage point for most of the B area. There are two ramps on both sides which lead down to ground level.
- A/B connector: Between the A and B areas is the A/B connector which is a tunnel which connects from BLU's A Tunnel exit to BLU's short B Tunnel exit.

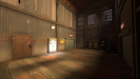
Point house
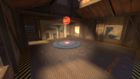
Control point B
A/B connector

Balcony
B tunnels


Control Point C: The Laser Gun
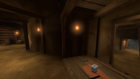
- Control Point: Control Point C is past the first two points, and adjacent to the RED base. The tunnels leading to the other Control Points are on a higher level than the ground in this area. The Control Point is located at the top of the central structure.
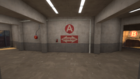
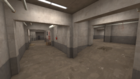
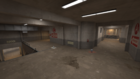
- RED Spawn Base: Located directly adjacent to Control Point C, on the opposite side of the area from the tunnels to Control Points A and B.
- The Laser Tower: In the center of the area is the giant tower, which atop sits a laser gun. There are three floors to the tower. The first is accessible from ground level by a ramp, and from two bridges connecting to the catwalks. The second floor is accessible by two sets of ramps of which lead along the outside of the tower and one through it. The third floor is the top which contains the Control Point and a small room behind the point open on three of its sides.
- Catwalks: All along the outside edge of the area are the catwalks. These are the metal walkways which are accessible via four entrances, two from the A/C connector tunnels and two from the B/C connector tunnels, and also accessible from two ramps outside the RED spawn.
- Ground Level: Below the catwalks and surrounding the tower is the ground level. On the far side is an entrance which leads to the A/C connector tunnels.
Control Point

Tower overview
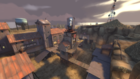
Area overview
A/C Tunnel
RED spawn room


Helpful overview

1.B side Tunnel
2.Radar building (And the Control point B too!)
3.Shadow Side
4.Balcony
5.A/B Connector
6.A side Tunnel
7.Paths
8.Valley
9.Radio Tower (And the Control point A too!)
10.Laser Tower (And the Control point C as well!)
11.Ground Level
Strategy
 | “Sun Tzu's got nothing on us!” This map's Community strategy page is a stub. As such, it is not complete. You can help the Team Fortress Wiki Community Strategy Project by expanding it. Notes: None added |
Control Point timing
| Control Point | Multiplier | Seconds | ||
|---|---|---|---|---|
| Control Point A | ×1 |
| ||
| ×2 |
| |||
| ×3 |
| |||
| ×4 |
| |||
| Control Point B | ×1 |
| ||
| ×2 |
| |||
| ×3 |
| |||
| ×4 |
| |||
| Control Point C | ×1 |
| ||
| ×2 |
| |||
| ×3 |
| |||
| ×4 |
|
Related achievements
 General achievements
|
|


Update history
- Changed the scoring method in
CP_GravelPitto score per capture rather than per round. - Updated
CP_GravelPitto fix all known exploits.
- Fixed the new Gravel Pit backgrounds using the wrong filename.
- Fixed z-fighting on the fan in the Red spawn building.
- Fixed Red Engineers building inside their spawn room.
- Clipped roof of building over cap A.
- Removed healthpack under terrain.
- Added decals under health kits and ammo packs.
- [Undocumented] Added saucers and posters to Gravel Pit.
- [Undocumented] Removed Saucers and Posters from all maps.
Bugs
- If a BLU Engineer builds a Teleporter Exit in the BLU-only area outside the main spawn, it is possible for an enemy Spy to teleport into the BLU spawn.
- In BLU's main spawn, it is possible to get stuck behind the utility pole to the left of the exit toward point A. This happens because the ground is uneven, and the area behind the pole is lower than the rest. Players can still escape as certain classes using methods like explosive jumping, but others may have to commit suicide to escape.
- When in Pyrovision, Gravel Pit's sky is unaffected.
- A player from BLU can spam control point announcer dialogue for RED by crouch jumping on top of a barrel prop in the room under Control Point A.[2]
- Engineers are able to build inside of BLU's main spawn room. [3]
Trivia
- Gravel is #34 in the "Pits of America" stamp series.[4]
- Before their war, the RED Demoman and BLU Soldier went on the "Gravel Pits of America" scenic bus tour together.[5]
- The comic The Insult That Made a "Jarate Master" Out of Sniper takes place in Gravel Pit.
- According to the "Map of Badlands", Gravel Pit is westward of Badwater Basin and northeast of Well (called "The Well"). A sea of gravel (called "The Gravel Sea" on the map) lies to the west.
- Meet the Demoman takes place in Gravel Pit, though the teams' roles are reversed - RED attacks while BLU defends.
- Gravel Pit appears in Worms: Reloaded as one of the forts.
- The image of Gravel Pit that appears in the background of the main menu was actually supposed to be Granary.
- The company name "Gray Gravel Co." can be seen on the outside wall of the Control Point B building. Long after the map was released, this company was revealed to be owned by Gray Mann, the long-forgotten brother of Blutarch and Redmond Mann.[6]
- Gravel Pit was originally going to be called cp_bridge.[7]
Gallery
Spy and Gravel Pit as a playable fort in Worms: Reloaded.

See also
References
- ↑ Gravel Pit was added as a background instead of Granary
- ↑ Video example.
- ↑ Video example.
- ↑ The Sniper Update - Day 2
- ↑ WAR! Comic, Page 3
- ↑ Shadow Boxers
- ↑ Interview with Robin Walker