Difference between revisions of "Egypt"
m (Applied filters to Egypt (Review RC#124462)) |
m (→Locations) |
||
| (111 intermediate revisions by 71 users not shown) | |||
| Line 1: | Line 1: | ||
{{Map infobox | {{Map infobox | ||
| − | |game-type=Control Point | + | | map-status = community |
| − | |file-name=cp_egypt_final | + | | map-game-type = Control Point |
| − | |map-image=Egypt_01.jpg | + | | map-file-name = cp_egypt_final |
| − | | | + | | map-image = Egypt_01.jpg |
| + | | map-released = {{Patch name|2|24|2009}} | ||
| + | | map-released-major = Scout Update | ||
| + | | map-has-n-stages = 3 | ||
| + | | map-environment = Egyptian | ||
| + | | map-setting = Daylight, sunny | ||
| + | | map-hazards = [[Environmental_death#Crushing|Ceiling trap]],<br />[[Environmental_death#Fire|Fire]] (environmental) | ||
| + | | map-pickups-health-small = 4 | ||
| + | | map-pickups-health-medium = 7 | ||
| + | | map-pickups-health-large = 5 | ||
| + | | map-pickups-ammo-small = 2 | ||
| + | | map-pickups-ammo-medium = 16 | ||
| + | | map-pickups-ammo-large = 4 | ||
| + | | map-stamp-link = https://steamcommunity.com/stats/TF2/leaderboards/30383 | ||
}} | }} | ||
| − | |||
| − | = | + | {{Quotation|'''The Spy''' on the burial location for the mummified Soldier|They can bury you in the 'Tomb of the Unskilled Soldier!'|sound=Spy DominationSoldier05.wav}} |
| − | BLU must capture both points to complete a stage. RED attempts to defend the points | + | |
| + | '''Egypt''' is a [[Steam Workshop|community-created]] [[Control Point (game mode)#Attack/Defend|Attack/Defend Control Point]] map adopting a custom Egyptian desert terrain theme, and featuring notably unique use of vertical space. [[RED]]'s goal is to defend a tomb of gold from [[BLU]] discovered after an archaeological dig. Egypt is one of the community maps chosen by [[Valve]] as honorary official [[List of maps|maps]] due to their high quality. | ||
| + | |||
| + | The objective for the map is that BLU must capture both points to complete a stage. RED attempts to defend the points and wins if any of the points remain uncaptured when time runs out. The timer is extended if BLU captures any of the points. | ||
== Locations == | == Locations == | ||
| − | ===Stage 1=== | + | {{HelpfulOverviewNote}} |
| − | *The first control point is located on a raised platform with ramps leading up to it, almost directly outside the BLU spawn. On the platform is another smaller platform running along the side towards the spawns. This prevents BLU | + | === Stage 1, Point A === |
| − | *The second control point is situated in a well surrounded by higher ground on all sides, providing good sightlines for | + | [[File:Egypt stage one.png|thumb|right|Details of stage 1.(Large file)]] |
| + | |||
| + | *'''BLU Spawn''': A corridor with a staircase leads to two main exits, one on the left and one on the right to assault A. | ||
| + | *'''Control Point''': The first [[Control point (objective)|control point]] is located on a raised platform with ramps leading up to it, almost directly outside the BLU spawn. On the platform is another smaller platform running along the side towards the spawns. This prevents BLU [[Soldier]]s and [[Demoman|Demomen]] from [[Rocket jump|rocket]]/[[sticky jump]]ing up straight out of the spawn. BLU is required to move around the point and up the ramp to capture the control point. | ||
| + | *'''Small Courtyard''': One of the two courtyards leading from Point A. The small courtyard has two wooden ramps and a set of stairs that lead to Point B's tunnels and the Point B chokepoint. | ||
| + | *'''Large Courtyard''': The second courtyard leading from Point A. This curves around the building between Point A and the Point B chokepoint. | ||
| + | *'''Ledges''': There is a wooden structure just right of the point. | ||
| + | |||
| + | <gallery widths=140px heights=80px> | ||
| + | File:egypt01.png|Stage 1, Point A. | ||
| + | File:egypt stage1courtyard.png| Small Courtyard. | ||
| + | File:egypt stage1courtyard2.png| Large Courtyard. | ||
| + | </gallery> | ||
| + | |||
| + | === Stage 1, Point B === | ||
| + | *'''Control Point''': The second control point is situated in a well surrounded by higher ground on all sides, providing good sightlines for [[Sniper]]s and [[Sentry Gun]]s, and a lot of tunnels frequented by [[Spy|Spies]] and [[Pyro]]s. This forces the attacking team to deal with the [[Ambushing|flanks]] first before assaulting the control point itself. | ||
| + | *'''Tunnels''': Other than the main chokepoint, another area useful to attackers are the tunnels that connect directly to the point and to a small courtyard behind the point. | ||
| + | *'''Point Courtyard''': Behind Point B is a small courtyard at the end of the tunnels. It is above ground level from the point, leaving many classes that are defending unable to access the area. | ||
| + | *'''RED Spawn''': A corridor with a staircase leading to B. There is also a shortcut to A, which locks when A is captured by BLU. Any RED team member attempting to use the shortcut when A is captured will become trapped and be crushed by a dropping ceiling. | ||
| + | |||
| + | <gallery widths=140px heights=80px> | ||
| + | File:egypt02.png|Stage 1, Point B. | ||
| + | File:egypt stage1tunnels.png| Tunnels. | ||
| + | File:egypt stage1courtyard3.png| Courtyard behind point. | ||
| + | </gallery> | ||
| + | |||
| + | === Stage 2, Point A === | ||
| + | [[File:Egypt stage two.png|thumb|right|Details of stage 2.(Large file)]] | ||
| + | |||
| + | *'''BLU Spawn''': A small spawn room leads to two large and spacious corridors. The leftward corridor has two exits, one on the ground level and one elevated, and the right corridor leads to a single exit on the ground level. | ||
| + | *'''Control Point''': The first control point is placed atop a tall structure that can be reached by two routes. The left route is a linear, uphill climb with another set of stairs while the right route uses stairs to scale the immense height. | ||
| + | *'''Side Path''': One of the two routes to the point. This upward path bends around the central structure leading to a set of stairs that lead to the point, and also leads to the platform area below the point which connects to a bridge above the spawn area and the second set of stairs that access the point. | ||
| + | *'''Stairs''': A large set of stairs connected to the courtyard that exits from the spawn. This leads to another small set of stairs that connect to the point and the platform and bridge that are below the point. | ||
| + | |||
| + | <gallery widths=140px heights=80px> | ||
| + | File:egypt03.png| Stage 2, Point A. | ||
| + | File:egypt stage2path.png| Side Path. | ||
| + | File:egypt stage2ramps.png| Stairs. | ||
| + | </gallery> | ||
| + | |||
| + | === Stage 2, Point B === | ||
| + | *'''Control Point''': The second control point is an elevated atop a flight of stairs, meeting at even ground with the enemy spawn. | ||
| + | *'''Main Building''': The building that is straight behind Point A. This is the main area attackers attack from. It has a main entrance leading to the area below the point and a gate that meets with ground level near the point. | ||
| + | *'''RED Spawn''': A small spawn area with a single exit behind a fence where the RED team must walk to reach B. | ||
| + | |||
| + | <gallery widths=140px heights=80px> | ||
| + | File:egypt04.png| Stage 2, Point B. | ||
| + | </gallery> | ||
| + | |||
| + | === Stage 3, Point A === | ||
| + | [[File:Egypt stage three.png|thumb|right|Details of stage 3.(Large file)]] | ||
| + | |||
| + | *'''BLU Spawn''': A small spawn room links to a small chamber with two pathways. The left pathway is a single ground exit, while the right is a short corridor that also leads to the ground floor, near the valley. | ||
| + | *'''Control Point''': The first control point of this stage uses the same "CP atop a huge structure" concept as the first point in Stage 2 but features a lot more open ground and cover. | ||
| + | *'''Opening''': From the attacker's spawn is a large opening in the ceiling. | ||
| + | *'''Valley''': Outside the attacker's spawn is a valley that gives access to many sets of stairs eventually leading to the central structure and the side path to the point. | ||
| + | *'''Central Building''': The building in the center of the valley. From the stairs leads to a bridge that connects the building. It has another bridge that connects to the point. | ||
| + | *'''Side Path''': Other than the central building the point is also accessed from another path that connects with the valley. | ||
| + | *'''Flank''': From the spawn is a winding set of stairs that lead to the top area by the point. | ||
| + | |||
| + | <gallery widths=140px heights=80px> | ||
| + | File:egypt05.png| Stage 3, Point A. | ||
| + | File:egypt stage3bridge.png| Central Building. | ||
| + | File:egypt stage3opening.png| The Opening. | ||
| + | </gallery> | ||
| + | |||
| + | === Stage 3, Point B === | ||
| + | *'''Control Point''': The final control point is at the tomb entrance itself, but just like the other second points in the previous two stages, is covered by a lot of open, high ground. Once again, this forces the attacking team to deal with their surroundings in a logical order first. | ||
| + | *'''Caves''': Connecting Point B's courtyard and Point A are a series of caves with 3 different entrances. | ||
| + | *'''Courtyard''': From the tunnel entrances are the courtyard which most of the fighting goes on at. Half of it is atop a flight of stairs and has a large arch structure in the middle which leads to the final point. | ||
| + | *'''RED Spawn''': A small spawn room with a single exit, located to the right of Point B. | ||
| + | *'''Vault/Tomb''': When the final point is captured, a door opens in front of it. This door has a flight of stairs that leads to a tomb with a sarcophagus filled with gold coins. | ||
| + | |||
| + | <gallery widths=140px heights=80px> | ||
| + | File:egypt06.png| Stage 3, Point B. | ||
| + | File:egypt stage3tunnels.png| The Tunnels. | ||
| + | File:egypt vault.png| The Vault. | ||
| + | </gallery> | ||
| − | == | + | == Helpful overview == |
| − | + | [[File:Egypt overview with lines.png|left|690px|Egypt's locations]] | |
| − | + | 1.Ledges | |
| + | 2.Small Courtyard | ||
| + | 3.Large Courtyard | ||
| + | 4.Tunnels | ||
| + | 5.Point Courtyard | ||
| + | 6.Stairs | ||
| + | 7.Side Path | ||
| + | 8.Main Building | ||
| + | 9.Flank | ||
| + | 10.Opening | ||
| + | 11.Valley | ||
| + | 12.Central Pillar | ||
| + | 13.Tunnels | ||
| + | 14.Courtyard | ||
| + | |||
| + | Red/blue diagonal lines: Red/Blu first spawn | ||
| + | Red/blue double diagonal lines: Red/Blu second spawn | ||
| + | Red/blue double diagonal lines w/ a rectangular: Red/Blu third spawn | ||
| − | + | Purple circle: First control point Stage 1 | |
| − | + | Green circle: Second control point Stage 1 | |
| − | |||
| − | + | Blue circle: First control point Stage 2 | |
| − | + | Dark red circle: Second control point Stage 2 | |
| − | |||
| − | |||
| − | |||
| − | + | Pink circle: First control point Stage 3 | |
| − | + | Black circle: Second/final control point Stage 3 | |
| − | |||
| − | == Control Point | + | == Strategy == |
| + | {{map strategy link|Egypt|main=yes|stub=yes}} | ||
| + | |||
| + | == Control Point timing == | ||
{{Control Point Timing/Official Map}} | {{Control Point Timing/Official Map}} | ||
| − | ==Trivia== | + | == Update history == |
| − | [[File:Egypt Hieroglyphs.png|thumb|150px|The | + | {{update history| |
| − | * Some of the hieroglyphics featured in the map are Team Fortress 2-related. These | + | '''{{Patch name|2|24|2009}}''' ([[Scout Update]]) |
| + | * Added Egypt to the game. | ||
| + | |||
| + | '''{{Patch name|5|1|2009}}''' | ||
| + | * Updated {{code|cp_egypt}} with changes based on player feedback, added additional health/ammo and updated routes. | ||
| + | |||
| + | '''{{Patch name|1|24|2011}}''' | ||
| + | * Fixed a bug with the round ending when a control point is captured during [[Overtime]] in {{code|CP_Egypt}}. | ||
| + | |||
| + | '''{{Patch name|7|10|2013}}''' | ||
| + | * Fixed clip brush exploits | ||
| + | * Players can no longer build on top of arches and high ledges | ||
| + | |||
| + | '''{{Patch name|8|27|2013}}''' | ||
| + | * Fixed players building inside of Blu's first spawn. | ||
| + | }} | ||
| + | |||
| + | == Bugs == | ||
| + | * The instant kill trigger inside of the stage 1 red spawn is always accessible until the first point is captured. | ||
| + | * Players are able to build in all of the spawn rooms excluding the stage 1 BLU spawn room. | ||
| + | |||
| + | == Trivia == | ||
| + | [[File:Egypt Hieroglyphs.png|thumb|150px|The hieroglyphics.]] | ||
| + | |||
| + | * Some of the hieroglyphics featured in the map are ''[[Team Fortress 2]]''-related. These include a [[Heavy]] with his [[Minigun]], a [[Sapper]], two small [[Sticky Bombs]], a large Sticky Bomb, a level one [[Sentry Gun]], the [[Backstab]] symbol, a simplified Demoman face, a crocodile, an [[Ubersaw]], a [[Soldier]] (sitting down), the Team Fortress logo, a hamburger, and what could be construed as a [[Pyro]] (mainly because of an [[Fire Axe|axe-like]] protrusion at the front of a silhouetted figure). | ||
| + | |||
| + | == External links == | ||
| + | * [https://www.teamfortress.com/scoutupdate/egypt.htm The Scout Update: Maps - Egypt + Fastlane Update] | ||
| + | * [https://www.gamebanana.com/maps/54003 Direct link to map, including more screenshots] | ||
| − | + | {{Scout Update Nav}} | |
| − | + | {{Maps Nav}} | |
| − | |||
| − | + | [[Category:Quickplay maps]] | |
Latest revision as of 19:51, 9 April 2024
| Egypt | |
|---|---|

| |
| Basic Information | |
| Map type: | Control Point |
| File name: | cp_egypt_final
|
| Released: | February 24, 2009 Patch (Scout Update) |
| Developer(s): | Sean "Heyo" Cutino |
| Map Info | |
| No. of Stages: | 3 |
| Environment: | Egyptian |
| Setting: | Daylight, sunny |
| Hazards: | Ceiling trap, Fire (environmental) |
| Map Items | |
| Map Photos | |
 | |
| Map Overview | |
 | |
| Map Stamp | |
| Supporters Leaderboard | |
| “ | They can bury you in the 'Tomb of the Unskilled Soldier!'
Click to listen
— The Spy on the burial location for the mummified Soldier
|
” |
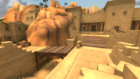
Egypt is a community-created Attack/Defend Control Point map adopting a custom Egyptian desert terrain theme, and featuring notably unique use of vertical space. RED's goal is to defend a tomb of gold from BLU discovered after an archaeological dig. Egypt is one of the community maps chosen by Valve as honorary official maps due to their high quality.
The objective for the map is that BLU must capture both points to complete a stage. RED attempts to defend the points and wins if any of the points remain uncaptured when time runs out. The timer is extended if BLU captures any of the points.
Contents
Locations
Note: If you are having trouble with finding the locations listed here, see the Helpful overview section to see their exact position marked on the map.
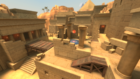
Stage 1, Point A

- BLU Spawn: A corridor with a staircase leads to two main exits, one on the left and one on the right to assault A.
- Control Point: The first control point is located on a raised platform with ramps leading up to it, almost directly outside the BLU spawn. On the platform is another smaller platform running along the side towards the spawns. This prevents BLU Soldiers and Demomen from rocket/sticky jumping up straight out of the spawn. BLU is required to move around the point and up the ramp to capture the control point.
- Small Courtyard: One of the two courtyards leading from Point A. The small courtyard has two wooden ramps and a set of stairs that lead to Point B's tunnels and the Point B chokepoint.
- Large Courtyard: The second courtyard leading from Point A. This curves around the building between Point A and the Point B chokepoint.
- Ledges: There is a wooden structure just right of the point.
Stage 1, Point A.
Small Courtyard.
Large Courtyard.


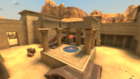
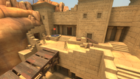
Stage 1, Point B
- Control Point: The second control point is situated in a well surrounded by higher ground on all sides, providing good sightlines for Snipers and Sentry Guns, and a lot of tunnels frequented by Spies and Pyros. This forces the attacking team to deal with the flanks first before assaulting the control point itself.
- Tunnels: Other than the main chokepoint, another area useful to attackers are the tunnels that connect directly to the point and to a small courtyard behind the point.
- Point Courtyard: Behind Point B is a small courtyard at the end of the tunnels. It is above ground level from the point, leaving many classes that are defending unable to access the area.
- RED Spawn: A corridor with a staircase leading to B. There is also a shortcut to A, which locks when A is captured by BLU. Any RED team member attempting to use the shortcut when A is captured will become trapped and be crushed by a dropping ceiling.
Stage 1, Point B.

Tunnels.

Courtyard behind point.


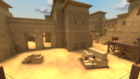
Stage 2, Point A

- BLU Spawn: A small spawn room leads to two large and spacious corridors. The leftward corridor has two exits, one on the ground level and one elevated, and the right corridor leads to a single exit on the ground level.
- Control Point: The first control point is placed atop a tall structure that can be reached by two routes. The left route is a linear, uphill climb with another set of stairs while the right route uses stairs to scale the immense height.
- Side Path: One of the two routes to the point. This upward path bends around the central structure leading to a set of stairs that lead to the point, and also leads to the platform area below the point which connects to a bridge above the spawn area and the second set of stairs that access the point.
- Stairs: A large set of stairs connected to the courtyard that exits from the spawn. This leads to another small set of stairs that connect to the point and the platform and bridge that are below the point.
Stage 2, Point A.
Side Path.
Stairs.


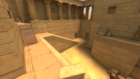
Stage 2, Point B
- Control Point: The second control point is an elevated atop a flight of stairs, meeting at even ground with the enemy spawn.
- Main Building: The building that is straight behind Point A. This is the main area attackers attack from. It has a main entrance leading to the area below the point and a gate that meets with ground level near the point.
- RED Spawn: A small spawn area with a single exit behind a fence where the RED team must walk to reach B.

Stage 2, Point B.

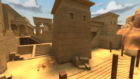
Stage 3, Point A

- BLU Spawn: A small spawn room links to a small chamber with two pathways. The left pathway is a single ground exit, while the right is a short corridor that also leads to the ground floor, near the valley.
- Control Point: The first control point of this stage uses the same "CP atop a huge structure" concept as the first point in Stage 2 but features a lot more open ground and cover.
- Opening: From the attacker's spawn is a large opening in the ceiling.
- Valley: Outside the attacker's spawn is a valley that gives access to many sets of stairs eventually leading to the central structure and the side path to the point.
- Central Building: The building in the center of the valley. From the stairs leads to a bridge that connects the building. It has another bridge that connects to the point.
- Side Path: Other than the central building the point is also accessed from another path that connects with the valley.
- Flank: From the spawn is a winding set of stairs that lead to the top area by the point.
Stage 3, Point A.
Central Building.
The Opening.


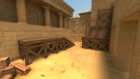
Stage 3, Point B
- Control Point: The final control point is at the tomb entrance itself, but just like the other second points in the previous two stages, is covered by a lot of open, high ground. Once again, this forces the attacking team to deal with their surroundings in a logical order first.
- Caves: Connecting Point B's courtyard and Point A are a series of caves with 3 different entrances.
- Courtyard: From the tunnel entrances are the courtyard which most of the fighting goes on at. Half of it is atop a flight of stairs and has a large arch structure in the middle which leads to the final point.
- RED Spawn: A small spawn room with a single exit, located to the right of Point B.
- Vault/Tomb: When the final point is captured, a door opens in front of it. This door has a flight of stairs that leads to a tomb with a sarcophagus filled with gold coins.

Stage 3, Point B.

The Tunnels.

The Vault.


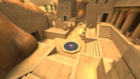
Helpful overview

1.Ledges
2.Small Courtyard
3.Large Courtyard
4.Tunnels
5.Point Courtyard
6.Stairs
7.Side Path
8.Main Building
9.Flank
10.Opening
11.Valley
12.Central Pillar
13.Tunnels
14.Courtyard

Red/blue diagonal lines: Red/Blu first spawn
Red/blue double diagonal lines: Red/Blu second spawn
Red/blue double diagonal lines w/ a rectangular: Red/Blu third spawn
Purple circle: First control point Stage 1
Green circle: Second control point Stage 1
Blue circle: First control point Stage 2
Dark red circle: Second control point Stage 2
Pink circle: First control point Stage 3
Black circle: Second/final control point Stage 3
Strategy
 | “Sun Tzu's got nothing on us!” This map's Community strategy page is a stub. As such, it is not complete. You can help the Team Fortress Wiki Community Strategy Project by expanding it. Notes: None added |
Control Point timing
| Control Point | Multiplier | Seconds | ||
|---|---|---|---|---|
| Control Point 1-1 | ×1 |
| ||
| ×2 |
| |||
| ×3 |
| |||
| ×4 |
| |||
| Control Point 1-2 | ×1 |
| ||
| ×2 |
| |||
| ×3 |
| |||
| ×4 |
| |||
| Control Point 2-1 | ×1 |
| ||
| ×2 |
| |||
| ×3 |
| |||
| ×4 |
| |||
| Control Point 2-2 | ×1 |
| ||
| ×2 |
| |||
| ×3 |
| |||
| ×4 |
| |||
| Control Point 3-1 | ×1 |
| ||
| ×2 |
| |||
| ×3 |
| |||
| ×4 |
| |||
| Control Point 3-2 | ×1 |
| ||
| ×2 |
| |||
| ×3 |
| |||
| ×4 |
|
Update history
- Added Egypt to the game.
- Updated
cp_egyptwith changes based on player feedback, added additional health/ammo and updated routes.
- Fixed a bug with the round ending when a control point is captured during Overtime in
CP_Egypt.
- Fixed clip brush exploits
- Players can no longer build on top of arches and high ledges
- Fixed players building inside of Blu's first spawn.
Bugs
- The instant kill trigger inside of the stage 1 red spawn is always accessible until the first point is captured.
- Players are able to build in all of the spawn rooms excluding the stage 1 BLU spawn room.
Trivia

- Some of the hieroglyphics featured in the map are Team Fortress 2-related. These include a Heavy with his Minigun, a Sapper, two small Sticky Bombs, a large Sticky Bomb, a level one Sentry Gun, the Backstab symbol, a simplified Demoman face, a crocodile, an Ubersaw, a Soldier (sitting down), the Team Fortress logo, a hamburger, and what could be construed as a Pyro (mainly because of an axe-like protrusion at the front of a silhouetted figure).
External links
| |||||||||||||||||