Difference between revisions of "Badlands (Arena)"
m (→Introduction video) |
m |
||
| Line 1: | Line 1: | ||
| − | {{Map | + | {{Map infobox |
| − | | | + | |game-type=Arena |
| − | | | + | |file-name=arena_badlands |
| − | | | + | |map-image=arenabadlands.jpg |
}} | }} | ||
{{hatnote|'''Badlands''' has multiple variations, including [[Badlands|Control Point]]}} | {{hatnote|'''Badlands''' has multiple variations, including [[Badlands|Control Point]]}} | ||
| Line 20: | Line 20: | ||
*'''Under the bridge:''' Each team also has a path that goes under the bridge. | *'''Under the bridge:''' Each team also has a path that goes under the bridge. | ||
*'''Rail Cars:''' There are rail cars located on either side of the capture point. Not only do these cars serve as cover, they also divide the bridge in half. The boxes on top of the cars are slightly smaller than the cars themselves, which allows for any class to jump over them by first jumping onto the car. | *'''Rail Cars:''' There are rail cars located on either side of the capture point. Not only do these cars serve as cover, they also divide the bridge in half. The boxes on top of the cars are slightly smaller than the cars themselves, which allows for any class to jump over them by first jumping onto the car. | ||
| − | *'''Window:''' There is a window and balcony on either side of the bridge. This spot is typically used as a | + | *'''Window:''' There is a window and balcony on either side of the bridge. This spot is typically used as a Sniper nest. |
*'''Pillars:''' Each side also has a pair of rock pillars that allow access from the bridge onto the balcony next to the window. | *'''Pillars:''' Each side also has a pair of rock pillars that allow access from the bridge onto the balcony next to the window. | ||
== Strategy == | == Strategy == | ||
| − | *A good sentry location for | + | *A good sentry location for Engineers is to place a sentry peeking out of the window at the balcony. With control over the central battleground, and a decent ammo pickup nearby, it's an effective location. |
*As the map has many twists and turns , [[Demomen]] and [[Heavies]] can be highly useful, especially with a [[Medic]] on the team. | *As the map has many twists and turns , [[Demomen]] and [[Heavies]] can be highly useful, especially with a [[Medic]] on the team. | ||
| − | *Due to the open nature of this map, | + | *Due to the open nature of this map, Snipers are useful, with the two main spots being at either end of the capture point bridge or in the lower area underneath the bridge, both giving the Sniper a view of large areas of the battlefield where he can pick of enemies with ease. |
*Medics are invaluable on this map due to the lack of health pickups. | *Medics are invaluable on this map due to the lack of health pickups. | ||
| Line 39: | Line 39: | ||
}} | }} | ||
| − | ==External | + | ==External links == |
*[http://steamgames.com/tf2/heavy/arena.htm A Heavy Update - Arena mode] | *[http://steamgames.com/tf2/heavy/arena.htm A Heavy Update - Arena mode] | ||
<br> | <br> | ||
{{Maps nav}} | {{Maps nav}} | ||
Revision as of 13:29, 5 July 2010
| Badlands (Arena) | |
|---|---|

| |
| Basic Information | |
| Variants: | Control Point and King of the Hill |
| Developer(s): | {{{map-developer}}} |
| Map Photos | |
| Map Overview | |
Badlands has multiple variations, including Control Point
Badlands is an Arena map, and is a modified version of Badlands (Control Point). Badlands, along with Lumberyard, Ravine, Well (Arena), and Granary (Arena), was released with the Heavy Update as the one of the first official Arena maps for Team Fortress 2. Similar to other modified arena maps, Badlands (Arena) is primarily the central control point area of its Control Point version, the only major difference is the inclusion of water underneath the small bridges left of each team's spawn room.
The goal of your team is to eliminate the entire enemy team or capture the central capture point.
Introduction Video
Locations
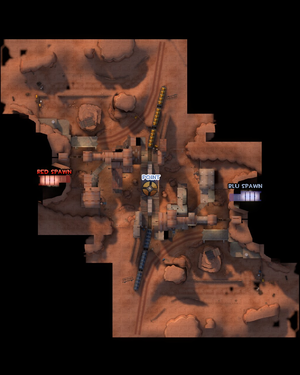
File:Team fortress 2 map overview arena badlands.jpg
An Overview of The Badlands Map
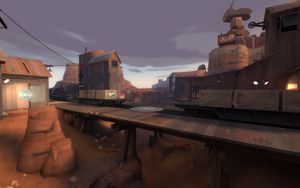
- The large wooden bridge in the center is where the control point is located, after 60 seconds it becomes active and the game can be won by capturing it, even if enemy players are still alive.
- Unlike in other versions of Badlands, the arena version has Water, located under the small bridges at each side of the map, remembering to get to these locations after a close encounter with a Pyro is useful indeed.
- Entrances: Each team has 3 paths to the bridge. One from either of the two buildings, and a third from the dirt ramps on the ends of the bridge.
- Under the bridge: Each team also has a path that goes under the bridge.
- Rail Cars: There are rail cars located on either side of the capture point. Not only do these cars serve as cover, they also divide the bridge in half. The boxes on top of the cars are slightly smaller than the cars themselves, which allows for any class to jump over them by first jumping onto the car.
- Window: There is a window and balcony on either side of the bridge. This spot is typically used as a Sniper nest.
- Pillars: Each side also has a pair of rock pillars that allow access from the bridge onto the balcony next to the window.
Strategy
- A good sentry location for Engineers is to place a sentry peeking out of the window at the balcony. With control over the central battleground, and a decent ammo pickup nearby, it's an effective location.
- As the map has many twists and turns , Demomen and Heavies can be highly useful, especially with a Medic on the team.
- Due to the open nature of this map, Snipers are useful, with the two main spots being at either end of the capture point bridge or in the lower area underneath the bridge, both giving the Sniper a view of large areas of the battlefield where he can pick of enemies with ease.
- Medics are invaluable on this map due to the lack of health pickups.
Control Point Timing
| Control Point | Multiplier | Seconds | ||
|---|---|---|---|---|
| Center Point | ×1 |
| ||
| ×2 |
| |||
| ×3 |
| |||
| ×4 |
|
External links

