Difference between revisions of "Precipice"
GrampaSwood (talk | contribs) (→Strategy: This is how it's usually done, just needs making) |
(Updated information to match changes as of October 17, 2019 patch; Made location information slightly more objective) |
||
| Line 1: | Line 1: | ||
| − | |||
{{Map infobox | {{Map infobox | ||
| game-type = Payload | | game-type = Payload | ||
| Line 26: | Line 25: | ||
== Locations == | == Locations == | ||
| − | |||
| − | |||
===Checkpoint A=== | ===Checkpoint A=== | ||
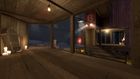
The BLU team starts at their headquarters with the Payload, with the first checkpoint right around the corner from where they start. | The BLU team starts at their headquarters with the Payload, with the first checkpoint right around the corner from where they start. | ||
| − | * '''Headquarters (BLU Spawn)''': The initial respawn and [[resupply area]] is a farm building with three exits, | + | * '''Headquarters (BLU Spawn)''': The initial respawn and [[resupply area]] is a farm building with three exits, two for the left and one for the right. The center-most exit deposits players directly onto the cart in the middle of a field, whereas the far left exit leads to an elevated area to the side of the payload. The right exit, meanwhile, allows players to take a route slightly further ahead of the payload. There are two [[resupply cabinet]]s: one located in the middle of the respawn room and one in the hallway to the right spawn exit. |
| − | * '''Courtyard''': Located directly outside the respawn building is the courtyard where the Payload track starts. This courtyard features basic elevated platforms and partial walling | + | * '''Courtyard''': Located directly outside the respawn building is the courtyard where the Payload track starts. This courtyard features basic elevated platforms and partial walling. The only building in this courtyard (other than the BLU spawn) houses the only [[Pickups|health kit]] for this area. |
* '''Buildings''': At the end of the courtyard lies the first checkpoint. On the left of the checkpoint is a series of buildings, which not only connect from checkpoint A to checkpoint B but also house a RED resupply room. On the right of the checkpoint lies the cliff edge, which acts as an environmental hazard for any classes that fall off. | * '''Buildings''': At the end of the courtyard lies the first checkpoint. On the left of the checkpoint is a series of buildings, which not only connect from checkpoint A to checkpoint B but also house a RED resupply room. On the right of the checkpoint lies the cliff edge, which acts as an environmental hazard for any classes that fall off. | ||
<gallery widths=140px heights=80px> | <gallery widths=140px heights=80px> | ||
File:Precipice A1.jpg | BLU spawn. | File:Precipice A1.jpg | BLU spawn. | ||
| − | File:Precipice A2.jpg| | + | File:Precipice A2.jpg| The left-most exit to the courtyard. |
| − | |||
File:Precipice BLU1.jpg | The distance between BLU spawn and the first checkpoint. | File:Precipice BLU1.jpg | The distance between BLU spawn and the first checkpoint. | ||
| − | File:Precipice A3.jpg| An overview of the | + | File:Precipice A3.jpg| An overview of the first checkpoint. |
File:Precipice A4.jpg| Some of the interiors alongside the checkpoints. | File:Precipice A4.jpg| Some of the interiors alongside the checkpoints. | ||
</gallery> | </gallery> | ||
| Line 47: | Line 43: | ||
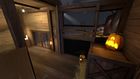
Checkpoint B is located running parallel to a series of hallways, with the cliff edge running on its other side. | Checkpoint B is located running parallel to a series of hallways, with the cliff edge running on its other side. | ||
| − | * '''Buildings''': Continued on from checkpoint A are a series of hallways running through the two sections. A RED resupply room is featured, as well as a one-way door that allows players to step onto the patio surrounding the cart track. The other end of the hallway deposits directly in front of checkpoint B, with the aforementioned patio circling the outer perimeter of the building | + | * '''Buildings''': Continued on from checkpoint A are a series of hallways running through the two sections. A RED resupply room is featured, as well as a one-way door that allows players to step onto the patio surrounding the cart track. The other end of the hallway deposits directly in front of checkpoint B, with the aforementioned patio circling the outer perimeter of the building. |
* '''Cliff Edge''': The cliff also continues from checkpoint A, growing in size to be a more formidable threat. | * '''Cliff Edge''': The cliff also continues from checkpoint A, growing in size to be a more formidable threat. | ||
* '''Shacks''': Hanging on the cliff are two shacks. The first shack has a staircase leading up to a three-walled room, with [[Pickups|health and ammo]] present. The second stops right before the cliff, with a treacherous platform hanging off with the promise of ammo. This platform is situated directly opposite of the RED resupply room, with a sign acting as a barrier between the two. | * '''Shacks''': Hanging on the cliff are two shacks. The first shack has a staircase leading up to a three-walled room, with [[Pickups|health and ammo]] present. The second stops right before the cliff, with a treacherous platform hanging off with the promise of ammo. This platform is situated directly opposite of the RED resupply room, with a sign acting as a barrier between the two. | ||
| Line 61: | Line 57: | ||
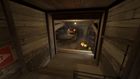
Checkpoint C is located tightly within a tunnel. At the end of this tunnel is a hallway, and to the outside is a path running parallel. | Checkpoint C is located tightly within a tunnel. At the end of this tunnel is a hallway, and to the outside is a path running parallel. | ||
| − | * '''Caves''': To the left is the path which the Payload track follows, going into a tight mining tunnel. At the end of this tunnel is a platform, connected to a hallway that ultimately leads to the final control point | + | * '''Flank''': Just before the entrance to the cave lies a one-way gate to the right, only opening from the defending team's side. Once Checkpoint C is captured, this gate opens permanently, allowing access from both sides. |
| − | + | * '''Caves''': To the left is the path which the Payload track follows, going into a tight mining tunnel. At the end of this tunnel is a platform, connected to a hallway that ultimately leads to the final control point. There are also two inlays in the center of the tunnel, one with health and ammo, allowing players to take cover. | |
<gallery widths=140px heights=80px perrow=5> | <gallery widths=140px heights=80px perrow=5> | ||
| + | File:Precipice C2.jpg| The main tunnel flank gate. | ||
File:Precipice C1.jpg| The tunnel, as seen from the platform. | File:Precipice C1.jpg| The tunnel, as seen from the platform. | ||
| − | |||
</gallery> | </gallery> | ||
| Line 72: | Line 68: | ||
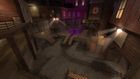
The final checkpoint lies behind two main pushes. The first one requires teams to push through the gates of an open shipping yard, where cover is plentiful and some minimal flanking is available. The second one opens up into a center surrounded by a building, where numerous hallways and vantage points allow the cart to be seen from just about every angle. | The final checkpoint lies behind two main pushes. The first one requires teams to push through the gates of an open shipping yard, where cover is plentiful and some minimal flanking is available. The second one opens up into a center surrounded by a building, where numerous hallways and vantage points allow the cart to be seen from just about every angle. | ||
| − | * '''Shipping Yard''': Between points C and D lies an open yard with various shipping containers and crates. To the left of this yard | + | * '''Shipping Yard''': Between points C and D lies an open yard with various shipping containers and crates. To the left of this yard is the hallway that connects C to D, acting as a way for classes to traverse between the points without having to take the frontlines. There is also a broken dock, which can act as a smaller-scale side route. |
| − | * '''Final Point''': Situated in the center of a hallway complex, the final point is a wide, open space, directly exposed to pathways both around | + | * '''Final Point''': Situated in the center of a hallway complex, the final point is a wide, open space, directly exposed to pathways both around and above the Payload track. |
| − | * '''Hallways''': Similar to the final point on [[Upward]], a RED respawn room is inside the walls of a building. This building has multiple narrow, small hallways, with the outside wrapped in patios | + | * '''Hallways''': Similar to the final point on [[Upward]], a RED respawn room is inside the walls of a building. This building has multiple narrow, small hallways, with the outside wrapped in patios. This route allows for great visibility on the Payload cart and is easily accessible by either team. |
<gallery widths=140px heights=80px perrow=5> | <gallery widths=140px heights=80px perrow=5> | ||
| Line 120: | Line 116: | ||
<gallery> | <gallery> | ||
File:Precipice cart.jpg|The unique payload being pushed on the map. | File:Precipice cart.jpg|The unique payload being pushed on the map. | ||
| − | |||
| − | |||
| − | |||
| − | |||
File:Precipice ghostroom.jpg|The developer room that houses the [[Ghost]] when not in use. | File:Precipice ghostroom.jpg|The developer room that houses the [[Ghost]] when not in use. | ||
File:Precipice Rockington.jpg|The "Rockington" rock on the side around the second point. | File:Precipice Rockington.jpg|The "Rockington" rock on the side around the second point. | ||
</gallery> | </gallery> | ||
| + | |||
{{Scream Fortress 2019 Nav}} | {{Scream Fortress 2019 Nav}} | ||
{{Halloween Map Nav}} | {{Halloween Map Nav}} | ||
{{Maps Nav}} | {{Maps Nav}} | ||
Revision as of 01:26, 24 October 2019
| Precipice | |
|---|---|

| |
| Basic Information | |
| Developer(s): | Unknown |
| Map Info | |
| Environment: | Halloween |
| Setting: | Night |
| Hazards: | Pitfalls, Skeletons, Pumpkin bombs |
| Map Photos | |
 | |
| Map Overview | |
 | |
| Map Stamp | |
| Supporters Leaderboard | |
Precipice is a community-made Payload map released during the Scream Fortress 2019 update.
Precipice was contributed to the Steam Workshop.
Contents
Locations
Checkpoint A
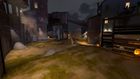
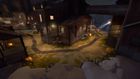
The BLU team starts at their headquarters with the Payload, with the first checkpoint right around the corner from where they start.
- Headquarters (BLU Spawn): The initial respawn and resupply area is a farm building with three exits, two for the left and one for the right. The center-most exit deposits players directly onto the cart in the middle of a field, whereas the far left exit leads to an elevated area to the side of the payload. The right exit, meanwhile, allows players to take a route slightly further ahead of the payload. There are two resupply cabinets: one located in the middle of the respawn room and one in the hallway to the right spawn exit.
- Courtyard: Located directly outside the respawn building is the courtyard where the Payload track starts. This courtyard features basic elevated platforms and partial walling. The only building in this courtyard (other than the BLU spawn) houses the only health kit for this area.
- Buildings: At the end of the courtyard lies the first checkpoint. On the left of the checkpoint is a series of buildings, which not only connect from checkpoint A to checkpoint B but also house a RED resupply room. On the right of the checkpoint lies the cliff edge, which acts as an environmental hazard for any classes that fall off.

BLU spawn.
The left-most exit to the courtyard.
The distance between BLU spawn and the first checkpoint.

An overview of the first checkpoint.
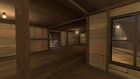
Some of the interiors alongside the checkpoints.


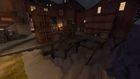
Checkpoint B
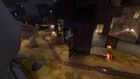
Checkpoint B is located running parallel to a series of hallways, with the cliff edge running on its other side.
- Buildings: Continued on from checkpoint A are a series of hallways running through the two sections. A RED resupply room is featured, as well as a one-way door that allows players to step onto the patio surrounding the cart track. The other end of the hallway deposits directly in front of checkpoint B, with the aforementioned patio circling the outer perimeter of the building.
- Cliff Edge: The cliff also continues from checkpoint A, growing in size to be a more formidable threat.
- Shacks: Hanging on the cliff are two shacks. The first shack has a staircase leading up to a three-walled room, with health and ammo present. The second stops right before the cliff, with a treacherous platform hanging off with the promise of ammo. This platform is situated directly opposite of the RED resupply room, with a sign acting as a barrier between the two.
The checkpoint.

More interiors.
Some of the patios overlooking the checkpoint.

The stretches of track beyond the checkpoint.


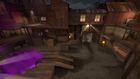
Checkpoint C
Checkpoint C is located tightly within a tunnel. At the end of this tunnel is a hallway, and to the outside is a path running parallel.
- Flank: Just before the entrance to the cave lies a one-way gate to the right, only opening from the defending team's side. Once Checkpoint C is captured, this gate opens permanently, allowing access from both sides.
- Caves: To the left is the path which the Payload track follows, going into a tight mining tunnel. At the end of this tunnel is a platform, connected to a hallway that ultimately leads to the final control point. There are also two inlays in the center of the tunnel, one with health and ammo, allowing players to take cover.
The main tunnel flank gate.
The tunnel, as seen from the platform.


Checkpoint D
The final checkpoint lies behind two main pushes. The first one requires teams to push through the gates of an open shipping yard, where cover is plentiful and some minimal flanking is available. The second one opens up into a center surrounded by a building, where numerous hallways and vantage points allow the cart to be seen from just about every angle.
- Shipping Yard: Between points C and D lies an open yard with various shipping containers and crates. To the left of this yard is the hallway that connects C to D, acting as a way for classes to traverse between the points without having to take the frontlines. There is also a broken dock, which can act as a smaller-scale side route.
- Final Point: Situated in the center of a hallway complex, the final point is a wide, open space, directly exposed to pathways both around and above the Payload track.
- Hallways: Similar to the final point on Upward, a RED respawn room is inside the walls of a building. This building has multiple narrow, small hallways, with the outside wrapped in patios. This route allows for great visibility on the Payload cart and is easily accessible by either team.
The final checkpoint.
The broken port of the shipping yard.
Looking down on the last push from one of the buildings.
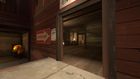
Entering the mazes of hallways.


Strategy
Update history
- Added Precipice to the game.
- Removed the right side path from BLU spawn near control point A to help BLU in keep momentum during coordinated pushes
- BLU main spawn has been rearranged to outlet the BLU team to the left of the courtyard
- Removed upper balcony for control point D on the RED team's side
- Added additional cover near control point A and control point D to block long headshot sightlines
- Redesigned RED spawn to support missing balcony level
- Added a ramp inside the Cave to allow players to jump up onto the dropdown platform that leads to control point D
- Fixed Engineers being able to build in certain doorways
- Moved the health cabinet in the neutral spawn closer to the exit doors
- Fixed one-way doors closing too soon, trapping players
- Fixed the cliff-side one way door not closing properly, leaving behind invisible collision
- Added additional health and ammo pickups between control point A and control point C
- Fixed several spots players shouldn't be able to reach
- Extended spawn room triggers to better encapsulate the neutral forward spawn room
- Made several shed rooftops non-buildable areas for Engineers(sic)
- Added more pumpkin bombs
- Spells cast by the cauldron are now helpful for the BLU team. The cauldron will only cast the tornado, jump pad, and skeleton spell. Skeletons will target and attack RED team.
- Fixed the cauldron spell audio not always playing correctly.
Trivia
- A rock with a smiley face drawn onto it can be found by the side around the second point. This is in reference to Rockington, a character featured in a video made by YouTuber JonTron.
Gallery
- Precipice cart.jpg
The unique payload being pushed on the map.

The developer room that houses the Ghost when not in use.

The "Rockington" rock on the side around the second point.


| ||||||||||||||||||||||||||||||||||||||||
| ||||||||||||||||||||||||||||||||||||||||||||||||||||||||||||||||