Difference between revisions of "Sawmill (King of the Hill)"
Hypothermo (talk | contribs) (→Locations) |
BrazilianNut (talk | contribs) m |
||
| (38 intermediate revisions by 26 users not shown) | |||
| Line 1: | Line 1: | ||
| − | |||
| − | |||
{{Map infobox | {{Map infobox | ||
| − | | game-type=King of the Hill | + | | map-status = official |
| − | | file-name=koth_sawmill | + | | map-game-type = King of the Hill |
| − | | map-image=kothsawmill.jpg | + | | map-file-name = koth_sawmill |
| − | | map-environment = Alpine | + | | map-image = kothsawmill.jpg |
| − | | map-setting = Cloudy, raining | + | | map-released = {{Patch name|8|13|2009}} |
| − | | map-deep-water = | + | | map-released-major = Classless Update |
| − | | map-hazards = [[ | + | | map-environment = Alpine |
| − | | map-health | + | | map-setting = Cloudy, raining |
| − | | map-health | + | | map-has-deep-water = yes |
| − | | map- | + | | map-hazards = [[Saw blade]]s |
| − | | map-ammo- | + | | map-pickups-health-small = 2 |
| − | | map-ammo- | + | | map-pickups-health-medium = 4 |
| − | | map- | + | | map-pickups-ammo-small = 2 |
| + | | map-pickups-ammo-medium = 2 | ||
| + | | map-pickups-ammo-large = 2 | ||
| + | | map-has-bots = yes | ||
}} | }} | ||
| − | {{Quotation|[ | + | {{Quotation|[https://www.teamfortress.com/sniper_vs_spy/day02_english.htm '''The Sniper vs. Spy Update''' (Day 2)]|Set in a stormy mountain sawmill, this arena map has its cap point in a large structure atop a hill in the center of the map; beneath which lies a hidden underground spytech base; and above which, pouring down on everything we just mentioned, is rain—the first weather effect to appear in a TF map. If that previous sentence wasn’t long enough for you, replace the period with a comma and add this next part: players must ALSO watch out for the two deadly [[saw blade]]s near the cap, which were left on when the previous occupants abandoned it for a less deadly, hilly, rain-swamped sawmill not built on a spybase.}} |
| − | Set in a stormy mountain sawmill, this arena map has its cap point in a large structure atop a hill in the center of the map; beneath which lies a hidden underground spytech base; and above which, pouring down on everything we just mentioned, is rain—the first weather effect to appear in a TF map. If that previous sentence wasn’t long enough for you, replace the period with a comma and add this next part: players must ALSO watch out for the two deadly [[saw | ||
| − | '''Sawmill''' is a [[King of the Hill]] map, a modified version of [[ | + | '''Sawmill''' is a [[King of the Hill]] map, a modified version of [[Sawmill (Arena)]]. It was released with the [[Classless Update]], in conjunction with its [[Sawmill (Capture the Flag)|Capture the Flag]] variant as an official map. Sawmill (King of the Hill) has an almost identical layout to its Arena variant. |
| − | |||
| − | |||
== Locations == | == Locations == | ||
| − | + | {{HelpfulOverviewNote}} | |
| − | |||
| − | |||
| − | |||
| − | |||
| − | |||
| − | |||
| + | * '''Waterfall''': Located on the right-hand side of [[RED]]'s spawn area, a titular waterfall flows down from a gray cliff into the center of a [[Water|large pool]]. Logs form a floating path across the pool, although the water itself is not too deep. A mini health kit can be found in the center of the logs. There is also an obvious "hidden" path that goes behind the waterfall that can be used in case of watchful enemy eyes. | ||
| + | * '''The Cave''': A cavern makes a wide loop around one side of the map behind the waterfall, and can be defended at either end. | ||
| + | * '''Log Shed''': On the right-hand side of [[BLU]]'s spawn area is a wide shed, full of timber, standing over a flooded ditch. Another mini health kit sits on a pile of planks within the shed. | ||
| + | * '''Center Shed''': The center of the map is dominated by a large shed that houses multiple entries for either team. Within the center of the shed is the map's control point. Two large, circular [[Wikipedia:Head saw|head saws]] move linear to the control point, generate large amounts of noise, and serve as deadly obstacles to players as they attempt to capture the point. Logs are suspended above the area. | ||
| + | * '''Rooftops''': Outside each [[spawn room]] are walkways which lead to the roof of the building directly across from them. Another wooden plank connects these rooftops to the Alcoves inside The Mill. | ||
| + | * '''The Alcoves''': On either side of the control point, perpendicular to the sides dominated by the blades, are two windowed ledges, with stairs leading down to the ground floor. These small "rooms" can be defended by a determined [[Engineer]], if he sets up a [[Buildings|Sentry nest]] early. | ||
<gallery widths=150px heights=80px> | <gallery widths=150px heights=80px> | ||
| Line 38: | Line 36: | ||
File:ARENA Sawmill Log Shed.jpg|The Log Shed | File:ARENA Sawmill Log Shed.jpg|The Log Shed | ||
File:ARENA Sawmill Center Shed.jpg|Inside the Center Shed, where the control point is located | File:ARENA Sawmill Center Shed.jpg|Inside the Center Shed, where the control point is located | ||
| − | File:arenasawmill caves.jpg|Caves behind the waterfall | + | File:arenasawmill caves.jpg|Caves behind the waterfall |
| − | File:arenasawmill roofentrance.jpg|Roof entrance to the point | + | File:arenasawmill roofentrance.jpg|Roof entrance to the point |
| − | File:arenasawmill sideentrance.jpg|Side entrance to the point | + | File:arenasawmill sideentrance.jpg|Side entrance to the point |
| − | File:arenasawmill yard.jpg|Yard outside spawn | + | File:arenasawmill yard.jpg|Yard outside spawn |
</gallery> | </gallery> | ||
| + | == Helpful overview == | ||
| + | [[File:Sawmill (Arena) overview with lines.png|left|575px|Sawmill's locations]] | ||
| + | <big>1.Rooftops | ||
| + | 2.Cave | ||
| + | 3.Waterfall | ||
| + | 4.Center Shed | ||
| + | 5.Alcoves | ||
| + | 6.Log Shed</big> | ||
| + | |||
| + | {{clr}} | ||
== Strategy == | == Strategy == | ||
| − | {{ | + | {{main|Community Sawmill (King of the Hill) strategy}} |
| + | {{community strategy stub link}} | ||
| − | == Control Point | + | == Control Point timing == |
{{Control Point Timing/Official Map}} | {{Control Point Timing/Official Map}} | ||
== Update history == | == Update history == | ||
| − | ''' | + | '''{{Patch name|8|13|2009}}''' ([[Classless Update]]) |
| − | * | + | * Added Sawmill (King of the Hill) to the game. |
| + | |||
| + | '''{{Patch name|10|29|2009}}''' ([[Haunted Halloween Special]]) | ||
| + | * Fixed [[Engineer]] exploit. | ||
| + | |||
| + | == Bugs == | ||
| + | * It is possible to clip onto the edge of BLU Spawn roof by [[Explosive jump|explosive jumping]]. | ||
| + | * It is possible for an [[Engineer]] to build on the head saw tracks without the buildings being destroyed by the saws. | ||
| + | * The [[w:Head saw|Head Saws]] are possible to jam if a player walks into their sides and lets the saws drag the player with them. If the player then gets stopped by a building or another player, the saw stops moving until the player dies while continuing to circle and kill anyone who walks into them. | ||
| − | + | == See also == | |
| − | * | + | * [[Sawmill (Capture the Flag)]] |
| + | * [[Sawmill (Arena)]] | ||
| + | * [[SnowVille]] | ||
| + | * [[Soul-Mill]] | ||
| − | == | + | == External links == |
| − | *[ | + | * [https://www.teamfortress.com/classless/day02.php The Classless Update: Day 2 - King of the Hill game mode, Viaduct, Nucleus (King of the Hill) and Sawmill (King of the Hill) maps] |
| − | |||
| − | + | {{Classless Update Nav}} | |
| − | + | {{Maps Nav}} | |
| − | + | [[Category:Quickplay maps]] | |
| − | |||
| − | |||
Latest revision as of 13:53, 22 February 2024
| Sawmill (King of the Hill) | |
|---|---|

| |
| Basic Information | |
| Map type: | King of the Hill |
| File name: | koth_sawmill
|
| Released: | August 13, 2009 Patch (Classless Update) |
| Variants: | Arena, Capture the Flag, SnowVille and Soul-Mill |
| Developer(s): | Valve |
| Map Info | |
| Environment: | Alpine |
| Setting: | Cloudy, raining |
| Hazards: | Saw blades |
| Deep Water: | Yes |
| Bot support: | Yes |
| Map Items | |
| Map Photos | |
 | |
| Map Overview | |
_overview.png) | |
| “ | Set in a stormy mountain sawmill, this arena map has its cap point in a large structure atop a hill in the center of the map; beneath which lies a hidden underground spytech base; and above which, pouring down on everything we just mentioned, is rain—the first weather effect to appear in a TF map. If that previous sentence wasn’t long enough for you, replace the period with a comma and add this next part: players must ALSO watch out for the two deadly saw blades near the cap, which were left on when the previous occupants abandoned it for a less deadly, hilly, rain-swamped sawmill not built on a spybase.
|
” |
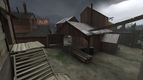
Sawmill is a King of the Hill map, a modified version of Sawmill (Arena). It was released with the Classless Update, in conjunction with its Capture the Flag variant as an official map. Sawmill (King of the Hill) has an almost identical layout to its Arena variant.
Contents
Locations
Note: If you are having trouble with finding the locations listed here, see the Helpful overview section to see their exact position marked on the map.
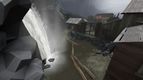
- Waterfall: Located on the right-hand side of RED's spawn area, a titular waterfall flows down from a gray cliff into the center of a large pool. Logs form a floating path across the pool, although the water itself is not too deep. A mini health kit can be found in the center of the logs. There is also an obvious "hidden" path that goes behind the waterfall that can be used in case of watchful enemy eyes.
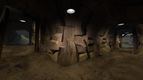
- The Cave: A cavern makes a wide loop around one side of the map behind the waterfall, and can be defended at either end.
- Log Shed: On the right-hand side of BLU's spawn area is a wide shed, full of timber, standing over a flooded ditch. Another mini health kit sits on a pile of planks within the shed.
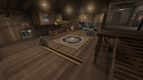
- Center Shed: The center of the map is dominated by a large shed that houses multiple entries for either team. Within the center of the shed is the map's control point. Two large, circular head saws move linear to the control point, generate large amounts of noise, and serve as deadly obstacles to players as they attempt to capture the point. Logs are suspended above the area.
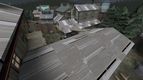
- Rooftops: Outside each spawn room are walkways which lead to the roof of the building directly across from them. Another wooden plank connects these rooftops to the Alcoves inside The Mill.
- The Alcoves: On either side of the control point, perpendicular to the sides dominated by the blades, are two windowed ledges, with stairs leading down to the ground floor. These small "rooms" can be defended by a determined Engineer, if he sets up a Sentry nest early.
The Waterfall

The Log Shed
Inside the Center Shed, where the control point is located
Caves behind the waterfall
Roof entrance to the point
Side entrance to the point

Yard outside spawn


Helpful overview
_overview_with_lines.png)
1.Rooftops
2.Cave
3.Waterfall
4.Center Shed
5.Alcoves
6.Log Shed
Strategy
Main article: Community Sawmill (King of the Hill) strategy
 | “Sun Tzu's got nothing on us!” This map's Community strategy page is a stub. As such, it is not complete. You can help the Team Fortress Wiki Community Strategy Project by expanding it. Notes: None added |
Control Point timing
| Control Point | Multiplier | Seconds | ||
|---|---|---|---|---|
| Control Point | ×1 |
| ||
| ×2 |
| |||
| ×3 |
| |||
| ×4 |
|
Update history
August 13, 2009 Patch (Classless Update)
- Added Sawmill (King of the Hill) to the game.
October 29, 2009 Patch (Haunted Halloween Special)
- Fixed Engineer exploit.
Bugs
- It is possible to clip onto the edge of BLU Spawn roof by explosive jumping.
- It is possible for an Engineer to build on the head saw tracks without the buildings being destroyed by the saws.
- The Head Saws are possible to jam if a player walks into their sides and lets the saws drag the player with them. If the player then gets stopped by a building or another player, the saw stops moving until the player dies while continuing to circle and kill anyone who walks into them.
See also
External links
| ||||||||||||||||||||||||||||||||||||||||||||||||||||||||||||||||