Difference between revisions of "Freight"
TerminalGear (talk | contribs) (added image gallery) |
m (→Locations) |
||
| (72 intermediate revisions by 43 users not shown) | |||
| Line 1: | Line 1: | ||
{{Map infobox | {{Map infobox | ||
| − | |game-type=Control Point | + | | map-status = community |
| − | |file-name=cp_freight_final1 | + | | map-game-type = Control Point |
| − | |map-image= | + | | map-file-name = cp_freight_final1 |
| − | | | + | | map-image = freight1.png |
| + | | map-released = {{Patch name|4|28|2010}} | ||
| + | | map-environment = Desert / Industrial | ||
| + | | map-setting = Daylight, sunny | ||
| + | | map-has-deep-water = yes | ||
| + | | map-hazards = [[Train]]s | ||
| + | | map-pickups-health-small = 8 | ||
| + | | map-pickups-health-medium = 6 | ||
| + | | map-pickups-ammo-small = 10 | ||
| + | | map-pickups-ammo-medium = 10 | ||
| + | | map-stamp-link = https://steamcommunity.com/stats/TF2/leaderboards/30390 | ||
}} | }} | ||
| − | '''Freight''' is a | + | '''Freight''' is a [[Steam Workshop|community-created]] [[Control Point (game mode)#Symmetric|Standard Control Point]] map. It shares many similarities with the map [[Well (Control Point)|Well]], with underwater routes, modified [[train|trains]], and bases designed for divisions of the [[RED]] and [[BLU]] teams all being prominent features. |
| − | + | Freight was included in the {{Patch name|4|28|2010}} as an official [[Community map|community developed map]] due to its outstanding quality. | |
| − | |||
| − | ==Locations== | + | == Locations == |
| − | + | {{HelpfulOverviewNote}}<br> | |
| − | + | Freight contains one middle point [[Ambushing|flanked]] by two buildings, and two symmetrical bases that correspond to either team. There are also two yards, and a final area which contains train tracks. | |
| − | |||
| − | |||
| − | |||
| − | The central point is located between two train tracks on opposing sides which mark the end of each team's yard. To the direct left and right of the point are two buildings | + | === Control Point 3 === |
| + | The central point is located between two train tracks on opposing sides, which mark the end of each team's yard. To the direct left and right of the point are two '''central buildings''' with slanted roof areas that players can stand on. This point is bordered by the team's yards, which each contain a separate staircase that is instantly accessible from the base exits, and plateaus into a [[Sniper]] deck. The yard also contains a health pack and an ammo pack located behind a concrete block, which can be used for cover. | ||
| − | + | * '''Flank/Stairs''': On the close side of each team's mid area is the flank. It can be accessed from the top of the stairs at the far side of the mid area, which leads to a small drop onto the train tracks. | |
| + | * '''Wall''': Parallel to the central building, and separated by the point, are the walls. The walls have two openings that lead into each team's yard and waterway entrance. There are a set of stairs on the opposite side of the wall to the point, which lead to a platform at the top of the wall. This is a very common spot for [[Sniper]]s. | ||
| + | * '''Water''': The waterway runs under the entire mid area, and is mainly entered from behind each team's wall. The waterways lead to an opening on the enemy's side of the mid area next to the point. | ||
| + | * '''Yard''': Outside the entrances to each team's main building is the yard. It is an open area containing the main waterway canal, the wall, and the third forward respawn gates. | ||
| − | == | + | <gallery widths=150px heights=90px> |
| − | + | File:freight2.png|Entrances to Point 2/4 building. | |
| + | File:freight3.png|Middle Point. | ||
| + | File:freight4.png|Well tunnels leading to mid. | ||
| + | File:freight5.png|Spawn for those who have capped Point 4. | ||
| + | </gallery> | ||
| − | ===Control Points | + | === Control Points 2 & 4 === |
| − | + | Control Points 2 & 4 are located in each team's main buildings. The main buildings consist of small corridors and tight spaces. With only two entrances, both being narrow hallways, this is by far the hardest control point to capture on the map, especially if the enemy has a [[Sentry Gun]] set up. | |
| − | <gallery> | + | |
| − | + | * '''Main Entrance''': From the defender's perspective, the main entrance is on the left. It is mostly used when making large attacks as it exits out directly in front of the point. In front of the swing door when entering is a window on the wall of the second floor of the building, only accessible for the defenders. | |
| − | + | * '''Flank Entrance''': The flank entrance is the only other entrance to the main building. It enters down to the main hallway behind the point. | |
| − | + | * '''Well Room''': Between the entrances is the well room, which contains a drop-down to the waterway. | |
| + | * '''Second Floor''': The second floor runs through the inner part of the building behind the point. It leads to a balcony overlooking the point, the small room above the main entrance ramp, and the small flank room directly across from the final point. The second floor is directly accessible by a staircase near the short exit and another staircase by the yard exit. | ||
| + | * '''Short Exit''': The short exit is the exit closest to the point. It exits out directly to a ramp, which plateaus right in front of the final point. | ||
| + | * '''Yard Exit''': The yard exit is located at the end of the hallway behind the point. It exits out across from the final point, at the basin of the yard. | ||
| + | |||
| + | <gallery widths=150px heights=90px perrow=5> | ||
| + | File:freight6.png|Spawn for those who have capped mid. | ||
| + | File:freight7.png|Main entrance hallway to the second point. | ||
| + | File:freight8.png|Other entrance hallway. | ||
| + | File:freight9.png|Well room. | ||
| + | File:freight10.png|Second Point. | ||
</gallery> | </gallery> | ||
| − | == | + | === Control Points 1 & 5 === |
| − | + | These control points are closest to each team's respawn. At round start, they belong to the team closest to it. They are directly outside the respawn and are in between two sets of train tracks. From this area, there are three exits: | |
| − | |||
| − | |||
| − | + | * '''Basin''': The open area in front of the point is the basin. It leads to two of the exits: The flank exit to the right, and the main yard exit next to it. The basin has a concrete block and barrier, which can be used for cover by players. | |
| − | * | + | * '''Tracks''': The point is located between two train tracks, which at random times will have trains crossing them. On the spawn side of the point is a barrier that covers the point from being directly attacked from the spawn rooms. |
| − | + | * '''Crates''': Behind the point barrier is a stack of crates and roofing tiles, which can be jumped on for a vantage of the whole area. This is a common spot for Snipers and Sentry Guns. | |
| − | * | ||
| − | == Control Point | + | <gallery widths=150px heights=90px perrow=5> |
| + | File:freight11.png|One of two spawn rooms. | ||
| + | File:freight12.png|The other spawn room. | ||
| + | File:freight13.png|Final Point. | ||
| + | </gallery> | ||
| + | |||
| + | == Helpful overview == | ||
| + | [[File:Freight overview with lines.png|left|Freight's locations|600px]] | ||
| + | <big>1.Central buildings | ||
| + | 2.Yard | ||
| + | 3.Stairs | ||
| + | 4.Water | ||
| + | 5.Main entrance | ||
| + | 6.Flank entrance | ||
| + | 7.Yard exit | ||
| + | 8.Stairs to the second floor | ||
| + | 9.Yard</big> | ||
| + | |||
| + | {{clr}} | ||
| + | == Strategy == | ||
| + | {{map strategy link|Freight|main=yes|stub=yes}} | ||
| + | |||
| + | == Control Point timing == | ||
{{Control Point Timing/Official Map}} | {{Control Point Timing/Official Map}} | ||
| + | == Update history == | ||
| + | '''{{Patch name|4|28|2010}}''' | ||
| + | * Added Freight to the game. | ||
| + | |||
| + | == Trivia == | ||
| + | * Although <code>CP_Freight</code> and <code>CP_Freight_Final</code> both exist, the version that was added to the game as an official map is <code>CP_Freight_final1</code>, yet another tweaked version of the map. | ||
| + | * An unofficial [[Arena]] iteration of this map by the same creators also exists. | ||
| + | * The developer's initials, JM, can be found in a hidden room underneath the middle point; the initials are only reachable via the noclip command. | ||
| + | * The picture on the loading screen when loading Freight is of the beta version of Freight. | ||
| + | |||
| + | {{Maps Nav}} | ||
| − | + | [[Category:Quickplay maps]] | |
Latest revision as of 16:20, 19 April 2024
| Freight | |
|---|---|

| |
| Basic Information | |
| Map type: | Control Point |
| File name: | cp_freight_final1
|
| Released: | April 28, 2010 Patch |
| Developer(s): | Jamie "Fishbus" Manson Mitch "ol" Robb |
| Map Info | |
| Environment: | Desert / Industrial |
| Setting: | Daylight, sunny |
| Hazards: | Trains |
| Deep Water: | Yes |
| Map Items | |
| Map Photos | |
 | |
| Map Overview | |
 | |
| Map Stamp | |
| Supporters Leaderboard | |
Freight is a community-created Standard Control Point map. It shares many similarities with the map Well, with underwater routes, modified trains, and bases designed for divisions of the RED and BLU teams all being prominent features.
Freight was included in the April 28, 2010 Patch as an official community developed map due to its outstanding quality.
Contents
Locations
Note: If you are having trouble with finding the locations listed here, see the Helpful overview section to see their exact position marked on the map.
Freight contains one middle point flanked by two buildings, and two symmetrical bases that correspond to either team. There are also two yards, and a final area which contains train tracks.
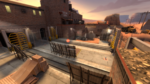
Control Point 3
The central point is located between two train tracks on opposing sides, which mark the end of each team's yard. To the direct left and right of the point are two central buildings with slanted roof areas that players can stand on. This point is bordered by the team's yards, which each contain a separate staircase that is instantly accessible from the base exits, and plateaus into a Sniper deck. The yard also contains a health pack and an ammo pack located behind a concrete block, which can be used for cover.
- Flank/Stairs: On the close side of each team's mid area is the flank. It can be accessed from the top of the stairs at the far side of the mid area, which leads to a small drop onto the train tracks.
- Wall: Parallel to the central building, and separated by the point, are the walls. The walls have two openings that lead into each team's yard and waterway entrance. There are a set of stairs on the opposite side of the wall to the point, which lead to a platform at the top of the wall. This is a very common spot for Snipers.
- Water: The waterway runs under the entire mid area, and is mainly entered from behind each team's wall. The waterways lead to an opening on the enemy's side of the mid area next to the point.
- Yard: Outside the entrances to each team's main building is the yard. It is an open area containing the main waterway canal, the wall, and the third forward respawn gates.
Entrances to Point 2/4 building.

Middle Point.

Well tunnels leading to mid.

Spawn for those who have capped Point 4.


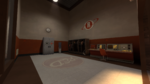
Control Points 2 & 4
Control Points 2 & 4 are located in each team's main buildings. The main buildings consist of small corridors and tight spaces. With only two entrances, both being narrow hallways, this is by far the hardest control point to capture on the map, especially if the enemy has a Sentry Gun set up.
- Main Entrance: From the defender's perspective, the main entrance is on the left. It is mostly used when making large attacks as it exits out directly in front of the point. In front of the swing door when entering is a window on the wall of the second floor of the building, only accessible for the defenders.
- Flank Entrance: The flank entrance is the only other entrance to the main building. It enters down to the main hallway behind the point.
- Well Room: Between the entrances is the well room, which contains a drop-down to the waterway.
- Second Floor: The second floor runs through the inner part of the building behind the point. It leads to a balcony overlooking the point, the small room above the main entrance ramp, and the small flank room directly across from the final point. The second floor is directly accessible by a staircase near the short exit and another staircase by the yard exit.
- Short Exit: The short exit is the exit closest to the point. It exits out directly to a ramp, which plateaus right in front of the final point.
- Yard Exit: The yard exit is located at the end of the hallway behind the point. It exits out across from the final point, at the basin of the yard.
Spawn for those who have capped mid.
Main entrance hallway to the second point.
Other entrance hallway.
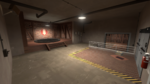
Well room.

Second Point.


Control Points 1 & 5
These control points are closest to each team's respawn. At round start, they belong to the team closest to it. They are directly outside the respawn and are in between two sets of train tracks. From this area, there are three exits:
- Basin: The open area in front of the point is the basin. It leads to two of the exits: The flank exit to the right, and the main yard exit next to it. The basin has a concrete block and barrier, which can be used for cover by players.
- Tracks: The point is located between two train tracks, which at random times will have trains crossing them. On the spawn side of the point is a barrier that covers the point from being directly attacked from the spawn rooms.
- Crates: Behind the point barrier is a stack of crates and roofing tiles, which can be jumped on for a vantage of the whole area. This is a common spot for Snipers and Sentry Guns.
One of two spawn rooms.

The other spawn room.
Final Point.


Helpful overview

1.Central buildings
2.Yard
3.Stairs
4.Water
5.Main entrance
6.Flank entrance
7.Yard exit
8.Stairs to the second floor
9.Yard
Strategy
 | “Sun Tzu's got nothing on us!” This map's Community strategy page is a stub. As such, it is not complete. You can help the Team Fortress Wiki Community Strategy Project by expanding it. Notes: None added |
Control Point timing
| Control Point | Multiplier | Seconds | ||
|---|---|---|---|---|
| Control Point 1 and 5 | ×1 |
| ||
| ×2 |
| |||
| ×3 |
| |||
| ×4 |
| |||
| Control Point 2 and 4 | ×1 |
| ||
| ×2 |
| |||
| ×3 |
| |||
| ×4 |
| |||
| Control Point 3 | ×1 |
| ||
| ×2 |
| |||
| ×3 |
| |||
| ×4 |
|
Update history
- Added Freight to the game.
Trivia
- Although
CP_FreightandCP_Freight_Finalboth exist, the version that was added to the game as an official map isCP_Freight_final1, yet another tweaked version of the map. - An unofficial Arena iteration of this map by the same creators also exists.
- The developer's initials, JM, can be found in a hidden room underneath the middle point; the initials are only reachable via the noclip command.
- The picture on the loading screen when loading Freight is of the beta version of Freight.