Difference between revisions of "User:Foxbite/Sandbox/1"
m (→{{TF2B|Overview}}) |
m (→{{TF2B|Overview}}: minor adjustments, might cut one of the approval-related states out) |
||
| (43 intermediate revisions by 2 users not shown) | |||
| Line 4: | Line 4: | ||
| TBD | | TBD | ||
| In progress<sup>(incl. these not approved)</sup> | | In progress<sup>(incl. these not approved)</sup> | ||
| − | | Approved | + | | Awaiting approval / Approved |
| Null<sup>(no old overview)</sup> | | Null<sup>(no old overview)</sup> | ||
|- | |- | ||
| ⌛ | | ⌛ | ||
| ⚒️ | | ⚒️ | ||
| − | | ☑️ | + | | ☑️/✅ |
| ❌ | | ❌ | ||
|- | |- | ||
| − | |||
| − | |||
| 0 | | 0 | ||
| − | | | + | | 125 |
| + | | 0 / 0 | ||
| + | | 2 | ||
|} | |} | ||
[[User:Lolimsogreat21/Sandbox2/Scout|Lolimsogreat21's Sandbox]] {{clr}} | [[User:Lolimsogreat21/Sandbox2/Scout|Lolimsogreat21's Sandbox]] {{clr}} | ||
| − | <b>last upd | + | <b>last upd 22/Feb/22</b> |
| + | ---- | ||
| + | <i>Notes</i> | ||
| + | # <s>I haven't changed much when transfering maps from the sandbox, therefore they still use the private version of the template. Idk if moving to it can theoretically break anything.</s> | ||
| + | # I've also noticed that some overlays are laid out on overview files different from these placed on the respective articles, some were likely recently updated and are straight up broken. This all will have to be re-checked, together with grammar and naming conventions. That's why we have two ticked states here. | ||
| + | ::-[[File:User Foxbite avatar.jpg|20px|link=User:Foxbite]]<tt style="font-size:13px">foxbite</tt> <sup>([[User talk:Foxbite|<tt>talk</tt>]]) ⨯ ([[Special:Contributions/Foxbite|<tt>contribs</tt>]])</sup> 10:04, 12 January 2022 (UTC) | ||
| − | * Current issues: | + | * Current major issues: |
** No way to implement the template properly on symmetrical maps | ** No way to implement the template properly on symmetrical maps | ||
| − | ** Marking CPs (some overlays have it some don't) | + | ** <s>Marking CPs (some overlays have it some don't)</s> <sup>''Resolved as of Jan 30th in the [[User:Wookipan/Map overview|private branch]]''</sup> |
| − | |||
| − | <b>PL(+R)</b>: | + | <b>PL(+R)</b>: 32/33 {{clr}} |
| − | <b>CP</b>: | + | <b>CP</b>: 35/36 <i>(Issues)</i>👀 {{clr}} |
| − | <b>KOTH</b>: | + | <b>KOTH</b>: 25/25 <i>(Issues)</i>👀 {{clr}} |
| − | <b>CTF</b>: | + | <b>CTF</b>: 9/9 <I>(Issues)</i>👀 {{clr}} |
<b>PD</b>: 6/6 {{clr}} | <b>PD</b>: 6/6 {{clr}} | ||
<b>ARENA</b>: 11/11 {{clr}} | <b>ARENA</b>: 11/11 {{clr}} | ||
<b>MVM</b>: 7/7 (?) {{clr}} | <b>MVM</b>: 7/7 (?) {{clr}} | ||
| − | Total: | + | Total: 125/127 |
---- | ---- | ||
| − | Overall:<b>Drafts</b> {{Percentage bar| | + | Overall:<b>Drafts</b> {{Percentage bar|125|total=127|width=413px|border=none|padding=3px 0 0 1px|color2=#eee}} |
Overall:<b>Approval</b> {{Percentage bar|0|total=127|width=413px|border=none|padding=3px 0 0 1px|color2=#eee}} | Overall:<b>Approval</b> {{Percentage bar|0|total=127|width=413px|border=none|padding=3px 0 0 1px|color2=#eee}} | ||
---- | ---- | ||
| Line 59: | Line 63: | ||
| ⚒️ | | ⚒️ | ||
| ❌ | | ❌ | ||
| − | |||
| ⚒️ | | ⚒️ | ||
| − | | | + | | ⚒️ |
| − | | | + | | ⚒️⚒️⚒️ |
| + | | ⚒️ | ||
| ⚒️⚒️⚒️ | | ⚒️⚒️⚒️ | ||
| ⚒️ | | ⚒️ | ||
| Line 82: | Line 86: | ||
|- | |- | ||
| ⚒️ | | ⚒️ | ||
| − | | | + | | ⚒️⚒️⚒️ |
| + | | ⚒️ | ||
| ⚒️ | | ⚒️ | ||
| − | |||
| ⚒️ | | ⚒️ | ||
| ⚒️ | | ⚒️ | ||
| ⚒️ | | ⚒️ | ||
| ⚒️ | | ⚒️ | ||
| − | | | + | | ⚒️⚒️⚒️ |
| ⚒️⚒️ | | ⚒️⚒️ | ||
| ⚒️ | | ⚒️ | ||
| Line 114: | Line 118: | ||
| [[Standin]] | | [[Standin]] | ||
|- | |- | ||
| − | | | + | | ⚒️ |
| ⚒️ | | ⚒️ | ||
| ⚒️ | | ⚒️ | ||
| Line 147: | Line 151: | ||
| ⚒️ | | ⚒️ | ||
| ⚒️ | | ⚒️ | ||
| − | | | + | | ⚒️ |
|- | |- | ||
| [[Metalworks]] | | [[Metalworks]] | ||
| Line 182: | Line 186: | ||
| ⚒️ | | ⚒️ | ||
| ⚒️ | | ⚒️ | ||
| − | | | + | | ⚒️ |
| ⚒️ | | ⚒️ | ||
| ⚒️⚒️ | | ⚒️⚒️ | ||
| Line 214: | Line 218: | ||
| ⚒️ | | ⚒️ | ||
| ⚒️ | | ⚒️ | ||
| − | | | + | | ⚒️⚒️ |
|- | |- | ||
| style="border-bottom:solid 2px;" rowspan="2" | {{TF2B|CTF}} | | style="border-bottom:solid 2px;" rowspan="2" | {{TF2B|CTF}} | ||
| Line 225: | Line 229: | ||
|- | |- | ||
| style="border-bottom:solid 2px;" | ⚒️⚒️ | | style="border-bottom:solid 2px;" | ⚒️⚒️ | ||
| − | | style="border-bottom:solid 2px;" | | + | | style="border-bottom:solid 2px;" | ⚒️⚒️ |
| style="border-bottom:solid 2px;" | ⚒️⚒️ | | style="border-bottom:solid 2px;" | ⚒️⚒️ | ||
| style="border-bottom:solid 2px;" | ⚒️ | | style="border-bottom:solid 2px;" | ⚒️ | ||
| Line 361: | Line 365: | ||
}} | }} | ||
===== Lolimsogreat21's version ===== | ===== Lolimsogreat21's version ===== | ||
| − | {{ | + | {{Map locations |
| − | | title = Badwater - | + | | title = Badwater - Locations |
| image = Badwater Basin overview cropped.png | | image = Badwater Basin overview cropped.png | ||
| − | | - | + | |- |
| area1 = Side path | | area1 = Side path | ||
| x1 = 220px | | x1 = 220px | ||
| y1 = 485px | | y1 = 485px | ||
| − | |||
| area2 = Cliffs | | area2 = Cliffs | ||
| x2 = 315px | | x2 = 315px | ||
| y2 = 380px | | y2 = 380px | ||
| − | |||
| area3 = Rocks | | area3 = Rocks | ||
| x3 = 385px | | x3 = 385px | ||
| y3 = 330px | | y3 = 330px | ||
| − | |||
| area4 = Bunker | | area4 = Bunker | ||
| x4 = 340px | | x4 = 340px | ||
| y4 = 285px | | y4 = 285px | ||
| − | |||
| area6 = Backroof | | area6 = Backroof | ||
| x6 = 200px | | x6 = 200px | ||
| y6 = 200px | | y6 = 200px | ||
| − | |||
| area7 = Yard | | area7 = Yard | ||
| x7 = 175px | | x7 = 175px | ||
| y7 = 100px | | y7 = 100px | ||
| − | |||
| area8 = Backsteps | | area8 = Backsteps | ||
| x8 = 300px | | x8 = 300px | ||
| y8 = 100px | | y8 = 100px | ||
| − | + | | area9 = Roof | |
| − | | area9= Roof | ||
| x9 = 340px | | x9 = 340px | ||
| y9 = 150px | | y9 = 150px | ||
| − | |||
| area5 = Front steps | | area5 = Front steps | ||
| x5 = 350px | | x5 = 350px | ||
| y5 = 220px | | y5 = 220px | ||
| − | |||
| area10 = Side room | | area10 = Side room | ||
| x10 = 450px | | x10 = 450px | ||
| y10 = 85px | | y10 = 85px | ||
| − | |||
| area11 = Bridge | | area11 = Bridge | ||
| x11 = 530px | | x11 = 530px | ||
| y11 = 100px | | y11 = 100px | ||
| − | |||
| area12 = Attic | | area12 = Attic | ||
| x12 = 650px | | x12 = 650px | ||
| y12 = 90px | | y12 = 90px | ||
| − | |||
| area13 = Alley | | area13 = Alley | ||
| x13 = 640px | | x13 = 640px | ||
| y13 = 190px | | y13 = 190px | ||
| − | |||
| area14 = Chicken wire room | | area14 = Chicken wire room | ||
| x14 = 699px | | x14 = 699px | ||
| y14 = 210px | | y14 = 210px | ||
| − | |||
| area15 = Sniper's hut | | area15 = Sniper's hut | ||
| x15 = 650px | | x15 = 650px | ||
| y15 = 250px | | y15 = 250px | ||
| − | |||
| area16 = Back Yard | | area16 = Back Yard | ||
| x16 = 690px | | x16 = 690px | ||
| y16 = 300px | | y16 = 300px | ||
| − | |||
| area17 = Platforms | | area17 = Platforms | ||
| x17 = 590px | | x17 = 590px | ||
| y17 = 300px | | y17 = 300px | ||
| − | |||
| area18 = Pit | | area18 = Pit | ||
| x18 = 550px | | x18 = 550px | ||
| y18 = 250px | | y18 = 250px | ||
| − | |||
| area19 = Map room | | area19 = Map room | ||
| x19 = 525px | | x19 = 525px | ||
| Line 512: | Line 498: | ||
}} | }} | ||
===== Lolimsogreat21's version ===== | ===== Lolimsogreat21's version ===== | ||
| − | {{ | + | {{Map locations |
| − | | title = Bloodwater - | + | | title = Bloodwater - Locations |
| image = Bloodwater overview.png | | image = Bloodwater overview.png | ||
| − | | - | + | |- |
| area1 = Side path | | area1 = Side path | ||
| x1 = 220px | | x1 = 220px | ||
| y1 = 485px | | y1 = 485px | ||
| − | |||
| area2 = Cliffs | | area2 = Cliffs | ||
| x2 = 265px | | x2 = 265px | ||
| y2 = 370px | | y2 = 370px | ||
| − | |||
| area3 = Rocks | | area3 = Rocks | ||
| x3 = 340px | | x3 = 340px | ||
| y3 = 330px | | y3 = 330px | ||
| − | |||
| area4 = Bunker | | area4 = Bunker | ||
| x4 = 315px | | x4 = 315px | ||
| y4 = 285px | | y4 = 285px | ||
| − | |||
| area6 = Backroof | | area6 = Backroof | ||
| x6 = 200px | | x6 = 200px | ||
| y6 = 220px | | y6 = 220px | ||
| − | |||
| area7 = Yard | | area7 = Yard | ||
| x7 = 170px | | x7 = 170px | ||
| y7 = 140px | | y7 = 140px | ||
| − | |||
| area8 = Backsteps | | area8 = Backsteps | ||
| x8 = 250px | | x8 = 250px | ||
| y8 = 125px | | y8 = 125px | ||
| − | |||
| area9= Roof | | area9= Roof | ||
| x9 = 300px | | x9 = 300px | ||
| y9 = 140px | | y9 = 140px | ||
| − | |||
| area5 = Front steps | | area5 = Front steps | ||
| x5 = 300px | | x5 = 300px | ||
| y5 = 230px | | y5 = 230px | ||
| − | |||
| area10 = Side room | | area10 = Side room | ||
| x10 = 400px | | x10 = 400px | ||
| y10 = 85px | | y10 = 85px | ||
| − | |||
| area11 = Bridge | | area11 = Bridge | ||
| x11 = 470px | | x11 = 470px | ||
| y11 = 130px | | y11 = 130px | ||
| − | |||
| area12 = Attic | | area12 = Attic | ||
| x12 = 570px | | x12 = 570px | ||
| y12 = 90px | | y12 = 90px | ||
| − | |||
| area13 = Alley | | area13 = Alley | ||
| x13 = 600px | | x13 = 600px | ||
| y13 = 180px | | y13 = 180px | ||
| − | |||
| area14 = Chicken wire room | | area14 = Chicken wire room | ||
| x14 = 610px | | x14 = 610px | ||
| y14 = 210px | | y14 = 210px | ||
| − | |||
| area15 = Sniper's hut | | area15 = Sniper's hut | ||
| x15 = 585px | | x15 = 585px | ||
| y15 = 260px | | y15 = 260px | ||
| − | |||
| area16 = Back Yard | | area16 = Back Yard | ||
| x16 = 600px | | x16 = 600px | ||
| y16 = 310px | | y16 = 310px | ||
| − | |||
| area17 = Platforms | | area17 = Platforms | ||
| x17 = 490px | | x17 = 490px | ||
| y17 = 320px | | y17 = 320px | ||
| − | |||
| area18 = Pit | | area18 = Pit | ||
| x18 = 490px | | x18 = 490px | ||
| y18 = 260px | | y18 = 260px | ||
| − | |||
| area19 = Map room | | area19 = Map room | ||
| x19 = 480px | | x19 = 480px | ||
| Line 670: | Line 638: | ||
}} | }} | ||
===== Lolimsogreat21's version ===== | ===== Lolimsogreat21's version ===== | ||
| − | {{ | + | {{Map locations |
| − | | title = Barnblitz - | + | | title = Barnblitz - Locations |
| image = Barnblitz overview.png | | image = Barnblitz overview.png | ||
| - | | - | ||
| Line 678: | Line 646: | ||
| xA = 650px | | xA = 650px | ||
| yA = 225px | | yA = 225px | ||
| − | |||
| spawn2 = BLU second spawn | | spawn2 = BLU second spawn | ||
| spawn-color2 = blu | | spawn-color2 = blu | ||
| xB = 345px | | xB = 345px | ||
| yB = 135px | | yB = 135px | ||
| − | |||
| spawn3 = RED first spawn | | spawn3 = RED first spawn | ||
| spawn color3 = red | | spawn color3 = red | ||
| xC = 280px | | xC = 280px | ||
| yC= 230px | | yC= 230px | ||
| − | |||
| spawn4 = RED second spawn | | spawn4 = RED second spawn | ||
| spawn color4 = red | | spawn color4 = red | ||
| xD = 100px | | xD = 100px | ||
| yD = 240px | | yD = 240px | ||
| − | |||
| spawn5 = RED final spawn | | spawn5 = RED final spawn | ||
| spawn color5 = red | | spawn color5 = red | ||
| Line 702: | Line 666: | ||
| x1 = 550px | | x1 = 550px | ||
| y1 = 230px | | y1 = 230px | ||
| − | |||
| area2 = Approach | | area2 = Approach | ||
| x2 = 480px | | x2 = 480px | ||
| y2 = 170px | | y2 = 170px | ||
| − | |||
| area3 = Left shed | | area3 = Left shed | ||
| x3 = 485px | | x3 = 485px | ||
| y3 = 265px | | y3 = 265px | ||
| − | |||
| area4 = Platform | | area4 = Platform | ||
| x4 = 420px | | x4 = 420px | ||
| y4 = 270px | | y4 = 270px | ||
| − | |||
| area5 = Defender's yard | | area5 = Defender's yard | ||
| x5 = 370px | | x5 = 370px | ||
| y5 = 210px | | y5 = 210px | ||
| − | |||
| area6 = Entrance | | area6 = Entrance | ||
| x6 = 325px | | x6 = 325px | ||
| y6 = 255px | | y6 = 255px | ||
| − | |||
| area7 = Dropdown | | area7 = Dropdown | ||
| x7 = 360px | | x7 = 360px | ||
| y7 = 320px | | y7 = 320px | ||
| − | |||
| area8 = Upper level | | area8 = Upper level | ||
| x8 = 260px | | x8 = 260px | ||
| y8 = 320px | | y8 = 320px | ||
| − | |||
| area9 = House entrance | | area9 = House entrance | ||
| x9 = 170px | | x9 = 170px | ||
| y9 = 300px | | y9 = 300px | ||
| − | |||
| area10 = Second story | | area10 = Second story | ||
| x10 = 130px | | x10 = 130px | ||
| y10 = 290px | | y10 = 290px | ||
| − | |||
| area11 = Third story | | area11 = Third story | ||
| x11 = 130px | | x11 = 130px | ||
| y11 = 230px | | y11 = 230px | ||
| − | |||
| area12 = Roof | | area12 = Roof | ||
| x12 = 170px | | x12 = 170px | ||
| y12 = 240px | | y12 = 240px | ||
| − | |||
| area13 = Left entrance | | area13 = Left entrance | ||
| x13 = 160px | | x13 = 160px | ||
| y13 = 160px | | y13 = 160px | ||
| − | |||
| area14 = Main entrance | | area14 = Main entrance | ||
| x14 = 220px | | x14 = 220px | ||
| y14 = 170px | | y14 = 170px | ||
| − | |||
| area15 = Right entrance | | area15 = Right entrance | ||
| x15 = 270px | | x15 = 270px | ||
| Line 818: | Line 768: | ||
}} | }} | ||
===== Lolimsogreat21's version ===== | ===== Lolimsogreat21's version ===== | ||
| − | {{ | + | {{Map locations |
| − | | title = Borneo - | + | | title = Borneo - Locations |
| image = Borneo overview.png | | image = Borneo overview.png | ||
| − | | - | + | |- |
| spawn1 = BLU first spawn | | spawn1 = BLU first spawn | ||
| spawn-color1 = blu | | spawn-color1 = blu | ||
| xA = 353px | | xA = 353px | ||
| yA = 900px | | yA = 900px | ||
| − | |||
| spawn2 = BLU second spawn | | spawn2 = BLU second spawn | ||
| spawn-color2 = blu | | spawn-color2 = blu | ||
| xB = 490px | | xB = 490px | ||
| yB = 710px | | yB = 710px | ||
| − | |||
| spawn3 = BLU third spawn | | spawn3 = BLU third spawn | ||
| spawn-color3 = blu | | spawn-color3 = blu | ||
| xC = 360px | | xC = 360px | ||
| yC = 490px | | yC = 490px | ||
| − | |||
| spawn4 = RED first spawn | | spawn4 = RED first spawn | ||
| spawn-color4 = red | | spawn-color4 = red | ||
| xD = 430px | | xD = 430px | ||
| yD= 400px | | yD= 400px | ||
| − | |||
| spawn5 = RED second spawn | | spawn5 = RED second spawn | ||
| spawn-color5 = red | | spawn-color5 = red | ||
| xE = 300px | | xE = 300px | ||
| yE = 10px | | yE = 10px | ||
| − | | - | + | |- |
| area1 = Shed | | area1 = Shed | ||
| x1 = 369px | | x1 = 369px | ||
| y1 = 812px | | y1 = 812px | ||
| − | |||
| area2 = Small house | | area2 = Small house | ||
| x2 = 278px | | x2 = 278px | ||
| y2 = 754px | | y2 = 754px | ||
| − | |||
| area3 = Maintenance building | | area3 = Maintenance building | ||
| x3 = 423px | | x3 = 423px | ||
| y3 = 703px | | y3 = 703px | ||
| − | |||
| area4 = Grey structure | | area4 = Grey structure | ||
| x4 = 591px | | x4 = 591px | ||
| y4 = 637px | | y4 = 637px | ||
| − | |||
| area5 = Bridge | | area5 = Bridge | ||
| x5 = 535px | | x5 = 535px | ||
| y5 = 580px | | y5 = 580px | ||
| − | |||
| area6 = Hill interior | | area6 = Hill interior | ||
| x6 = 436px | | x6 = 436px | ||
| y6 = 531px | | y6 = 531px | ||
| − | |||
| area7 = Tunnel | | area7 = Tunnel | ||
| x7 = 519px | | x7 = 519px | ||
| y7 = 456px | | y7 = 456px | ||
| − | |||
| area8 = Giant garage | | area8 = Giant garage | ||
| x8 = 324px | | x8 = 324px | ||
| y8 = 362px | | y8 = 362px | ||
| − | |||
| area9 = Casali building | | area9 = Casali building | ||
| x9 = 353px | | x9 = 353px | ||
| Line 884: | Line 822: | ||
}} | }} | ||
---- | ---- | ||
| − | ==== Bread | + | ==== Bread Space ==== |
---- | ---- | ||
| + | |||
==== Brimstone ==== | ==== Brimstone ==== | ||
===== Old ===== | ===== Old ===== | ||
[[File:Brimstone_(map)_overview_with_lines.png|800px|center]] | [[File:Brimstone_(map)_overview_with_lines.png|800px|center]] | ||
| + | ===== Lolimsogreat21's version ===== | ||
| + | {{Map locations | ||
| + | | title = Brimstone - Locations | ||
| + | | image = Brimstone (map) overview.png | ||
| + | |- | ||
| + | | spawn1 = BLU first spawn | ||
| + | | spawn-color1 = blu | ||
| + | | xA = 287px | ||
| + | | yA = 1166px | ||
| + | | spawn2 = BLU second spawn | ||
| + | | spawn-color2 = blu | ||
| + | | xB = 641px | ||
| + | | yB = 685px | ||
| + | | spawn3 = RED first spawn | ||
| + | | spawn-color3 = red | ||
| + | | xC = 300px | ||
| + | | yC = 467px | ||
| + | | spawn4 = RED second spawn | ||
| + | | spawn-color4 = red | ||
| + | | xD = 304px | ||
| + | | yD = 367px | ||
| + | | spawn5 = RED third spawn | ||
| + | | spawn-color5 = red | ||
| + | | xE = 330px | ||
| + | | yE = 70px | ||
| + | |- | ||
| + | | area1 = Lumber mill | ||
| + | | x1 = 470px | ||
| + | | y1 = 1178px | ||
| + | | area2 = Garage | ||
| + | | x2 = 676px | ||
| + | | y2 = 971px | ||
| + | | area3 = Wet paint! | ||
| + | | x3 = 597px | ||
| + | | y3 = 835px | ||
| + | | area4 = Shortcut to B | ||
| + | | x4 = 449px | ||
| + | | y4 = 836px | ||
| + | | area5 = Library | ||
| + | | x5 = 281px | ||
| + | | y5 = 755px | ||
| + | | area6 = Dump truck | ||
| + | | x6 = 357px | ||
| + | | y6 = 672px | ||
| + | | area7 = Brick building | ||
| + | | x7 = 627px | ||
| + | | y7 = 548px | ||
| + | | area8 = Warehouse | ||
| + | | x8 = 526px | ||
| + | | y8 = 369px | ||
| + | | area9 = Sniper's nest | ||
| + | | x9 = 139px | ||
| + | | y9 = 150px | ||
| + | }} | ||
| + | |||
---- | ---- | ||
| + | |||
==== Chilly ==== | ==== Chilly ==== | ||
| − | + | ===== Brand new ===== | |
| − | ==== | + | {{Map locations |
| − | + | | title = Chilly - Locations | |
| − | = | + | | image = Chilly overview.png |
| − | = | + | |- |
| − | + | | spawn1 = BLU first spawn | |
| − | - | + | | spawn-color1 = blu |
| − | ==== | + | | xA = 610px |
| − | ==== | + | | yA = 150px |
| − | + | | spawn2 = BLU second spawn | |
| − | + | | spawn-color2 = blu | |
| − | + | | xB = 285px | |
| − | + | | yB = 140px | |
| − | + | | spawn3 = RED first spawn | |
| − | = | + | | spawn-color3 = red |
| − | + | | xC = 330px | |
| − | | | + | | yC = 255px |
| − | | | + | | spawn4 = RED second spawn |
| − | | - | + | | spawn-color4 = red |
| − | | | + | | xD = 260px |
| − | | x1 = | + | | yD = 180px |
| − | | y1 = | + | | spawn5 = RED third spawn |
| − | | area2 = | + | | spawn-color5 = red |
| − | | x2 = | + | | xE = 105px |
| − | | y2 = | + | | yE = 310px |
| − | | area3 = | + | |- |
| − | | x3 = | + | | area1 = Front Yard |
| − | | y3 = | + | | x1 = 550px |
| − | | area4 = | + | | y1 = 180px |
| − | | x4 = | + | | area2 = Low Hanging Roof |
| − | | y4 = | + | | x2 = 540px |
| − | | area5 = | + | | y2 = 225px |
| − | | x5 = | + | | area3 = RED shed |
| − | | y5 = | + | | x3 = 495px |
| − | | area6 = | + | | y3 = 190px |
| − | | x6 = | + | | area4 = Rocks |
| − | | y6 = | + | | x4 = 475px |
| − | | area7 = | + | | y4 = 225px |
| − | | x7 = | + | | area5 = Crossing |
| − | | y7 = | + | | x5 = 440px |
| − | | area8 = | + | | y5 = 205px |
| − | | x8 = | + | | area6 = Slope |
| − | | y8 = | + | | x6 = 420px |
| − | | area9 = | + | | y6 = 230px |
| − | | x9 = | + | | area7 = Cliffside Shed |
| − | | y9 = | + | | x7 = 390px |
| + | | y7 = 300px | ||
| + | | area8 = Old Geeser | ||
| + | | x8 = 390px | ||
| + | | y8 = 230px | ||
| + | | area9 = Bridge | ||
| + | | x9 = 360px | ||
| + | | y9 = 240px | ||
| + | | area10 = Mann Mannor | ||
| + | | x10 = 325px | ||
| + | | y10 = 235px | ||
| + | | area11 = Tree | ||
| + | | x11 = 345px | ||
| + | | y11 = 190px | ||
| + | | area12 = Casali Shafting | ||
| + | | x12 = 250px | ||
| + | | y12 = 240px | ||
| + | | area13 = Flank House | ||
| + | | x13 = 240px | ||
| + | | y13 = 290px | ||
| + | | area14 = Pit | ||
| + | | x14 = 215px | ||
| + | | y14 = 250px | ||
| + | | area15 = Outhouse | ||
| + | | x15 = 180px | ||
| + | | y15 = 270px | ||
}} | }} | ||
| − | ====== Stage | + | ---- |
| − | {{ | + | |
| − | | title = | + | ==== Enclosure ==== |
| − | | image = | + | =====Brand new===== |
| − | | - | + | ======Stage 1====== |
| − | | area1 = | + | {{Map locations |
| − | | x1 = | + | | title = Enclosure, stage one - Locations |
| − | | y1 = | + | | image = Enclosure stage1.png |
| − | | area2 = | + | |- |
| − | | x2 = | + | | spawn1 = BLU spawn |
| − | | y2 = | + | | spawn-color1 = blu |
| − | | area3 = | + | | xA = 573px |
| − | | x3 = | + | | yA = 210px |
| − | | y3 = | + | | spawn2 = RED spawn |
| − | | area4 = | + | | spawn-color2 = red |
| − | | x4 = | + | | xB = 190px |
| − | | y4 = | + | | yB = 0px |
| − | | area5 = | + | |- |
| − | | x5 = | + | | area1 = Chasm |
| − | | y5 = | + | | x1 = 445px |
| − | | area6 = | + | | y1 = 335px |
| − | | x6 = | + | | area2 = Ramps |
| − | | y6 = | + | | x2 = 440px |
| − | | area7 = | + | | y2 = 230px |
| − | | x7 = | + | | area3 = Service Hall |
| − | | y7 = | + | | x3 = 450px |
| − | | area8 = | + | | y3 = 175px |
| − | | x8 = | + | | area4 = High High |
| − | | y8 = | + | | x4 = 345px |
| + | | y4 = 130px | ||
| + | | area5 = Fan Exit | ||
| + | | x5 = 305px | ||
| + | | y5 = 160px | ||
| + | | area6 = Aviary | ||
| + | | x6 = 265px | ||
| + | | y6 = 200px | ||
| + | | area7 = Cage | ||
| + | | x7 = 260px | ||
| + | | y7 = 155px | ||
| + | | area8 = Sorting Shed | ||
| + | | x8 = 225px | ||
| + | | y8 = 100px | ||
| + | | area9 = Amber Mine | ||
| + | | x9 = 215px | ||
| + | | y9 = 50px | ||
| + | | area10 = Restricted Area | ||
| + | | x10 = 175px | ||
| + | | y10 = 165px | ||
}} | }} | ||
| − | ====== Stage 3 ====== | + | |
| − | {{ | + | ======Stage 2====== |
| − | | title = | + | {{Map locations |
| − | | image = | + | | title = Enclosure, stage two - Locations |
| + | | image = Enclosure stage2.png | ||
| + | |- | ||
| + | | spawn1 = BLU spawn | ||
| + | | spawn-color1 = blu | ||
| + | | xA = 415px | ||
| + | | yA = 0px | ||
| + | | spawn2 = RED spawn | ||
| + | | spawn-color2 = red | ||
| + | | xB = 100px | ||
| + | | yB = 230px | ||
| + | |- | ||
| + | | area1 = Stream | ||
| + | | x1 = 460px | ||
| + | | y1 = 85px | ||
| + | | area2 = Trail | ||
| + | | x2 = 385px | ||
| + | | y2 = 145px | ||
| + | | area3 = Security Buildings | ||
| + | | x3 = 460px | ||
| + | | y3 = 155px | ||
| + | | area4 = Brachiosaurus Enclosure | ||
| + | | x4 = 510px | ||
| + | | y4 = 210px | ||
| + | | area5 = Control Room | ||
| + | | x5 = 425px | ||
| + | | y5 = 365px | ||
| + | | area6 = Pipeline | ||
| + | | x6 = 315px | ||
| + | | y6 = 255px | ||
| + | | area7 = Wood Structure | ||
| + | | x7 = 255px | ||
| + | | y7 = 270px | ||
| + | | area8 = Goldbloom | ||
| + | | x8 = 205px | ||
| + | | y8 = 200px | ||
| + | | area9 = Lean to | ||
| + | | x9 = 145px | ||
| + | | y9 = 260px | ||
| + | | area10 = Boathouse | ||
| + | | x10 = 100px | ||
| + | | y10 = 290px | ||
| + | }} | ||
| + | |||
| + | ======Stage 3====== | ||
| + | {{Map locations | ||
| + | | title = Enclosure, stage three - Locations | ||
| + | | image = Enclosure stage3.png | ||
| + | |- | ||
| + | | spawn1 = BLU spawn | ||
| + | | spawn-color1 = blu | ||
| + | | xA = 153px | ||
| + | | yA = 145px | ||
| + | | spawn2 = BLU second spawn | ||
| + | | spawn-color2 = blu | ||
| + | | xB = 485px | ||
| + | | yB = 330px | ||
| + | | spawn3 = RED spawn | ||
| + | | spawn-color3 = red | ||
| + | | xC = 535px | ||
| + | | yC = 330px | ||
| + | |- | ||
| + | | area1 = Raptor Enclosure | ||
| + | | x1 = 315px | ||
| + | | y1 = 210px | ||
| + | | area2 = Maintenance Shed | ||
| + | | x2 = 315px | ||
| + | | y2 = 295px | ||
| + | | area3 = Gate 01 | ||
| + | | x3 = 425px | ||
| + | | y3 = 210px | ||
| + | | area4 = Sector 6 | ||
| + | | x4 = 530px | ||
| + | | y4 = 230px | ||
| + | | area5 = T.rex encounter | ||
| + | | x5 = 605px | ||
| + | | y5 = 300px | ||
| + | }} | ||
| + | ---- | ||
| + | |||
| + | ==== Frontier ==== | ||
| + | ===== Old ===== | ||
| + | [[File:Frontier_overview.with_lines.png|800px|center]] | ||
| + | ===== New ===== | ||
| + | {{Map locations | ||
| + | | title = Frontier - overview indicators | ||
| + | | image = Frontier overview.png | ||
| - | | - | ||
| − | | area1 = | + | | spawn1 = BLU first spawn |
| − | | x1 = | + | | spawn-color1 = blu |
| − | | y1 = | + | | xA = 410px |
| − | | area2 = | + | | yA = 410px |
| − | | x2 = | + | | spawn2 = BLU second spawn/RED first spawn |
| − | | y2 = | + | | spawn-color2 = mix |
| − | | area3 = | + | | xB = 730px |
| − | | x3 = | + | | yB = 260px |
| − | | y3 = | + | | spawn3 = BLU third spawn |
| − | | area4 = | + | | spawn-color3 = blu |
| − | | x4 = | + | | xC = 535px |
| − | | y4 = | + | | yC = 230px |
| − | | area5 = | + | | spawn4 = BLU fourth spawn/RED second spawn |
| − | | x5 = | + | | spawn-color4 = mix |
| − | | y5 = | + | | xD = 465px |
| − | | area6 = | + | | yD = 125px |
| − | | x6 = | + | | spawn5 = RED third spawn |
| − | | y6 = | + | | spawn-color5 = red |
| − | | area7 = | + | | xE = 230px |
| − | | x7 = | + | | yE = 50px |
| − | | y7 = | + | | - |
| − | | area8 = | + | | area1 = Shack |
| − | | x8 = | + | | x1 = 560px |
| − | | y8 = | + | | y1 = 515px |
| − | | area9 = | + | | area2 = Cave |
| − | | x9 = | + | | x2 = 580px |
| − | | y9 = | + | | y2 = 450px |
| − | | area10 = | + | | area3 = Tower |
| − | | x10= | + | | x3 = 650px |
| − | | y10 = | + | | y3 = 380px |
| − | | area11 = | + | | area4 = Cliff |
| − | | x11 = | + | | x4 = 645px |
| − | | y11 = | + | | y4 = 310px |
| − | | area12 = | + | | area5 = Canyon |
| − | | x12 = | + | | x5 = 685px |
| − | | y12 = | + | | y5 = 195px |
| − | }} | + | | area6 = House |
| − | ---- | + | | x6 = 645px |
| − | ==== | + | | y6 = 160px |
| − | ===== Old ===== | + | | area7 = Incline |
| − | [[File: | + | | x7 = 610px |
| + | | y7 = 195px | ||
| + | | area8 = Rock Wall | ||
| + | | x8 = 570px | ||
| + | | y8 = 170px | ||
| + | | area9 = Warehouse | ||
| + | | x9 = 530px | ||
| + | | y9 = 110px | ||
| + | | area10 = Small Shack | ||
| + | | x10 = 465px | ||
| + | | y10 = 75px | ||
| + | | area11 = Second Incline | ||
| + | | x11 = 450px | ||
| + | | y11 = 105px | ||
| + | | area12 = Hollow Building | ||
| + | | x12 = 330px | ||
| + | | y12 = 235px | ||
| + | | area13 = Rock Plateau | ||
| + | | x13 = 340px | ||
| + | | y13 = 185px | ||
| + | | area14 = Red Catwalks | ||
| + | | x14 = 255px | ||
| + | | y14 = 150px | ||
| + | | area15 = Balcony | ||
| + | | x15 = 320px | ||
| + | | y15 = 105px | ||
| + | }} | ||
| + | ---- | ||
| + | |||
| + | ==== Gold Rush ==== | ||
| + | ===== Old ===== | ||
| + | [[File:Stage A but with lines5.jpg|600px|left|Stage 1]] | ||
| + | [[File:Goldrush section2.png|600px|left|Stage 2]] | ||
| + | [[File:Goldrush sectiio3 with lines.png|600px|center|Stage 3]] | ||
| + | {{clr}} | ||
===== Lolimsogreat21's version ===== | ===== Lolimsogreat21's version ===== | ||
| − | + | ====== Stage 1 ====== | |
| − | + | {{Map locations | |
| − | + | | title = Goldrush, stage one - Locations | |
| − | + | | image = GoldrushSection1.jpg | |
| − | + | |- | |
| − | + | | area1 = Elevated tracks | |
| − | + | | x1 = 154px | |
| − | + | | y1 = 70px | |
| − | + | | area2 = Cliffs | |
| − | + | | x2 = 197px | |
| − | + | | y2 = 117px | |
| − | + | | area3 = Hut | |
| − | + | | x3 = 357px | |
| − | + | | y3 = 170px | |
| − | | | + | | area4 = Tunnel |
| − | | | + | | x4 = 480px |
| − | | - | + | | y4 = 30px |
| − | | area1 = | + | | area5 = Imperial building |
| − | | x1 = | + | | x5 = 544px |
| − | | y1 = | + | | y5 = 92px |
| − | | area2 = | + | | area6 = Red deck |
| − | | x2 = | + | | x6 = 591px |
| − | | y2 = | + | | y6 = 139px |
| − | | area3 = | + | | area7 = Ditch |
| − | | x3 = | + | | x7 = 651px |
| − | | y3 = | + | | y7 = 73px |
| − | | area4 = | + | | area8 = Attic |
| − | | x4 = | + | | x8 = 708px |
| − | | y4 = | + | | y8 = 11px |
| − | | area5 = | + | | area9 = Mine shaft |
| − | | x5 = | + | | x9 = 732px |
| − | | y5 = | + | | y9 = 142px |
| − | | area6 = | ||
| − | | x6 = | ||
| − | | y6 = | ||
| − | | area7 = | ||
| − | | x7 = | ||
| − | | y7 = | ||
}} | }} | ||
| − | + | ====== Stage 2 ====== | |
| − | + | {{Map locations | |
| − | + | | title = Goldrush, stage two - Locations | |
| − | + | | image = Gold Rush Section two.png | |
| − | + | |- | |
| − | {{ | + | | area1 = Watchtower |
| − | | title = | + | | x1 = 291px |
| − | | image = | + | | y1 = 258px |
| − | + | | area2 = House | |
| − | + | | x2 = 172px | |
| − | + | | y2 = 218px | |
| − | + | | area3 = Bridge | |
| − | + | | x3 = 225px | |
| − | + | | y3 = 143px | |
| − | + | | area4 = Sniper's ledge | |
| − | + | | x4 = 193px | |
| − | + | | y4 = 51px | |
| − | + | | area5 = Battlement | |
| − | + | | x5 = 445px | |
| − | + | | y5 = 98px | |
| − | + | | area6 = Choke area | |
| − | + | | x6 = 563px | |
| − | + | | y6 = 113px | |
| − | + | | area7 = Main buildings | |
| − | + | | x7 = 631px | |
| − | + | | y7 = 111px | |
| − | + | | area8 = Sentry deck | |
| − | + | | x8 = 678px | |
| − | + | | y8 = 154px | |
| − | | - | ||
| − | | area1 = | ||
| − | | x1 = | ||
| − | | y1 = | ||
| − | | area2 = | ||
| − | | x2 = | ||
| − | | y2 = | ||
| − | | area3 = | ||
| − | | x3 = | ||
| − | | y3 = | ||
| − | | area4 = | ||
| − | | x4 = | ||
| − | | y4 = | ||
| − | | area5 = | ||
| − | | x5 = | ||
| − | | y5 = | ||
| − | | area6 = | ||
| − | | x6 = | ||
| − | | y6 = | ||
}} | }} | ||
| − | + | ====== Stage 3 ====== | |
| − | ==== | ||
| − | |||
| − | |||
| − | |||
| − | |||
| − | |||
| − | |||
{{Map locations | {{Map locations | ||
| − | + | | title = Goldrush, stage three - Locations | |
| − | + | | image = Gold Rush Section three.png | |
| − | + | |- | |
| − | + | | area1 = Truck house | |
| − | + | | x1 = 539px | |
| − | + | | y1 = 360px | |
| − | + | | area2 = Basin | |
| − | + | | x2 = 486px | |
| − | + | | y2 = 391px | |
| − | + | | area3 = Platform | |
| − | + | | x3 = 455px | |
| − | + | | y3 = 429px | |
| − | + | | area4 = Main deck | |
| − | + | | x4 = 389px | |
| − | + | | y4 = 443px | |
| − | + | | area5 = Main hallway | |
| − | + | | x5 = 341px | |
| − | + | | y5 = 401px | |
| − | + | | area6 = Sentry deck | |
| − | + | | x6 = 294px | |
| − | + | | y6 = 333px | |
| − | + | | area7 = Sniper's deck | |
| − | + | | x7 = 274px | |
| − | + | | y7 = 459px | |
| − | + | | area8 = Valley | |
| − | + | | x8 = 199px | |
| − | + | | y8 = 441px | |
| − | + | | area9 = Narrow building | |
| − | + | | x9 = 187px | |
| − | + | | y9 = 354px | |
| − | + | | area10 = Chokepoint | |
| − | + | | x10= 134px | |
| − | + | | y10 = 354px | |
| − | + | | area11 = House | |
| − | + | | x11 = 45px | |
| − | + | | y11 = 386px | |
| − | + | | area12 = Battlements | |
| − | + | | x12 = 77px | |
| − | + | | y12 = 520px | |
| − | + | }} | |
| − | + | ---- | |
| − | + | ==== Gravestone ==== | |
| − | + | ===== Old ===== | |
| − | + | [[File:Gravestone_overview_with_lines.png|800px|center]] | |
| − | + | ===== Lolimsogreat21's version ===== | |
| − | + | {{Map locations | |
| − | + | | title = Gravestone - Locations | |
| − | + | | image = Gravestone overview.png | |
| − | + | |- | |
| − | + | | spawn1 = BLU first spawn | |
| − | + | | spawn-color1 = blu | |
| − | + | | xA = 589px | |
| − | + | | yA = 379px | |
| − | + | | spawn2 = BLU second spawn | |
| − | + | | spawn-color2 = blu | |
| − | + | | xB = 222px | |
| − | + | | yB = 250px | |
| − | + | | spawn3 = RED's only spawn | |
| − | + | | spawn-color3 = red | |
| − | + | | xC = 419px | |
| − | + | | yC = 478px | |
| − | + | |- | |
| − | + | | area1 = Shack | |
| − | + | | x1 = 503px | |
| − | + | | y1 = 324px | |
| + | | area2 = Shortcut | ||
| + | | x2 = 397px | ||
| + | | y2 = 362px | ||
| + | | area3 = Red barn | ||
| + | | x3 = 395px | ||
| + | | y3 = 287px | ||
| + | | area4 = Jimi Jam | ||
| + | | x4 = 426px | ||
| + | | y4 = 222px | ||
| + | | area5 = Kitchen | ||
| + | | x5 = 326px | ||
| + | | y5 = 239px | ||
| + | | area6 = Binski logging sawmill | ||
| + | | x6 = 259px | ||
| + | | y6 = 287px | ||
| + | | area7 = Backyard | ||
| + | | x7 = 220px | ||
| + | | y7 = 437px | ||
}} | }} | ||
| + | ---- | ||
| + | ==== Hellstone ==== | ||
| + | ===== Old ===== | ||
| + | [[File:Hellstone_overview_with_lines.png|800px|center]] | ||
===== Lolimsogreat21's version ===== | ===== Lolimsogreat21's version ===== | ||
| − | {{ | + | {{Map locations |
| − | + | | title = Hellstone - Locations | |
| − | + | | image = Hellstone overview.png | |
| − | + | |- | |
| − | + | | spawn1 = BLU first spawn | |
| − | + | | spawn-color1 = blu | |
| − | + | | xA = 422px | |
| − | + | | yA = 549px | |
| − | + | | spawn2 = BLU second spawn | |
| − | + | | spawn-color2 = blu | |
| − | + | | xB = 670px | |
| − | + | | yB = 310px | |
| − | + | | spawn3 = BLU third spawn | |
| − | + | | spawn-color3 = blu | |
| − | + | | xC = 383px | |
| − | + | | yC = 266px | |
| − | + | | spawn4 = RED first spawn | |
| − | + | | spawn-color4 = red | |
| − | + | | xD = 436px | |
| − | + | | yD = 300px | |
| − | + | | spawn5 = RED final spawn | |
| − | + | | spawn-color5 = red | |
| − | + | | xE = 242px | |
| − | + | | yE = 87px | |
| − | + | |- | |
| − | + | | area1 = Freight House | |
| − | + | | x1 = 362px | |
| − | + | | y1 = 379px | |
| − | + | | area2 = Cubby hole | |
| − | + | | x2 = 472px | |
| − | + | | y2 = 439px | |
| − | + | | area3 = Mine shack | |
| − | + | | x3 = 542px | |
| − | + | | y3 = 380px | |
| − | + | | area4 = Horsemann's house | |
| − | + | | x4 = 575px | |
| − | + | | y4 = 268px | |
| − | + | | area5 = Yard | |
| − | + | | x5 = 507px | |
| − | + | | y5 = 303px | |
| − | + | | area6 = Hells bells | |
| − | + | | x6 = 396px | |
| − | + | | y6 = 236px | |
| − | |||
| − | |||
| − | |||
| − | |||
| − | |||
| − | |||
| − | |||
| − | |||
| − | |||
| − | |||
| − | |||
| − | |||
| − | |||
| − | |||
| − | |||
| − | |||
| − | |||
| − | |||
| − | |||
| − | |||
| − | |||
| − | |||
| − | |||
}} | }} | ||
---- | ---- | ||
| − | ==== | + | ==== Hoodoo ==== |
| + | =====Brand new===== | ||
| + | ======Stage 1====== | ||
| + | {{Map locations | ||
| + | | title = Hoodoo, stage one - Locations | ||
| + | | image = Hoodoo stage1.png | ||
| + | |- | ||
| + | | spawn1 = BLU spawn | ||
| + | | spawn-color1 = blu | ||
| + | | xA = 540px | ||
| + | | yA = 105px | ||
| + | | spawn2 = RED spawn | ||
| + | | spawn-color2 = red | ||
| + | | xB = 175px | ||
| + | | yB = 365px | ||
| + | |- | ||
| + | | area1 = Hoodoos | ||
| + | | x1 = 405px | ||
| + | | y1 = 95px | ||
| + | | area2 = Cliff | ||
| + | | x2 = 395px | ||
| + | | y2 = 150px | ||
| + | | area3 = Shack | ||
| + | | x3 = 270px | ||
| + | | y3 = 90px | ||
| + | | area4 = Gates | ||
| + | | x4 = 275px | ||
| + | | y4 = 195px | ||
| + | | area5 = Side Tunnel | ||
| + | | x5 = 165px | ||
| + | | y5 = 210px | ||
| + | | area6 = Flank | ||
| + | | x6 = 270px | ||
| + | | y6 = 295px | ||
| + | | area7 = Ditch | ||
| + | | x7 = 215px | ||
| + | | y7 = 330px | ||
| + | | area8 = Bridge | ||
| + | | x8 = 175px | ||
| + | | y8 = 330px | ||
| + | }} | ||
| + | |||
| + | ======Stage 2====== | ||
| + | {{Map locations | ||
| + | | title = Hoodoo, stage two - Locations | ||
| + | | image = Hoodoo stage2.png | ||
| + | |- | ||
| + | | spawn1 = BLU spawn | ||
| + | | spawn-color1 = blu | ||
| + | | xA = 720px | ||
| + | | yA = 340px | ||
| + | | spawn2 = RED spawn | ||
| + | | spawn-color2 = red | ||
| + | | xB = 95px | ||
| + | | yB = 200px | ||
| + | |- | ||
| + | | area1 = Mining Building | ||
| + | | x1 = 485px | ||
| + | | y1 = 410px | ||
| + | | area2 = Rocks | ||
| + | | x2 = 495px | ||
| + | | y2 = 335px | ||
| + | | area3 = Side House | ||
| + | | x3 = 530px | ||
| + | | y3 = 210px | ||
| + | | area4 = Tunnels | ||
| + | | x4 = 395px | ||
| + | | y4 = 145px | ||
| + | | area5 = Chokepoint | ||
| + | | x5 = 335px | ||
| + | | y5 = 225px | ||
| + | | area6 = Valley | ||
| + | | x6 = 265px | ||
| + | | y6 = 145px | ||
| + | | area7 = Concrete Platform | ||
| + | | x7 = 265px | ||
| + | | y7 = 95px | ||
| + | }} | ||
| + | |||
| + | ======Stage 3====== | ||
| + | {{Map locations | ||
| + | | title = Hoodoo, stage three - Locations | ||
| + | | image = Hoodoo stage3.png | ||
| + | |- | ||
| + | | spawn1 = BLU spawn | ||
| + | | spawn-color1 = blu | ||
| + | | xA = 715px | ||
| + | | yA = 250px | ||
| + | | spawn2 = RED spawn | ||
| + | | spawn-color2 = red | ||
| + | | xB = 270px | ||
| + | | yB = 200px | ||
| + | |- | ||
| + | | area1 = Side route | ||
| + | | x1 = 645px | ||
| + | | y1 = 220px | ||
| + | | area2 = Grain Shack | ||
| + | | x2 = 590px | ||
| + | | y2 = 230px | ||
| + | | area3 = Metal Bridge | ||
| + | | x3 = 550px | ||
| + | | y3 = 210px | ||
| + | | area4 = Shortcut | ||
| + | | x4 = 515px | ||
| + | | y4 = 170px | ||
| + | | area5 = Propane Tank | ||
| + | | x5 = 515px | ||
| + | | y5 = 120px | ||
| + | | area6 = Sentry Deck | ||
| + | | x6 = 420px | ||
| + | | y6 = 185px | ||
| + | | area7 = Flank | ||
| + | | x7 = 435px | ||
| + | | y7 = 270px | ||
| + | | area8 = Industrial Building | ||
| + | | x8 = 350px | ||
| + | | y8 = 225px | ||
| + | }} | ||
---- | ---- | ||
| − | ==== | + | |
| + | ==== Pier ==== | ||
| + | <i>Well, an overview for this one is already listed as an example by Wookipan</i> | ||
===== Old ===== | ===== Old ===== | ||
| − | [[File: | + | [[File:Pier_overview_with_lines.png|800px|center]] |
| − | ===== | + | ===== Wookipan's version ===== |
| − | {{ | + | {{Map locations |
| − | | title = | + | | title = Pier - Locations |
| − | | image = | + | | image = Pier overview.png |
| − | | - | + | |- |
| − | | spawn1 = BLU first spawn | + | | spawn1 = BLU first spawn |
| − | | spawn-color1 = blu | + | | spawn-color1 = blu |
| − | | xA = | + | | xA = 335px |
| − | | yA = | + | | yA = 150px |
| − | | spawn2 = BLU second spawn | + | | spawn2 = BLU second spawn |
| − | | spawn-color2 = blu | + | | spawn-color2 = blu |
| − | | xB = | + | | xB = 193px |
| − | | yB = | + | | yB = 230px |
| − | | spawn3 = BLU third spawn | + | | spawn3 = RED first spawn / BLU third spawn |
| − | | spawn-color3 = | + | | spawn-color3 = mix |
| − | | xC = | + | | xC = 245px |
| − | | yC = | + | | yC = 400px |
| − | | spawn4 = RED | + | | spawn4 = RED final spawn |
| − | | spawn-color4 = red | + | | spawn-color4 = red |
| − | | xD = | + | | xD = 608px |
| − | | yD = | + | | yD = 512px |
| − | + | |- | |
| − | + | | area1 = Beach | |
| − | + | | x1 = 210px | |
| − | + | | y1 = 120px | |
| − | | - | + | | area2 = Caves |
| − | | area1 = | + | | x2 = 285px |
| − | | x1 = | + | | y2 = 230px |
| − | | y1 = | + | | area3 = Minivan parking space |
| − | | area2 = | + | | x3 = 280px |
| − | | x2 = | + | | y3 = 290px |
| − | | y2 = | + | | area4 = Cliff |
| − | | area3 = | + | | x4 = 240px |
| − | | x3 = | + | | y4 = 220px |
| − | | y3 = | + | | area5 = Bridge |
| − | | area4 = | + | | x5 = 200px |
| − | | x4 = | + | | y5 = 320px |
| − | | y4 = | + | | area6 = Red carpet building |
| − | | area5 = | + | | x6 = 160px |
| − | | x5 = | + | | y6 = 350px |
| − | | y5 = | + | | area7 = Wine cellar |
| − | | area6 = | + | | x7 = 90px |
| − | | x6 = | + | | y7 = 390px |
| − | | y6 = | + | | area8 = Docks |
| − | | area7 = | + | | x8 = 135px |
| − | | x7 = | + | | y8 = 520px |
| − | | y7 = | + | | area9 = Warehouse |
| − | | area8 = | + | | x9 = 305px |
| − | | x8 = | + | | y9 = 480px |
| − | | y8 = | + | | area10 = Kitchen |
| − | | area9 = | + | | x10 = 340px |
| − | | x9 = | + | | y10 = 410px |
| − | | y9 = | + | | area11 = Sandy beach |
| + | | x11 = 425px | ||
| + | | y11 = 460px | ||
| + | | area12 = Barn bridge | ||
| + | | x12 = 430px | ||
| + | | y12 = 400px | ||
| + | | area13 = Small barn | ||
| + | | x13 = 468px | ||
| + | | y13 = 425px | ||
| + | | area14 = Building adjacent to the barn | ||
| + | | x14 = 505px | ||
| + | | y14 = 460px | ||
| + | | area15 = Target range | ||
| + | | x15 = 600px | ||
| + | | y15 = 460px | ||
}} | }} | ||
| − | |||
| − | |||
| − | |||
| − | |||
===== Lolimsogreat21's version ===== | ===== Lolimsogreat21's version ===== | ||
| − | {{ | + | {{Map locations |
| − | | title = | + | | title = Pier - Locations |
| − | | image = | + | | image = Pier overview.png |
| − | | - | + | |- |
| − | | spawn1 = BLU first spawn | + | | spawn1 = BLU first spawn |
| − | | spawn-color1 = blu | + | | spawn-color1 = blu |
| − | | xA = | + | | xA = 335px |
| − | | yA = | + | | yA = 150px |
| − | | spawn2 = BLU second spawn | + | | spawn2 = BLU second spawn |
| − | | spawn-color2 = blu | + | | spawn-color2 = blu |
| − | | xB = | + | | xB = 193px |
| − | | yB = | + | | yB = 230px |
| − | | spawn3 = BLU third spawn | + | | spawn3 = RED first spawn / BLU third spawn |
| − | | spawn-color3 = | + | | spawn-color3 = mix |
| − | | xC = | + | | xC = 245px |
| − | | yC = | + | | yC = 400px |
| − | | spawn4 = RED | + | | spawn4 = RED final spawn |
| − | | spawn-color4 = red | + | | spawn-color4 = red |
| − | | xD = | + | | xD = 608px |
| − | | yD = | + | | yD = 512px |
| − | + | |- | |
| − | + | | area1 = Beach | |
| − | + | | x1 = 210px | |
| − | + | | y1 = 120px | |
| − | | - | + | | area2 = Caves |
| − | | area1 = | + | | x2 = 285px |
| − | | x1 = | + | | y2 = 230px |
| − | | y1 = | + | | area3 = Minivan parking space |
| − | | area2 = | + | | x3 = 280px |
| − | | x2 = | + | | y3 = 290px |
| − | | y2 = | + | | area4 = Cliff |
| − | | area3 = | + | | x4 = 240px |
| − | | x3 = | + | | y4 = 220px |
| − | | y3 = | + | | area5 = Bridge |
| − | | area4 = | + | | x5 = 200px |
| − | | x4 = | + | | y5 = 320px |
| − | | y4 = | + | | area6 = Red carpet building |
| − | | area5 = | + | | x6 = 160px |
| − | | x5 = | + | | y6 = 350px |
| − | | y5 = | + | | area7 = Wine cellar |
| − | | area6 = | + | | x7 = 90px |
| − | | x6 = | + | | y7 = 390px |
| − | | y6 = 390px | + | | area8 = Docks |
| + | | x8 = 135px | ||
| + | | y8 = 520px | ||
| + | | area9 = Warehouse | ||
| + | | x9 = 305px | ||
| + | | y9 = 480px | ||
| + | | area10 = Kitchen | ||
| + | | x10 = 340px | ||
| + | | y10 = 410px | ||
| + | | area11 = Sandy beach | ||
| + | | x11 = 425px | ||
| + | | y11 = 460px | ||
| + | | area12 = Barn bridge | ||
| + | | x12 = 430px | ||
| + | | y12 = 400px | ||
| + | | area13 = Small barn | ||
| + | | x13 = 468px | ||
| + | | y13 = 425px | ||
| + | | area14 = Building adjacent to the barn | ||
| + | | x14 = 505px | ||
| + | | y14 = 460px | ||
| + | | area15 = Target range | ||
| + | | x15 = 600px | ||
| + | | y15 = 460px | ||
}} | }} | ||
---- | ---- | ||
| − | ==== | + | ==== Polar ==== |
| − | ===== | + | =====Brand new===== |
| − | |||
| − | |||
{{Map locations | {{Map locations | ||
| − | + | | title = Polar - Locations | |
| − | + | | image = Polar overview.png | |
| − | + | |- | |
| − | + | | spawn1 = BLU first spawn | |
| − | + | | spawn-color1 = blu | |
| − | + | | xA = 430px | |
| − | + | | yA = 20px | |
| − | + | | spawn2 = BLU second spawn | |
| − | + | | spawn-color2 = blu | |
| − | + | | xB = 290px | |
| − | + | | yB = 185px | |
| − | + | | spawn3 = RED first spawn | |
| − | + | | spawn-color3 = red | |
| − | + | | xC = 435px | |
| − | + | | yC = 200px | |
| − | + | | spawn4 = RED second spawn | |
| − | + | | spawn-color4 = red | |
| − | + | | xD = 395px | |
| − | + | | yD = 370px | |
| − | + | | spawn5 = RED third spawn | |
| − | + | | spawn-color5 = red | |
| − | + | | xE = 500px | |
| − | + | | yE = 375px | |
| − | + | |- | |
| − | + | | area1 = Christmas Tree | |
| − | + | | x1 = 370px | |
| − | + | | y1 = 70px | |
| − | + | | area2 = Brick Building | |
| − | + | | x2 = 380px | |
| − | + | | y2 = 110px | |
| − | + | | area3 = Sentry Deck | |
| − | + | | x3 = 395px | |
| − | + | | y3 = 140px | |
| − | + | | area4 = A Point Building | |
| − | + | | x4 = 410px | |
| − | + | | y4 = 170px | |
| − | + | | area5 = Chute | |
| − | + | | x5 = 325px | |
| − | + | | y5 = 180px | |
| − | + | | area6 = Jenkin Coal.co | |
| − | + | | x6 = 370px | |
| − | + | | y6 = 240px | |
| − | + | | area7 = Concrete Platform | |
| − | + | | x7 = 435px | |
| − | + | | y7 = 255px | |
| − | + | | area8 = Sniper's Hut | |
| − | + | | x8 = 430px | |
| − | + | | y8 = 295px | |
| − | + | | area9 = Dropdown | |
| − | + | | x9 = 385px | |
| − | + | | y9 = 315px | |
| − | + | | area10 = Gates | |
| − | + | | x10 = 350px | |
| − | + | | y10 = 335px | |
| − | + | | area11 = Flank | |
| − | + | | x11 = 320px | |
| − | + | | y11 = 350px | |
| − | + | | area12 = Shack | |
| − | + | | x12 = 350px | |
| − | + | | y12 = 380px | |
| − | + | | area13 = Factory | |
| − | + | | x13 = 430px | |
| − | + | | y13 = 340px | |
| − | + | | area14 = Shipping Crates | |
| − | + | | x14 = 450px | |
| − | + | | y14 = 365px | |
| − | + | | area15 = Delivery Pod | |
| − | + | | x15 = 480px | |
| − | + | | y15 = 360px | |
| + | }} | ||
| + | ---- | ||
| + | |||
| + | ==== Precipice ==== | ||
| + | ===== Old ===== | ||
| + | [[File:Precipice_overview2with_lines.png|800px|center]] | ||
| + | ===== Lolimsogreat21's version ===== | ||
| + | {{Map locations | ||
| + | | title = Precipice - Locations | ||
| + | | image = Precipice overview.png | ||
| + | |- | ||
| + | | spawn1 = BLU first spawn | ||
| + | | spawn-color1 = blu | ||
| + | | xA = 252px | ||
| + | | yA = 126px | ||
| + | | spawn2 = BLU second spawn | ||
| + | | spawn-color2 = blu | ||
| + | | xB = 348px | ||
| + | | yB = 264px | ||
| + | | spawn3 = BLU third spawn | ||
| + | | spawn-color3 = blu | ||
| + | | xC = 480px | ||
| + | | yC = 325px | ||
| + | | spawn4 = RED first spawn | ||
| + | | spawn-color4 = red | ||
| + | | xD = 466px | ||
| + | | yD = 263px | ||
| + | | spawn5 = RED final spawn | ||
| + | | spawn-color5 = red | ||
| + | | xE = 681px | ||
| + | | yE = 48px | ||
| + | |- | ||
| + | | area1 = Courtyard | ||
| + | | x1 = 297px | ||
| + | | y1 = 230px | ||
| + | | area2 = Buildings | ||
| + | | x2 = 383px | ||
| + | | y2 = 229px | ||
| + | | area3 = Loading zone | ||
| + | | x3 = 405px | ||
| + | | y3 = 302px | ||
| + | | area4 = Shack A | ||
| + | | x4 = 367px | ||
| + | | y4 = 391px | ||
| + | | area5 = Shack B | ||
| + | | x5 = 442px | ||
| + | | y5 = 456px | ||
| + | | area6 = Caves | ||
| + | | x6 = 492px | ||
| + | | y6 = 275px | ||
| + | | area7 = Flank | ||
| + | | x7 = 562px | ||
| + | | y7 = 245px | ||
| + | | area8 = Shipping yard | ||
| + | | x8 = 577px | ||
| + | | y8 = 170px | ||
| + | | area9 = Hidden room | ||
| + | | x9 = 626px | ||
| + | | y9 = 113px | ||
}} | }} | ||
| + | ---- | ||
| + | ==== Snowycoast ==== | ||
| + | ===== Old ===== | ||
| + | [[File:Snowycoast_overview_with_lines.png|800px|center]] | ||
===== Lolimsogreat21's version ===== | ===== Lolimsogreat21's version ===== | ||
| − | {{ | + | {{Map locations |
| − | | title = | + | | title = Snowycoast - Locations |
| − | | image = | + | | image = Snowycoast overview.png |
| − | | - | + | |- |
| spawn1 = BLU first spawn | | spawn1 = BLU first spawn | ||
| spawn-color1 = blu | | spawn-color1 = blu | ||
| − | | xA = | + | | xA = 398px |
| − | | yA = | + | | yA = 1100px |
| spawn2 = BLU second spawn | | spawn2 = BLU second spawn | ||
| spawn-color2 = blu | | spawn-color2 = blu | ||
| − | | xB = | + | | xB = 557px |
| − | | yB = | + | | yB = 853px |
| − | | spawn3 = | + | | spawn3 = BLU third spawn |
| − | | spawn-color3 = | + | | spawn-color3 = blu |
| − | | xC = | + | | xC = 306px |
| − | | yC = | + | | yC = 685px |
| − | | spawn4 = RED | + | | spawn4 = RED first spawn |
| spawn-color4 = red | | spawn-color4 = red | ||
| − | | xD = | + | | xD = 300px |
| − | | yD = | + | | yD = 773px |
| − | | spawn5 = RED | + | | spawn5 = RED second spawn |
| spawn-color5 = red | | spawn-color5 = red | ||
| − | | xE = | + | | xE = 667px |
| − | | yE = | + | | yE = 439px |
| − | | - | + | |- |
| − | | area1 = | + | | area1 = Side structure |
| − | | x1 = | + | | x1 = 524px |
| − | | y1 = | + | | y1 = 964px |
| − | | area2 = | + | | area2 = Quonset hut |
| − | | x2 = | + | | x2 = 466px |
| − | | y2 = | + | | y2 = 826px |
| − | | area3 = | + | | area3 = Kennels |
| − | | x3 = | + | | x3 = 384px |
| − | | y3 = | + | | y3 = 776px |
| − | | area4 = | + | | area4 = Mines |
| − | | x4 = | + | | x4 = 540px |
| − | | y4 = | + | | y4 = 699px |
| − | | area5 = | + | | area5 = Shutter gate |
| − | | x5 = | + | | x5 = 495px |
| − | | y5 = | + | | y5 = 467px |
| − | | area6 = | + | | area6 = Excavation site |
| − | | x6 = | + | | x6 = 498px |
| − | | y6 = | + | | y6 = 390px |
| − | + | }} | |
| − | + | ---- | |
| − | + | ==== Swiftwater ==== | |
| − | + | ===== Old ===== | |
| − | + | [[File:Swiftwater_overview_with_lines2.png|800px|center]] | |
| − | + | ===== Foxbite's version ===== | |
| − | + | {{Map locations | |
| − | + | | title = Swiftwater - Locations | |
| − | + | | image = Swiftwater overview.png | |
| − | + | |- | |
| − | + | | spawn1 = BLU first spawn | |
| − | + | | spawn-color1 = blu | |
| − | + | | xA = 418px | |
| − | + | | yA = 689px | |
| − | + | | spawn2 = RED first spawn | |
| − | + | | spawn-color2 = red | |
| − | + | | xB = 601px | |
| − | + | | yB = 197px | |
| − | + | | spawn3 = BLU second spawn | |
| − | + | | spawn-color3 = blu | |
| − | + | | xC = 480px | |
| − | + | | yC = 363px | |
| − | | | + | | spawn4 = RED second spawn |
| − | | | + | | spawn-color4 = red |
| − | + | | xD = 480px | |
| − | + | | yD = 196px | |
| − | + | | spawn5 = RED final spawn | |
| − | + | | spawn-color5 = red | |
| − | + | | xE = 537px | |
| − | == | + | | yE = 88px |
| − | + | |- | |
| − | {{ | + | | area1 = Front Yard |
| − | | title = | + | | x1 = 350px |
| − | | image = | + | | y1 = 525px |
| − | | - | + | | area2 = Main House |
| − | | spawn1 = BLU first spawn | + | | x2 = 319px |
| − | | spawn-color1 = blu | + | | y2 = 465px |
| − | | xA = | + | | area3 = Ditch |
| − | | yA = | + | | x3 = 450px |
| − | | spawn2 = | + | | y3 = 554px |
| − | | spawn-color2 = | + | | area4 = Shifty's Quick Shot shack |
| − | | xB = | + | | x4 = 478px |
| − | | yB = | + | | y4 = 600px |
| − | | spawn3 = | + | | area5 = Tunnel |
| − | | spawn-color3 = | + | | x5 = 608px |
| − | | xC = | + | | y5 = 536px |
| − | | yC = | + | | area6 = Sawmill |
| − | | spawn4 = RED second spawn | + | | x6 = 697px |
| − | | spawn-color4 = red | + | | y6 = 321px |
| − | | xD = | + | | area7 = Catwalks |
| − | | yD = | + | | x7 = 619px |
| − | | spawn5 = RED | + | | y7 = 381px |
| − | | spawn-color5 = red | + | | area8 = Front area |
| − | | xE = | + | | x8 = 480px |
| − | | yE = | + | | y8 = 255px |
| − | | - | + | | area9 = Silos |
| − | | area1 = Front Yard | + | | x9 = 484px |
| − | | x1 = | + | | y9 = 343px |
| − | | y1 = | + | | area10 = Railway Building |
| − | | area2 = | + | | x10 = 296px |
| − | | x2 = | + | | y10 = 370px |
| − | | y2 = | + | | area11 = Corner house |
| − | | area3 = | + | | x11 = 280px |
| − | | x3 = | + | | y11 = 151px |
| − | | y3 = | + | | area12 = Steep Decline |
| − | | area4 = | + | | x12 = 374px |
| − | | x4 = | + | | y12 = 173px |
| − | | y4 = | + | | area13 = Battlements |
| − | | area5 = | + | | x13 = 430px |
| − | | x5 = | + | | y13 = 126px |
| − | | y5 = | + | | area14 = Cliff |
| − | | area6 = | + | | x14 = 512px |
| − | | x6 = | + | | y14 = 173px |
| − | | y6 = | + | | area15 = Barn |
| − | | area7 = | + | | x15 = 535px |
| − | | x7 = | + | | y15 = 400px |
| − | | y7 = | ||
| − | | area8 = | ||
| − | | x8 = | ||
| − | | y8 = | ||
| − | | area9 = | ||
| − | | x9 = | ||
| − | | y9 = | ||
| − | | area10 = | ||
| − | | x10 = | ||
| − | | y10 = | ||
| − | | area11 = | ||
| − | | x11 = | ||
| − | | y11 = | ||
| − | | area12 = | ||
| − | | x12 = | ||
| − | | y12 = | ||
| − | | area13 = | ||
| − | | x13 = | ||
| − | | y13 = | ||
| − | | area14 = | ||
| − | | x14 = | ||
| − | | y14 = | ||
| − | | area15 = | ||
| − | | x15 = | ||
| − | | y15 = | ||
}} | }} | ||
| − | + | ===== Lolimsogreat21's version ===== | |
| − | + | {{Map locations | |
| − | + | | title = Swiftwater - Locations | |
| − | + | | image = Swiftwater overview.png | |
| − | + | |- | |
| − | |||
| − | ===== Lolimsogreat21's version ===== | ||
| − | {{ | ||
| − | | title = | ||
| − | | image = | ||
| − | | - | ||
| spawn1 = BLU first spawn | | spawn1 = BLU first spawn | ||
| spawn-color1 = blu | | spawn-color1 = blu | ||
| − | | xA = | + | | xA = 419px |
| − | | yA = | + | | yA = 707px |
| spawn2 = BLU second spawn | | spawn2 = BLU second spawn | ||
| spawn-color2 = blu | | spawn-color2 = blu | ||
| − | | xB = | + | | xB = 478px |
| − | | yB = | + | | yB = 384px |
| − | | spawn3 = RED first | + | | spawn3 = RED first spawn |
| − | | spawn-color3 = | + | | spawn-color3 = red |
| − | | xC = | + | | xC = 587px |
| − | | yC = | + | | yC = 206px |
| spawn4 = RED second spawn | | spawn4 = RED second spawn | ||
| spawn-color4 = red | | spawn-color4 = red | ||
| − | | xD = | + | | xD = 488px |
| − | | yD = | + | | yD = 183px |
| − | | - | + | | spawn5 = RED final spawn |
| − | | area1 = | + | | spawn-color5 = red |
| − | | x1 = | + | | xE = 540px |
| − | | y1 = | + | | yE = 75px |
| − | | area2 = | + | |- |
| − | | x2 = | + | | area1 = Front yard |
| − | | y2 = | + | | x1 = 327px |
| − | | area3 = | + | | y1 = 528px |
| − | | x3 = | + | | area2 = Main house |
| − | | y3 = | + | | x2 = 381px |
| − | | area4 = | + | | y2 = 484px |
| − | | x4 = | + | | area3 = Ditch |
| − | | y4 = | + | | x3 = 449px |
| − | | area5 = | + | | y3 = 551px |
| − | | x5 = | + | | area4 = Shifty's Quick Shot shack |
| − | | y5 = | + | | x4 = 487px |
| − | | area6 = | + | | y4 = 600px |
| − | | x6 = | + | | area5 = Tunnel |
| − | | y6 = | + | | x5 = 626px |
| − | | area7 = | + | | y5 = 520px |
| − | | x7 = | + | | area6 = Sawmill |
| − | | y7 = | + | | x6 = 701px |
| − | | area8 = | + | | y6 = 321px |
| − | | x8 = | + | | area7 = Catwalks |
| − | | y8 = | + | | x7 = 621px |
| − | | area9 = | + | | y7 = 383px |
| − | | x9 = | + | | area8 = Barn |
| − | | y9 = | + | | x8 = 537px |
| − | | area10 = | + | | y8 = 392px |
| − | | x10 = | + | | area9 = Silos |
| − | | y10 = | + | | x9 = 492px |
| − | | area11 = | + | | y9 = 344px |
| − | | x11 = | + | | area10 = Front area |
| − | | y11 = | + | | x10 = 472px |
| − | | area12 = | + | | y10 = 285px |
| − | | x12 = | + | | area11 = Railway building |
| − | | y12 = | + | | x11 = 295px |
| − | | area13 = | + | | y11 = 358px |
| − | | x13 = | + | | area12 = Corner house |
| − | | y13 = | + | | x12 = 298px |
| − | | area14 = | + | | y12 = 164px |
| − | | x14 = | + | | area13 = Steep decline |
| − | | y14 = | + | | x13 = 386px |
| − | | area15 = | + | | y13 = 183px |
| − | | x15 = | + | | area14 = Battlements |
| − | | y15 = | + | | x14 = 441px |
| − | + | | y14 = 135px | |
| − | + | | area15 = Cliff | |
| − | + | | x15 = 510px | |
| − | + | | y15 = 154px | |
| − | |||
| − | |||
}} | }} | ||
---- | ---- | ||
| − | ==== | + | ==== Terror ==== |
| − | |||
| − | |||
===== Lolimsogreat21's version ===== | ===== Lolimsogreat21's version ===== | ||
| − | {{ | + | {{Map locations |
| − | | title = | + | | title = Terror - Locations |
| − | | image = | + | | image = Terror overview.png |
| − | | - | + | |- |
| spawn1 = BLU first spawn | | spawn1 = BLU first spawn | ||
| spawn-color1 = blu | | spawn-color1 = blu | ||
| − | | xA = | + | | xA = 665px |
| − | | yA = | + | | yA = 170px |
| spawn2 = BLU second spawn | | spawn2 = BLU second spawn | ||
| spawn-color2 = blu | | spawn-color2 = blu | ||
| − | | xB = | + | | xB = 245px |
| − | | yB = | + | | yB = 144px |
| − | | spawn3 = RED first | + | | spawn3 = RED first spawn |
| − | | spawn-color3 = | + | | spawn-color3 = red |
| − | | xC = | + | | xC = 300px |
| − | | yC = | + | | yC = 310px |
| spawn4 = RED second spawn | | spawn4 = RED second spawn | ||
| spawn-color4 = red | | spawn-color4 = red | ||
| − | | xD = | + | | xD = 230px |
| − | | yD = | + | | yD = 215px |
| − | | - | + | | spawn5 = RED third spawn |
| − | | area1 = | + | | spawn-color5 = red |
| − | | x1 = | + | | xE = 53px |
| − | | y1 = | + | | yE = 333px |
| − | | area2 = | + | |- |
| − | | x2 = | + | | area1 = Front Yard |
| − | | y2 = | + | | x1 = 580px |
| − | | area3 = | + | | y1 = 183px |
| − | | x3 = | + | | area2 = Low Hanging Roof |
| − | | y3 = | + | | x2 = 570px |
| − | | area4 = | + | | y2 = 236px |
| − | | x4 = | + | | area3 = RED shed |
| − | | y4 = | + | | x3 = 519px |
| − | | area5 = | + | | y3 = 196px |
| − | | x5 = | + | | area4 = Rocks |
| − | | y5 = | + | | x4 = 477px |
| − | | area6 = | + | | y4 = 234px |
| − | | x6 = | + | | area5 = Crossing |
| − | | y6 = | + | | x5 = 440px |
| − | | area7 = | + | | y5 = 216px |
| − | | x7 = | + | | area6 = Slope |
| − | | y7 = | + | | x6 = 410px |
| − | | area8 = | + | | y6 = 259px |
| − | | x8 = | + | | area7 = Cliffside Shed |
| − | | y8 = | + | | x7 = 384px |
| − | | area9 = | + | | y7 = 332px |
| − | | x9 = | + | | area8 = Old Geeser |
| − | | y9 = | + | | x8 = 375px |
| − | | area10 = | + | | y8 = 240px |
| − | | x10 = | + | | area9 = Bridge |
| − | | y10 = | + | | x9 = 345px |
| − | | area11 = | + | | y9 = 254px |
| − | | x11 = | + | | area10 = Mann Mannor |
| − | | y11 = | + | | x10 = 310px |
| − | | area12 = | + | | y10 = 266px |
| − | | x12 = | + | | area11 = Tree |
| − | | y12 = | + | | x11 = 320px |
| − | | area13 = | + | | y11 = 195px |
| − | | x13 = | + | | area12 = Casali Shafting |
| − | | y13 = | + | | x12 = 200px |
| − | | area14 = | + | | y12 = 250px |
| − | | x14 = | + | | area13 = Flank House |
| − | | y14 = | + | | x13 = 183px |
| − | | area15 = | + | | y13 = 320px |
| − | | x15 = | + | | area14 = Pit |
| − | | y15 = | + | | x14 = 145px |
| − | + | | y14 = 275px | |
| − | + | | area15 = Outhouse | |
| − | + | | x15 = 110px | |
| − | + | | y15 = 303px | |
| − | |||
| − | |||
}} | }} | ||
---- | ---- | ||
| − | ==== | + | ==== Thunder Mountain ==== |
| + | =====Brand new===== | ||
| + | ======Stage 1====== | ||
| + | {{Map locations | ||
| + | | title = Thunder Mountain, stage one - Locations | ||
| + | | image = Thunder Mountain Stage1.png | ||
| + | |- | ||
| + | | spawn1 = BLU spawn | ||
| + | | spawn-color1 = blu | ||
| + | | xA = 465px | ||
| + | | yA = 340px | ||
| + | | spawn2 = RED spawn | ||
| + | | spawn-color2 = red | ||
| + | | xB = 480px | ||
| + | | yB = 60px | ||
| + | |- | ||
| + | | area1 = First Courtyard | ||
| + | | x1 = 455px | ||
| + | | y1 = 310px | ||
| + | | area2 = Garage | ||
| + | | x2 = 455px | ||
| + | | y2 = 275px | ||
| + | | area3 = Cliffside Shed | ||
| + | | x3 = 535px | ||
| + | | y3 = 195px | ||
| + | | area4 = Ramp | ||
| + | | x4 = 430px | ||
| + | | y4 = 205px | ||
| + | | area5 = Bridge | ||
| + | | x5 = 355px | ||
| + | | y5 = 140px | ||
| + | | area6 = Catwalks | ||
| + | | x6 = 270px | ||
| + | | y6 = 180px | ||
| + | | area7 = Warehouse | ||
| + | | x7 = 180px | ||
| + | | y7 = 40px | ||
| + | | area8 = Balcony | ||
| + | | x8 = 320px | ||
| + | | y8 = 60px | ||
| + | }} | ||
| + | ======Stage 2====== | ||
| + | {{Map locations | ||
| + | | title = Thunder Mountain, stage two - Locations | ||
| + | | image = Thunder Mountain stage2.png | ||
| + | |- | ||
| + | | spawn1 = BLU spawn | ||
| + | | spawn-color1 = blu | ||
| + | | xA = 210px | ||
| + | | yA = 230px | ||
| + | | spawn2 = RED spawn | ||
| + | | spawn-color2 = red | ||
| + | | xB = 760px | ||
| + | | yB = 380px | ||
| + | |- | ||
| + | | area1 = Rafters | ||
| + | | x1 = 340px | ||
| + | | y1 = 295px | ||
| + | | area2 = Bridge | ||
| + | | x2 = 365px | ||
| + | | y2 = 237px | ||
| + | | area3 = Lumber Mill | ||
| + | | x3 = 410px | ||
| + | | y3 = 315px | ||
| + | | area4 = Tunnel | ||
| + | | x4 = 560px | ||
| + | | y4 = 230px | ||
| + | | area5 = Side Buildings | ||
| + | | x5 = 650px | ||
| + | | y5 = 200px | ||
| + | | area6 = Concealed shed | ||
| + | | x6 = 650px | ||
| + | | y6 = 300px | ||
| + | | area7 = Final Cap | ||
| + | | x7 = 765px | ||
| + | | y7 = 270px | ||
| + | }} | ||
| + | |||
| + | ======Stage 3====== | ||
| + | {{Map locations | ||
| + | | title = Thunder Mountain, stage three - Locations | ||
| + | | image = Thunder Mountain stage3.png | ||
| + | |- | ||
| + | | spawn1 = BLU spawn | ||
| + | | spawn-color1 = blu | ||
| + | | xA = 240px | ||
| + | | yA = 255px | ||
| + | | spawn2 = RED spawn | ||
| + | | spawn-color2 = red | ||
| + | | xB = 570px | ||
| + | | yB = 190px | ||
| + | |- | ||
| + | | area1 = Spawn Yard | ||
| + | | x1 = 305px | ||
| + | | y1 = 265px | ||
| + | | area4 = Final Tower | ||
| + | | x4 = 375px | ||
| + | | y4 = 245px | ||
| + | | area2 = First cap | ||
| + | | x2 = 410px | ||
| + | | y2 = 385px | ||
| + | | area3 = Balcony | ||
| + | | x3 = 395px | ||
| + | | y3 = 320px | ||
| + | | area5 = Valley | ||
| + | | x5 = 440px | ||
| + | | y5 = 245px | ||
| + | | area6 = Stairs | ||
| + | | x6 = 455px | ||
| + | | y6 = 180px | ||
| + | | area7 = Gates | ||
| + | | x7 = 460px | ||
| + | | y7 = 140px | ||
| + | | area8 = Second cap | ||
| + | | x8 = 375px | ||
| + | | y8 = 60px | ||
| + | }} | ||
| + | ---- | ||
| + | |||
| + | ==== Upward ==== | ||
===== Old ===== | ===== Old ===== | ||
| − | [[File: | + | [[File:Upward_overview_with_lines.png|800px|center]] |
===== Lolimsogreat21's version ===== | ===== Lolimsogreat21's version ===== | ||
| − | {{ | + | {{Map locations |
| − | | title = | + | | title = Upward - Locations |
| − | | image = | + | | image = Upward overview.png |
| − | | - | + | |- |
| spawn1 = BLU first spawn | | spawn1 = BLU first spawn | ||
| spawn-color1 = blu | | spawn-color1 = blu | ||
| − | | xA = | + | | xA = 513px |
| − | | yA = | + | | yA = 655px |
| − | | spawn2 = BLU second | + | | spawn2 = BLU second spawn |
| − | | spawn-color2 = | + | | spawn-color2 = blu |
| − | | xB = | + | | xB = 397px |
| − | | yB = | + | | yB = 271px |
| − | | spawn3 = BLU third | + | | spawn3 = RED first spawn/ BLU third spawn |
| spawn-color3 = mix | | spawn-color3 = mix | ||
| − | | xC = | + | | xC = 183px |
| − | | yC = | + | | yC = 356px |
| − | | spawn4 = RED | + | | spawn4 = RED second spawn |
| spawn-color4 = red | | spawn-color4 = red | ||
| − | | xD = | + | | xD = 304px |
| − | | yD = | + | | yD = 386px |
| − | | - | + | |- |
| − | | area1 = | + | | area1 = Roof |
| − | | x1 = | + | | x1 = 583px |
| − | | y1 = | + | | y1 = 569px |
| − | | area2 = | + | | area2 = Behind roof |
| − | | x2 = | + | | x2 = 621px |
| − | | y2 = | + | | y2 = 514px |
| − | | area3 = | + | | area3 = Slope |
| − | | x3 = | + | | x3 = 600px |
| − | | y3 = | + | | y3 = 391px |
| − | | area4 = | + | | area4 = House |
| − | | x4 = | + | | x4 = 549px |
| − | | y4 = | + | | y4 = 317px |
| − | | area5 = | + | | area5 = Cliff |
| − | | x5 = | + | | x5 = 455px |
| − | | y5 = | + | | y5 = 323px |
| − | | area6 = | + | | area6 = Hill |
| − | | x6 = | + | | x6 = 399px |
| − | | y6 = | + | | y6 = 220px |
| − | }} | + | | area7 = Rocks |
| + | | x7 = 346px | ||
| + | | y7 = 196px | ||
| + | | area8 = Flanking cliff | ||
| + | | x8 = 277px | ||
| + | | y8 = 174px | ||
| + | | area9 = B hut | ||
| + | | x9 = 187px | ||
| + | | y9 = 248px | ||
| + | | area10 = Apartments | ||
| + | | x10 = 275px | ||
| + | | y10 = 295px | ||
| + | | area11 = Platform | ||
| + | | x11 = 243px | ||
| + | | y11 = 335px | ||
| + | | area12 = Balcony | ||
| + | | x12 = 300px | ||
| + | | y12 = 465px | ||
| + | | area13 = Spiraling bridge | ||
| + | | x13 = 227px | ||
| + | | y13 = 545px | ||
| + | | area14 = Under bridge | ||
| + | | x14 = 246px | ||
| + | | y14 = 590px | ||
| + | | area15 = C hut | ||
| + | | x15 = 320px | ||
| + | | y15 = 580px | ||
| + | | area16 = Valley | ||
| + | | x16 = 390px | ||
| + | | y16 = 521px | ||
| + | | area17 = Across buildings | ||
| + | | x17 = 456px | ||
| + | | y17 = 408px | ||
| + | }} | ||
---- | ---- | ||
| − | === | + | ==== Hassle Castle ==== |
| − | |||
===== Old ===== | ===== Old ===== | ||
| − | [[File: | + | [[File:Hassle_Castle_overview_with_lines.png|800px|center]] |
===== Lolimsogreat21's version ===== | ===== Lolimsogreat21's version ===== | ||
| − | {{ | + | {{Map locations |
| − | | title = | + | | title = Hassle Castle - Locations |
| − | | image = | + | | image = Hassle Castle overview.png |
| − | | - | + | |- |
| − | | spawn1 = | + | | spawn1 = BLU first spawn |
| − | | spawn-color1 = | + | | spawn-color1 = blu |
| − | | xA = | + | | xA = 560px |
| − | | yA = | + | | yA = 605px |
| − | | spawn2 = BLU spawn | + | | spawn2 = BLU second spawn |
| spawn-color2 = blu | | spawn-color2 = blu | ||
| − | | xB = | + | | xB = 392px |
| − | | yB = | + | | yB = 157px |
| − | | - | + | | spawn3 = RED first spawn/ BLU third spawn |
| − | | area1 = | + | | spawn-color3 = mix |
| − | | x1 = | + | | xC = 214px |
| − | | y1 = | + | | yC = 269px |
| − | | area2 = | + | | spawn4 = RED second spawn |
| − | | x2 = | + | | spawn-color4 = red |
| − | | y2 = | + | | xD = 298px |
| − | | area3 = | + | | yD = 306px |
| − | | x3 = | + | |- |
| − | | y3 = | + | | area1 = Roof |
| − | | area4 = | + | | x1 = 625px |
| − | | x4 = | + | | y1 = 524px |
| − | | y4 = | + | | area2 = Behind roof |
| − | | area5 = | + | | x2 = 671px |
| − | | x5 = | + | | y2 = 459px |
| − | | y5 = | + | | area3 = Slope |
| − | | area6 = | + | | x3 = 643px |
| − | | x6 = | + | | y3 = 336px |
| − | | y6 = | + | | area4 = House |
| − | | area7 = | + | | x4 = 607px |
| − | | x7 = | + | | y4 = 254px |
| − | | y7 = | + | | area5 = Cliff |
| − | | area8 = | + | | x5 = 513px |
| − | | x8 = | + | | y5 = 226px |
| − | | y8 = | + | | area6 = Hill |
| − | + | | x6 = 459px | |
| − | + | | y6 = 112px | |
| − | + | | area7 = Rocks | |
| − | + | | x7 = 379px | |
| − | + | | y7 = 111px | |
| − | + | | area8 = Flanking cliff | |
| − | + | | x8 = 274px | |
| − | | | + | | y8 = 89px |
| − | | | + | | area9 = B hut |
| − | + | | x9 = 176px | |
| − | | | + | | y9 = 131px |
| − | | | + | | area10 = Apartments |
| − | | | + | | x10 = 269px |
| − | | | + | | y10 = 207px |
| − | | | + | | area11 = Platform |
| − | | | + | | x11 = 235px |
| − | | | + | | y11 = 253px |
| − | | | + | | area12 = Balcony |
| − | + | | x12 = 311px | |
| − | | | + | | y12 = 385px |
| − | | | + | | area13 = Spiraling bridge |
| − | | | + | | x13 = 221px |
| − | + | | y13 = 491px | |
| − | + | | area14 = Under bridge | |
| − | + | | x14 = 274px | |
| − | + | | y14 = 529px | |
| − | | | + | | area15 = C hut |
| − | | | + | | x15 = 332px |
| − | | | + | | y15 = 525px |
| − | | | + | | area16 = Valley |
| − | | | + | | x16 = 444px |
| − | | | + | | y16 = 463px |
| − | | | + | | area17 = Across buildings |
| − | | | + | | x17 = 502px |
| − | | | + | | y17 = 365px |
| − | | | ||
| − | | | ||
| − | | | ||
| − | | | ||
| − | | | ||
}} | }} | ||
---- | ---- | ||
| − | === | + | ==== Wutville ==== |
| − | |||
===== Old ===== | ===== Old ===== | ||
| − | + | [[File:Wutville_overview_with_lines.png|800px|center]] | |
| − | [[File: | ||
===== Lolimsogreat21's version ===== | ===== Lolimsogreat21's version ===== | ||
| − | {{ | + | {{Map locations |
| − | | title = | + | | title = Wutville - Locations |
| − | | image = | + | | image = Wutville overview.png |
| − | | - | + | |- |
| − | | spawn1 = BLU spawn | + | | spawn1 = BLU first spawn |
| spawn-color1 = blu | | spawn-color1 = blu | ||
| − | | xA = | + | | xA = 100px |
| − | | yA = | + | | yA = 539px |
| − | | spawn2 = BLU spawn | + | | spawn2 = BLU second spawn/RED first spawn |
| − | | spawn-color2 = | + | | spawn-color2 = mix |
| − | | xB = | + | | xB = 250px |
| − | | yB = | + | | yB = 14px |
| − | | spawn3 = RED spawn | + | | spawn3 = BLU third spawn/RED second spawn |
| − | | spawn-color3 = | + | | spawn-color3 = mix |
| − | | xC = | + | | xC = 579px |
| − | | yC = | + | | yC = 215px |
| − | | spawn4 = RED spawn | + | | spawn4 = RED third spawn |
| spawn-color4 = red | | spawn-color4 = red | ||
| − | | xD = | + | | xD = 502px |
| − | | yD = | + | | yD = 312px |
| − | | - | + | |- |
| − | | area1 = | + | | area1 = RÜDY's station |
| − | | x1 = | + | | x1 = 211px |
| − | | y1 = | + | | y1 = 577px |
| − | | area2 = | + | | area2 = Arch |
| − | | x2 = | + | | x2 = 242px |
| − | | y2 = | + | | y2 = 406px |
| − | | area3 = | + | | area3 = Plaza |
| − | | x3 = | + | | x3 = 216px |
| − | | y3 = | + | | y3 = 278px |
| − | | | + | | area4 = Alleyway |
| − | | | + | | x4 = 416px |
| − | | | + | | y4 = 250px |
| − | | | + | | area5 = Wooden path |
| − | | | + | | x5 = 544px |
| − | | | + | | y5 = 388px |
| − | | | + | | area6 = Side path |
| − | | | + | | x6 =600px |
| − | | | + | | y6 = 474px |
| − | | | + | }} |
| − | | | + | ---- |
| − | | | + | === PLR === |
| − | | | + | ==== Banana Bay ==== |
| − | | | + | ===== Old ===== |
| − | | | + | [[File:Banana_Bay_overview_with_lines.png|800px|center]] |
| − | | | + | ===== Lolimsogreat21's version ===== |
| − | | | + | {{Map locations |
| − | | | + | | title = Banana Bay - Locations |
| − | | | + | | image = Banana Bay overview.png |
| − | | | + | |- |
| − | | | + | | spawn1 = RED spawn |
| − | | | + | | spawn-color1 = red |
| − | | | + | | xA = 110px |
| − | | | + | | yA = 140px |
| + | | spawn2 = BLU spawn | ||
| + | | spawn-color2 = blu | ||
| + | | xB = 650px | ||
| + | | yB = 270px | ||
| + | |- | ||
| + | | area1 = Highline | ||
| + | | x1 = 382px | ||
| + | | y1 = 209px | ||
| + | | area2 = Incline | ||
| + | | x2 = 526px | ||
| + | | y2 = 157px | ||
| + | | area3 = Platform | ||
| + | | x3 = 600px | ||
| + | | y3 = 247px | ||
| + | | area4 = Deck | ||
| + | | x4 = 540px | ||
| + | | y4 = 270px | ||
| + | | area5 = Sally Port | ||
| + | | x5 = 580px | ||
| + | | y5 = 325px | ||
| + | | area6 = Docks | ||
| + | | x6 = 485px | ||
| + | | y6 = 337px | ||
| + | | area7 = Start point | ||
| + | | x7 = 430px | ||
| + | | y7 = 305px | ||
| + | | area8 = Siphon | ||
| + | | x8 = 370px | ||
| + | | y8 = 292px | ||
}} | }} | ||
---- | ---- | ||
| + | ==== Helltower ==== | ||
| + | ===== Old ===== | ||
| + | [[File:Helltower_overview_with_lines.png|800px|center]] | ||
| + | ===== Lolimsogreat21's version ===== | ||
| + | {{Map locations | ||
| + | | title = Helltower - Locations | ||
| + | | image = Helltower overview.png | ||
| + | |- | ||
| + | | spawn1 = RED spawn | ||
| + | | spawn-color1 = red | ||
| + | | xA = 250px | ||
| + | | yA = 526px | ||
| + | | spawn2 = BLU spawn | ||
| + | | spawn-color2 = blu | ||
| + | | xB = 250px | ||
| + | | yB = 25px | ||
| + | |- | ||
| + | | area1 = Tower Corridor | ||
| + | | x1 = 130px | ||
| + | | y1 = 280px | ||
| + | | area2 = Balconies | ||
| + | | x2 = 155px | ||
| + | | y2 = 196px | ||
| + | | area3 = Central Tower | ||
| + | | x3 = 240px | ||
| + | | y3 = 290px | ||
| + | | area4 = Crossing | ||
| + | | x4 = 290px | ||
| + | | y4 = 288px | ||
| + | | area5 = The Ramp | ||
| + | | x5 = 360px | ||
| + | | y5 = 207px | ||
| + | | area6 = Cliff House | ||
| + | | x6 = 410px | ||
| + | | y6 = 289px | ||
| + | | area7 = Clocktower | ||
| + | | x7 = 570px | ||
| + | | y7 = 287px | ||
| + | }} | ||
| + | ---- | ||
| + | === CP (A/D) === | ||
| + | ==== Altitude ==== | ||
| + | ===== Brand new ===== | ||
| + | {{Map locations | ||
| + | | title = Altitude - Locations | ||
| + | | image = Altitude overview.png | ||
| + | |- | ||
| + | | spawn1 = BLU first spawn | ||
| + | | spawn-color1 = blu | ||
| + | | xA = 210px | ||
| + | | yA = 310px | ||
| + | | spawn2 = BLU second spawn | ||
| + | | spawn-color2 = blu | ||
| + | | xB = 80px | ||
| + | | yB = 10px | ||
| + | | spawn3 = BLU third spawn | ||
| + | | spawn-color3 = blu | ||
| + | | xC = 207px | ||
| + | | yC = 90px | ||
| + | | spawn4 = RED first spawn | ||
| + | | spawn-color4 = red | ||
| + | | xD = 490px | ||
| + | | yD = 140px | ||
| + | | spawn5 = RED second spawn | ||
| + | | sapwn-color5 = red | ||
| + | | xE = 690px | ||
| + | | yE = 140px | ||
| + | |- | ||
| + | | area3 = Cornerstone | ||
| + | | x3 = 160px | ||
| + | | y3 = 230px | ||
| + | | area2 = Cliffs | ||
| + | | x2 = 100px | ||
| + | | y2 = 220px | ||
| + | | area1 = Warehouse | ||
| + | | x1 = 50px | ||
| + | | y1 = 125px | ||
| + | | area5 = Cliff's Rocks.inc | ||
| + | | x5 = 160px | ||
| + | | y5 = 55px | ||
| + | | area6 = Valley | ||
| + | | x6 = 230px | ||
| + | | y6 = 65px | ||
| + | | area4 = Side Building | ||
| + | | x4 = 210px | ||
| + | | y4 = 145px | ||
| + | | area7 = Gated Shortcut | ||
| + | | x7 = 245px | ||
| + | | y7 = 160px | ||
| + | | area8 = Water Tower | ||
| + | | x8 = 285.5px | ||
| + | | y8 = 150px | ||
| + | | area9 = Triangular House | ||
| + | | x9 = 315px | ||
| + | | y9 = 85px | ||
| + | | area10 = B Hut | ||
| + | | x10 = 375px | ||
| + | | y10 = 155px | ||
| + | | area11 = Server room | ||
| + | | x11 = 540px | ||
| + | | y11 = 165px | ||
| + | }} | ||
| + | ---- | ||
| + | |||
| + | ==== Dustbowl ==== | ||
| + | ===== Old ===== | ||
| + | [[File:Dustbowl_overview_with_lines.png|800px|center]] | ||
| + | ===== Lolimsogreat21's version ===== | ||
| + | {{Map locations | ||
| + | | title = Dustbowl - Locations | ||
| + | | image = Dustbowl overview.png | ||
| + | |- | ||
| + | | spawn1 = BLU first spawn | ||
| + | | spawn-color1 = blu | ||
| + | | xA = 172px | ||
| + | | yA = 106px | ||
| + | | spawn2 = BLU second spawn/RED first spawn | ||
| + | | spawn-color2 = mix | ||
| + | | xB = 568px | ||
| + | | yB = 225px | ||
| + | | spawn3 = BLU third spawn/RED second spawn | ||
| + | | spawn-color3 = mix | ||
| + | | xC = 220px | ||
| + | | yC = 500px | ||
| + | | spawn4 = RED final spawn | ||
| + | | spawn-color4 = red | ||
| + | | xD = 367px | ||
| + | | yD = 235px | ||
| + | |- | ||
| + | | area1 = Right exit shed | ||
| + | | x1 = 227px | ||
| + | | y1 = 139px | ||
| + | | area2 = Canyon | ||
| + | | x2 = 260px | ||
| + | | y2 = 170px | ||
| + | | area3 = Left exit shed | ||
| + | | x3 = 266px | ||
| + | | y3 = 212px | ||
| + | | area4 = Tunnels | ||
| + | | x4 = 427px | ||
| + | | y4 = 116px | ||
| + | | area5 = Bridge | ||
| + | | x5 =485px | ||
| + | | y5 = 161px | ||
| + | | area6 = Platform | ||
| + | | x6 = 473px | ||
| + | | y6 = 206px | ||
| + | | area7 = Dugout | ||
| + | | x7 = 566px | ||
| + | | y7 = 326px | ||
| + | | area8 = Large shed | ||
| + | | x8 = 521px | ||
| + | | y8 = 378px | ||
| + | | area9 = Control point building | ||
| + | | x9 = 576px | ||
| + | | y9 = 441px | ||
| + | | area10 = Office | ||
| + | | x10 = 508px | ||
| + | | y10 = 507px | ||
| + | | area11 = Mining tunnel | ||
| + | | x11 = 450px | ||
| + | | y11 = 558px | ||
| + | | area12 = Double tunnels | ||
| + | | x12 = 420px | ||
| + | | y12 = 495px | ||
| + | | area13 = Gated tunnel | ||
| + | | x13 = 409px | ||
| + | | y13 = 436px | ||
| + | | area14 = Courtyard | ||
| + | | x14 = 370px | ||
| + | | y14 = 489px | ||
| + | | area15 = Middle building | ||
| + | | x15 = 325px | ||
| + | | y15 = 498px | ||
| + | | area16 = Loading dock | ||
| + | | x16 = 222px | ||
| + | | y16 = 371px | ||
| + | | area17 = Ledge | ||
| + | | x17 = 317px | ||
| + | | y17 = 314px | ||
| + | | area18 = Alleys | ||
| + | | x18 = 351px | ||
| + | | y18 = 400px | ||
| + | | area19 = Valley | ||
| + | | x19 = 390px | ||
| + | | y19 = 345px | ||
| + | }} | ||
| + | ---- | ||
| + | ==== Egypt ==== | ||
| + | ===== Old ===== | ||
| + | [[File:Egypt_overview_with_lines.png|800px|center]] | ||
| + | ===== Lolimsogreat21's version ===== | ||
| + | {{Map locations | ||
| + | | title = Egypt - Locations | ||
| + | | image = Egypt overview.png | ||
| + | |- | ||
| + | | spawn1 = BLU first spawn | ||
| + | | spawn-color1 = blu | ||
| + | | xA = 36px | ||
| + | | yA = 120px | ||
| + | | spawn2 = BLU second spawn | ||
| + | | spawn-color2 = blu | ||
| + | | xB = 335px | ||
| + | | yB = 290px | ||
| + | | spawn3 = BLU final spawn | ||
| + | | spawn-color3 = blu | ||
| + | | xC = 534px | ||
| + | | yC = 438px | ||
| + | | spawn4 = RED first spawn | ||
| + | | spawn-color4 = red | ||
| + | | xD = 255px | ||
| + | | yD = 249px | ||
| + | | spawn5 = RED second spawn | ||
| + | | spawn-color5 = red | ||
| + | | xE = 473px | ||
| + | | yE = 446px | ||
| + | |- | ||
| + | | area1 = Ledges | ||
| + | | x1 = 161px | ||
| + | | y1 = 157px | ||
| + | | area2 = Large courtyard | ||
| + | | x2 = 165px | ||
| + | | y2 = 253px | ||
| + | | area3 = Small courtyard | ||
| + | | x3 = 208px | ||
| + | | y3 = 168px | ||
| + | | area4 = Tunnels | ||
| + | | x4 = 280px | ||
| + | | y4 = 178px | ||
| + | | area5 = Point courtyard | ||
| + | | x5 = 318px | ||
| + | | y5 = 224px | ||
| + | | area6 = Stairs | ||
| + | | x6 = 338px | ||
| + | | y6 = 403px | ||
| + | | area7 = Main building | ||
| + | | x7 = 378px | ||
| + | | y7 = 448px | ||
| + | | area8 = Side path | ||
| + | | x8 = 435px | ||
| + | | y8 = 368px | ||
| + | | area9 = Flank | ||
| + | | x9 = 604px | ||
| + | | y9 = 451px | ||
| + | | area10 = Opening | ||
| + | | x10 = 551px | ||
| + | | y10 = 414px | ||
| + | | area11 = Valley | ||
| + | | x11 = 568px | ||
| + | | y11 = 394px | ||
| + | | area12 = Central pillar | ||
| + | | x12 = 556px | ||
| + | | y12 = 367px | ||
| + | | area13 = Caves | ||
| + | | x13 = 630px | ||
| + | | y13 = 313px | ||
| + | | area14 = Open courtyard | ||
| + | | x14 = 686px | ||
| + | | y14 = 373px | ||
| + | }} | ||
| + | ---- | ||
| + | ==== Erebus ==== | ||
| + | ===== Lolimsogreat21's version ===== | ||
| + | ====== Stage 1 ====== | ||
| + | {{Map locations | ||
| + | | title = Erebus, stage one - Locations | ||
| + | | image = Cp ambush event0001.png | ||
| + | |- | ||
| + | | spawn1 = BLU spawn | ||
| + | | spawn-color1 = blu | ||
| + | | xA = 170px | ||
| + | | yA = 310px | ||
| + | | spawn2 = RED spawn | ||
| + | | spawn-color2 = red | ||
| + | | xB = 750px | ||
| + | | yB = 160px | ||
| + | |- | ||
| + | | area1 = Tree Stunps | ||
| + | | x1 = 330px | ||
| + | | y1 = 335px | ||
| + | | area2 = Lower area | ||
| + | | x2 = 230px | ||
| + | | y2 = 150px | ||
| + | | area3 = Lumber Yard | ||
| + | | x3 = 320px | ||
| + | | y3 = 155px | ||
| + | | area4 = Sawmill | ||
| + | | x4 = 395px | ||
| + | | y4 = 120px | ||
| + | | area5 = Mineshafts | ||
| + | | x5 = 460px | ||
| + | | y5 = 260px | ||
| + | }} | ||
| + | ====== Stage 2 ====== | ||
| + | {{Map locations | ||
| + | | title = Erebus, stage two - Locations | ||
| + | | image = Cp ambush event0003.png | ||
| + | |- | ||
| + | | spawn1 = BLU spawn | ||
| + | | spawn-color1 = blu | ||
| + | | xA = 190px | ||
| + | | yA = 90px | ||
| + | | spawn2 = RED spawn | ||
| + | | spawn-color2 = red | ||
| + | | xB = 730px | ||
| + | | yB = 340px | ||
| + | |- | ||
| + | | area1 = Ravine | ||
| + | | x1 = 220px | ||
| + | | y1 = 260px | ||
| + | | area2 = Cliff | ||
| + | | x2 = 285px | ||
| + | | y2 = 275px | ||
| + | | area3 = Cave | ||
| + | | x3 = 280px | ||
| + | | y3 = 190px | ||
| + | | area4 = Sniper's Deck | ||
| + | | x4 = 485px | ||
| + | | y4 = 235px | ||
| + | | area5 = Shed | ||
| + | | x5 = 400px | ||
| + | | y5 = 165px | ||
| + | | area6 = Left Flank | ||
| + | | x6 = 545px | ||
| + | | y6 = 125px | ||
| + | | area7 = Central area | ||
| + | | x7 = 565px | ||
| + | | y7 = 220px | ||
| + | | area8 = Church | ||
| + | | x8 = 635px | ||
| + | | y8 = 180px | ||
| + | }} | ||
| + | ====== Stage 3 ====== | ||
| + | {{Map locations | ||
| + | | tile = Erebus, stage three - Locations | ||
| + | | image = Cp ambush event0002.png | ||
| + | |- | ||
| + | | spawn1 = BLU spawn | ||
| + | | spawn-color1 = blu | ||
| + | | xA = 90px | ||
| + | | yA = 370px | ||
| + | | spawn2 = RED spawn | ||
| + | | spawn-color2 = red | ||
| + | | xB = 600px | ||
| + | | yB = 220px | ||
| + | |- | ||
| + | | area1 = Building 237 | ||
| + | | x1 = 120px | ||
| + | | y1 = 320px | ||
| + | | area2 = Yard | ||
| + | | x2 = 295px | ||
| + | | y2 = 320px | ||
| + | | area3 = Elevation | ||
| + | | x3 = 280px | ||
| + | | y3 = 210px | ||
| + | | area4 = Computer room | ||
| + | | x4 = 355px | ||
| + | | y4 = 205px | ||
| + | | area5 = Under Flank | ||
| + | | x5 = 375px | ||
| + | | y5 = 165px | ||
| + | | area6 = Propane Yard | ||
| + | | x6 = 515px | ||
| + | | y6 = 260px | ||
| + | | area7 = Red Shed | ||
| + | | x7 = 470px | ||
| + | | y7 = 320px | ||
| + | }} | ||
| + | ---- | ||
| + | ==== Gorge ==== | ||
| + | ===== Old ===== | ||
| + | [[File:Gorge_overview_with_lines.png|800px|center]] | ||
| + | ===== Lolimsogreat21's version ===== | ||
| + | {{Map locations | ||
| + | | title = Gorge - Locations | ||
| + | | image = Gorge overview.png | ||
| + | |- | ||
| + | | spawn1 = BLU first spawn | ||
| + | | spawn-color1 = blu | ||
| + | | xA =431px | ||
| + | | yA = 65px | ||
| + | | spawn2 = BLU second spawn | ||
| + | | spawn-color2 = blu | ||
| + | | xB = 418px | ||
| + | | yB = 437px | ||
| + | | spawn3 = RED only spawn | ||
| + | | spawn-color3 = red | ||
| + | | xC = 283px | ||
| + | | yC = 986px | ||
| + | |- | ||
| + | | area1 = Entrance yard | ||
| + | | x1 = 320px | ||
| + | | y1 = 257px | ||
| + | | area2 = Toll both | ||
| + | | x2 = 353px | ||
| + | | y2 = 309px | ||
| + | | area3 = Upper deck | ||
| + | | x3 = 511px | ||
| + | | y3 = 367px | ||
| + | | area4 = Checkpoint building | ||
| + | | x4 = 364px | ||
| + | | y4 = 473px | ||
| + | | area5 = Gorge (valley) | ||
| + | | x5 = 436px | ||
| + | | y5 = 557px | ||
| + | | area6 = Flank hallway | ||
| + | | x6 = 396px | ||
| + | | y6 = 673px | ||
| + | | area7 = Main hallway | ||
| + | | x7 = 295px | ||
| + | | y7 = 727px | ||
| + | | area8 = Second floor | ||
| + | | x8 = 381px | ||
| + | | y8 = 812px | ||
| + | | area9 = Flank room | ||
| + | | x9 = 440px | ||
| + | | y9 = 957px | ||
| + | }} | ||
| + | ---- | ||
| + | ==== Gorge Event ==== | ||
| + | ===== Old ===== | ||
| + | [[File:Gorge_Event_overview_with_lines.png|800px|center]] | ||
| + | ===== Lolimsogreat21's version ===== | ||
| + | {{Map locations | ||
| + | | title = Gorge Event - Locations | ||
| + | | image = Gorge Event overview.png | ||
| + | |- | ||
| + | | spawn1 = BLU first spawn | ||
| + | | spawn-color1 = blu | ||
| + | | xA = 533px | ||
| + | | yA = 62px | ||
| + | | spawn2 = BLU second spawn | ||
| + | | spawn-color2 = blu | ||
| + | | xB = 480px | ||
| + | | yB = 246px | ||
| + | | spawn3 = RED only spawn | ||
| + | | spawn-color3 = red | ||
| + | | xC = 416px | ||
| + | | yC = 658px | ||
| + | |- | ||
| + | | area1 = Entrance yard | ||
| + | | x1 = 455px | ||
| + | | y1 = 131px | ||
| + | | area2 = Toll both | ||
| + | | x2 = 472px | ||
| + | | y2 = 170px | ||
| + | | area3 = Upper deck | ||
| + | | x3 = 587px | ||
| + | | y3 = 216px | ||
| + | | area4 = Checkpoint building | ||
| + | | x4 = 520px | ||
| + | | y4 = 272px | ||
| + | | area5 = Gorge (valley) | ||
| + | | x5 = 564px | ||
| + | | y5 = 333px | ||
| + | | area6 = Flank hallway | ||
| + | | x6 = 500px | ||
| + | | y6 = 420px | ||
| + | | area7 = Main hallway | ||
| + | | x7 = 427px | ||
| + | | y7 = 465px | ||
| + | | area8 = Second floor | ||
| + | | x8 = 522px | ||
| + | | y8 = 542px | ||
| + | | area9 = Flank room | ||
| + | | x9 = 541px | ||
| + | | y9 = 641px | ||
| + | }} | ||
| + | ---- | ||
| + | ==== Gravel Pit ==== | ||
| + | ===== Old ===== | ||
| + | [[File:Gravel_Pit_overview_with_lines.png|800px|center]] | ||
| + | ===== Lolimsogreat21's version ===== | ||
| + | {{Map locations | ||
| + | | title = Gravel Pit - Locations | ||
| + | | image = Gravel Pit overview.png | ||
| + | |- | ||
| + | | spawn1 = BLU spawn | ||
| + | | spawn-color1 = blu | ||
| + | | xA = 470px | ||
| + | | yA = 190px | ||
| + | | spawn2 = RED spawn | ||
| + | | spawn-color2 = red | ||
| + | | xB = 83px | ||
| + | | yB = 347px | ||
| + | |- | ||
| + | | area1 = B side tunnel | ||
| + | | x1 = 398px | ||
| + | | y1 = 134px | ||
| + | | area2 = Radar building | ||
| + | | x2 = 265px | ||
| + | | y2 = 168px | ||
| + | | area3 = Shadow side | ||
| + | | x3 = 229px | ||
| + | | y3 = 194px | ||
| + | | area4 = Balcony | ||
| + | | x4 = 300px | ||
| + | | y4 = 268px | ||
| + | | area5 = A/B connector | ||
| + | | x5 = 378px | ||
| + | | y5 = 258px | ||
| + | | area6 = A side tunnel | ||
| + | | x6 = 455px | ||
| + | | y6 = 289px | ||
| + | | area7 = Path | ||
| + | | x7 = 448px | ||
| + | | y7 = 356px | ||
| + | | area8 = Valley | ||
| + | | x8 = 482px | ||
| + | | y8 = 381px | ||
| + | | area9 = Radio tower | ||
| + | | x9 = 435px | ||
| + | | y9 = 416px | ||
| + | | area10 = Laser tower | ||
| + | | x10 = 225px | ||
| + | | y10 = 365px | ||
| + | | area11 = Ground level | ||
| + | | x11 = 190px | ||
| + | | y11 = 402px | ||
| + | }} | ||
| + | ---- | ||
| + | ==== Junction ==== | ||
| + | ===== Old ===== | ||
| + | [[File:Junction_overview_with_lines.png|800px|center]] | ||
| + | ===== Lolimsogreat21's version ===== | ||
| + | {{Map locations | ||
| + | | title = Junction - Locations | ||
| + | | image = Junction overview.png | ||
| + | |- | ||
| + | | spawn1 = BLU spawn | ||
| + | | spawn-color1 = blu | ||
| + | | xA = 580px | ||
| + | | yA = 270px | ||
| + | | spawn2 = RED spawn | ||
| + | | spawn-color2 = red | ||
| + | | xB = 90px | ||
| + | | yB = 253px | ||
| + | |- | ||
| + | | area1 = Balconies | ||
| + | | x1 = 438px | ||
| + | | y1 = 113px | ||
| + | | area2 = B lobby | ||
| + | | x2 = 420px | ||
| + | | y2 = 160px | ||
| + | | area3 = Balconies | ||
| + | | x3 = 341px | ||
| + | | y3 = 204px | ||
| + | | area4 = B/C flank | ||
| + | | x4 = 308px | ||
| + | | y4 = 235px | ||
| + | | area5 = Platform | ||
| + | | x5 = 191px | ||
| + | | y5 = 286px | ||
| + | | area6 = A/C flank | ||
| + | | x6 = 304px | ||
| + | | y6 = 343px | ||
| + | | area7 = A/B route | ||
| + | | x7 = 390px | ||
| + | | y7 = 315px | ||
| + | | area8 = A lobby | ||
| + | | x8 = 415px | ||
| + | | y8 = 405px | ||
| + | | area9 = Stairs | ||
| + | | x9 = 360px | ||
| + | | y9 = 463px | ||
| + | }} | ||
| + | ---- | ||
| + | ==== Mercenary Park ==== | ||
| + | ===== Old ===== | ||
| + | [[File:Mercenary_Park_with_lines.png|800px|center]] | ||
| + | ===== Lolimsogreat21's version ===== | ||
| + | {{Map locations | ||
| + | | title = Mercenary Park - Locations | ||
| + | | image = Mercenary Park (map) overview.png | ||
| + | |- | ||
| + | | spawn1 = BLU first spawn | ||
| + | | spawn-color1 = blu | ||
| + | | xA = 624px | ||
| + | | yA = 158px | ||
| + | | spawn2 = BLU second spawn | ||
| + | | spawn-color2 = blu | ||
| + | | xB = 482px | ||
| + | | yB = 256px | ||
| + | | spawn3 = BLU third spawn | ||
| + | | spawn-color3 = blu | ||
| + | | xC = 260px | ||
| + | | yC = 218px | ||
| + | | spawn4 = RED first spawn | ||
| + | | spawn-color4 = red | ||
| + | | xD = 332px | ||
| + | | yD = 100px | ||
| + | | spawn5 = RED final spawn | ||
| + | | spawn-color5 = red | ||
| + | | xE = 64px | ||
| + | | yE = 169px | ||
| + | |- | ||
| + | | area1 = Gift shop | ||
| + | | x1 = 594px | ||
| + | | y1 = 158px | ||
| + | | area2 = Playground | ||
| + | | x2 = 563px | ||
| + | | y2 = 212px | ||
| + | | area3 = Mann.Co building | ||
| + | | x3 = 498px | ||
| + | | y3 = 234px | ||
| + | | area4 = Transport cages | ||
| + | | x4 = 439px | ||
| + | | y4 = 237px | ||
| + | | area5 = Catwalks | ||
| + | | x5 = 414px | ||
| + | | y5 = 184px | ||
| + | | area6 = Server room | ||
| + | | x6 = 330px | ||
| + | | y6 = 173px | ||
| + | | area7 = Elevator shaft | ||
| + | | x7 = 189px | ||
| + | | y7 = 200px | ||
| + | | area8 = Institute for Research and Development (YTI Room) | ||
| + | | x8 = 183px | ||
| + | | y8 = 241px | ||
| + | | area9 = Ventilation shaft | ||
| + | | x9 = 161px | ||
| + | | y9 = 275px | ||
| + | | area10 = Side stairs | ||
| + | | x10 = 108px | ||
| + | | y10 = 249px | ||
| + | | area11 = Platform | ||
| + | | x11 = 128px | ||
| + | | y11 = 202px | ||
| + | }} | ||
| + | ---- | ||
| + | ==== Mossrock ==== | ||
| + | ===== Old ===== | ||
| + | [[File:Mossrock_overview_with_lines.png|800px|center]] | ||
| + | ===== Lolimsogreat21's version ===== | ||
| + | {{Map locations | ||
| + | | title = Mossrock - Locations | ||
| + | | image = Mossrock overview.png | ||
| + | |- | ||
| + | | spawn1 = BLU first spawn | ||
| + | | spawn-color1 = blu | ||
| + | | xA = 220px | ||
| + | | yA = 537px | ||
| + | | spawn2 = BLU second spawn | ||
| + | | spawn-color2 = blu | ||
| + | | xB = 416px | ||
| + | | yB = 572px | ||
| + | | spawn3 = RED spawn | ||
| + | | spawn-color3 = red | ||
| + | | xC = 748px | ||
| + | | yC = 430px | ||
| + | |- | ||
| + | | area1 = Captain Dan's Wood pulp | ||
| + | | x1 = 318px | ||
| + | | y1 = 547px | ||
| + | | area2 = Casali Shafting Co. | ||
| + | | x2 = 401px | ||
| + | | y2 = 541px | ||
| + | | area3 = Riverwalk | ||
| + | | x3 = 415px | ||
| + | | y3 = 499px | ||
| + | | area4 = Radio Shack with Radio Room | ||
| + | | x4 = 415px | ||
| + | | y4 = 430px | ||
| + | | area5 = Island flank | ||
| + | | x5 = 461px | ||
| + | | y5 = 463px | ||
| + | | area6 = Jenkin Coal Co. | ||
| + | | x6 = 527px | ||
| + | | y6 = 474px | ||
| + | | area7 = Shipping | ||
| + | | x7 = 580px | ||
| + | | y7 = 438px | ||
| + | | area8 = One tree hill | ||
| + | | x8 = 585px | ||
| + | | y8 = 487px | ||
| + | | area9 = Trestle | ||
| + | | x9 = 629px | ||
| + | | y9 = 496px | ||
| + | }} | ||
| + | ---- | ||
| + | ==== Mountain Lab ==== | ||
| + | ===== Old ===== | ||
| + | [[File:Mountain_Lab_overview_with_lines.png|800px|center]] | ||
| + | ===== Lolimsogreat21's version ===== | ||
| + | {{Map locations | ||
| + | | title = Mountain Lab - Locations | ||
| + | | image = Mountain Lab overview.png | ||
| + | |- | ||
| + | | spawn1 = BLU spawn | ||
| + | | spawn-color1 = blu | ||
| + | | xA = 698px | ||
| + | | yA = 232px | ||
| + | | spawn2 = RED spawn | ||
| + | | spawn-color2 = red | ||
| + | | xB = 37px | ||
| + | | yB = 100px | ||
| + | |- | ||
| + | | area1 = Yard | ||
| + | | x1 = 601px | ||
| + | | y1 = 271px | ||
| + | | area2 = Warehouse | ||
| + | | x2 = 550px | ||
| + | | y2 = 198px | ||
| + | | area3 = Shed | ||
| + | | x3 = 454px | ||
| + | | y3 = 142px | ||
| + | | area4 = Tunnel | ||
| + | | x4 = 432px | ||
| + | | y4 = 298px | ||
| + | | area5 = Small house | ||
| + | | x5 = 355px | ||
| + | | y5 = 455px | ||
| + | | area6 = Cliffs | ||
| + | | x6 = 330px | ||
| + | | y6 = 324px | ||
| + | | area8 = Lower entrance tunnels | ||
| + | | x8 = 319px | ||
| + | | y8 = 186px | ||
| + | | area7 = Upper entrance tunnels | ||
| + | | x7 = 210px | ||
| + | | y7 = 228px | ||
| + | | area9 = Top floor | ||
| + | | x9 = 219px | ||
| + | | y9 = 120px | ||
| + | }} | ||
| + | ---- | ||
| + | ==== Mann Manor ==== | ||
| + | ===== Old ===== | ||
| + | [[File:Mann_Manor_overview_with_lines.png|800px|center]] | ||
| + | ===== Lolimsogreat21's version ===== | ||
| + | {{Map locations | ||
| + | | title = Mann Manor - Locations | ||
| + | | image = Mann Manor overview.png | ||
| + | |- | ||
| + | | spawn1 = BLU spawn | ||
| + | | spawn-color1 = blu | ||
| + | | xA = 680px | ||
| + | | yA = 287px | ||
| + | | spawn2 = RED spawn | ||
| + | | spawn-color2 = red | ||
| + | | xB = 120px | ||
| + | | yB = 151px | ||
| + | |- | ||
| + | | area1 = Yard | ||
| + | | x1 = 618px | ||
| + | | y1 = 286px | ||
| + | | area2 = Warehouse | ||
| + | | x2 = 567px | ||
| + | | y2 = 260px | ||
| + | | area3 = Shed | ||
| + | | x3 = 495px | ||
| + | | y3 = 195px | ||
| + | | area4 = Tunnel | ||
| + | | x4 = 477px | ||
| + | | y4 = 323px | ||
| + | | area5 = Small house | ||
| + | | x5 = 404px | ||
| + | | y5 = 429px | ||
| + | | area6 = Cliffs | ||
| + | | x6 = 377px | ||
| + | | y6 = 347px | ||
| + | | area8 = Lower entrance tunnels | ||
| + | | x8 = 374px | ||
| + | | y8 = 231px | ||
| + | | area7 = Upper entrance tunnels | ||
| + | | x7 = 284px | ||
| + | | y7 = 287px | ||
| + | | area9 = Top floor | ||
| + | | x9 = 271px | ||
| + | | y9 = 173px | ||
| + | }} | ||
| + | ---- | ||
| + | ==== Snowplow ==== | ||
| + | ===== Old ===== | ||
| + | [[File:Snowplow_Overview_A_with_lines.png|600px]] | ||
| + | [[File:Snowplow Overview B with lines.png|600px]] | ||
| + | ===== Lolimsogreat21's version ===== | ||
| + | ====== Stage 1 ====== | ||
| + | {{Map locations | ||
| + | | title = Snowplow, stage one - Locations | ||
| + | | image = Snowplow Overview 1.png | ||
| + | |- | ||
| + | | spawn1 = BLU first spawn | ||
| + | | spawn-color1 = blu | ||
| + | | xA = 212px | ||
| + | | yA = 537px | ||
| + | | spawn2 = BLU second spawn | ||
| + | | spawn-color2 = blu | ||
| + | | xB = 319px | ||
| + | | yB = 430px | ||
| + | | spawn3 = RED first spawn | ||
| + | | spawn-color3 = red | ||
| + | | xC = 347px | ||
| + | | yC = 133px | ||
| + | | spawn4 = RED second spawn | ||
| + | | spawn-color4 = red | ||
| + | | xD = 160px | ||
| + | | yD = 151px | ||
| + | |- | ||
| + | | area1 = Left exit building | ||
| + | | x1 =170px | ||
| + | | y1 = 450px | ||
| + | | area2 = Right side building | ||
| + | | x2 = 272px | ||
| + | | y2 = 434px | ||
| + | | area3 = Right side structure | ||
| + | | x3 = 421px | ||
| + | | y3 = 420px | ||
| + | | area4 = Structural path | ||
| + | | x4 = 381px | ||
| + | | y4 = 355px | ||
| + | | area5 = Warehouse | ||
| + | | x5 = 430px | ||
| + | | y5 = 189px | ||
| + | | area6 = Wooden tower | ||
| + | | x6 = 249px | ||
| + | | y6 = 254px | ||
| + | }} | ||
| + | ====== Stage 2 ====== | ||
| + | {{Map locations | ||
| + | | title = Snowplow, stage two - Locations | ||
| + | | image = Snowplow Overview 2.png | ||
| + | |- | ||
| + | | spawn1 = BLU first spawn | ||
| + | | spawn-color1 = blu | ||
| + | | xA = 299px | ||
| + | | yA = 540px | ||
| + | | spawn2 = BLU second spawn | ||
| + | | xB = 328px | ||
| + | | yB = 238px | ||
| + | | spawn3 = RED spawn | ||
| + | | xC = 616px | ||
| + | | yC = 240px | ||
| + | |- | ||
| + | | area1 = Supply shed | ||
| + | | x1 = 233px | ||
| + | | y1 = 445px | ||
| + | | area2 = Left house | ||
| + | | x2 = 260px | ||
| + | | y2 = 300px | ||
| + | | area3 = Battlements | ||
| + | | x3 = 424px | ||
| + | | y3 = 179px | ||
| + | | area4 = Left path structure | ||
| + | | x4 = 616px | ||
| + | | y4 = 92px | ||
| + | }} | ||
| + | ---- | ||
| + | ==== Steel ==== | ||
| + | ===== Old ===== | ||
| + | [[File:Steel_overview_with_lines.png|800px|center]] | ||
| + | ===== Lolimsogreat21's version ===== | ||
| + | {{Map locations | ||
| + | | title = Steel - Locations | ||
| + | | image = Steel overview.png | ||
| + | |- | ||
| + | | spawn1 = BLU spawn | ||
| + | | spawn-color1 = blu | ||
| + | | xA = 384px | ||
| + | | yA = 447px | ||
| + | | spawn2 = RED spawn | ||
| + | | spawn-color2 = red | ||
| + | | xB = 366px | ||
| + | | yB = 13px | ||
| + | |- | ||
| + | | area1 = Hill | ||
| + | | x1 = 258px | ||
| + | | y1 = 423px | ||
| + | | area2 = Cliffs | ||
| + | | x2 = 322px | ||
| + | | y2 = 382px | ||
| + | | area3 = Shipping dock | ||
| + | | x3 = 298px | ||
| + | | y3 = 310px | ||
| + | | area5 = Storehouse | ||
| + | | x5 = 270px | ||
| + | | y5 = 125px | ||
| + | | area4 = Launch room | ||
| + | | x4 = 363px | ||
| + | | y4 = 211px | ||
| + | | area6 = Canyon | ||
| + | | x6 = 464px | ||
| + | | y6 = 108px | ||
| + | | area7 = Rocks | ||
| + | | x7 = 467px | ||
| + | | y7 = 175px | ||
| + | | area8 = Truck yard | ||
| + | | x8 = 523px | ||
| + | | y8 = 274px | ||
| + | | area9 = Wooden building | ||
| + | | x9 = 469px | ||
| + | | y9 = 330px | ||
| + | | area10 = narrow building | ||
| + | | x10 = 522px | ||
| + | | y10 = 390px | ||
| + | }} | ||
| + | ---- | ||
| + | ==== DeGroot Keep ==== | ||
| + | ===== Old ===== | ||
| + | [[File:DeGroot_Keep_overview_with_lines.png|800px|center]] | ||
| + | ===== Lolimsogreat21's version ===== | ||
| + | {{Map locations | ||
| + | | title = DeGroot Keep - Locations | ||
| + | | image = DeGroot Keep overview.png | ||
| + | |- | ||
| + | | area1 = Rock | ||
| + | | x1 = 329px | ||
| + | | y1 = 300px | ||
| + | | area2 = Main battlefield | ||
| + | | x2 = 352px | ||
| + | | y2 = 252px | ||
| + | | area3 = Battlements | ||
| + | | x3 = 368px | ||
| + | | y3 = 173px | ||
| + | | area4 = Castle halls | ||
| + | | x4 = 314px | ||
| + | | y4 = 114px | ||
| + | }} | ||
| + | ---- | ||
| + | ==== Standin ==== | ||
| + | ---- | ||
| + | === CP (Symmetric) === | ||
| + | ==== 5Gorge ==== | ||
| + | ===== Old ===== | ||
| + | [[File:5Gorge_overview_with_lines.png|800px|center]] | ||
| + | ===== Lolimsogreat21's version ===== | ||
| + | {{Map locations | ||
| + | | title = 5Gorge - Locations | ||
| + | | image = 5Gorge overview.png | ||
| + | |- | ||
| + | | spawn1 = RED first spawn | ||
| + | | xA = 431px | ||
| + | | yA = 15px | ||
| + | | spawn2 = RED second spawn | ||
| + | | xB = 400px | ||
| + | | yB = 211px | ||
| + | | spawn3 = RED third spawn | ||
| + | | xC = 307px | ||
| + | | yC = 512px | ||
| + | |- | ||
| + | | area1 = Pit | ||
| + | | x1 = 383px | ||
| + | | y1 = 491px | ||
| + | | area2 = Upper ring | ||
| + | | x2 = 433px | ||
| + | | y2 = 465px | ||
| + | | area3 = Lobby | ||
| + | | x3 = 386px | ||
| + | | y3 = 412px | ||
| + | | area4 = Main hallway | ||
| + | | x4 = 330px | ||
| + | | y4 = 390px | ||
| + | | area5 = Flank hallway | ||
| + | | x5 = 397px | ||
| + | | y5 = 361px | ||
| + | | area6 = Valley (Gorge) | ||
| + | | x6 = 420px | ||
| + | | y6 = 293px | ||
| + | | area7 = Main building | ||
| + | | x7 = 365px | ||
| + | | y7 = 228px | ||
| + | | area8 = Second floor | ||
| + | | x8 = 467px | ||
| + | | y8 = 202px | ||
| + | | area9 = Small shed | ||
| + | | x9 = 377px | ||
| + | | y9 = 166px | ||
| + | | area10 = Crates | ||
| + | | x10 = 412px | ||
| + | | y10 = 130px | ||
| + | }} | ||
| + | ---- | ||
| + | ==== Badlands (Control Point) ==== | ||
| + | ===== Old ===== | ||
| + | [[File:Badlands_(Control_Point)_overview_with_lines.png|800px|center]] | ||
| + | ===== Lolimsogreat21's version ===== | ||
| + | {{Map locations | ||
| + | | title = Badlands (Control Point) - Locations | ||
| + | | image = Badlands (Control Point) overview.png | ||
| + | |- | ||
| + | | area1 = Rail cars | ||
| + | | x1 = 388px | ||
| + | | y1 = 528px | ||
| + | | area2 = Pillars | ||
| + | | x2 = 356px | ||
| + | | y2 = 474px | ||
| + | | area3 = Window and the Balcony | ||
| + | | x3 = 312px | ||
| + | | y3 = 486px | ||
| + | | area4 = Valley | ||
| + | | x4 = 275px | ||
| + | | y4 = 470px | ||
| + | | area5 = Ledge | ||
| + | | x5 = 320px | ||
| + | | y5 = 309px | ||
| + | | area6 = Bridge | ||
| + | | x6 = 226px | ||
| + | | y6 = 377px | ||
| + | | area7 = Battlements | ||
| + | | x7 = 150px | ||
| + | | y7 = 395px | ||
| + | | area8 = Lower left entrance | ||
| + | | x8 = 43px | ||
| + | | y8 = 331px | ||
| + | }} | ||
| + | ---- | ||
| + | ==== Coldfront ==== | ||
| + | ===== Old ===== | ||
| + | [[File:Coldfront_overview_with_lines.png|800px|center]] | ||
| + | ===== Lolimsogreat21's version ===== | ||
| + | {{Map locations | ||
| + | | title = Coldfront - Locations | ||
| + | | image = Coldfront overview.png | ||
| + | |- | ||
| + | | spawn1 = RED first spawn | ||
| + | | xA = 758px | ||
| + | | yA = 164px | ||
| + | | spawn2 = RED second spawn | ||
| + | | xB = 582px | ||
| + | | yB = 121px | ||
| + | | spawn3 = RED third spawn | ||
| + | | xC = 441px | ||
| + | | yC = 146px | ||
| + | |- | ||
| + | | area1 = Rocks | ||
| + | | x1 = 377px | ||
| + | | y1 = 183px | ||
| + | | area2 = High cliff | ||
| + | | x2 = 427px | ||
| + | | y2 = 189px | ||
| + | | area3 = Yard | ||
| + | | x3 = 490px | ||
| + | | y3 = 173px | ||
| + | | area4 = Garage | ||
| + | | x4 = 538px | ||
| + | | y4 = 147px | ||
| + | | area5 = Platform | ||
| + | | x5 = 560px | ||
| + | | y5 = 170px | ||
| + | | area6 = Silo | ||
| + | | x6 = 622px | ||
| + | | y6 = 179px | ||
| + | | area7 = Outer ring | ||
| + | | x7 = 645px | ||
| + | | y7 = 218px | ||
| + | | area8 = Side entrance | ||
| + | | x8 = 614px | ||
| + | | y8 = 256px | ||
| + | }} | ||
| + | ---- | ||
| + | ==== Fastlane ==== | ||
| + | ===== Old ===== | ||
| + | [[File:Fastlane_overview_with_lines.png|800px|center]] | ||
| + | ===== Lolimsogreat21's version ===== | ||
| + | {{Map locations | ||
| + | | title = Fastlane - Locations | ||
| + | | image = Fastlane overview.png | ||
| + | |- | ||
| + | | spawn1 = RED first spawn | ||
| + | | xA = 735px | ||
| + | | yA = 186px | ||
| + | | spawn2 = RED second spawn | ||
| + | | xB = 543px | ||
| + | | yB = 140px | ||
| + | | spawn3 = RED third spawn | ||
| + | | xC = 429px | ||
| + | | yC = 185px | ||
| + | |- | ||
| + | | area1 = Shacks | ||
| + | | x1 = 379px | ||
| + | | y1 = 260px | ||
| + | | area2 = Valley | ||
| + | | x2 = 427px | ||
| + | | y2 = 270px | ||
| + | | area3 = House | ||
| + | | x3 = 461px | ||
| + | | y3 = 231px | ||
| + | | area4 = Bridge | ||
| + | | x4 = 570px | ||
| + | | y4 = 227px | ||
| + | | area5 = Lobby | ||
| + | | x5 = 615px | ||
| + | | y5 = 222px | ||
| + | | area6 = Upper hallway | ||
| + | | x6 = 690px | ||
| + | | y6 = 250px | ||
| + | }} | ||
| + | ---- | ||
| + | ==== Foundry ==== | ||
| + | ===== Old ===== | ||
| + | [[File:Foundry_overview_with_lines2.png|800px|center]] | ||
| + | ===== Lolimsogreat21's version ===== | ||
| + | {{Map locations | ||
| + | | title = Foundry - Locations | ||
| + | | image = Foundry overview.png | ||
| + | |- | ||
| + | | spawn1 = RED first spawn | ||
| + | | xA = 420px | ||
| + | | yA = 287px | ||
| + | | spawn2 = RED second spawn | ||
| + | | xB = 421px | ||
| + | | yB = 436px | ||
| + | | spawn3 = RED third spawn | ||
| + | | xC = 265px | ||
| + | | yC = 722px | ||
| + | |- | ||
| + | | area1 = Roof and the central platform | ||
| + | | x1 = 391px | ||
| + | | y1 = 843px | ||
| + | | area2 = Transition building | ||
| + | | x2 = 493px | ||
| + | | y2 = 653px | ||
| + | | area3 = Platform | ||
| + | | x3 = 541px | ||
| + | | y3 = 508px | ||
| + | | area4 = Yard | ||
| + | | x4 = 414px | ||
| + | | y4 = 547px | ||
| + | | area5 = Side path | ||
| + | | x5 = 322px | ||
| + | | y5 = 472px | ||
| + | | area6 = Upper walkway | ||
| + | | x6 = 391px | ||
| + | | y6 = 407px | ||
| + | | area7 = Stairs | ||
| + | | x7 = 492px | ||
| + | | y7 = 397px | ||
| + | | area8 = Foundry room | ||
| + | | x8 = 424px | ||
| + | | y8 = 341px | ||
| + | }} | ||
| + | ---- | ||
| + | ==== Freight ==== | ||
| + | ===== Old ===== | ||
| + | [[File:Freight_overview_with_lines.png|800px|center]] | ||
| + | ===== Lolimsogreat21's version ===== | ||
| + | {{Map locations | ||
| + | | title = Freight - Locations | ||
| + | | image = Freight overview.png | ||
| + | |- | ||
| + | | spawn1 = RED first spawn | ||
| + | | xA = 630px | ||
| + | | yA = 341px | ||
| + | | spawn2 = RED second spawn | ||
| + | | xB = 558px | ||
| + | | yB = 152px | ||
| + | | spawn3 = RED third spawn | ||
| + | | xC = 418px | ||
| + | | yC = 397px | ||
| + | |- | ||
| + | | area1 = Central building | ||
| + | | x1 = 431px | ||
| + | | y1 = 310px | ||
| + | | area2 = Yard | ||
| + | | x2 = 377px | ||
| + | | y2 = 275px | ||
| + | | area3 = Stairs | ||
| + | | x3 = 416px | ||
| + | | y3 = 252px | ||
| + | | area4 = Water | ||
| + | | x4 = 460px | ||
| + | | y4 = 237px | ||
| + | | area5 = Main entrance | ||
| + | | x5 = 496px | ||
| + | | y5 = 257px | ||
| + | | area6 = Flank entrance | ||
| + | | x6 = 533px | ||
| + | | y6 = 179px | ||
| + | | area7 = Yard exit | ||
| + | | x7 = 615px | ||
| + | | y7 = 195px | ||
| + | | area8 = Stairs to the second floor | ||
| + | | x8 = 570px | ||
| + | | y8 = 265px | ||
| + | | area9 = Tracks | ||
| + | | x9 = 591px | ||
| + | | y9 = 304px | ||
| + | }} | ||
| + | ---- | ||
| + | ==== Granary (Control Point) ==== | ||
| + | ===== Old ===== | ||
| + | [[File:Granary_(Control_Point)_overview_with_lines.png|800px|center]] | ||
| + | ===== Lolimsogreat21's version ===== | ||
| + | {{Map locations | ||
| + | | title = Granary (Control Point) - Locations | ||
| + | | image = Granary (Control Point) overview.png | ||
| + | |- | ||
| + | | area1 = Crates | ||
| + | | x1 = 380px | ||
| + | | y1 = 240px | ||
| + | | area2 = Garage | ||
| + | | x2 = 438px | ||
| + | | y2 = 253px | ||
| + | | area3 = Choke | ||
| + | | x3 = 451px | ||
| + | | y3 = 327px | ||
| + | | area4 = Left yard | ||
| + | | x4 = 505px | ||
| + | | y4 = 290px | ||
| + | | area5 = Chute hallway | ||
| + | | x5 = 529px | ||
| + | | y5 = 251px | ||
| + | | area6 = Right yard | ||
| + | | x6 = 544px | ||
| + | | y6 = 194px | ||
| + | | area7 = Granary mill | ||
| + | | x7 = 570px | ||
| + | | y7 = 230px | ||
| + | | area8 = Yard | ||
| + | | x8 = 648px | ||
| + | | y8 = 230px | ||
| + | | area9 = Pipes | ||
| + | | x9 = 660px | ||
| + | | y9 = 280px | ||
| + | | area10 = Yard | ||
| + | | x10 = 685px | ||
| + | | y10 = 317px | ||
| + | | area11 = Headquarters | ||
| + | | x11 = 740px | ||
| + | | y11 = 274px | ||
| + | }} | ||
| + | ---- | ||
| + | ==== Gullywash ==== | ||
| + | =====Brand new===== | ||
| + | {{Map locations | ||
| + | | title = Gullywash - Locations | ||
| + | | image = Gullywash overview.png | ||
| + | |- | ||
| + | | spawn1 = RED first spawn | ||
| + | | spawn-color1 = red | ||
| + | | xA = 105px | ||
| + | | yA = 140px | ||
| + | | spawn2 = RED second spawn | ||
| + | | spawn-color2 = red | ||
| + | | xB = 275px | ||
| + | | yB = 80px | ||
| + | | spawn3 = BLU third spawn | ||
| + | | spawn-color3 = red | ||
| + | | xC = 360px | ||
| + | | yC = 150px | ||
| + | |- | ||
| + | | area1 = Lobby | ||
| + | | x1 = 185px | ||
| + | | y1 = 165px | ||
| + | | area2 = Flanking route | ||
| + | | x2 = 225px | ||
| + | | y2 = 215px | ||
| + | | area3 = Main Entrance | ||
| + | | x3 = 260px | ||
| + | | y3 = 135px | ||
| + | | area4 = Balcony | ||
| + | | x4 = 345px | ||
| + | | y4 = 70px | ||
| + | | area5 = Cover | ||
| + | | x5 = 400px | ||
| + | | y5 = 170px | ||
| + | | area6 = Ramps | ||
| + | | x6 = 370px | ||
| + | | y6 = 210px | ||
| + | }} | ||
| + | ---- | ||
| + | |||
| + | ==== Metalworks ==== | ||
| + | ===== Old ===== | ||
| + | [[File:Metalworks_overview_with_lines.png|800px|center]] | ||
| + | ===== Lolimsogreat21's version ===== | ||
| + | {{Map locations | ||
| + | | title = Metalworks - Locations | ||
| + | | image = Metalworks overview.png | ||
| + | |- | ||
| + | | spawn1 = RED first spawn | ||
| + | | xA = 141px | ||
| + | | yA = 7px | ||
| + | | spawn2 = RED second spawn | ||
| + | | xB = 40px | ||
| + | | yB = 437px | ||
| + | | spawn3 = RED third spawn | ||
| + | | xC = 257px | ||
| + | | yC = 628px | ||
| + | |- | ||
| + | | area1 = Control point bridge | ||
| + | | x1 = 391px | ||
| + | | y1 = 634px | ||
| + | | area2 = Choke | ||
| + | | x2 = 339px | ||
| + | | y2 = 544px | ||
| + | | area3 = Pipe room | ||
| + | | x3 = 280px | ||
| + | | y3 = 617px | ||
| + | | area4 = Yard | ||
| + | | x4 = 204px | ||
| + | | y4 = 658px | ||
| + | | area5 = Flank | ||
| + | | x5 = 142px | ||
| + | | y5 = 632px | ||
| + | | area6 = bridge | ||
| + | | x6 = 203px | ||
| + | | y6 = 515px | ||
| + | | area7 = Main building | ||
| + | | x7 = 192px | ||
| + | | y7 = 351px | ||
| + | | area8 = Walkway | ||
| + | | x8 = 210px | ||
| + | | y8 = 230px | ||
| + | | area9 = Front yard | ||
| + | | x9 = 136px | ||
| + | | y9 = 159px | ||
| + | }} | ||
| + | ---- | ||
| + | ==== Powerhouse ==== | ||
| + | ===== Old ===== | ||
| + | [[File:Powerhouse_overview_with_lines.png|800px|center]] | ||
| + | ===== Lolimsogreat21's version ===== | ||
| + | {{Map locations | ||
| + | | title = Powerhouse - Locations | ||
| + | | image = Powerhouse overview.png | ||
| + | |- | ||
| + | | spawn1 = RED spawn | ||
| + | | spawn-color1 = red | ||
| + | | xA = 612px | ||
| + | | yA = 66px | ||
| + | | spawn2 = BLU spawn | ||
| + | | spawn-color2 = blu | ||
| + | | xB = 165px | ||
| + | | yB = 66px | ||
| + | |- | ||
| + | | area1 = End of paths | ||
| + | | x1 = 385px | ||
| + | | y1 = 470px | ||
| + | | area2 = Team sides | ||
| + | | x2 = 440px | ||
| + | | y2 = 390px | ||
| + | | area3 = Water | ||
| + | | x3 = 380px | ||
| + | | y3 = 360px | ||
| + | | area4 = Battlements | ||
| + | | x4 = 505px | ||
| + | | y4 = 345px | ||
| + | | area5 = Chokepoint | ||
| + | | x5 = 505px | ||
| + | | y5 = 300px | ||
| + | | area6 = Launch pad room | ||
| + | | x6 = 565px | ||
| + | | y6 = 265px | ||
| + | | area7 = Control room | ||
| + | | x7 = 525px | ||
| + | | y7 = 220px | ||
| + | }} | ||
| + | ---- | ||
| + | |||
| + | ==== Process ==== | ||
| + | ===== Old ===== | ||
| + | [[File:Process_overview_with_lines.png|800px|center]] | ||
| + | ===== Lolimsogreat21's version ===== | ||
| + | {{Map locations | ||
| + | | title = Process - Locations | ||
| + | | image = Process overview.png | ||
| + | |- | ||
| + | | spawn1 = RED first spawn | ||
| + | | xA = 654px | ||
| + | | yA = 322px | ||
| + | | spawn2 = RED second spawn | ||
| + | | xB = 604px | ||
| + | | yB = 156px | ||
| + | | spawn3 = RED third spawn | ||
| + | | xC = 405px | ||
| + | | yC = 270px | ||
| + | |- | ||
| + | | area1 = Platform | ||
| + | | x1 = 403px | ||
| + | | y1 = 230px | ||
| + | | area2 = Behind | ||
| + | | x2 = 409px | ||
| + | | y2 = 172px | ||
| + | | area3 = Sewers | ||
| + | | x3 = 456px | ||
| + | | y3 = 129px | ||
| + | | area4 = Choke | ||
| + | | x4 = 477px | ||
| + | | y4 = 177px | ||
| + | | area5 = IT/PC | ||
| + | | x5 = 503px | ||
| + | | y5 = 208px | ||
| + | | area6 = Spiral | ||
| + | | x6 = 568px | ||
| + | | y6 = 172px | ||
| + | | area7 = Balcony | ||
| + | | x7 = 566px | ||
| + | | y7 = 216px | ||
| + | | area8 = Rollout | ||
| + | | x8 = 599px | ||
| + | | y8 = 224px | ||
| + | | area9 = Tunnel | ||
| + | | x9 = 631px | ||
| + | | y9 = 220px | ||
| + | | area10 = Upper | ||
| + | | x10 = 625px | ||
| + | | y10 = 317px | ||
| + | }} | ||
| + | ---- | ||
| + | ==== Snakewater ==== | ||
| + | ===== Old ===== | ||
| + | [[File:Snakewater_overview_with_lines.png|800px|center]] | ||
| + | ===== Lolimsogreat21's version ===== | ||
| + | {{Map locations | ||
| + | | title = Snakewater - Locations | ||
| + | | image = Snakewater overview.png | ||
| + | |- | ||
| + | | spawn1 = RED first spawn | ||
| + | | xA = 749px | ||
| + | | yA = 422px | ||
| + | | spawn2 = RED second spawn | ||
| + | | xB = 473px | ||
| + | | yB = 465px | ||
| + | | spawn3 = RED third spawn | ||
| + | | xC = 487px | ||
| + | | yC = 280px | ||
| + | |- | ||
| + | | area1 = Kitchen/Shed | ||
| + | | x1 = 390px | ||
| + | | y1 = 360px | ||
| + | | area2 = House | ||
| + | | x2 = 421px | ||
| + | | y2 = 394px | ||
| + | | area3 = Buildings | ||
| + | | x3 = 466px | ||
| + | | y3 = 354px | ||
| + | | area4 = Main | ||
| + | | x4 = 468px | ||
| + | | y4 = 425px | ||
| + | | area5 = Cliff | ||
| + | | x5 = 555px | ||
| + | | y5 = 472px | ||
| + | | area6 = Lobby | ||
| + | | x6 = 590px | ||
| + | | y6 = 438px | ||
| + | | area7 = Right flank | ||
| + | | x7 = 645px | ||
| + | | y7 = 475px | ||
| + | | area8 = Lower/Main | ||
| + | | x8 = 663px | ||
| + | | y8 = 434px | ||
| + | | area9 = Left flank | ||
| + | | x9 = 681px | ||
| + | | y9 = 381px | ||
| + | }} | ||
| + | ---- | ||
| + | ==== Sunshine ==== | ||
| + | ===== Old ===== | ||
| + | [[File:Sunshine_overview_with_lines.png|800px|center]] | ||
| + | ===== Lolimsogreat21's version ===== | ||
| + | {{Map locations | ||
| + | | title = Sunshine - Locations | ||
| + | | image = Sunshine overview.png | ||
| + | |- | ||
| + | | spawn1 = RED first spawn | ||
| + | | xA = 523px | ||
| + | | yA = 675px | ||
| + | | spawn2 = RED second spawn | ||
| + | | xB = 580px | ||
| + | | yB = 384px | ||
| + | | spawn3 = RED third spawn | ||
| + | | xC = 459px | ||
| + | | yC = 353px | ||
| + | |- | ||
| + | | area1 = Shacks | ||
| + | | x1 = 420px | ||
| + | | y1 = 322px | ||
| + | | area2 = Cafe | ||
| + | | x2 = 489px | ||
| + | | y2 = 349px | ||
| + | | area3 = Chokepoint | ||
| + | | x3 = 455px | ||
| + | | y3 = 401px | ||
| + | | area4 = Valley | ||
| + | | x4 = 451px | ||
| + | | y4 = 452px | ||
| + | | area5 = Platform | ||
| + | | x5 = 480px | ||
| + | | y5 = 482px | ||
| + | | area6 = Staircase | ||
| + | | x6 = 582px | ||
| + | | y6 = 480px | ||
| + | | area7 = Wooden warehouse | ||
| + | | x7 = 529px | ||
| + | | y7 = 543px | ||
| + | | area8 = Elevation | ||
| + | | x8 = 474px | ||
| + | | y8 = 603px | ||
| + | | area9 = Wall | ||
| + | | x9 = 522px | ||
| + | | y9 = 643px | ||
| + | | area10 = Crates | ||
| + | | x10 = 593px | ||
| + | | y10 = 624px | ||
| + | }} | ||
| + | ---- | ||
| + | ==== Sinshine ==== | ||
| + | ===== Old ===== | ||
| + | [[File:Sinshine_overview_with_lines.png|800px|center]] | ||
| + | ===== Lolimsogreat21's version ===== | ||
| + | {{Map locations | ||
| + | | title = Sinshine - Locations | ||
| + | | image = Sinshine overview.png | ||
| + | |- | ||
| + | | spawn1 = RED first spawn | ||
| + | | xA = 485px | ||
| + | | yA = 594px | ||
| + | | spawn2 = RED second spawn | ||
| + | | xB = 546px | ||
| + | | yB = 310px | ||
| + | | spawn3 = RED third spawn | ||
| + | | xC = 429px | ||
| + | | yC = 290px | ||
| + | |- | ||
| + | | area1 = Shacks | ||
| + | | x1 = 393px | ||
| + | | y1 = 269px | ||
| + | | area2 = Cafe | ||
| + | | x2 = 472px | ||
| + | | y2 = 305px | ||
| + | | area3 = Chokepoint | ||
| + | | x3 = 428px | ||
| + | | y3 = 349px | ||
| + | | area4 = Valley | ||
| + | | x4 = 412px | ||
| + | | y4 = 385px | ||
| + | | area5 = Platform | ||
| + | | x5 = 450px | ||
| + | | y5 = 422px | ||
| + | | area6 = Staircase | ||
| + | | x6 = 544px | ||
| + | | y6 = 408px | ||
| + | | area7 = Wooden warehouse | ||
| + | | x7 = 498px | ||
| + | | y7 = 462px | ||
| + | | area8 = Elevation | ||
| + | | x8 = 445px | ||
| + | | y8 = 534px | ||
| + | | area9 = Wall | ||
| + | | x9 = 490px | ||
| + | | y9 = 560px | ||
| + | | area10 = Crates | ||
| + | | x10 = 543px | ||
| + | | y10 = 545px | ||
| + | }} | ||
| + | ---- | ||
| + | ==== Vanguard ==== | ||
| + | ===== Old ===== | ||
| + | [[File:Vanguard_overview_with_lines.png|800px|center]] | ||
| + | ===== Lolimsogreat21's version ===== | ||
| + | {{Map locations | ||
| + | | title = Vanguard - Locations | ||
| + | | image = Vanguard overview.png | ||
| + | | - | ||
| + | | spawn1 = RED first spawn | ||
| + | | xA = 755px | ||
| + | | yA = 324px | ||
| + | | spawn2 = RED second spawn | ||
| + | | xB = 569px | ||
| + | | yB = 221px | ||
| + | | spawn3 = RED third spawn | ||
| + | | xC = 460px | ||
| + | | yC = 220px | ||
| + | | - | ||
| + | | area1 = Center yard | ||
| + | | x1 = 385px | ||
| + | | y1 = 273px | ||
| + | | area2 = Scaffoldings | ||
| + | | x2 = 425px | ||
| + | | y2 = 240px | ||
| + | | area3 = Right balcony | ||
| + | | x3 = 536px | ||
| + | | y3 = 261px | ||
| + | | area4 = Center Scaffoldings | ||
| + | | x4 = 559px | ||
| + | | y4 = 312px | ||
| + | | area5 = Elevator | ||
| + | | x5 = 535px | ||
| + | | y5 = 350px | ||
| + | | area6 = Left building | ||
| + | | x6 = 560px | ||
| + | | y6 = 384px | ||
| + | | area7 = Observation room | ||
| + | | x7 = 633px | ||
| + | | y7 = 342px | ||
| + | | area8 = Air vent | ||
| + | | x8 = 689px | ||
| + | | y8 = 279px | ||
| + | }} | ||
| + | ---- | ||
| + | ==== Well (Control Point) ==== | ||
| + | ===== Old ===== | ||
| + | [[File:Well_(Control_Point)_overview_with_lines.png|800px|center]] | ||
| + | ===== Lolimsogreat21's version ===== | ||
| + | {{Map locations | ||
| + | | title = Well (Control Point) - Locations | ||
| + | | image = Well (Control Point) overview.png | ||
| + | |- | ||
| + | | spawn1 = RED first spawn | ||
| + | | xA = 13px | ||
| + | | yA = 189px | ||
| + | | spawn2 = RED second spawn | ||
| + | | xB = 180px | ||
| + | | yB = 238px | ||
| + | | spawn3 = RED third spawn | ||
| + | | xC = 352px | ||
| + | | yC = 220px | ||
| + | |- | ||
| + | | area1 = Main building | ||
| + | | x1 = 385px | ||
| + | | y1 = 228px | ||
| + | | area2 = Yard | ||
| + | | x2 = 329px | ||
| + | | y2 = 200px | ||
| + | | area3 = Swing door | ||
| + | | x3 = 275px | ||
| + | | y3 = 184px | ||
| + | | area4 = Swing door | ||
| + | | x4 = 275px | ||
| + | | y4 = 234px | ||
| + | | area5 = Battlements | ||
| + | | x5 = 254px | ||
| + | | y5 = 209px | ||
| + | | area6 = Inner lobby | ||
| + | | x6 = 200px | ||
| + | | y6 = 201px | ||
| + | | area7 = Command room | ||
| + | | x7 = 174px | ||
| + | | y7 = 201px | ||
| + | | area8 = Catwalks | ||
| + | | x8 = 145px | ||
| + | | y8 = 201px | ||
| + | }} | ||
| + | ---- | ||
| + | ==== Yukon ==== | ||
| + | ===== Old ===== | ||
| + | [[File:Yukon_overview_with_lines.png|800px|center]] | ||
| + | ===== Lolimsogreat21's version ===== | ||
| + | {{Map locations | ||
| + | | title = Yukon - Locations | ||
| + | | image = Yukon overview.png | ||
| + | |- | ||
| + | | spawn1 = RED first spawn | ||
| + | | xA = 137px | ||
| + | | yA = 496px | ||
| + | | spawn2 = RED second spawn | ||
| + | | xB = 119px | ||
| + | | yB = 244px | ||
| + | | spawn3 = RED third spawn | ||
| + | | xC = 321px | ||
| + | | yC = 338px | ||
| + | |- | ||
| + | | area1 = Bridge valley | ||
| + | | x1 = 383px | ||
| + | | y1 = 275px | ||
| + | | area2 = Valley | ||
| + | | x2 = 372px | ||
| + | | y2 = 211px | ||
| + | | area3 = Back path | ||
| + | | x3 = 275px | ||
| + | | y3 = 157px | ||
| + | | area4 = Main path | ||
| + | | x4 = 266px | ||
| + | | y4 = 204px | ||
| + | | area5 = Lower tunnel | ||
| + | | x5 = 250px | ||
| + | | y5 = 257px | ||
| + | | area6 = Side tunnel | ||
| + | | x6 = 111px | ||
| + | | y6 = 327px | ||
| + | | area7 = Bridge | ||
| + | | x7 = 170px | ||
| + | | y7 = 387px | ||
| + | | area8 = Basin | ||
| + | | x8 = 222px | ||
| + | | y8 = 389px | ||
| + | | area9 = Right path | ||
| + | | x9 = 241px | ||
| + | | y9 = 426px | ||
| + | }} | ||
| + | ---- | ||
| + | |||
| + | === KOTH === | ||
| + | ==== Badlands (King of the Hill) ==== | ||
| + | ===== Old ===== | ||
| + | [[File:Badlands_(King_of_the_Hill)_overview_with_lines_2.png|800px|center]] | ||
| + | ===== Lolimsogreat21's version ===== | ||
| + | {{Map locations | ||
| + | | title = Badlands (King of the Hill) - Locations | ||
| + | | image = Badlands (King of the Hill) overview.png | ||
| + | |- | ||
| + | | spawn1 = RED spawn | ||
| + | | spawn-color1 = red | ||
| + | | xA = 470px | ||
| + | | yA = 3px | ||
| + | | spawn2 = BLU spawn | ||
| + | | spawn-color2 = blu | ||
| + | | xB = 302px | ||
| + | | yB = 840px | ||
| + | |- | ||
| + | | area1 = Rail cars | ||
| + | | x1 = 453px | ||
| + | | y1 = 437px | ||
| + | | area2 = Rocky pillars | ||
| + | | x2 = 408px | ||
| + | | y2 = 377px | ||
| + | | area3 = Balcony | ||
| + | | x3 = 400px | ||
| + | | y3 = 300px | ||
| + | | area4 = Valley | ||
| + | | x4 = 328px | ||
| + | | y4 = 281px | ||
| + | }} | ||
| + | ---- | ||
| + | ==== Brazil ==== | ||
| + | ===== Old ===== | ||
| + | [[File:Brazil_overview_with_lines.png|800px|center]] | ||
| + | ===== Lolimsogreat21's version ===== | ||
| + | {{Map locations | ||
| + | | title = Brazil - Locations | ||
| + | | image = Brazil overview.png | ||
| + | |- | ||
| + | | spawn1 = BLU spawn | ||
| + | | spawn-color1 = blu | ||
| + | | xA = 190px | ||
| + | | yA = 480px | ||
| + | | spawn2 = RED spawn | ||
| + | | spawn-color2 = red | ||
| + | | xB = 570px | ||
| + | | yB = 480px | ||
| + | |- | ||
| + | | area1 = Spawn yard | ||
| + | | x1 = 220px | ||
| + | | y1 = 470px | ||
| + | | area2 = Outside route | ||
| + | | x2 = 260px | ||
| + | | y2 = 423px | ||
| + | | area3 = Middle route | ||
| + | | x3 = 262px | ||
| + | | y3 = 468px | ||
| + | | area4 = Inside route | ||
| + | | x4 = 281px | ||
| + | | y4 = 508px | ||
| + | | area5 = Vault room (Above the Alley) | ||
| + | | x5 = 321px | ||
| + | | y5 = 486px | ||
| + | | area6 = Alley | ||
| + | | x6 = 309px | ||
| + | | y6 = 457px | ||
| + | | area7 = Stairwell | ||
| + | | x7 = 375px | ||
| + | | y7 = 471px | ||
| + | | area8 = Hurg perch | ||
| + | | x8 = 380px | ||
| + | | y8 = 380px | ||
| + | | area9 = Coal house | ||
| + | | x9 = 302px | ||
| + | | y9 = 343px | ||
| + | | area10 = Back road | ||
| + | | x10 = 382px | ||
| + | | y10 = 288px | ||
| + | }} | ||
| + | ---- | ||
| + | ==== Cascade ==== | ||
| + | ===== Brand new ===== | ||
| + | {{Map locations | ||
| + | | title = Cascade - Locations | ||
| + | | image = Cascade overview.png | ||
| + | |- | ||
| + | | spawn1 = RED spawn | ||
| + | | spawn-color1 = red | ||
| + | | xA = 380px | ||
| + | | yA = 20px | ||
| + | | spawn2 = BLU spawn | ||
| + | | spawn-color2 = blu | ||
| + | | xB = 395px | ||
| + | | yB = 1020px | ||
| + | |- | ||
| + | | area1 = Spawn Area | ||
| + | | x1 = 390px | ||
| + | | y1 = 170px | ||
| + | | area2 = Valley | ||
| + | | x2 = 415px | ||
| + | | y2 = 300px | ||
| + | | area3 = Grain Pile | ||
| + | | x3 = 560px | ||
| + | | y3 = 370px | ||
| + | | area4 = Binski Logging | ||
| + | | x4 = 410px | ||
| + | | y4 = 370px | ||
| + | | area5 = Forklift | ||
| + | | x5 = 260px | ||
| + | | y5 = 410px | ||
| + | | area6 = Date Servers (Entrance) | ||
| + | | x6 = 355px | ||
| + | | y6 = 480px | ||
| + | | area7 = Mines | ||
| + | | x7 = 255px | ||
| + | | y7 = 550px | ||
| + | }} | ||
| + | ---- | ||
| + | |||
| + | ==== Cauldron ==== | ||
| + | ===== Old ===== | ||
| + | [[File:Cauldron_overview_with_lines.png|800px|center]] | ||
| + | ===== Lolimsogreat21's version ===== | ||
| + | {{Map locations | ||
| + | | title = Cauldron - Locations | ||
| + | | image = Cauldron overview.png | ||
| + | |- | ||
| + | | spawn1 = RED spawn | ||
| + | | spawn-color1 = red | ||
| + | | xA = 127px | ||
| + | | yA = 340px | ||
| + | | spawn2 = BLU spawn | ||
| + | | spawn-color2 = blu | ||
| + | | xB = 617px | ||
| + | | yB = 370px | ||
| + | |- | ||
| + | | area1 = Spawn areas | ||
| + | | x1 = 182px | ||
| + | | y1 = 360px | ||
| + | | area2 = Tracks/Ramp | ||
| + | | x2 = 205px | ||
| + | | y2 = 420px | ||
| + | | area3 = Battlements | ||
| + | | x3 = 262px | ||
| + | | y3 = 369px | ||
| + | | area4 = High ground | ||
| + | | x4 = 324px | ||
| + | | y4 = 346px | ||
| + | | area5 = Side buildings | ||
| + | | x5 = 379px | ||
| + | | y5 = 325px | ||
| + | }} | ||
| + | ---- | ||
| + | ==== Harvest ==== | ||
| + | ===== Old ===== | ||
| + | [[File:Harvest_overview_with_lines.png|800px|center]] | ||
| + | ===== Lolimsogreat21's version ===== | ||
| + | {{Map locations | ||
| + | | title = Harvest - Locations | ||
| + | |image = Harvest overview.png | ||
| + | |- | ||
| + | | spawn1 = RED spawn | ||
| + | | spawn-color1 = red | ||
| + | | xA = 343px | ||
| + | | yA = 475px | ||
| + | | spawn2 = BLU spawn | ||
| + | | spawn-color2 = blu | ||
| + | | xB = 425px | ||
| + | | yB = 77px | ||
| + | |- | ||
| + | | area1 = Center shed | ||
| + | | x1 = 385px | ||
| + | | y1 = 288px | ||
| + | | area2 = Farmhouse | ||
| + | | x2 = 468px | ||
| + | | y2 = 169px | ||
| + | | area3 = Side sheds | ||
| + | | x3 = 302px | ||
| + | | y3 = 189px | ||
| + | }} | ||
| + | ---- | ||
| + | ==== Harvest Event ==== | ||
| + | ===== Old ===== | ||
| + | [[File:Harvest_Event_overview_with_lines.png|800px|center]] | ||
| + | ===== Lolimsogreat21's version ===== | ||
| + | {{Map locations | ||
| + | | title = Harvest event - Locations | ||
| + | | image = Harvest Event overview.png | ||
| + | |- | ||
| + | | spawn1 = RED spawn | ||
| + | | spawn-color1 = red | ||
| + | | xA = 745px | ||
| + | | yA = 178px | ||
| + | | spawn2 = BLU spawn | ||
| + | | spawn-color2 = blu | ||
| + | | xB = 69px | ||
| + | | yB = 243px | ||
| + | |- | ||
| + | | area1 = Center shed | ||
| + | | x1 = 404px | ||
| + | | y1 = 222px | ||
| + | | area2 = Farmhouse | ||
| + | | x2 = 233px | ||
| + | | y2 = 180px | ||
| + | | area3 = Side sheds | ||
| + | | x3 = 294px | ||
| + | | y3 = 372px | ||
| + | }} | ||
| + | ---- | ||
| + | ==== Highpass ==== | ||
| + | ===== Old ===== | ||
| + | [[File:Highpass_overview_with_lines.png|800px|center]] | ||
| + | ===== Lolimsogreat21's version ===== | ||
| + | {{Map locations | ||
| + | | title = Highpass - Locations | ||
| + | | image = Highpass overview.png | ||
| + | |- | ||
| + | | spawn1 = BLU spawn | ||
| + | | spawn-color1 = blu | ||
| + | | xA = 73px | ||
| + | | yA = 175px | ||
| + | | spawn2 = RED spawn | ||
| + | | spawn-color2 = red | ||
| + | | xB = 700px | ||
| + | | yB = 216px | ||
| + | |- | ||
| + | | area1 = Bridge | ||
| + | | x1 = 382px | ||
| + | | y1 = 217px | ||
| + | | area2 = Yard | ||
| + | | x2 = 337px | ||
| + | | y2 = 220px | ||
| + | | area3 = Industrial houses | ||
| + | | x3 = 285px | ||
| + | | y3 = 212px | ||
| + | }} | ||
| + | ---- | ||
| + | ==== Kong King ==== | ||
| + | ===== Old ===== | ||
| + | [[File:Kong_King_overview_with_lines.png|800px|center]] | ||
| + | ===== Lolimsogreat21's version ===== | ||
| + | {{Map locations | ||
| + | | title = Kong King - Locations | ||
| + | | image = Kong King overview.png | ||
| + | |- | ||
| + | | spawn1 = RED spawn | ||
| + | | spawn-color1 = red | ||
| + | | xA = 172px | ||
| + | | yA = 216px | ||
| + | | spawn2 = BLU spawn | ||
| + | | spawn-color2 = blu | ||
| + | | xB = 601px | ||
| + | | yB = 882px | ||
| + | |- | ||
| + | | area1 = Alleyways | ||
| + | | x1 = 630px | ||
| + | | y1 = 771px | ||
| + | | area2 = Buses | ||
| + | | x2 = 515px | ||
| + | | y2 = 759px | ||
| + | | area3 = Covered bridges | ||
| + | | x3 = 407px | ||
| + | | y3 = 800px | ||
| + | | area4 = Double stairs | ||
| + | | x4 = 314px | ||
| + | | y4 = 717px | ||
| + | | area5 = Short stairs | ||
| + | | x5 = 443px | ||
| + | | y5 = 693px | ||
| + | | area6 = Side stairs | ||
| + | | x6 = 536px | ||
| + | | y6 = 580px | ||
| + | | area7 = Pillar rooms | ||
| + | | x7 = 489px | ||
| + | | y7 = 558px | ||
| + | }} | ||
| + | ---- | ||
| + | ==== Lakeside ==== | ||
| + | ===== Old ===== | ||
| + | [[File:Lakeside_overview_with_lines.png|800px|center]] | ||
| + | ===== Lolimsogreat21's version ===== | ||
| + | {{Map locations | ||
| + | | title = Lakeside - Locations | ||
| + | | image = Lakeside overview.png | ||
| + | |- | ||
| + | | spawn1 = RED spawn | ||
| + | | spawn-color1 = red | ||
| + | | xA = 47px | ||
| + | | yA = 249px | ||
| + | | spawn2 = BLU spawn | ||
| + | | spawn-color2 = blu | ||
| + | | xB = 727px | ||
| + | | yB = 249px | ||
| + | |- | ||
| + | | area1 = Team courtyards | ||
| + | | x1 = 150px | ||
| + | | y1 = 228px | ||
| + | | area2 = Small wooden structure | ||
| + | | x2 = 171px | ||
| + | | y2 = 179px | ||
| + | | area3 = Sandstone archway | ||
| + | | x3 = 200px | ||
| + | | y3 = 250px | ||
| + | | area4 = Winding tunnel | ||
| + | | x4 = 244px | ||
| + | | y4 = 313px | ||
| + | | area5 = Forts | ||
| + | | x5 = 280px | ||
| + | | y5 = 200px | ||
| + | | area6 = Health room | ||
| + | | x6 = 268px | ||
| + | | y6 = 124px | ||
| + | | area7 = Ammunition archway | ||
| + | | x7 = 381px | ||
| + | | y7 = 149px | ||
| + | | area8 = Obelisk | ||
| + | | x8 = 417px | ||
| + | | y8 = 209px | ||
| + | | area9 = Water temple | ||
| + | | x9 = 390px | ||
| + | | y9 = 312px | ||
| + | }} | ||
| + | ---- | ||
| + | ==== Ghost Fort ==== | ||
| + | ===== Old ===== | ||
| + | [[File:Ghost_Fort_overview_with_lines.png|800px|center]] | ||
| + | ===== Lolimsogreat21's version ===== | ||
| + | {{Map locations | ||
| + | | title = Ghost Fort - Locations | ||
| + | | image = Ghost Fort overview.png | ||
| + | |- | ||
| + | | spawn1 = RED spawn | ||
| + | | spawn-color1 = red | ||
| + | | xA = 90px | ||
| + | | yA = 257px | ||
| + | | spawn2 = BLU spawn | ||
| + | | spawn-color2 = blu | ||
| + | | xB = 709px | ||
| + | | yB = 257px | ||
| + | |- | ||
| + | | area1 = Team courtyards | ||
| + | | x1 = 167px | ||
| + | | y1 = 209px | ||
| + | | area2 = Small wooden structure | ||
| + | | x2 = 181px | ||
| + | | y2 = 151px | ||
| + | | area3 = Catwalks archway | ||
| + | | x3 = 202px | ||
| + | | y3 = 223px | ||
| + | | area4 = Winding tunnel | ||
| + | | x4 = 233px | ||
| + | | y4 = 275px | ||
| + | | area5 = Forts | ||
| + | | x5 = 282px | ||
| + | | y5 = 184px | ||
| + | | area6 = Health room | ||
| + | | x6 = 257px | ||
| + | | y6 = 114px | ||
| + | | area7 = Ammunition archway | ||
| + | | x7 = 389px | ||
| + | | y7 = 121px | ||
| + | | area8 = Tower | ||
| + | | x8 = 419px | ||
| + | | y8 = 185px | ||
| + | | area9 = Pit temple | ||
| + | | x9 = 390px | ||
| + | | y9 = 309px | ||
| + | }} | ||
| + | ---- | ||
| + | ==== Los Muertos ==== | ||
| + | ===== Lolimsogreat21's version ===== | ||
| + | {{Map locations | ||
| + | | title = Los Muertos - Locations | ||
| + | | image = Los Muertos overview.png | ||
| + | |- | ||
| + | | spawn1 = RED spawn | ||
| + | | spawn-color1 = red | ||
| + | | xA = 90px | ||
| + | | yA = 220px | ||
| + | | spawn2 = BLU spawn | ||
| + | | spawn-color2 = blu | ||
| + | | xB = 680px | ||
| + | | yB = 220px | ||
| + | |- | ||
| + | | area1 = Bus | ||
| + | | x1 = 195px | ||
| + | | y1 = 220px | ||
| + | | area2 = Terminal | ||
| + | | x2 = 200px | ||
| + | | y2 = 175px | ||
| + | | area3 = Bakery | ||
| + | | x3 = 229px | ||
| + | | y3 = 150px | ||
| + | | area4 = Alley (And the Balcony) | ||
| + | | x4 = 270px | ||
| + | | y4 = 210px | ||
| + | | area5 = House | ||
| + | | x5 = 240px | ||
| + | | y5 = 275px | ||
| + | | area6 = Street | ||
| + | | x6 = 250px | ||
| + | | y6 = 360px | ||
| + | | area7 = Belltower | ||
| + | | x7 = 300px | ||
| + | | y7 = 339px | ||
| + | | area8 = Cathedral (And the Sarcophagus (Tomb)) | ||
| + | | x8 = 385px | ||
| + | | y8 = 348px | ||
| + | | area9 = Entrance | ||
| + | | x9 = 384px | ||
| + | | y9 = 279px | ||
| + | | area10 = Town Square | ||
| + | | x10 = 383px | ||
| + | | y10 = 217px | ||
| + | | area11 = Planters | ||
| + | | x11 = 437px | ||
| + | | y11 = 210px | ||
| + | | area12 = Crypt | ||
| + | | x12 = 390px | ||
| + | | y12 = 130px | ||
| + | | area13 = Church | ||
| + | | x13 = 387px | ||
| + | | y13 = 37px | ||
| + | }} | ||
| + | ---- | ||
| + | ==== Laughter ==== | ||
| + | ===== Old ===== | ||
| + | [[File:Laughter_overview_with_lines.png|800px|center]] | ||
| + | ===== Lolimsogreat21's version ===== | ||
| + | {{Map locations | ||
| + | | title = Laughter - Locations | ||
| + | | image = Laughter (map) overview.png | ||
| + | |- | ||
| + | | spawn1 = BLU spawn | ||
| + | | spawn-color1 = blu | ||
| + | | xA = 11px | ||
| + | | yA = 240px | ||
| + | | spawn2 = RED spawn | ||
| + | | spawn-color2 = red | ||
| + | | xB = 769px | ||
| + | | yB = 160px | ||
| + | |- | ||
| + | | area1 = Badlands Bandito/Pirate's Blunder | ||
| + | | x1 = 19px | ||
| + | | y1 = 315px | ||
| + | | area2 = Bottle Buster/Pumpkin Smash | ||
| + | | x2 = 153px | ||
| + | | y2 = 342px | ||
| + | | area3 = Spawn Yard | ||
| + | | x3 = 150px | ||
| + | | y3 = 245px | ||
| + | | area4 = Gift Shop/Arcade | ||
| + | | x4 = 180px | ||
| + | | y4 = 179px | ||
| + | | area5 = Robotic Sideshow/Real Live Crocodiles | ||
| + | | x5 = 230px | ||
| + | | y5 = 233px | ||
| + | | area6 = Stairs | ||
| + | | x6 = 242px | ||
| + | | y6 = 156px | ||
| + | | area7 = Mike Toss/Hall of Mirrors | ||
| + | | x7 = 274px | ||
| + | | y7 = 130px | ||
| + | | area8 = Balcony | ||
| + | | x8 = 286px | ||
| + | | y8 = 236px | ||
| + | | area9 = Sawmill of Love/Mad Mansion | ||
| + | | x9 = 353px | ||
| + | | y9 = 112px | ||
| + | }} | ||
| + | ---- | ||
| + | ==== Lazarus ==== | ||
| + | ===== Old ===== | ||
| + | [[File:Lazarus_overview.with_lines.png|800px|center]] | ||
| + | ===== Lolimsogreat21's version ===== | ||
| + | {{Map locations | ||
| + | | title = Lazarus - Locations | ||
| + | | image = Lazarus overview.png | ||
| + | |- | ||
| + | | spawn1 = BLU spawn | ||
| + | | spawn-color1 = blu | ||
| + | | xA = 108px | ||
| + | | yA = 416px | ||
| + | | spawn2 = RED spawn | ||
| + | | spawn-color2 = red | ||
| + | | xB = 472px | ||
| + | | yB = 60px | ||
| + | |- | ||
| + | | area1 = Yard | ||
| + | | x1 = 215px | ||
| + | | y1 = 453px | ||
| + | | area2 = Outside exit | ||
| + | | x2 = 271px | ||
| + | | y2 = 478px | ||
| + | | area3 = Low route | ||
| + | | x3 = 269px | ||
| + | | y3 = 400px | ||
| + | | area4 = High rout | ||
| + | | x4 = 256px | ||
| + | | y4 = 341px | ||
| + | | area5 = Digs | ||
| + | | x5 = 324px | ||
| + | | y5 = 321px | ||
| + | | area6 = Corridor | ||
| + | | x6 = 316px | ||
| + | | y6 = 380px | ||
| + | | area7 = Stairs | ||
| + | | x7 = 387px | ||
| + | | y7 = 440px | ||
| + | | area8 = Garage | ||
| + | | x8 = 417px | ||
| + | | y8 = 529px | ||
| + | | area9 = Altar | ||
| + | | x9 = 485px | ||
| + | | y9 = 441px | ||
| + | }} | ||
| + | ---- | ||
| + | ==== Maple Ridge Event ==== | ||
| + | ===== Old ===== | ||
| + | [[File:Maple_Ridge_Event_overview_with_lines.png|800px|center]] | ||
| + | ===== Lolimsogreat21's version ===== | ||
| + | {{Map locations | ||
| + | | title = Maple Ridge Event - Locations | ||
| + | | image = Maple Ridge Event overview.png | ||
| + | |- | ||
| + | | spawn1 = RED spawn | ||
| + | | spawn-color1 = red | ||
| + | | xA = 418px | ||
| + | | yA = 1037px | ||
| + | | spawn2 = BLU spawn | ||
| + | | spawn-color2 = blu | ||
| + | | xB = 418px | ||
| + | | yB = 56px | ||
| + | |- | ||
| + | | area1 = Yard | ||
| + | | x1 = 500px | ||
| + | | y1 = 908px | ||
| + | | area2 = Hall | ||
| + | | x2 = 449px | ||
| + | | y2 = 817px | ||
| + | | area3 = Flank fence | ||
| + | | x3 = 363px | ||
| + | | y3 = 782px | ||
| + | | area4 = Library | ||
| + | | x4 = 317px | ||
| + | | y4 = 719px | ||
| + | | area5 = Patio | ||
| + | | x5 = 319px | ||
| + | | y5 = 643px | ||
| + | | area6 = Chapel | ||
| + | | x6 = 312px | ||
| + | | y6 = 554px | ||
| + | | area7 = Pipes | ||
| + | | x7 = 514px | ||
| + | | y7 = 603px | ||
| + | | area8 = Ramp | ||
| + | | x8 = 542px | ||
| + | | y8 = 556px | ||
| + | | area9 = Redmond's house | ||
| + | | x9 = 623px | ||
| + | | y9 = 558px | ||
| + | }} | ||
| + | ---- | ||
| + | ==== Megalo ==== | ||
| + | ===== Old ===== | ||
| + | [[File:Megalo_overview_with_lines.png|800px|center]] | ||
| + | ===== Lolimsogreat21's version ===== | ||
| + | {{Map locations | ||
| + | | title = Megalo - Locations | ||
| + | | image = Megalo overview.png | ||
| + | |- | ||
| + | | spawn1 = RED spawn | ||
| + | | spawn-color1 = red | ||
| + | | xA = 57px | ||
| + | | yA = 211px | ||
| + | | spawn2 = BLU spawn | ||
| + | | spawn-color2 = blu | ||
| + | | xB = 675px | ||
| + | | yB = 150px | ||
| + | |- | ||
| + | | area1 = Yard | ||
| + | | x1 = 200px | ||
| + | | y1 = 227px | ||
| + | | area2 = Valley | ||
| + | | x2 = 275px | ||
| + | | y2 = 243px | ||
| + | | area3 = Factories | ||
| + | | x3 = 315px | ||
| + | | y3 = 184px | ||
| + | }} | ||
| + | ---- | ||
| + | ==== Moldergrove ==== | ||
| + | ===== Old ===== | ||
| + | [[File:Moldergrove_overview_with_lines.png|800px|center]] | ||
| + | ===== Lolimsogreat21's version ===== | ||
| + | {{Map locations | ||
| + | | title = Moldergrove - Locations | ||
| + | | image = Moldergrove overview.png | ||
| + | |- | ||
| + | | spawn1 = RED spawn | ||
| + | | spawn-color1 = red | ||
| + | | xA = 87px | ||
| + | | yA = 190px | ||
| + | | spawn2 = BLU spawn | ||
| + | | spawn-color2 = blu | ||
| + | | xB = 687px | ||
| + | | yB = 190px | ||
| + | |- | ||
| + | | area1 = Spawn yard | ||
| + | | x1 = 169px | ||
| + | | y1 = 207px | ||
| + | | area2 = Blinski Logging | ||
| + | | x2 = 210px | ||
| + | | y2 = 150px | ||
| + | | area3 = End of the Line | ||
| + | | x3 = 297px | ||
| + | | y3 = 170px | ||
| + | | area4 = Central building | ||
| + | | x4 = 340px | ||
| + | | y4 = 198px | ||
| + | | area5 = Mine Pit | ||
| + | | x5 = 386px | ||
| + | | y5 = 120px | ||
| + | | area6 = Red valley Mountain | ||
| + | | x6 = 385px | ||
| + | | y6 = 311px | ||
| + | }} | ||
| + | ---- | ||
| + | ==== Moonshine Event ==== | ||
| + | ===== Old ===== | ||
| + | [[File:Moonshine Event_overview_with_lines.png|800px|center]] | ||
| + | ===== Lolimsogreat21's version ===== | ||
| + | {{Map locations | ||
| + | | title = Moonshine Event - Locations | ||
| + | | image = Moonshine Event overview.png | ||
| + | |- | ||
| + | | spawn1 = RED spawn | ||
| + | | spawn-color1 = red | ||
| + | | xA = 30px | ||
| + | | yA = 112px | ||
| + | | spawn2 = BLU spawn | ||
| + | | spawn-color2 = blu | ||
| + | | xB = 740px | ||
| + | | yB = 112px | ||
| + | |- | ||
| + | | area1 = Spawn yard | ||
| + | | x1 = 114px | ||
| + | | y1 = 119px | ||
| + | | area2 = Industrial Houses | ||
| + | | x2 = 245px | ||
| + | | y2 = 88px | ||
| + | | area3 = Bayou Shipping House | ||
| + | | x3 = 385px | ||
| + | | y3 = 90px | ||
| + | }} | ||
| + | ---- | ||
| + | ==== Nucleus (King of the Hill) ==== | ||
| + | ===== Old ===== | ||
| + | [[File:Nucleus_(Arena)_overview_with_lines.png|800px|center]] | ||
| + | ===== Lolimsogreat21's version ===== | ||
| + | {{Map locations | ||
| + | | title = Nucleus (King of the Hill) - Locations | ||
| + | | image = Nucleus (Arena) overview.png | ||
| + | |- | ||
| + | | spawn1 = RED spawn | ||
| + | | spawn-color1 = red | ||
| + | | xA = 706px | ||
| + | | yA = 262px | ||
| + | | spawn2 = BLU spawn | ||
| + | | spawn-color2 = blu | ||
| + | | xB = 76px | ||
| + | | yB = 262px | ||
| + | |- | ||
| + | | area1 = Perimiter | ||
| + | | x1 = 243px | ||
| + | | y1 = 499px | ||
| + | | area2 = Roofs | ||
| + | | x2 = 388px | ||
| + | | y2 = 455px | ||
| + | | area3 = Bridges | ||
| + | | x3 = 390px | ||
| + | | y3 = 347px | ||
| + | | area4 = Flank buildings | ||
| + | | x4 = 281px | ||
| + | | y4 = 165px | ||
| + | | area5 = Access Building | ||
| + | | x5 = 390px | ||
| + | | y5 = 84px | ||
| + | }} | ||
| + | ---- | ||
| + | ==== Probed ==== | ||
| + | ===== Old ===== | ||
| + | [[File:Probed_overview._with_lines.png|800px|center]] | ||
| + | ===== Lolimsogreat21's version ===== | ||
| + | {{Map locations | ||
| + | | title = Probed - Locations | ||
| + | | image = Probed overview.png | ||
| + | |- | ||
| + | | spawn1 = RED spawn | ||
| + | | spawn-color1 = red | ||
| + | | xA = 200px | ||
| + | | yA = 129px | ||
| + | | spawn2 = BLU spawn | ||
| + | | spawn-color2 = blu | ||
| + | | xB = 476px | ||
| + | | yB = 368px | ||
| + | |- | ||
| + | | area1 = Spawn yard | ||
| + | | x1 = 260px | ||
| + | | y1 = 116px | ||
| + | | area2 = Transition Building | ||
| + | | x2 = 306px | ||
| + | | y2 = 135px | ||
| + | | area3 = Sheds | ||
| + | | x3 = 387px | ||
| + | | y3 = 112px | ||
| + | | area4 = Grain Silo | ||
| + | | x4 = 450px | ||
| + | | y4 = 140px | ||
| + | }} | ||
| + | ---- | ||
| + | ==== Sawmill (King of the Hill) ==== | ||
| + | ===== Old ===== | ||
| + | [[File:Sawmill_(Arena)_overview_with_lines.png|800px|center]] | ||
| + | ===== Lolimsogreat21's version ===== | ||
| + | {{Map locations | ||
| + | | title = Sawmill (King of the Hill) - Locations | ||
| + | | image = Sawmill (Arena) overview.png | ||
| + | |- | ||
| + | | spawn1 = RED spawn | ||
| + | | spawn-color1 = red | ||
| + | | xA = 590px | ||
| + | | yA = 24px | ||
| + | | spawn2 = BLU spawn | ||
| + | | spawn-color2 = blu | ||
| + | | xB = 200px | ||
| + | | yB = 525px | ||
| + | |- | ||
| + | | area1 = Rooftops | ||
| + | | x1 = 222px | ||
| + | | y1 = 330px | ||
| + | | area2 = Cave | ||
| + | | x2 = 225px | ||
| + | | y2 = 172px | ||
| + | | area3 = Waterfall | ||
| + | | x3 = 274px | ||
| + | | y3 = 198px | ||
| + | | area4 = Alcoves | ||
| + | | x4 = 354px | ||
| + | | y4 = 296px | ||
| + | | area5 = Center Shed | ||
| + | | x5 = 390px | ||
| + | | y5 = 290px | ||
| + | | area6 = Log Shed | ||
| + | | x6 = 519px | ||
| + | | y6 = 412px | ||
| + | }} | ||
| + | ---- | ||
| + | ==== Sinthetic ==== | ||
| + | ===== Lolimsogreat21's version ===== | ||
| + | {{Map locations | ||
| + | | title = Sinthetic - Locations | ||
| + | | image = Sinthetic overview.png | ||
| + | |- | ||
| + | | spawn1 = RED spawn | ||
| + | | spawn-color1 = red | ||
| + | | xA = 100px | ||
| + | | yA = 180px | ||
| + | | spawn2 = BLU spawn | ||
| + | | spawn-color2 = blu | ||
| + | | xB = 705px | ||
| + | | yB = 210px | ||
| + | |- | ||
| + | | area1 = Spawn Yard | ||
| + | | x1 = 160px | ||
| + | | y1 = 200px | ||
| + | | area2 = Transitional Building | ||
| + | | x2 = 195px | ||
| + | | y2 = 227px | ||
| + | | area3 = Valley | ||
| + | | x3 = 255px | ||
| + | | y3 = 240px | ||
| + | | area4 = House | ||
| + | | x4 = 293px | ||
| + | | y4 = 222px | ||
| + | | area5 = Flanks | ||
| + | | x5 = 370px | ||
| + | | y5 = 273px | ||
| + | | area6 = Tunnels | ||
| + | | x6 = 420px | ||
| + | | y6 = 230px | ||
| + | }} | ||
| + | ---- | ||
| + | ==== Slasher ==== | ||
| + | ===== Old ===== | ||
| + | [[File:Slasher_overview_with_lines.png|800px|center]] | ||
| + | ===== Lolimsogreat21's version ===== | ||
| + | {{Map locations | ||
| + | | title = Slasher - Locations | ||
| + | | image = Slasher overview.png | ||
| + | |- | ||
| + | | spawn1 = RED spawn | ||
| + | | spawn-color1 = red | ||
| + | | xA = 334px | ||
| + | | yA = 185px | ||
| + | | spawn2 = BLU spawn | ||
| + | | spawn-color2 = blu | ||
| + | | xB = 334px | ||
| + | | yB = 970px | ||
| + | |- | ||
| + | | area1 = Campfire | ||
| + | | x1 = 380px | ||
| + | | y1 = 830px | ||
| + | | area2 = Mines | ||
| + | | x2 = 490px | ||
| + | | y2 = 790px | ||
| + | | area3 = Middle Entrance | ||
| + | | x3 = 436px | ||
| + | | y3 = 749px | ||
| + | | area4 = Boat Rentals | ||
| + | | x4 = 377px | ||
| + | | y4 = 750px | ||
| + | | area5 = Maintance | ||
| + | | x5 = 240px | ||
| + | | y5 = 745px | ||
| + | | area6 = Boat dock | ||
| + | | x6 = 152px | ||
| + | | y6 = 570px | ||
| + | | area7 = Bonfire | ||
| + | | x7 = 230px | ||
| + | | y7 = 575px | ||
| + | | area8 = Supply Shed | ||
| + | | x8 = 284px | ||
| + | | y8 = 581px | ||
| + | | area9 = Ramps | ||
| + | | x9 = 370px | ||
| + | | y9 = 623px | ||
| + | | area10 = Ranger Lodge | ||
| + | | x10 = 544px | ||
| + | | y10 = 577px | ||
| + | }} | ||
| + | ---- | ||
| + | ==== Suijin ==== | ||
| + | ===== Old ===== | ||
| + | [[File:Suijin_Overview_with_lines.png|800px|center]] | ||
| + | ===== Lolimsogreat21's version ===== | ||
| + | {{Map locations | ||
| + | | title = Suijin - Locations | ||
| + | | image = Suijin Overview 1.png | ||
| + | |- | ||
| + | | spawn1 = RED spawn | ||
| + | | spawn-color1 = red | ||
| + | | xA = 485px | ||
| + | | yA = 905px | ||
| + | | spawn2 = BLU spawn | ||
| + | | spawn-color2 = blu | ||
| + | | xB = 499px | ||
| + | | yB = 94px | ||
| + | |- | ||
| + | | area1 = Far Islands | ||
| + | | x1 = 45px | ||
| + | | y1 = 870px | ||
| + | | area2 = Cliffside Temple | ||
| + | | x2 = 90px | ||
| + | | y2 = 509px | ||
| + | | area3 = Bamboo Buildings | ||
| + | | x3 = 416px | ||
| + | | y3 = 745px | ||
| + | | area4 = Temple Tower | ||
| + | | x4 = 460px | ||
| + | | y4 = 505px | ||
| + | | area5 = Calligraphy Temple | ||
| + | | x5 = 655px | ||
| + | | y5 = 598px | ||
| + | }} | ||
| + | ---- | ||
| + | ==== Viaduct ==== | ||
| + | ===== Old ===== | ||
| + | [[File:Viaduct_overview_with_lines.png|800px|center]] | ||
| + | ===== Lolimsogreat21's version ===== | ||
| + | {{Map locations | ||
| + | | title = Viaduct - Locations | ||
| + | | image = Viaduct overview.png | ||
| + | |- | ||
| + | | spawn1 = RED spawn | ||
| + | | spawn-color1 = red | ||
| + | | xA = 435px | ||
| + | | yA = 120px | ||
| + | | spawn2 = BLU spawn | ||
| + | | spawn-color2 = blu | ||
| + | | xB = 435px | ||
| + | | yB = 710px | ||
| + | |- | ||
| + | | area1 = Spawn Yard | ||
| + | | x1 = 450px | ||
| + | | y1 = 190px | ||
| + | | area2 = Transition building | ||
| + | | x2 = 424px | ||
| + | | y2 = 254px | ||
| + | | area3 = Valley | ||
| + | | x3 = 390px | ||
| + | | y3 = 300px | ||
| + | | area4 = Scullery (House) | ||
| + | | x4 = 440px | ||
| + | | y4 = 320px | ||
| + | | area5 = Stairs | ||
| + | | x5 = 380px | ||
| + | | y5 = 359px | ||
| + | | area6 = Hills | ||
| + | | x6 = 509px | ||
| + | | y6 = 370px | ||
| + | | area7 = Summit with the point | ||
| + | | x7 = 440px | ||
| + | | y7 = 415px | ||
| + | }} | ||
| + | ---- | ||
| + | ==== Eyeaduct ==== | ||
| + | ===== Old ===== | ||
| + | [[File:Eyeaduct_overview_with_lines.png|800px|center]] | ||
| + | ===== New ===== | ||
| + | {{Map overview | ||
| + | | title = Eyeaduct - overview indicators | ||
| + | | image = Eyeaduct overview.png | ||
| + | | - | ||
| + | | spawn1 = BLU spawn | ||
| + | | spawn-color1 = blu | ||
| + | | xA = 340px | ||
| + | | yA = 135px | ||
| + | | spawn2 = RED spawn | ||
| + | | spawn-color2 = red | ||
| + | | xB = 340px | ||
| + | | yB = 620px | ||
| + | | - | ||
| + | | area1 = Spawn Yard | ||
| + | | x1 = 340px | ||
| + | | y1 = 210px | ||
| + | | area2 = Transition Building | ||
| + | | x2 = 340px | ||
| + | | y2 = 260px | ||
| + | | area3 = Valley | ||
| + | | x3 = 340px | ||
| + | | y3 = 295px | ||
| + | | area4 = Scullery | ||
| + | | x4 = 340px | ||
| + | | y4 = 325px | ||
| + | | area5 = Stairs | ||
| + | | x5 = 280px | ||
| + | | y5 = 350px | ||
| + | | area6 = Hills | ||
| + | | x6 = 400px | ||
| + | | y6 = 350px | ||
| + | | area7 = Summit | ||
| + | | x7 = 340px | ||
| + | | y7 = 400px | ||
| + | }} | ||
| + | ---- | ||
| + | |||
| + | === CTF === | ||
| + | ==== 2Fort ==== | ||
| + | ===== Old ===== | ||
| + | <i>Please note the following: The Blu side shows the first floor while the Red side shows the second floor.</i> <span style="font-family:sans-serif;direction:ltr;font-size: 95%;font-weight: bold;color: #555;">(this msg should ideally be nested somewhere inside the template)</span> | ||
| + | [[File:2Fort_overview_with_lines.png|800px|center]] | ||
| + | ===== Lolimsogreat21's version ===== | ||
| + | {{Map locations | ||
| + | | title = 2Fort - Locations | ||
| + | | image = 2Fort overview.png | ||
| + | |- | ||
| + | | spawn1 = BLU spawn | ||
| + | | spawn-color1 = blu | ||
| + | | xA = 230px | ||
| + | | yA = 386px | ||
| + | | spawn2 = BLU spawn | ||
| + | | spawn-color2 = blu | ||
| + | | xB = 260px | ||
| + | | yB = 174px | ||
| + | | spawn3 = RED spawn | ||
| + | | spawn-color3 = red | ||
| + | | xC = 542px | ||
| + | | yC = 201px | ||
| + | | spawn4 = RED spawn | ||
| + | | spawn-color4 = red | ||
| + | | xD = 503px | ||
| + | | yD = 426px | ||
| + | |- | ||
| + | | area1 = Bridge | ||
| + | | x1 = 390px | ||
| + | | y1 = 300px | ||
| + | | area2 = Entrance | ||
| + | | x2 = 450px | ||
| + | | y2 = 265px | ||
| + | | area3 = Battlements | ||
| + | | x3 = 470px | ||
| + | | y3 = 294px | ||
| + | | area11 = Sewer exit | ||
| + | | x11 = 512px | ||
| + | | y11= 182px | ||
| + | | area4 = Grate | ||
| + | | x4 = 510px | ||
| + | | y4 = 296px | ||
| + | | area5 = Entrance side room | ||
| + | | x5 = 512px | ||
| + | | y5 = 357px | ||
| + | | area6 = Courtyard | ||
| + | | x6 = 555px | ||
| + | | y6 = 383px | ||
| + | | area7 = Stairs | ||
| + | | x7 = 615px | ||
| + | | y7 = 390px | ||
| + | | area8 = Basement | ||
| + | | x8 = 630px | ||
| + | | y8 = 340px | ||
| + | | area9 = Spiral | ||
| + | | x9 = 595px | ||
| + | | y9 = 290px | ||
| + | | area10 = Intelligence Room | ||
| + | | x10 = 665px | ||
| + | | y10 = 252px | ||
| + | }} | ||
| + | ---- | ||
| + | ==== 2Fort Invasion ==== | ||
| + | ===== Old ===== | ||
| + | [[File:2Fort_Invasion_overview_with_lines.png|800px|center]] | ||
| + | ===== Lolimsogreat21's version ===== | ||
| + | {{Map locations | ||
| + | | title = 2Fort Invasion - Locations | ||
| + | | image = 2Fort Invasion overview.png | ||
| + | |- | ||
| + | | spawn1 = BLU spawn | ||
| + | | spawn-color1 = blu | ||
| + | | xA = 495px | ||
| + | | yA = 595px | ||
| + | | spawn2 = BLU spawn | ||
| + | | spawn-color2 = blu | ||
| + | | xB = 250px | ||
| + | | yB = 546px | ||
| + | | spawn3 = RED spawn | ||
| + | | spawn-color3 = red | ||
| + | | xC = 276px | ||
| + | | yC = 186px | ||
| + | | spawn4 = RED spawn | ||
| + | | spawn-color4 = red | ||
| + | | xD = 527px | ||
| + | | yD = 229px | ||
| + | |- | ||
| + | | area1 = Bridge | ||
| + | | x1 = 389px | ||
| + | | y1 = 394px | ||
| + | | area2 = Entrance | ||
| + | | x2 = 423px | ||
| + | | y2 = 473px | ||
| + | | area3 = Battlements | ||
| + | | x3 = 387px | ||
| + | | y3 = 503px | ||
| + | | area11 = Sewer exit | ||
| + | | x11 = 540px | ||
| + | | y11 = 570px | ||
| + | | area4 = Grate | ||
| + | | x4 = 387px | ||
| + | | y4 = 547px | ||
| + | | area5 = Entrance side room | ||
| + | | x5 = 322px | ||
| + | | y5 = 567px | ||
| + | | area6 = Courtyard | ||
| + | | x6 = 276px | ||
| + | | y6 = 611px | ||
| + | | area7 = Stairs | ||
| + | | x7 = 263px | ||
| + | | y7 = 692px | ||
| + | | area8 = Basement | ||
| + | | x8 = 320px | ||
| + | | y8 = 762px | ||
| + | | area9 = Spiral | ||
| + | | x9 = 384px | ||
| + | | y9 = 685px | ||
| + | | area10 = Intelligence Room | ||
| + | | x10 = 445px | ||
| + | | y10 = 769px | ||
| + | }} | ||
| + | ---- | ||
| + | ==== Double Cross ==== | ||
| + | ===== Old ===== | ||
| + | [[File:Double_Cross_overview_with_lines.png|800px|center]] | ||
| + | ===== Lolimsogreat21's version ===== | ||
| + | {{Map locations | ||
| + | | title = Double Cross - Locations | ||
| + | | image = Double Cross overview.png | ||
| + | |- | ||
| + | | spawn1 = RED spawn | ||
| + | | spawn-color1 = red | ||
| + | | xA = 263px | ||
| + | | yA = 413px | ||
| + | | spawn2 = BLU spawn | ||
| + | | spawn-color2 = blu | ||
| + | | xB = 510px | ||
| + | | yB = 123px | ||
| + | |- | ||
| + | | area1 = Main Bridge | ||
| + | | x1 = 393px | ||
| + | | y1 = 285px | ||
| + | | area2 = Train Bridge | ||
| + | | x2 = 393px | ||
| + | | y2 = 336px | ||
| + | | area3 = Battlements | ||
| + | | x3 = 354px | ||
| + | | y3 = 380px | ||
| + | | area4 = Courtyard | ||
| + | | x4 = 334px | ||
| + | | y4 = 445px | ||
| + | | area5 = Intelligence room | ||
| + | | x5 = 276px | ||
| + | | y5 = 478px | ||
| + | }} | ||
| + | ---- | ||
| + | ==== Doublefrost ==== | ||
| + | ===== Brand New ===== | ||
| + | ===== Lolimsogreat21's version ===== | ||
| + | {{Map locations | ||
| + | | title = Doublefrost - Locations | ||
| + | | image = Doublefrost overview.png | ||
| + | |- | ||
| + | | spawn1 = RED spawn | ||
| + | | spawn-color1 = red | ||
| + | | xA = 230px | ||
| + | | yA = 460px | ||
| + | | spawn2 = BLU spawn | ||
| + | | spawn-color2 = blu | ||
| + | | xB = 530px | ||
| + | | yB = 150px | ||
| + | |- | ||
| + | | area1 = Main Bridge | ||
| + | | x1 = 385px | ||
| + | | y1 = 340px | ||
| + | | area2 = Train Bridge | ||
| + | | x2 = 385px | ||
| + | | y2 = 400px | ||
| + | | area3 = Battlements | ||
| + | | x3 = 325px | ||
| + | | y3 = 425px | ||
| + | | area4 = Courtyard | ||
| + | | x4 = 330px | ||
| + | | y4 = 500px | ||
| + | | area5 = Intelligence room | ||
| + | | x5 = 260px | ||
| + | | y5 = 550px | ||
| + | }} | ||
| + | ---- | ||
| + | |||
| + | ==== Landfall ==== | ||
| + | ===== Old ===== | ||
| + | [[File:Landfall_overview_with_lines.png|800px|center]] | ||
| + | ===== Lolimsogreat21's version ===== | ||
| + | {{Map locations | ||
| + | | title = Landfall - Locations | ||
| + | | image = Landfall overview.png | ||
| + | |- | ||
| + | | spawn1 = RED spawn | ||
| + | | spawn-color1 = red | ||
| + | | xA = 90px | ||
| + | | yA = 350px | ||
| + | | spawn2 = BLU spawn | ||
| + | | spawn-color2 = blu | ||
| + | | xB = 620px | ||
| + | | yB = 90px | ||
| + | |- | ||
| + | | area1 = Tree | ||
| + | | x1 = 378px | ||
| + | | y1 = 188px | ||
| + | | area2 = Resources deck | ||
| + | | x2 = 479px | ||
| + | | y2 = 151px | ||
| + | | area3 = Lumber Building | ||
| + | | x3 = 520px | ||
| + | | y3 = 230px | ||
| + | | area4 = Side route | ||
| + | | x4 = 524px | ||
| + | | y4 = 338px | ||
| + | | area5 = Shack | ||
| + | | x5 = 583px | ||
| + | | y5 = 370px | ||
| + | | area6 = Courtyard | ||
| + | | x6 = 611px | ||
| + | | y6 = 283px | ||
| + | | area7 = Rooftops | ||
| + | | x7 = 695px | ||
| + | | y7 = 220px | ||
| + | }} | ||
| + | ---- | ||
| + | ==== Snowfall ==== | ||
| + | ===== Old ===== | ||
| + | [[File:Snowfall_overview_with_lines.png|800px|center]] | ||
| + | ===== Lolimsogreat21's version ===== | ||
| + | {{Map locations | ||
| + | | title = Snowfall - Locations | ||
| + | | image = Snowfall overview.png | ||
| + | |- | ||
| + | | spawn1 = BLU spawn | ||
| + | | spawn-color1 = blu | ||
| + | | xA = 70px | ||
| + | | yA = 275px | ||
| + | | spawn2 = RED spawn | ||
| + | | spawn-color2 = red | ||
| + | | xB = 700px | ||
| + | | yB = 820px | ||
| + | |- | ||
| + | | area1 = Tree | ||
| + | | x1 = 385px | ||
| + | | y1 = 561px | ||
| + | | area2 = Resources deck | ||
| + | | x2 = 498px | ||
| + | | y2 = 608px | ||
| + | | area3 = Lumber Building | ||
| + | | x3 = 416px | ||
| + | | y3 = 700px | ||
| + | | area4 = Side route | ||
| + | | x4 = 335px | ||
| + | | y4 = 783px | ||
| + | | area5 = Shack | ||
| + | | x5 = 303px | ||
| + | | y5 = 854px | ||
| + | | area6 = Courtyard | ||
| + | | x6 = 493px | ||
| + | | y6 = 853px | ||
| + | | area7 = Rooftops | ||
| + | | x7 = 530px | ||
| + | | y7 = 965px | ||
| + | }} | ||
| + | ---- | ||
| + | ==== Sawmill (Capture the Flag) ==== | ||
| + | ===== Old ===== | ||
| + | [[File:Sawmill_(Capture_the_Flag)_overview_with_lines.png|800px|center]] | ||
| + | ===== Lolimsogreat21's version ===== | ||
| + | {{Map locations | ||
| + | | title = Sawmill (Capture the Flag) - Locations | ||
| + | | image = Sawmill (Capture the Flag) overview.png | ||
| + | |- | ||
| + | | spawn1 = BLU spawn | ||
| + | | spawn-color1 = blu | ||
| + | | xA = 260px | ||
| + | | yA = 332px | ||
| + | | spawn2 = RED spawn | ||
| + | | spawn-color2 = red | ||
| + | | xB = 543px | ||
| + | | yB = 82px | ||
| + | |- | ||
| + | | area1 = Rooftops | ||
| + | | x1 = 275px | ||
| + | | y1 = 249px | ||
| + | | area2 = Cave | ||
| + | | x2 = 280px | ||
| + | | y2 = 121px | ||
| + | | area3 = Watterfall | ||
| + | | x3 = 318px | ||
| + | | y3 = 144px | ||
| + | | area4 = Alcoves | ||
| + | | x4 = 377px | ||
| + | | y4 = 200px | ||
| + | | area5 = Center Shed | ||
| + | | x5 = 410px | ||
| + | | y5 = 220px | ||
| + | | area6 = Log Shed | ||
| + | | x6 = 508px | ||
| + | | y6 = 303px | ||
| + | }} | ||
| + | ---- | ||
| + | ==== Turbine ==== | ||
| + | ===== Old ===== | ||
| + | [[File:Turbine_overview_with_lines.png|800px|center]] | ||
| + | ===== Lolimsogreat21's version ===== | ||
| + | {{Map locations | ||
| + | | title = Turbine - Locations | ||
| + | | image = Turbine overview.png | ||
| + | |- | ||
| + | | spawn1 = BLU spawn | ||
| + | | spawn-color1 = blu | ||
| + | | xA = 70px | ||
| + | | yA = 90px | ||
| + | | spawn2 = RED spawn | ||
| + | | spawn-color2 = red | ||
| + | | xB = 697px | ||
| + | | yB = 215px | ||
| + | |- | ||
| + | | area1 = Turbines | ||
| + | | x1 = 387px | ||
| + | | y1 = 168px | ||
| + | | area2 = Alcoves | ||
| + | | x2 = 422px | ||
| + | | y2 = 249px | ||
| + | | area3 = Balcony | ||
| + | | x3 = 451px | ||
| + | | y3 = 192px | ||
| + | | area4 = Vents | ||
| + | | x4 = 484px | ||
| + | | y4 = 164px | ||
| + | | area5 = Main Hallway | ||
| + | | x5 = 516px | ||
| + | | y5 = 109px | ||
| + | | area6 = Raised Platform | ||
| + | | x6 = 550px | ||
| + | | y6 = 36px | ||
| + | }} | ||
| + | ---- | ||
| + | ==== Well (Capture the Flag) ==== | ||
| + | ===== Lolimsogreat21's version ===== | ||
| + | {{Map locations | ||
| + | | title = Well (Control Point) - Locations | ||
| + | | image = Well (Control Point) overview.png | ||
| + | |- | ||
| + | | spawn1 = RED first spawn | ||
| + | | xA = 13px | ||
| + | | yA = 189px | ||
| + | | spawn2 = RED second spawn | ||
| + | | xB = 180px | ||
| + | | yB = 238px | ||
| + | | spawn3 = RED third spawn | ||
| + | | xC = 352px | ||
| + | | yC = 220px | ||
| + | |- | ||
| + | | area1 = Main building | ||
| + | | x1 = 385px | ||
| + | | y1 = 228px | ||
| + | | area2 = Yard | ||
| + | | x2 = 329px | ||
| + | | y2 = 200px | ||
| + | | area3 = Swing door | ||
| + | | x3 = 275px | ||
| + | | y3 = 184px | ||
| + | | area4 = Swing door | ||
| + | | x4 = 275px | ||
| + | | y4 = 234px | ||
| + | | area5 = Battlements | ||
| + | | x5 = 254px | ||
| + | | y5 = 209px | ||
| + | | area6 = Inner lobby | ||
| + | | x6 = 200px | ||
| + | | y6 = 201px | ||
| + | | area7 = Command room | ||
| + | | x7 = 174px | ||
| + | | y7 = 201px | ||
| + | | area8 = Catwalks | ||
| + | | x8 = 145px | ||
| + | | y8 = 201px | ||
| + | }} | ||
| + | ---- | ||
| + | |||
| + | === PD === | ||
| + | ==== Cursed Cove ==== | ||
| + | ===== Lolimsogreat21's version ===== | ||
| + | {{Map locations | ||
| + | | title = Cursed Cove - Locations | ||
| + | | image = Cursed Cove overview.png | ||
| + | |- | ||
| + | | spawn1 = BLU spawn | ||
| + | | spawn-color1 = blu | ||
| + | | xA = 100px | ||
| + | | yA = 280px | ||
| + | | spawn2 = RED spawn | ||
| + | | spawn-color2 = red | ||
| + | | xB = 660px | ||
| + | | yB = 280px | ||
| + | |- | ||
| + | | area1 = Beach | ||
| + | | x1 = 225px | ||
| + | | y1 = 40px | ||
| + | | area2 = Docks | ||
| + | | x2 = 380px | ||
| + | | y2 = 60px | ||
| + | | area3 = Port | ||
| + | | x3 = 380px | ||
| + | | y3 = 170px | ||
| + | | area4 = Gate | ||
| + | | x4 = 380px | ||
| + | | y4 = 240px | ||
| + | | area5 = Courtyard | ||
| + | | x5 = 380px | ||
| + | | y5 = 330px | ||
| + | }} | ||
| + | ---- | ||
| + | ==== Farmageddon ==== | ||
| + | ===== Lolimsogreat21's version ===== | ||
| + | {{Map locations | ||
| + | | title = Farmageddon - Locations | ||
| + | | image = Farmageddon overview.png | ||
| + | |- | ||
| + | | spawn1 = RED spawn | ||
| + | | spawn-color1 = red | ||
| + | | xA = 70px | ||
| + | | yA = 200px | ||
| + | | spawn2 = BLU spawn | ||
| + | | spawn-color2 = blu | ||
| + | | xB = 710px | ||
| + | | yB = 200px | ||
| + | |- | ||
| + | | area1 = Grain Shed | ||
| + | | x1 = 235px | ||
| + | | y1 = 220px | ||
| + | | area2 = Road | ||
| + | | x2 = 290px | ||
| + | | y2 = 245px | ||
| + | | area3 = Hayrack Ride | ||
| + | | x3 = 255px | ||
| + | | y3 = 310px | ||
| + | | area5 = Machine Shed | ||
| + | | x5 = 385px | ||
| + | | y5 = 190px | ||
| + | | area4 = Combine | ||
| + | | x4 = 385px | ||
| + | | y4 = 225px | ||
| + | | area6 = Machine room | ||
| + | | x6 = 385px | ||
| + | | y6 = 145px | ||
| + | }} | ||
| + | ---- | ||
| + | ==== Monster Bash ==== | ||
| + | ===== Lolimsogreat21's version ===== | ||
| + | {{Map locations | ||
| + | | title = Monster Bash - Locations | ||
| + | | image = Monster Bash overview.png | ||
| + | |- | ||
| + | | spawn1 = BLU spawn | ||
| + | | xA = 150px | ||
| + | | yA = 410px | ||
| + | | spawn-color1 = blu | ||
| + | | spawn2 = RED spawn | ||
| + | | spawn-color2 = red | ||
| + | | xB = 670px | ||
| + | | yB = 410px | ||
| + | |- | ||
| + | | area3 = Causeway | ||
| + | | x3 = 540px | ||
| + | | y3 = 530px | ||
| + | | area2 = Courtyard | ||
| + | | x2 = 545px | ||
| + | | y2 = 430px | ||
| + | | area1 = Chemicals | ||
| + | | x1 = 520px | ||
| + | | y1 = 335px | ||
| + | | area4 = Grand Foyer | ||
| + | | x4 = 395px | ||
| + | | y4 = 560px | ||
| + | | area5 = Lab | ||
| + | | x5 = 395px | ||
| + | | y5 = 400px | ||
| + | | area6 = Ballroom | ||
| + | | x6 = 395px | ||
| + | | y6 = 295px | ||
| + | | area7 = Balcony | ||
| + | | x7 = 395px | ||
| + | | y7 = 240px | ||
| + | | area8 = Patio | ||
| + | | x8 = 295px | ||
| + | | y8 = 335px | ||
| + | | area10 = Library | ||
| + | | x10 = 240px | ||
| + | | y10 = 530px | ||
| + | | area9 = Gallery | ||
| + | | x9 = 255px | ||
| + | | y9 = 430px | ||
| + | }} | ||
| + | ---- | ||
| + | ==== Pit of Death ==== | ||
| + | ===== Lolimsogreat21's version ===== | ||
| + | {{Map locations | ||
| + | | title = Pit of Death - Locations | ||
| + | | image = Pit of Death overview.png | ||
| + | |- | ||
| + | | spawn1 = RED spawn | ||
| + | | spawn-color1 = red | ||
| + | | xA = 290px | ||
| + | | yA = 25px | ||
| + | | spawn2 = BLU spawn | ||
| + | | spawn-color2 = blu | ||
| + | | xB = 290px | ||
| + | | yB = 690px | ||
| + | |- | ||
| + | | area1 = Courtyard | ||
| + | | x1 = 280px | ||
| + | | y1 = 630px | ||
| + | | area2 = Bridge Route | ||
| + | | x2 = 350px | ||
| + | | y2 = 580px | ||
| + | | area3 = Dock Route | ||
| + | | x3 = 230px | ||
| + | | y3 = 545px | ||
| + | | area4 = Staircase | ||
| + | | x4 = 240px | ||
| + | | y4 = 480px | ||
| + | | area5 = Rooftops (Above)/Hallway (Below) | ||
| + | | x5 = 280px | ||
| + | | y5 = 465px | ||
| + | | area7 = Pit Access | ||
| + | | x7 = 205px | ||
| + | | y7 = 375px | ||
| + | | area8 = Basemenet | ||
| + | | x8 = 245px | ||
| + | | y8 = 375px | ||
| + | | area6 = Ledges | ||
| + | | x6 = 240px | ||
| + | | y6 = 435px | ||
| + | | area9 = Pit Flanks | ||
| + | | x9 = 310px | ||
| + | | y9 = 400px | ||
| + | | area10 = Overlook Building | ||
| + | | x10 = 385px | ||
| + | | y10 = 375px | ||
| + | | area11 = Broken Bridge | ||
| + | | x11 = 415px | ||
| + | | y11 = 375px | ||
| + | }} | ||
| + | ---- | ||
| + | ==== SnowVille ==== | ||
| + | ===== Lolimsogreat21's version ===== | ||
| + | {{Map locations | ||
| + | | title = SnowVille - Locations | ||
| + | | image = SnowVille overview.png | ||
| + | |- | ||
| + | | spawn1 = RED spawn | ||
| + | | spawn-color1 = red | ||
| + | | xA = 20px | ||
| + | | yA = 260px | ||
| + | | spawn2 = BLU spawn | ||
| + | | spawn-color2 = blu | ||
| + | | xB = 747px | ||
| + | | yB = 815px | ||
| + | |- | ||
| + | | area2 = Rooftops | ||
| + | | x2 = 250px | ||
| + | | y2 = 260px | ||
| + | | area3 = Garage | ||
| + | | x3 = 325px | ||
| + | | y3 = 305px | ||
| + | | area8 = Small Delivery Zone | ||
| + | | x8 = 230px | ||
| + | | y8 = 675px | ||
| + | | area4 = Coal Shed | ||
| + | | x4 = 555px | ||
| + | | y4 = 350px | ||
| + | | area1 = Wood Shed | ||
| + | | x1 = 140px | ||
| + | | y1 = 395px | ||
| + | | area6 = Center Shed | ||
| + | | x6 = 385px | ||
| + | | y6 = 550px | ||
| + | | area5 = Alcoves | ||
| + | | x5 = 380px | ||
| + | | y5 = 490px | ||
| + | | area7 = Sewers | ||
| + | | x7 = 230px | ||
| + | | y7 = 620px | ||
| + | | area9 = Cave | ||
| + | | x9 = 135px | ||
| + | | y9 = 775px | ||
| + | }} | ||
| + | ---- | ||
| + | ==== Watergate ==== | ||
| + | ===== Lolimsogreat21's version ===== | ||
| + | {{Map locations | ||
| + | | title = Watergate - Locations | ||
| + | | image = Watergate overview.png | ||
| + | |- | ||
| + | | spawn1 = RED spawn | ||
| + | | spawn-color1 = red | ||
| + | | xA = 60px | ||
| + | | yA = 215px | ||
| + | | spawn2 = BLU spawn | ||
| + | | spawn-color2 = blu | ||
| + | | xB = 705px | ||
| + | | yB = 215px | ||
| + | |- | ||
| + | | area1 = Open Alley | ||
| + | | x1 = 115px | ||
| + | | y1 = 280px | ||
| + | | area2 = Catwalk | ||
| + | | x2 = 185px | ||
| + | | y2 = 310px | ||
| + | | area4 = Dropoff | ||
| + | | x4 = 295px | ||
| + | | y4 = 325px | ||
| + | | area5 = Central Corridors | ||
| + | | x5 = 245px | ||
| + | | y5 = 200px | ||
| + | | area3 = Gatehouse | ||
| + | | x3 = 250px | ||
| + | | y3 = 380px | ||
| + | | area6 = Cellars (Entrance) | ||
| + | | x6 = 285px | ||
| + | | y6 = 145px | ||
| + | | area7 = Sewers | ||
| + | | x7 = 335px | ||
| + | | y7 = 190px | ||
| + | | area9 = Dilapidated Boat | ||
| + | | x9 = 385px | ||
| + | | y9 = 275px | ||
| + | | area8 = Overhead Bar (Above)/Central Sewer (Below) | ||
| + | | x8 = 385px | ||
| + | | y8 = 160px | ||
| + | | area10 = Overhead Catwalks | ||
| + | | x10 = 385px | ||
| + | | y10 = 400px | ||
| + | }} | ||
| + | ---- | ||
| + | |||
| + | === Arena === | ||
| + | ==== Badlands (Arena) ==== | ||
| + | ===== Lolimsogreat21's version ===== | ||
| + | {{Map locations | ||
| + | | title = Badlands (Arena) - Locations | ||
| + | | image = Badlands (Arena) overview.png | ||
| + | |- | ||
| + | | area3 = Bridge | ||
| + | | x3 = 383px | ||
| + | | y3 = 485px | ||
| + | | area2 = Rail Cars | ||
| + | | x2 = 383px | ||
| + | | y2 = 535px | ||
| + | | area1 = Closet | ||
| + | | x1 = 355px | ||
| + | | y1 = 565px | ||
| + | | area5 = House | ||
| + | | x5 = 325px | ||
| + | | y5 = 400px | ||
| + | | area4 = Pillars | ||
| + | | x4 = 345px | ||
| + | | y4 = 470px | ||
| + | | area6 = Valley | ||
| + | | x6 = 265px | ||
| + | | y6 = 470px | ||
| + | | area7 = Well | ||
| + | | x7 = 210px | ||
| + | | y7 = 360px | ||
| + | | area8 = Spire (Blocked off) | ||
| + | | x8 = 220px | ||
| + | | y8 = 300px | ||
| + | }} | ||
| + | ---- | ||
| + | ==== Byre ==== | ||
| + | ===== Lolimsogreat21's version ===== | ||
| + | {{Map locations | ||
| + | | title = Byre - Locations | ||
| + | | image = Byre Overview 1.png | ||
| + | |- | ||
| + | | spawn1 = RED spawn | ||
| + | | spawn-color1 = red | ||
| + | | xA = 97px | ||
| + | | yA = 275px | ||
| + | | spawn2 = BLU spawn | ||
| + | | spawn-color2 = blu | ||
| + | | xB = 657px | ||
| + | | yB = 160px | ||
| + | |- | ||
| + | | area1 = Ditch | ||
| + | | x1 = 230px | ||
| + | | y1 = 70px | ||
| + | | area2 = Tool Barn | ||
| + | | x2 = 310px | ||
| + | | y2 = 120px | ||
| + | | area3 = Tool Shed | ||
| + | | x3 = 283px | ||
| + | | y3 = 280px | ||
| + | | area4 = Death ray | ||
| + | | x4 = 390px | ||
| + | | y4 = 230px | ||
| + | }} | ||
| + | ---- | ||
| + | ==== Granary (Arena) ==== | ||
| + | ===== Lolimsogreat21's version ===== | ||
| + | {{Map locations | ||
| + | | title = Granary (Arena) - Locations | ||
| + | | image = Granary (Arena) overview.png | ||
| + | |- | ||
| + | | area1 = Ledge | ||
| + | | x1 = 305px | ||
| + | | y1 = 425px | ||
| + | | area2 = Choke | ||
| + | | x2 = 255px | ||
| + | | y2 = 390px | ||
| + | | area3 = Garage | ||
| + | | x3 = 400px | ||
| + | | y3 = 390px | ||
| + | | area4 = Catwalks | ||
| + | | x4 = 330px | ||
| + | | y4 = 365px | ||
| + | | area5 = Crates | ||
| + | | x5 = 295px | ||
| + | | y5 = 315px | ||
| + | }} | ||
| + | ---- | ||
| + | ==== Lumberyard ==== | ||
| + | ===== Lolimsogreat21's version ===== | ||
| + | {{Map locations | ||
| + | | title = Lumberyard - Locations | ||
| + | | image = Lumberyard overview.png | ||
| + | |- | ||
| + | | area3 = Mountain Side | ||
| + | | x3 = 515px | ||
| + | | y3 = 330px | ||
| + | | area2 = Central Building | ||
| + | | x2 = 361px | ||
| + | | y2 = 330px | ||
| + | | area1 = Cliff Side | ||
| + | | x1 = 225px | ||
| + | | y1 = 330px | ||
| + | }} | ||
| + | ---- | ||
| + | ==== Graveyard ==== | ||
| + | ===== Lolimsogreat21's version ===== | ||
| + | {{Map locations | ||
| + | | title = Graveyard - Locations | ||
| + | | image = Graveyard overview.png | ||
| + | |- | ||
| + | | spawn1 = RED spawn | ||
| + | | spawn-color1 = red | ||
| + | | xA = 250px | ||
| + | | yA = 195px | ||
| + | | spawn2 = BLU spawn | ||
| + | | spawn-color2 = blu | ||
| + | | xB = 520px | ||
| + | | yB = 195px | ||
| + | |- | ||
| + | | area1 = Cliff Side | ||
| + | | x1 = 385px | ||
| + | | y1 = 90px | ||
| + | | area2 = Charnel Church | ||
| + | | x2 = 385px | ||
| + | | y2 = 210px | ||
| + | | area3 = Mountain Side | ||
| + | | x3 = 385px | ||
| + | | y3 = 340px | ||
| + | }} | ||
| + | ---- | ||
| + | ==== Nucleus (Arena) ==== | ||
| + | ===== Lolimsogreat21's version ===== | ||
| + | {{Map locations | ||
| + | | title = Nucleus (Arena) - Locations | ||
| + | | image = Nucleus (Arena) overview.png | ||
| + | |- | ||
| + | | area1 = Perimiter | ||
| + | | x1 = 243px | ||
| + | | y1 = 499px | ||
| + | | area2 = Roofs | ||
| + | | x2 = 388px | ||
| + | | y2 = 455px | ||
| + | | area3 = Bridges | ||
| + | | x3 = 385px | ||
| + | | y3 = 347px | ||
| + | | area4 = Flank buildings | ||
| + | | x4 = 281px | ||
| + | | y4 = 165px | ||
| + | | area5 = Access Building | ||
| + | | x5 = 390px | ||
| + | | y5 = 84px | ||
| + | }} | ||
| + | ---- | ||
| + | ==== Offblast ==== | ||
| + | ===== Lolimsogreat21's version ===== | ||
| + | {{Map locations | ||
| + | | title = Offblast - Locations | ||
| + | | image = Offblast overview.png | ||
| + | |- | ||
| + | | area2 = Cliff-Side | ||
| + | | x2 = 330px | ||
| + | | y2 = 235px | ||
| + | | area1 = House | ||
| + | | x1 = 397px | ||
| + | | y1 = 135px | ||
| + | | area3 = Top Floor | ||
| + | | x3 = 325px | ||
| + | | y3 = 310px | ||
| + | | area4 = Main Floor | ||
| + | | x4 = 397px | ||
| + | | y4 = 373px | ||
| + | | area5 = Top Floor | ||
| + | | x5 = 360px | ||
| + | | y5 = 405px | ||
| + | }} | ||
| + | ---- | ||
| + | ==== Ravine ==== | ||
| + | ===== Lolimsogreat21's version ===== | ||
| + | {{Map locations | ||
| + | | title = Ravine - Locations | ||
| + | | image = Ravine overview.png | ||
| + | |- | ||
| + | | area1 = Yard | ||
| + | | x1 = 360px | ||
| + | | y1 = 185px | ||
| + | | area2 = House | ||
| + | | x2 = 270px | ||
| + | | y2 = 305px | ||
| + | | area4 = Well | ||
| + | | x4 = 530px | ||
| + | | y4 = 305px | ||
| + | | area3 = Shack | ||
| + | | x3 = 427px | ||
| + | | y3 = 305px | ||
| + | }} | ||
| + | ---- | ||
| + | ==== Sawmill (Arena) ==== | ||
| + | ===== Lolimsogreat21's version ===== | ||
| + | {{Map locations | ||
| + | | title = Sawmill (Arena) - Locations | ||
| + | | image = Sawmill (Arena) overview.png | ||
| + | |- | ||
| + | | spawn1 = RED spawn | ||
| + | | spawn-color1 = red | ||
| + | | xA = 590px | ||
| + | | yA = 24px | ||
| + | | spawn2 = BLU spawn | ||
| + | | spawn-color2 = blu | ||
| + | | xB = 200px | ||
| + | | yB = 525px | ||
| + | |- | ||
| + | | area1 = Rooftops | ||
| + | | x1 = 235px | ||
| + | | y1 = 335px | ||
| + | | area2 = Cave | ||
| + | | x2 = 225px | ||
| + | | y2 = 140px | ||
| + | | area3 = Waterfall | ||
| + | | x3 = 274px | ||
| + | | y3 = 198px | ||
| + | | area4 = Alcoves | ||
| + | | x4 = 354px | ||
| + | | y4 = 290px | ||
| + | | area5 = Center Shed | ||
| + | | x5 = 390px | ||
| + | | y5 = 290px | ||
| + | | area6 = Log Shed | ||
| + | | x6 = 525px | ||
| + | | y6 = 410px | ||
| + | }} | ||
| + | ---- | ||
| + | ==== Watchtower ==== | ||
| + | ===== Lolimsogreat21's version ===== | ||
| + | {{Map locations | ||
| + | | title = Watchtower - Locations | ||
| + | | image = Watchtower overview.png | ||
| + | |- | ||
| + | | area1 = Tower Shack | ||
| + | | x1 = 378px | ||
| + | | y1 = 302px | ||
| + | | area2 = Lower Pipe | ||
| + | | x2 = 380px | ||
| + | | y2 = 240px | ||
| + | | area3 = Higher Pipe | ||
| + | | x3 = 280px | ||
| + | | y3 = 300px | ||
| + | | area4 = Center Valley | ||
| + | | x4 = 310px | ||
| + | | y4 = 235px | ||
| + | | area5 = External Ring | ||
| + | | x5 = 230px | ||
| + | | y5 = 190px | ||
| + | }} | ||
| + | ---- | ||
| + | ==== Well (Arena) ==== | ||
| + | ===== Lolimsogreat21's version ===== | ||
| + | {{Map locations | ||
| + | | title = Well (Arena) - Locations | ||
| + | | image = Well (Arena) overview.png | ||
| + | |- | ||
| + | | spawn1 = BLU spawn | ||
| + | | spawn-color1 = blu | ||
| + | | xA = 380px | ||
| + | | yA = 45px | ||
| + | | spawn2 = RED spawn | ||
| + | | spawn-color2 = red | ||
| + | | xB = 380px | ||
| + | | yB = 485px | ||
| + | |- | ||
| + | | area1 = Boxcars | ||
| + | | x1 = 295px | ||
| + | | y1 = 423px | ||
| + | | area2 = Waterways | ||
| + | | x2 = 385px | ||
| + | | y2 = 380px | ||
| + | | area3 = Battlements | ||
| + | | x3 = 355px | ||
| + | | y3 = 355px | ||
| + | | area4 = Train Rails | ||
| + | | x4 = 330px | ||
| + | | y4 = 300px | ||
| + | | area5 = Catwalk | ||
| + | | x5 = 385px | ||
| + | | y5 = 270px | ||
| + | }} | ||
| + | ---- | ||
| + | |||
| + | === MVM === | ||
| + | |||
| + | ==== Big Rock ==== | ||
| + | ===== Lolimsogreat21's version ===== | ||
| + | {{Map locations | ||
| + | | title = Big Rock - Locations | ||
| + | | image = Bigrock overview.png | ||
| + | |- | ||
| + | | spawn1 = RED spawn | ||
| + | | spawn-color1 = red | ||
| + | | xA = 490px | ||
| + | | yA = 870px | ||
| + | | spawn2 = Robot spawn | ||
| + | | spawn-color2 = blu | ||
| + | | xB = 250px | ||
| + | | yB = 130px | ||
| + | | spawn3 = Tank spawn | ||
| + | | spawn-color3 = blu | ||
| + | | xC = 470px | ||
| + | | yC = 100px | ||
| + | |- | ||
| + | | area2 = Center Bridge | ||
| + | | x2 = 415px | ||
| + | | y2 = 710px | ||
| + | | area1 = Left Catwalk | ||
| + | | x1 = 290px | ||
| + | | y1 = 765px | ||
| + | | area3 = Right Catwalk | ||
| + | | x3 = 530px | ||
| + | | y3 = 720px | ||
| + | | area4 = Right Lane | ||
| + | | x4 = 505px | ||
| + | | y4 = 610px | ||
| + | | area5 = Casali Shafting Co. | ||
| + | | x5 = 415px | ||
| + | | y5 = 590px | ||
| + | | area6 = Left Lane | ||
| + | | x6 = 315px | ||
| + | | y6 = 575px | ||
| + | | area7 = Entrance | ||
| + | | x7 = 420px | ||
| + | | y7 = 420px | ||
| + | | area8 = Robot Cave | ||
| + | | x8 = 390px | ||
| + | | y8 = 205px | ||
| + | }} | ||
| + | ---- | ||
| + | ==== Coal Town ==== | ||
| + | ===== Lolimsogreat21's version ===== | ||
| + | {{Map locations | ||
| + | | title = Coal Town - Locations | ||
| + | | image = Coal Town overview.png | ||
| + | |- | ||
| + | | spawn1 = RED spawn | ||
| + | | spawn-color1 = red | ||
| + | | xA = 270px | ||
| + | | yA = 1020px | ||
| + | | spawn2 = RED spawn | ||
| + | | spawn-color2 = red | ||
| + | | xB = 460px | ||
| + | | yB = 1020px | ||
| + | | spawn3 = Robot/Tank spawn | ||
| + | | spawn-color3 = blu | ||
| + | | xC = 380px | ||
| + | | yC = 370px | ||
| + | |- | ||
| + | | area1 = Left Side Hotel | ||
| + | | x1 = 220px | ||
| + | | y1 = 950px | ||
| + | | area3 = Right Side Mann Mining | ||
| + | | x3 = 570px | ||
| + | | y3 = 770px | ||
| + | | area2 = Mining Accident Simulator | ||
| + | | x2 = 380px | ||
| + | | y2 = 875px | ||
| + | | area4 = Right Lane | ||
| + | | x4 = 505px | ||
| + | | y4 = 770px | ||
| + | | area5 = Salt Rock Interior | ||
| + | | x5 = 320px | ||
| + | | y5 = 780px | ||
| + | | area6 = Rooftop | ||
| + | | x6 = 375px | ||
| + | | y6 = 700px | ||
| + | | area7 = Left Lane | ||
| + | | x7 = 275px | ||
| + | | y7 = 685px | ||
| + | }} | ||
| + | ---- | ||
| + | ==== Ghost Town ==== | ||
| + | ===== Lolimsogreat21's version ===== | ||
| + | {{Map locations | ||
| + | | title = Ghost Town - Locations | ||
| + | | image = Ghost Town overview.png | ||
| + | |- | ||
| + | | spawn1 = RED spawn | ||
| + | | spawn-color1 = red | ||
| + | | xA = 270px | ||
| + | | yA = 1035px | ||
| + | | spawn2 = RED spawn | ||
| + | | spawn-color2 = red | ||
| + | | xB = 460px | ||
| + | | yB = 1035px | ||
| + | | spawn3 = Robot/Tank spawn | ||
| + | | spawn-color3 = blu | ||
| + | | xC = 380px | ||
| + | | yC = 370px | ||
| + | |- | ||
| + | | area1 = Left Side Hotel | ||
| + | | x1 = 210px | ||
| + | | y1 = 965px | ||
| + | | area3 = Right Side Mann Mining | ||
| + | | x3 = 560px | ||
| + | | y3 = 785px | ||
| + | | area2 = Mining Accident Simulator | ||
| + | | x2 = 370px | ||
| + | | y2 = 890px | ||
| + | | area4 = Right Lane | ||
| + | | x4 = 495px | ||
| + | | y4 = 785px | ||
| + | | area5 = Salt Rock Interior | ||
| + | | x5 = 315px | ||
| + | | y5 = 795px | ||
| + | | area6 = Rooftop | ||
| + | | x6 = 365px | ||
| + | | y6 = 710px | ||
| + | | area7 = Left Lane | ||
| + | | x7 = 265px | ||
| + | | y7 = 695px | ||
| + | }} | ||
| + | ---- | ||
| + | ==== Decoy ==== | ||
| + | ===== Lolimsogreat21's version ===== | ||
| + | {{Map locations | ||
| + | | title = Decoy - Locations | ||
| + | | image = Decoy overview.png | ||
| + | |- | ||
| + | | spawn1 = RED spawn | ||
| + | | spawn-color1 = red | ||
| + | | xA = 290px | ||
| + | | yA = 1170px | ||
| + | | spawn2 = RED spawn | ||
| + | | spawn-color2 = red | ||
| + | | xB = 510px | ||
| + | | yB = 1170px | ||
| + | | spawn3 = Robot spawn | ||
| + | | spawn-color3 = blu | ||
| + | | xC = 424.5px | ||
| + | | yC = 515px | ||
| + | |- | ||
| + | | area1 = Mann Co. Hatch of Great Importance | ||
| + | | x1 = 411px | ||
| + | | y1 = 1117px | ||
| + | | area2 = Base Bridge | ||
| + | | x2 = 505px | ||
| + | | y2 = 1020px | ||
| + | | area3 = Base Bridge | ||
| + | | x3 = 315px | ||
| + | | y3 = 1020px | ||
| + | | area4 = Left Cliff | ||
| + | | x4 = 235px | ||
| + | | y4 = 920px | ||
| + | | area5 = Center Structure | ||
| + | | x5 = 420px | ||
| + | | y5 = 875px | ||
| + | | area6 = Right Structure | ||
| + | | x6 = 535px | ||
| + | | y6 = 690px | ||
| + | | area7 = Structure Bridge | ||
| + | | x7 = 430px | ||
| + | | y7 = 630px | ||
| + | | area8 = Left Structure | ||
| + | | x8 = 340px | ||
| + | | y8 = 675px | ||
| + | }} | ||
| + | ---- | ||
| + | ==== Rottenburg ==== | ||
| + | ===== Lolimsogreat21's version ===== | ||
| + | {{Map locations | ||
| + | | title = Rottenburg - Locations | ||
| + | | image = Rottenburg overview.png | ||
| + | |- | ||
| + | | spawn1 = RED spawn | ||
| + | | spawn-color1 = red | ||
| + | | xA = 265px | ||
| + | | yA = 305px | ||
| + | | spawn2 = RED spawn | ||
| + | | spawn-color2 = red | ||
| + | | xB = 230px | ||
| + | | yB = 450px | ||
| + | | spawn3 = Robot spawn | ||
| + | | spawn-color3 = blu | ||
| + | | xC = 410px | ||
| + | | yC = 725px | ||
| + | | spawn4 = Robot/Tank spawn | ||
| + | | spawn-color4 = blu | ||
| + | | xD = 615px | ||
| + | | yD = 720px | ||
| + | |- | ||
| + | | area1 = Hatch Area | ||
| + | | x1 = 247px | ||
| + | | y1 = 400px | ||
| + | | area2 = Tank Path | ||
| + | | x2 = 230px | ||
| + | | y2 = 270px | ||
| + | | area3 = Overhead Platform | ||
| + | | x3 = 310px | ||
| + | | y3 = 270px | ||
| + | | area4 = Catwalks | ||
| + | | x4 = 355px | ||
| + | | y4 = 350px | ||
| + | | area5 = Tunnel Entrance | ||
| + | | x5 = 355px | ||
| + | | y5 = 395px | ||
| + | | area6 = Stone Tower | ||
| + | | x6 = 510px | ||
| + | | y6 = 450px | ||
| + | | area8 = City Gates | ||
| + | | x8 = 505px | ||
| + | | y8 = 555px | ||
| + | | area7 = Pitchfork checkpoint | ||
| + | | x7 = 540px | ||
| + | | y7 = 555px | ||
| + | | area9 = Barricade | ||
| + | | x9 = 505px | ||
| + | | y9 = 635px | ||
| + | | area10 = Field | ||
| + | | x10 = 500px | ||
| + | | y10 = 690px | ||
| + | | area11 = Rightside Cliff | ||
| + | | x11 = 485px | ||
| + | | y11 = 745px | ||
| + | }} | ||
| + | ---- | ||
| + | ==== Mannhattan ==== | ||
| + | ===== Lolimsogreat21's version ===== | ||
| + | {{Map locations | ||
| + | | title = Mannhattan - Locations | ||
| + | | image = Mannhattan overview.png | ||
| + | |- | ||
| + | | spawn1 = Robot spawn #1 | ||
| + | | spawn-color1 = blu | ||
| + | | xA = 225px | ||
| + | | yA = 530px | ||
| + | | spawn2 = Robot spawn #2 | ||
| + | | spawn-color2 = blu | ||
| + | | xB = 430px | ||
| + | | yB = 430px | ||
| + | | spawn3 = Robot spawn #3 | ||
| + | | spawn-color3 = blu | ||
| + | | xC = 180px | ||
| + | | yC = 380px | ||
| + | | spawn4 = RED spawn | ||
| + | | spawn-color4 = red | ||
| + | | xD = 315px | ||
| + | | yD = 115px | ||
| + | |- | ||
| + | | area1 = Warehouse | ||
| + | | x1 = 300px | ||
| + | | y1 = 505px | ||
| + | | area3 = Grinder | ||
| + | | x3 = 363px | ||
| + | | y3 = 375px | ||
| + | | area2 = Shipping Containers | ||
| + | | x2 = 305px | ||
| + | | y2 = 420px | ||
| + | | area5 = Old Railway Ditch | ||
| + | | x5 = 270px | ||
| + | | y5 = 265px | ||
| + | | area4 = Mannhattan Used Fireworks (And Repair) | ||
| + | | x4 = 375px | ||
| + | | y4 = 265px | ||
| + | }} | ||
| + | ---- | ||
| + | ==== Mannworks ==== | ||
| + | ===== Lolimsogreat21's version ===== | ||
| + | {{Map locations | ||
| + | | title = Mannworks - Locations | ||
| + | | image = Mannworks overview.png | ||
| + | |- | ||
| + | | spawn1 = RED spawn | ||
| + | | spawn-color1 = red | ||
| + | | xA = 423px | ||
| + | | yA = 830px | ||
| + | | spawn2 = Robot spawn | ||
| + | | spawn-color2 = blu | ||
| + | | xB = 450px | ||
| + | | yB = 255px | ||
| + | |- | ||
| + | | area1 = Central Hatch | ||
| + | | x1 = 367px | ||
| + | | y1 = 749px | ||
| + | | area2 = Dual Structures | ||
| + | | x2 = 310px | ||
| + | | y2 = 635px | ||
| + | | area3 = Red Structure | ||
| + | | x3 = 270px | ||
| + | | y3 = 510px | ||
| + | | area4 = Center Structure | ||
| + | | x4 = 420px | ||
| + | | y4 = 455px | ||
| + | | area5 = Valley | ||
| + | | x5 = 440px | ||
| + | | y5 = 345px | ||
| + | }} | ||
| + | |||
| + | <div style="position:fixed;bottom:205px;right:22.5px;">[[Image:Icon-tasks.png|link=#firstHeading|60px|Back to top]]<div style="position:absolute;top:52.5%;left:52.5%;transform:translate(-50%,-50%);font-family:TF2 Build;font-size:1.5em;pointer-events:none;">TOP</div></div> | ||
| + | <div style="position:fixed;bottom:155px;right:55px;">[[Image:Icon-tasks.png|link=#PL|50px|Payload]]<div style="position:absolute;top:50%;left:52.5%;transform:translate(-50%,-50%);font-family:TF2 Build;font-size:1.5em;pointer-events:none;">PL</div></div> | ||
| + | <div style="position:fixed;bottom:155px;right:5px;">[[Image:Icon-tasks.png|link=#PLR|50px|Payload Race]]<div style="position:absolute;top:50%;left:52.5%;transform:translate(-50%,-50%);font-family:TF2 Build;font-size:1.5em;pointer-events:none;">PLR</div></div> | ||
| + | <div style="position:fixed;bottom:105px;right:55px;">[[Image:Icon-tasks.png|link=#CP (A/D)|50px|Attack/Defend]]<div style="position:absolute;top:50%;left:50%;transform:translate(-50%,-50%);font-family:TF2 Build;font-size:1.5em;pointer-events:none;">A/D</div></div> | ||
| + | <div style="position:fixed;bottom:105px;right:5px;">[[Image:Icon-tasks.png|link=#CP (Symmetric)|50px|Control Point]]<div style="position:absolute;top:50%;left:52.5%;transform:translate(-50%,-50%);font-family:TF2 Build;font-size:1.5em;pointer-events:none;">CP</div></div> | ||
| + | <div style="position:fixed;bottom:55px;right:55px;">[[Image:Icon-tasks.png|link=#KOTH|50px|King of the Hill]]<div style="position:absolute;top:50%;left:50%;transform:translate(-50%,-50%);font-family:TF2 Build;font-size:1.1em;pointer-events:none;">KOTH</div></div> | ||
| + | <div style="position:fixed;bottom:55px;right:5px;">[[Image:Icon-tasks.png|link=#CTF|50px|Capture the Flag]]<div style="position:absolute;top:50%;left:50%;transform:translate(-50%,-50%);font-family:TF2 Build;font-size:1.5em;pointer-events:none;">CTF</div></div> | ||
| + | <div style="position:fixed;bottom:5px;right:105px;">[[Image:Icon-tasks.png|link=#PD|50px|Player Destruction]]<div style="position:absolute;top:50%;left:52.5%;transform:translate(-50%,-50%);font-family:TF2 Build;font-size:1.5em;pointer-events:none;">PD</div></div> | ||
| + | <div style="position:fixed;bottom:5px;right:55px;">[[Image:Icon-tasks.png|link=#Arena|50px|Arena]]<div style="position:absolute;top:50%;left:50%;transform:translate(-50%,-50%);font-family:TF2 Build;font-size:0.95em;pointer-events:none;">Arena</div></div> | ||
| + | <div style="position:fixed;bottom:5px;right:5px;">[[Image:Icon-tasks.png|link=#MVM|50px|Mann vs Machine]]<div style="position:absolute;top:50%;left:50%;transform:translate(-50%,-50%);font-family:TF2 Build;font-size:1.2em;pointer-events:none;">MVM</div></div> | ||
Latest revision as of 21:54, 22 February 2022
Contents
- 1 Overview
- 2 Map list
- 3 Sandbox
- 3.1 PL
- 3.1.1 Badwater Basin
- 3.1.2 Bloodwater
- 3.1.3 Barnlitz
- 3.1.4 Borneo
- 3.1.5 Bread Space
- 3.1.6 Brimstone
- 3.1.7 Chilly
- 3.1.8 Enclosure
- 3.1.9 Frontier
- 3.1.10 Gold Rush
- 3.1.11 Gravestone
- 3.1.12 Hellstone
- 3.1.13 Hoodoo
- 3.1.14 Pier
- 3.1.15 Polar
- 3.1.16 Precipice
- 3.1.17 Snowycoast
- 3.1.18 Swiftwater
- 3.1.19 Terror
- 3.1.20 Thunder Mountain
- 3.1.21 Upward
- 3.1.22 Hassle Castle
- 3.1.23 Wutville
- 3.2 PLR
- 3.3 CP (A/D)
- 3.4 CP (Symmetric)
- 3.4.1 5Gorge
- 3.4.2 Badlands (Control Point)
- 3.4.3 Coldfront
- 3.4.4 Fastlane
- 3.4.5 Foundry
- 3.4.6 Freight
- 3.4.7 Granary (Control Point)
- 3.4.8 Gullywash
- 3.4.9 Metalworks
- 3.4.10 Powerhouse
- 3.4.11 Process
- 3.4.12 Snakewater
- 3.4.13 Sunshine
- 3.4.14 Sinshine
- 3.4.15 Vanguard
- 3.4.16 Well (Control Point)
- 3.4.17 Yukon
- 3.5 KOTH
- 3.5.1 Badlands (King of the Hill)
- 3.5.2 Brazil
- 3.5.3 Cascade
- 3.5.4 Cauldron
- 3.5.5 Harvest
- 3.5.6 Harvest Event
- 3.5.7 Highpass
- 3.5.8 Kong King
- 3.5.9 Lakeside
- 3.5.10 Ghost Fort
- 3.5.11 Los Muertos
- 3.5.12 Laughter
- 3.5.13 Lazarus
- 3.5.14 Maple Ridge Event
- 3.5.15 Megalo
- 3.5.16 Moldergrove
- 3.5.17 Moonshine Event
- 3.5.18 Nucleus (King of the Hill)
- 3.5.19 Probed
- 3.5.20 Sawmill (King of the Hill)
- 3.5.21 Sinthetic
- 3.5.22 Slasher
- 3.5.23 Suijin
- 3.5.24 Viaduct
- 3.5.25 Eyeaduct
- 3.6 CTF
- 3.7 PD
- 3.8 Arena
- 3.9 MVM
- 3.1 PL
Overview
| TBD | In progress(incl. these not approved) | Awaiting approval / Approved | Null(no old overview) |
| ⌛ | ⚒️ | ☑️/✅ | ❌ |
| 0 | 125 | 0 / 0 | 2 |
last upd 22/Feb/22
Notes
I haven't changed much when transfering maps from the sandbox, therefore they still use the private version of the template. Idk if moving to it can theoretically break anything.- I've also noticed that some overlays are laid out on overview files different from these placed on the respective articles, some were likely recently updated and are straight up broken. This all will have to be re-checked, together with grammar and naming conventions. That's why we have two ticked states here.
- Current major issues:
- No way to implement the template properly on symmetrical maps
Marking CPs (some overlays have it some don't)Resolved as of Jan 30th in the private branch
PL(+R): 32/33
CP: 35/36 (Issues)👀
KOTH: 25/25 (Issues)👀
CTF: 9/9 (Issues)👀
PD: 6/6
ARENA: 11/11
MVM: 7/7 (?)
Total: 125/127
Overall:Drafts
Overall:Approval
Map list
Sandbox
PL
Badwater Basin
Old

Foxbite's version
| Badwater Basin - Locations |
|---|
|
Mouseover the markers to see the name of the location
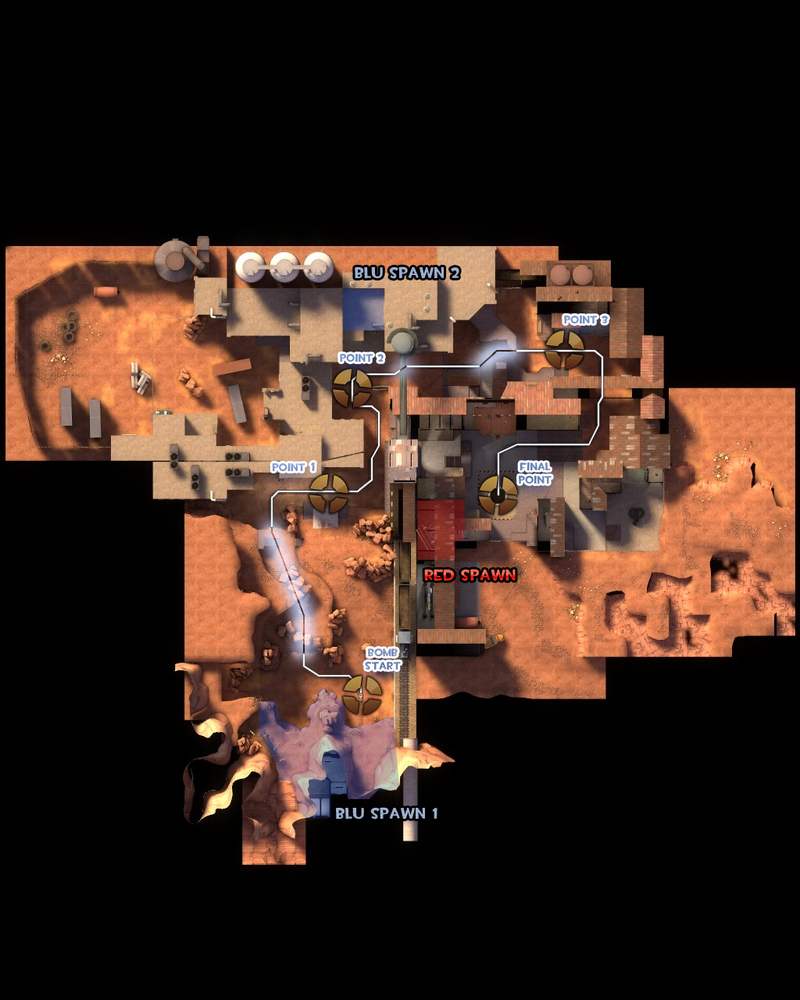
1 Side path 2 Cliffs 3 Rocks 4 Bunker 5 Front Steps 6 Back-Roof 7 Backyard 8 Roof 9 Back Steps 10 Alcove 11 Side Room 12 Bridge 13 Attic 14 Map Room 15 Alley 16 Chicken Wire Room 17 Sniper Hut 18 Back Yard 19 Pit 20 Platforms
|
Lolimsogreat21's version
| Badwater - Locations |
|---|
|
Mouseover the markers to see the name of the location
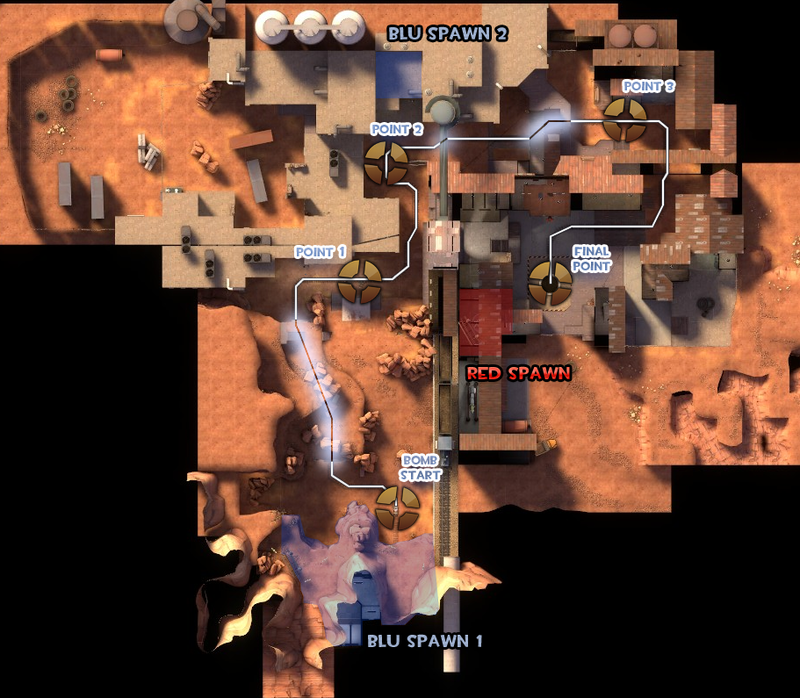
1 Side path 2 Cliffs 3 Rocks 4 Bunker 5 Front steps 6 Backroof 7 Yard 8 Backsteps 9 Roof 10 Side room 11 Bridge 12 Attic 13 Alley 14 Chicken wire room 15 Sniper's hut 16 Back Yard 17 Platforms 18 Pit 19 Map room
|
Bloodwater
Old

Foxbite's version
| Bloodwater - Locations |
|---|
|
Mouseover the markers to see the name of the location
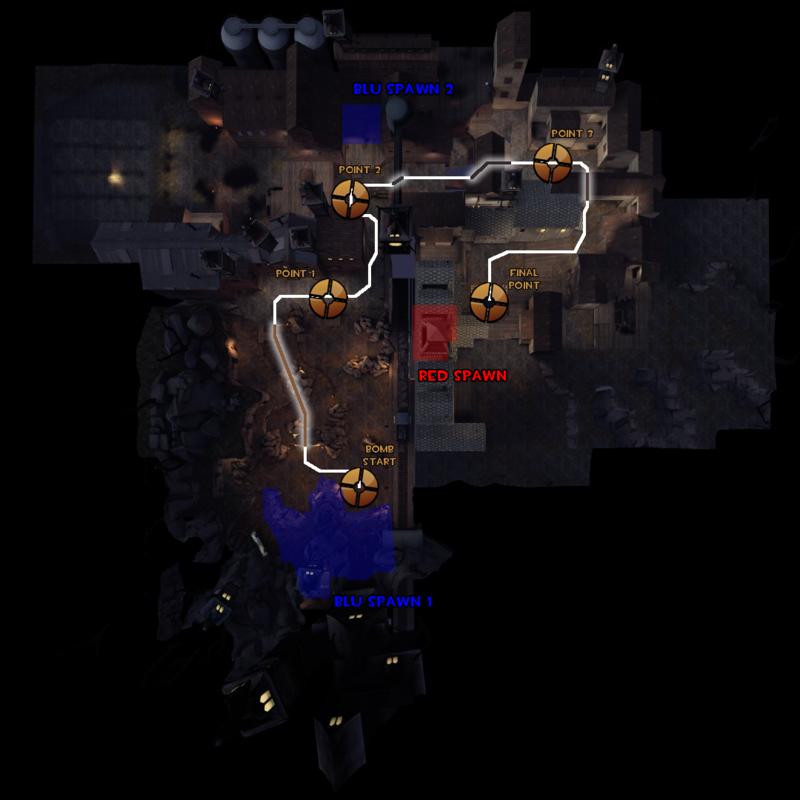
1 Side path 2 Cliffs 3 Rocks 4 Bunker 5 Front Steps 6 Back-Roof 7 Roof 8 Backyard 9 Back Steps 10 Alcove 11 Side Room 12 Bridge 13 Attic 14 Map Room 15 Alley 16 Chicken Wire Room 17 Sniper Hut 18 Back Yard 19 Pit 20 Platforms
|
Lolimsogreat21's version
| Bloodwater - Locations |
|---|
|
Mouseover the markers to see the name of the location
1 Side path 2 Cliffs 3 Rocks 4 Bunker 5 Front steps 6 Backroof 7 Yard 8 Backsteps 9 Roof 10 Side room 11 Bridge 12 Attic 13 Alley 14 Chicken wire room 15 Sniper's hut 16 Back Yard 17 Platforms 18 Pit 19 Map room
|
Barnlitz
Old

Foxbite's version
missing control points; missing 2nd final spawn point; fix spawn naming
| Barnblitz - Locations |
|---|
|
Mouseover the markers to see the name of the location

1 Attacker's Yard 2 Approach 3 Left Shed 4 Platform 5 Defender Yard 6 Entrance 7 Dropdown 8 Upper level 9 House Entrance 10 Second story 11 Third story 12 Roof 13 Left entrance 14 Main entrance (The third checkpoint) 15 Right entrance A BLU first spawn B RED first spawn
C BLU second spawn D RED second spawn E RED final spawn
|
Lolimsogreat21's version
| Barnblitz - Locations |
|---|
|
Mouseover the markers to see the name of the location
1 Attacker's Yard 2 Approach 3 Left shed 4 Platform 5 Defender's yard 6 Entrance 7 Dropdown 8 Upper level 9 House entrance 10 Second story 11 Third story 12 Roof 13 Left entrance 14 Main entrance 15 Right entrance A BLU first spawn B BLU second spawn
C RED first spawn D RED second spawn E RED final spawn
|
Borneo
Old

Foxbite's version
| Borneo - Locations |
|---|
|
Mouseover the markers to see the name of the location
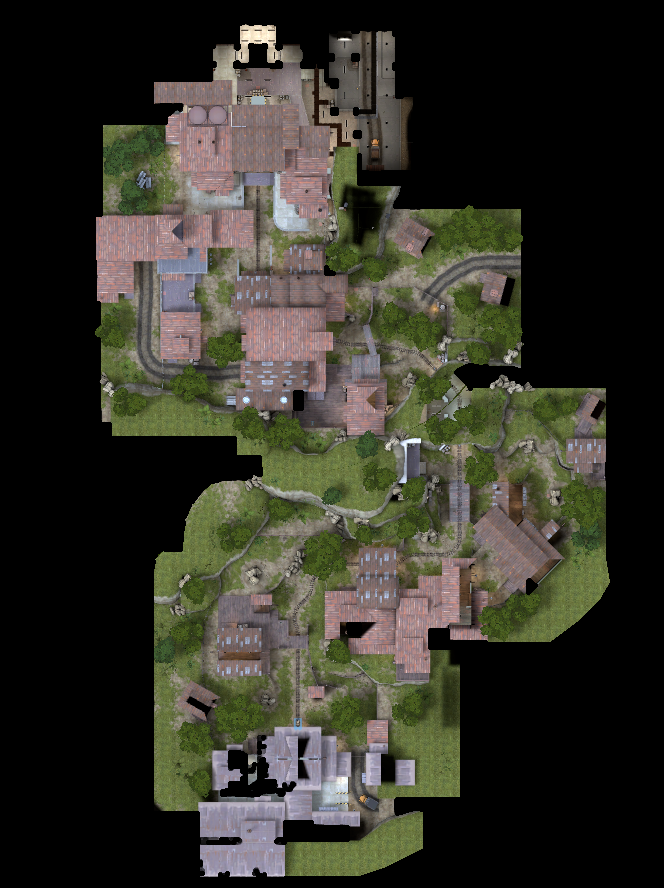
1 Shed 2 Small House 3 Maintenance Building 4 Grey Structure 5 Bridge 6 Hill interior 7 Tunnel 8 Giant Garage 9 Casali building A BLU first spawn B RED first spawn
C BLU second spawn D RED second spawn E BLU final spawn
|
Lolimsogreat21's version
| Borneo - Locations |
|---|
|
Mouseover the markers to see the name of the location
1 Shed 2 Small house 3 Maintenance building 4 Grey structure 5 Bridge 6 Hill interior 7 Tunnel 8 Giant garage 9 Casali building A BLU first spawn B BLU second spawn
C BLU third spawn D RED first spawn E RED second spawn
|
Bread Space
Brimstone
Old
_overview_with_lines.png)
Lolimsogreat21's version
| Brimstone - Locations |
|---|
|
Mouseover the markers to see the name of the location
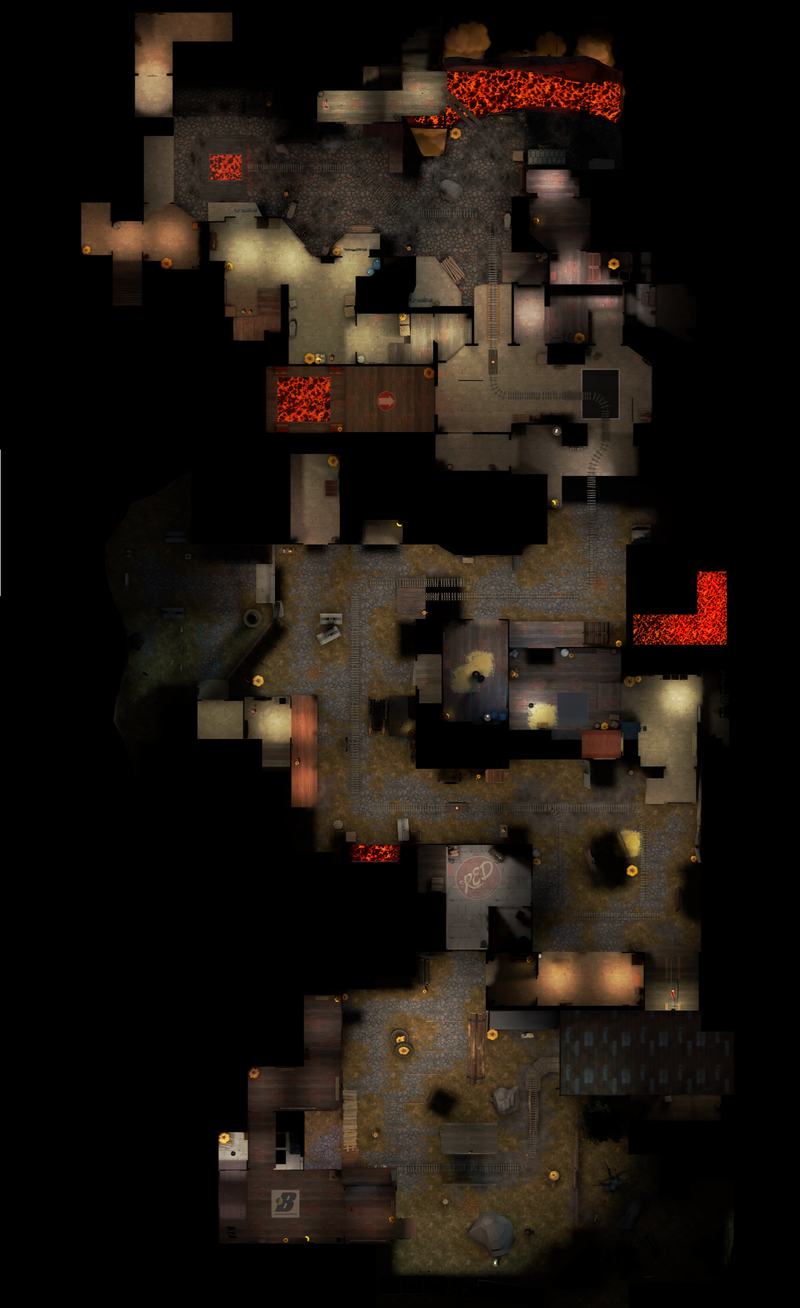
1 Lumber mill 2 Garage 3 Wet paint! 4 Shortcut to B 5 Library 6 Dump truck 7 Brick building 8 Warehouse 9 Sniper's nest A BLU first spawn B BLU second spawn
C RED first spawn D RED second spawn E RED third spawn
|
Chilly
Brand new
| Chilly - Locations |
|---|
|
Mouseover the markers to see the name of the location
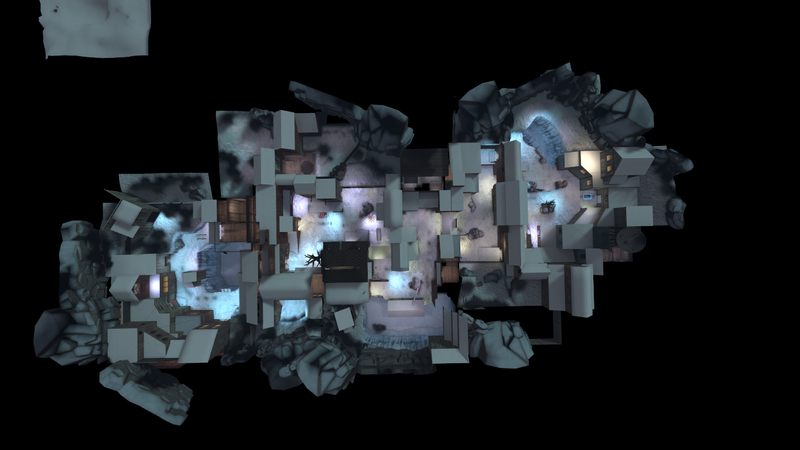
1 Front Yard 2 Low Hanging Roof 3 RED shed 4 Rocks 5 Crossing 6 Slope 7 Cliffside Shed 8 Old Geeser 9 Bridge 10 Mann Mannor 11 Tree 12 Casali Shafting 13 Flank House 14 Pit 15 Outhouse A BLU first spawn B BLU second spawn
C RED first spawn D RED second spawn E RED third spawn
|
Enclosure
Brand new
Stage 1
| Enclosure, stage one - Locations |
|---|
|
Mouseover the markers to see the name of the location
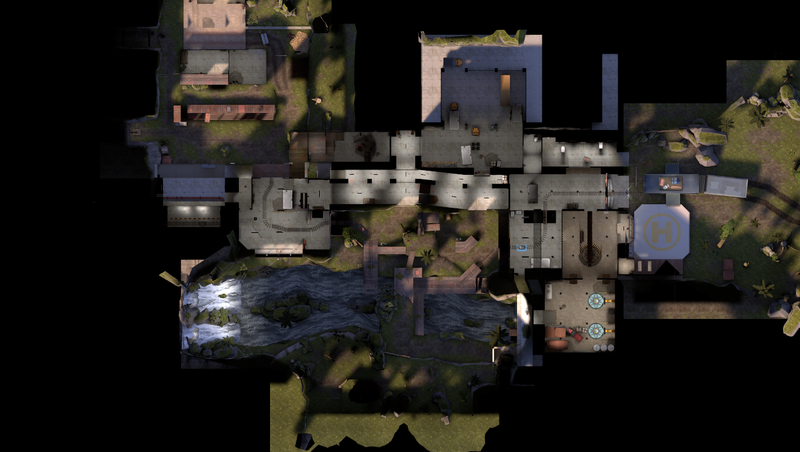
1 Chasm 2 Ramps 3 Service Hall 4 High High 5 Fan Exit 6 Aviary 7 Cage 8 Sorting Shed 9 Amber Mine 10 Restricted Area A BLU spawn B RED spawn
|
Stage 2
| Enclosure, stage two - Locations |
|---|
|
Mouseover the markers to see the name of the location
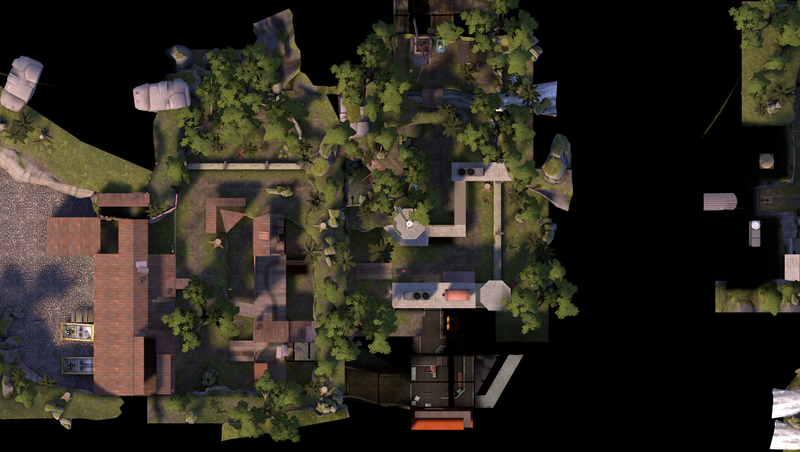
1 Stream 2 Trail 3 Security Buildings 4 Brachiosaurus Enclosure 5 Control Room 6 Pipeline 7 Wood Structure 8 Goldbloom 9 Lean to 10 Boathouse A BLU spawn B RED spawn
|
Stage 3
| Enclosure, stage three - Locations |
|---|
|
Mouseover the markers to see the name of the location
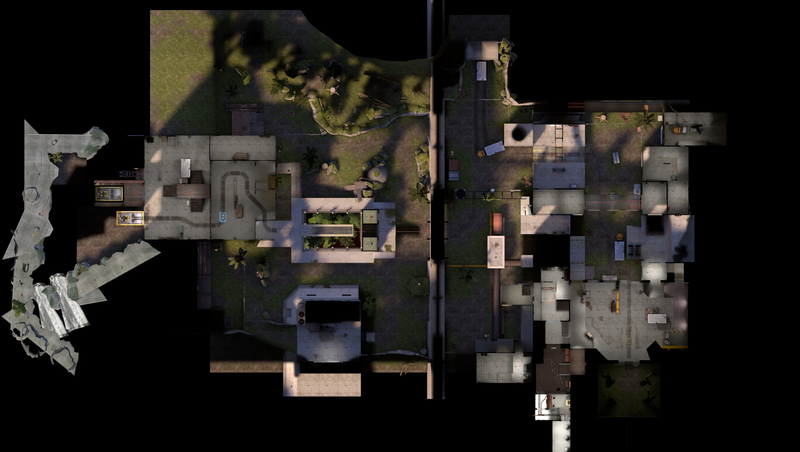
1 Raptor Enclosure 2 Maintenance Shed 3 Gate 01 4 Sector 6 5 T.rex encounter A BLU spawn B BLU second spawn
C RED spawn
|
Frontier
Old

New
| Frontier - overview indicators |
|---|
|
Mouseover the markers to see the name of the location
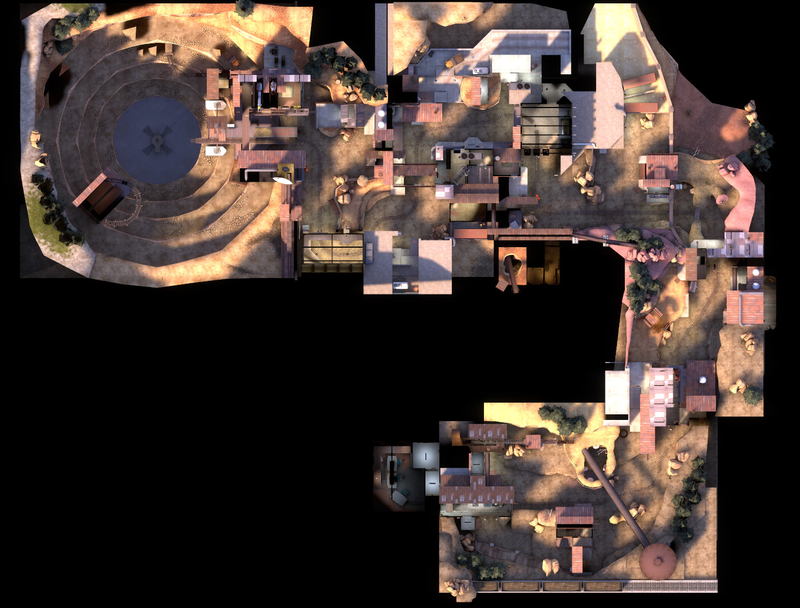
1 Shack 2 Cave 3 Tower 4 Cliff 5 Canyon 6 House 7 Incline 8 Rock Wall 9 Warehouse 10 Small Shack 11 Second Incline 12 Hollow Building 13 Rock Plateau 14 Red Catwalks 15 Balcony A BLU first spawn B BLU second spawn/RED first spawn
C BLU third spawn D BLU fourth spawn/RED second spawn E RED third spawn
|
Gold Rush
Old


Lolimsogreat21's version
Stage 1
| Goldrush, stage one - Locations |
|---|
|
Mouseover the markers to see the name of the location
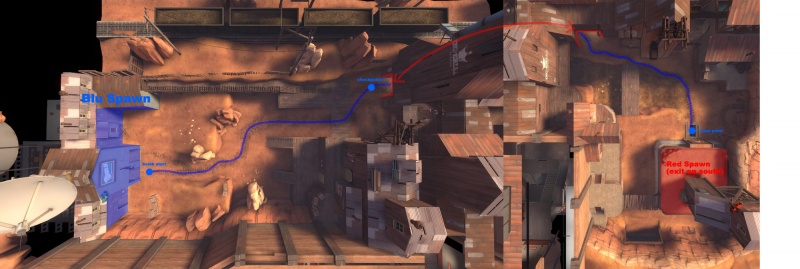
1 Elevated tracks 2 Cliffs 3 Hut 4 Tunnel 5 Imperial building 6 Red deck 7 Ditch 8 Attic 9 Mine shaft
|
Stage 2
| Goldrush, stage two - Locations |
|---|
|
Mouseover the markers to see the name of the location
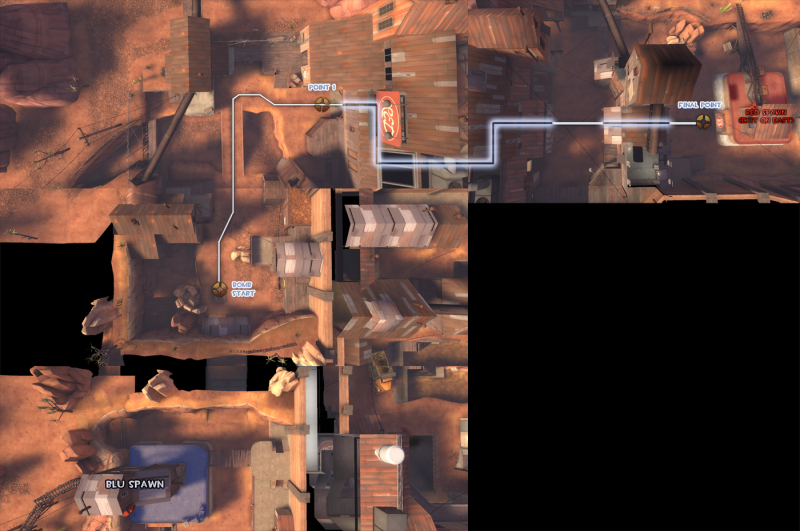
1 Watchtower 2 House 3 Bridge 4 Sniper's ledge 5 Battlement 6 Choke area 7 Main buildings 8 Sentry deck
|
Stage 3
| Goldrush, stage three - Locations |
|---|
|
Mouseover the markers to see the name of the location
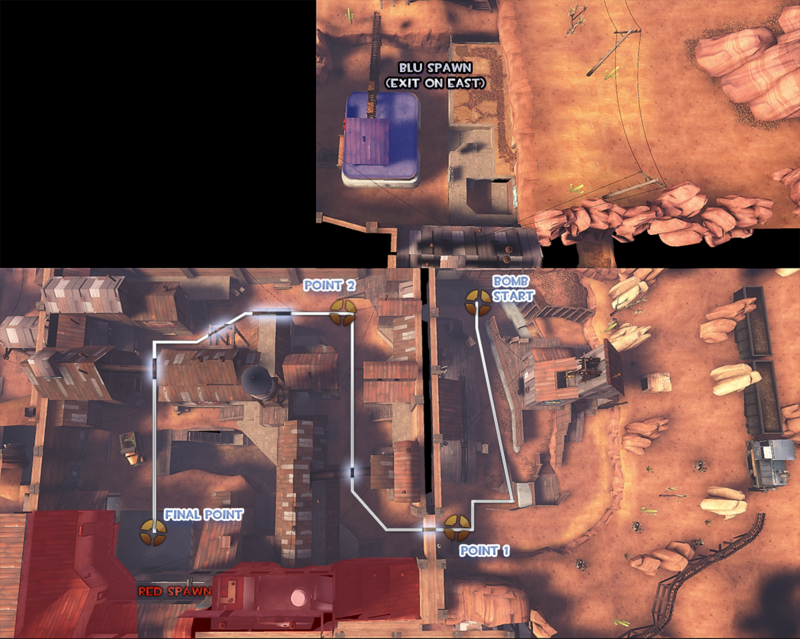
1 Truck house 2 Basin 3 Platform 4 Main deck 5 Main hallway 6 Sentry deck 7 Sniper's deck 8 Valley 9 Narrow building 10 Chokepoint 11 House 12 Battlements
|
Gravestone
Old

Lolimsogreat21's version
| Gravestone - Locations |
|---|
|
Mouseover the markers to see the name of the location
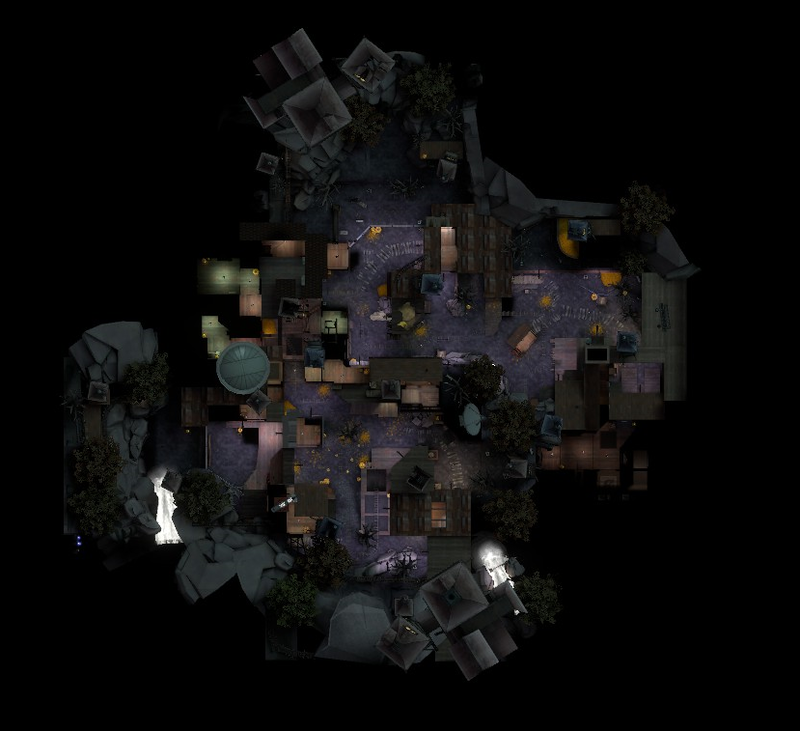
1 Shack 2 Shortcut 3 Red barn 4 Jimi Jam 5 Kitchen 6 Binski logging sawmill 7 Backyard A BLU first spawn B BLU second spawn
C RED's only spawn
|
Hellstone
Old

Lolimsogreat21's version
| Hellstone - Locations |
|---|
|
Mouseover the markers to see the name of the location
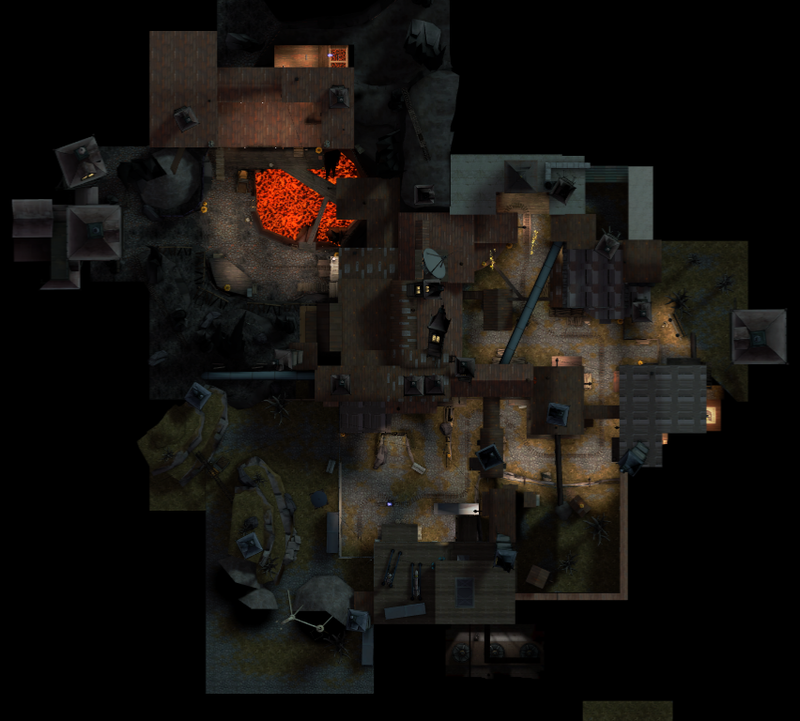
1 Freight House 2 Cubby hole 3 Mine shack 4 Horsemann's house 5 Yard 6 Hells bells A BLU first spawn B BLU second spawn
C BLU third spawn D RED first spawn E RED final spawn
|
Hoodoo
Brand new
Stage 1
| Hoodoo, stage one - Locations |
|---|
|
Mouseover the markers to see the name of the location
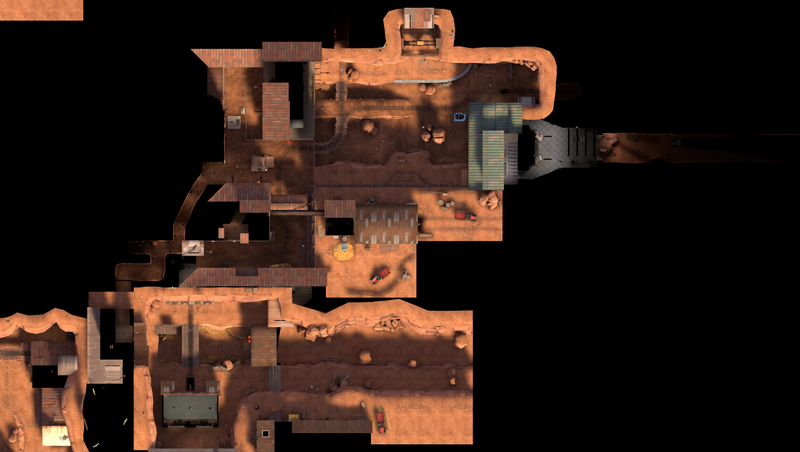
1 Hoodoos 2 Cliff 3 Shack 4 Gates 5 Side Tunnel 6 Flank 7 Ditch 8 Bridge A BLU spawn B RED spawn
|
Stage 2
| Hoodoo, stage two - Locations |
|---|
|
Mouseover the markers to see the name of the location
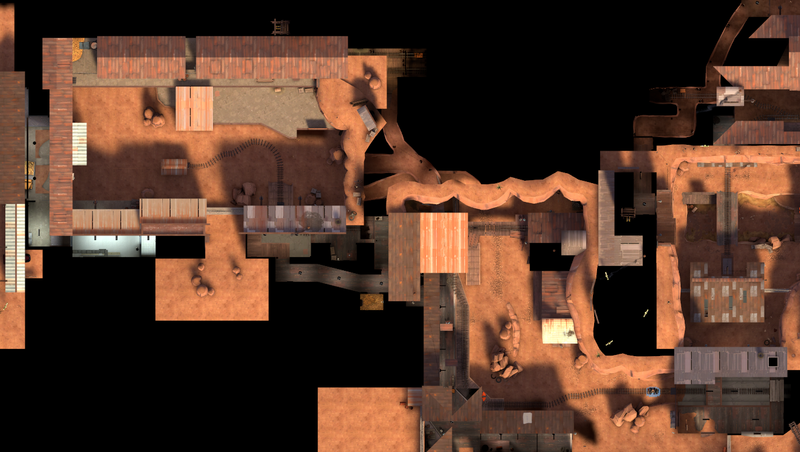
1 Mining Building 2 Rocks 3 Side House 4 Tunnels 5 Chokepoint 6 Valley 7 Concrete Platform A BLU spawn B RED spawn
|
Stage 3
| Hoodoo, stage three - Locations |
|---|
|
Mouseover the markers to see the name of the location
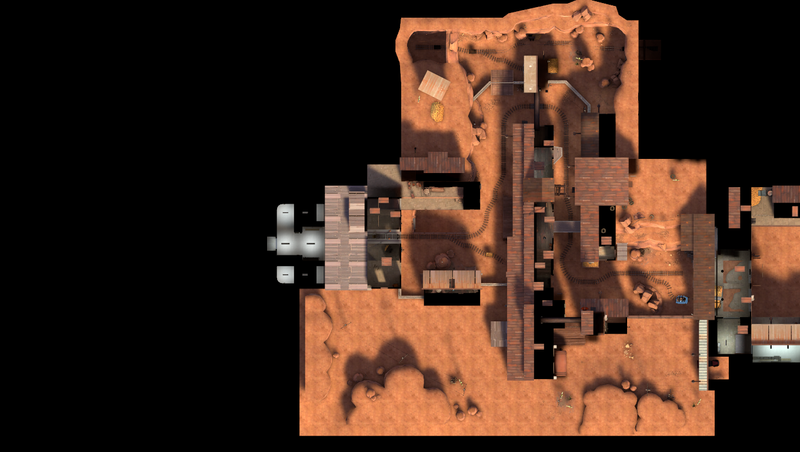
1 Side route 2 Grain Shack 3 Metal Bridge 4 Shortcut 5 Propane Tank 6 Sentry Deck 7 Flank 8 Industrial Building A BLU spawn B RED spawn
|
Pier
Well, an overview for this one is already listed as an example by Wookipan
Old

Wookipan's version
| Pier - Locations |
|---|
|
Mouseover the markers to see the name of the location
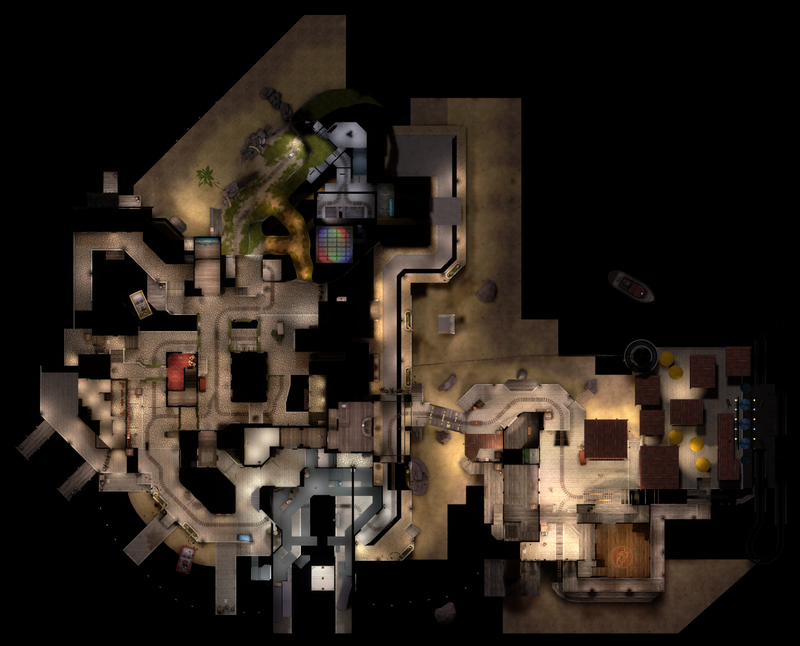
1 Beach 2 Caves 3 Minivan parking space 4 Cliff 5 Bridge 6 Red carpet building 7 Wine cellar 8 Docks 9 Warehouse 10 Kitchen 11 Sandy beach 12 Barn bridge 13 Small barn 14 Building adjacent to the barn 15 Target range A BLU first spawn B BLU second spawn
C RED first spawn / BLU third spawn D RED final spawn
|
Lolimsogreat21's version
| Pier - Locations |
|---|
|
Mouseover the markers to see the name of the location
1 Beach 2 Caves 3 Minivan parking space 4 Cliff 5 Bridge 6 Red carpet building 7 Wine cellar 8 Docks 9 Warehouse 10 Kitchen 11 Sandy beach 12 Barn bridge 13 Small barn 14 Building adjacent to the barn 15 Target range A BLU first spawn B BLU second spawn
C RED first spawn / BLU third spawn D RED final spawn
|
Polar
Brand new
| Polar - Locations |
|---|
|
Mouseover the markers to see the name of the location
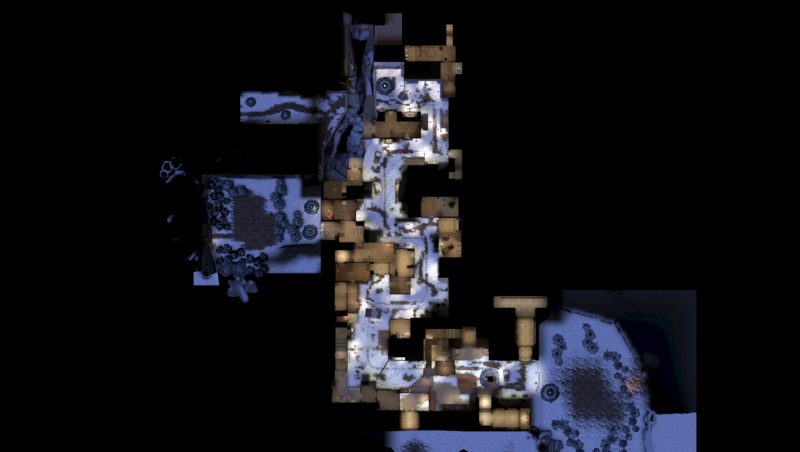
1 Christmas Tree 2 Brick Building 3 Sentry Deck 4 A Point Building 5 Chute 6 Jenkin Coal.co 7 Concrete Platform 8 Sniper's Hut 9 Dropdown 10 Gates 11 Flank 12 Shack 13 Factory 14 Shipping Crates 15 Delivery Pod A BLU first spawn B BLU second spawn
C RED first spawn D RED second spawn E RED third spawn
|
Precipice
Old

Lolimsogreat21's version
| Precipice - Locations |
|---|
|
Mouseover the markers to see the name of the location
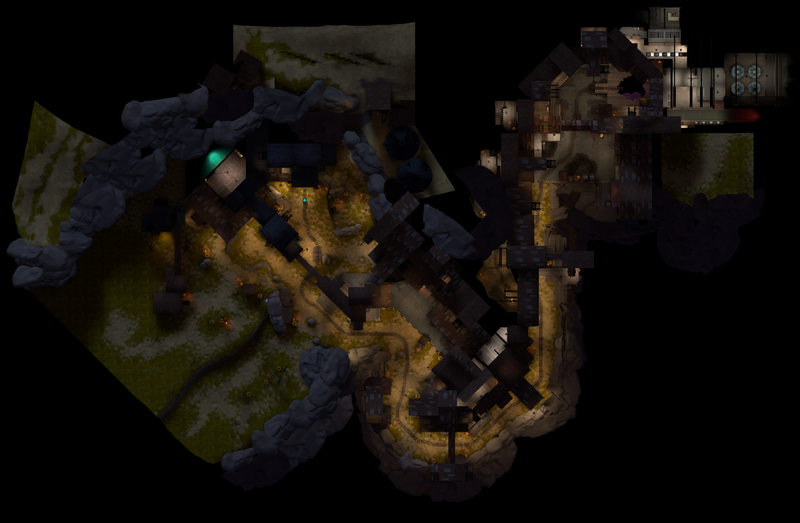
1 Courtyard 2 Buildings 3 Loading zone 4 Shack A 5 Shack B 6 Caves 7 Flank 8 Shipping yard 9 Hidden room A BLU first spawn B BLU second spawn
C BLU third spawn D RED first spawn E RED final spawn
|
Snowycoast
Old

Lolimsogreat21's version
| Snowycoast - Locations |
|---|
|
Mouseover the markers to see the name of the location
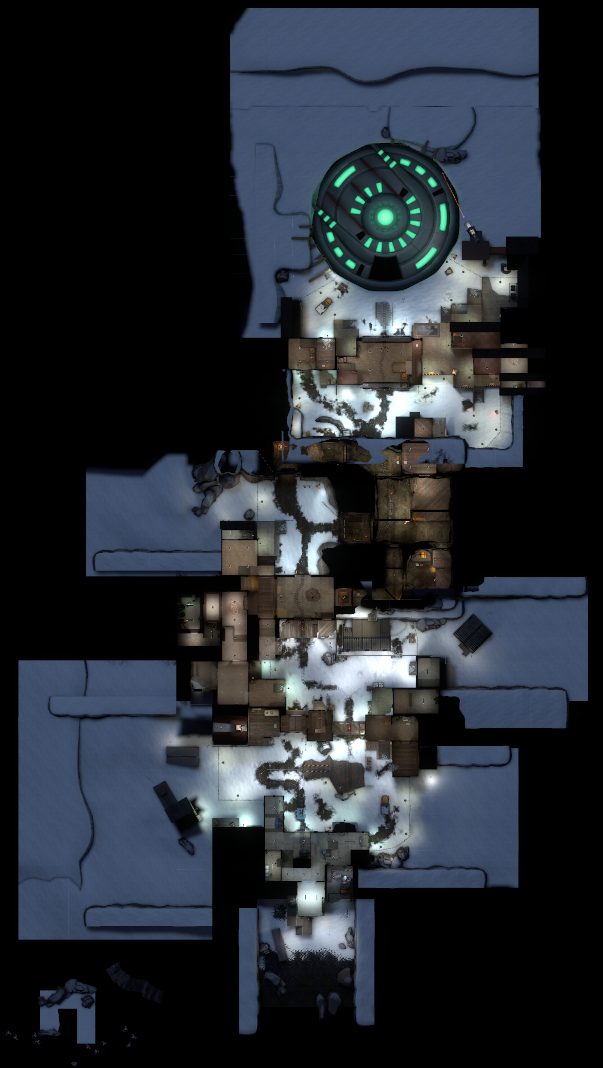
1 Side structure 2 Quonset hut 3 Kennels 4 Mines 5 Shutter gate 6 Excavation site A BLU first spawn B BLU second spawn
C BLU third spawn D RED first spawn E RED second spawn
|
Swiftwater
Old

Foxbite's version
| Swiftwater - Locations |
|---|
|
Mouseover the markers to see the name of the location
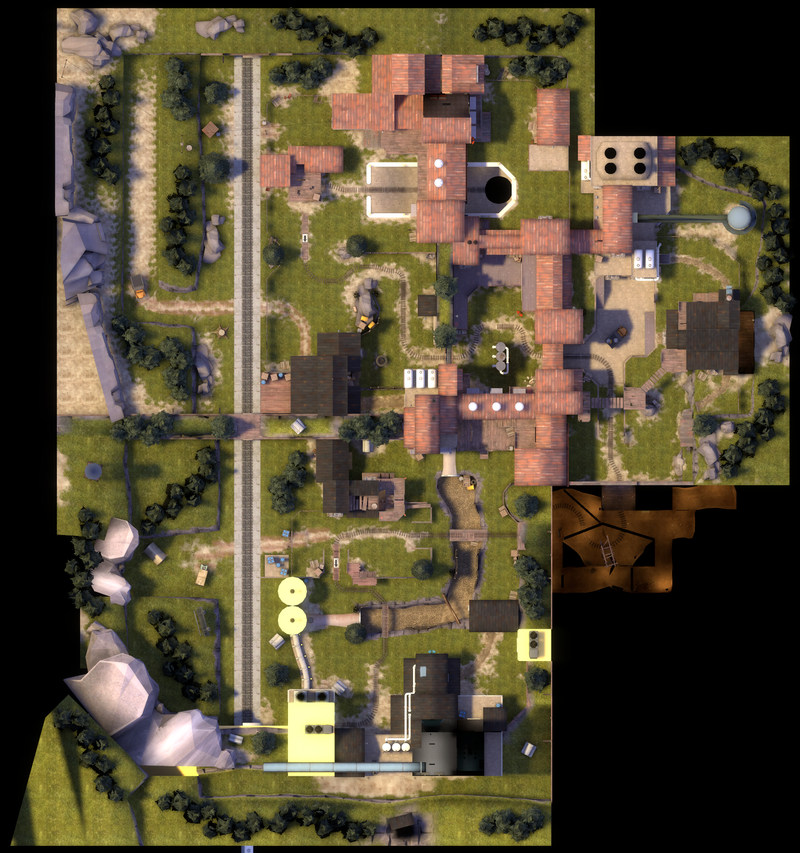
1 Front Yard 2 Main House 3 Ditch 4 Shifty's Quick Shot shack 5 Tunnel 6 Sawmill 7 Catwalks 8 Front area 9 Silos 10 Railway Building 11 Corner house 12 Steep Decline 13 Battlements 14 Cliff 15 Barn A BLU first spawn B RED first spawn
C BLU second spawn D RED second spawn E RED final spawn
|
Lolimsogreat21's version
| Swiftwater - Locations |
|---|
|
Mouseover the markers to see the name of the location
1 Front yard 2 Main house 3 Ditch 4 Shifty's Quick Shot shack 5 Tunnel 6 Sawmill 7 Catwalks 8 Barn 9 Silos 10 Front area 11 Railway building 12 Corner house 13 Steep decline 14 Battlements 15 Cliff A BLU first spawn B BLU second spawn
C RED first spawn D RED second spawn E RED final spawn
|
Terror
Lolimsogreat21's version
| Terror - Locations |
|---|
|
Mouseover the markers to see the name of the location
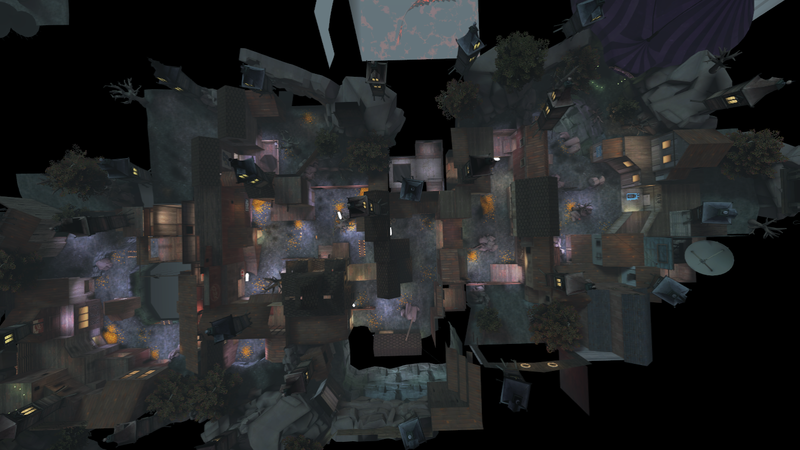
1 Front Yard 2 Low Hanging Roof 3 RED shed 4 Rocks 5 Crossing 6 Slope 7 Cliffside Shed 8 Old Geeser 9 Bridge 10 Mann Mannor 11 Tree 12 Casali Shafting 13 Flank House 14 Pit 15 Outhouse A BLU first spawn B BLU second spawn
C RED first spawn D RED second spawn E RED third spawn
|
Thunder Mountain
Brand new
Stage 1
| Thunder Mountain, stage one - Locations |
|---|
|
Mouseover the markers to see the name of the location
1 First Courtyard 2 Garage 3 Cliffside Shed 4 Ramp 5 Bridge 6 Catwalks 7 Warehouse 8 Balcony A BLU spawn B RED spawn
|
Stage 2
| Thunder Mountain, stage two - Locations |
|---|
|
Mouseover the markers to see the name of the location
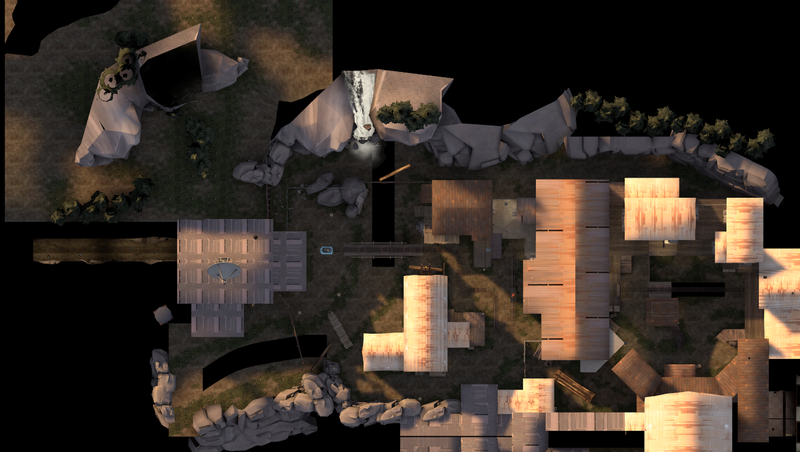
1 Rafters 2 Bridge 3 Lumber Mill 4 Tunnel 5 Side Buildings 6 Concealed shed 7 Final Cap A BLU spawn B RED spawn
|
Stage 3
| Thunder Mountain, stage three - Locations |
|---|
|
Mouseover the markers to see the name of the location
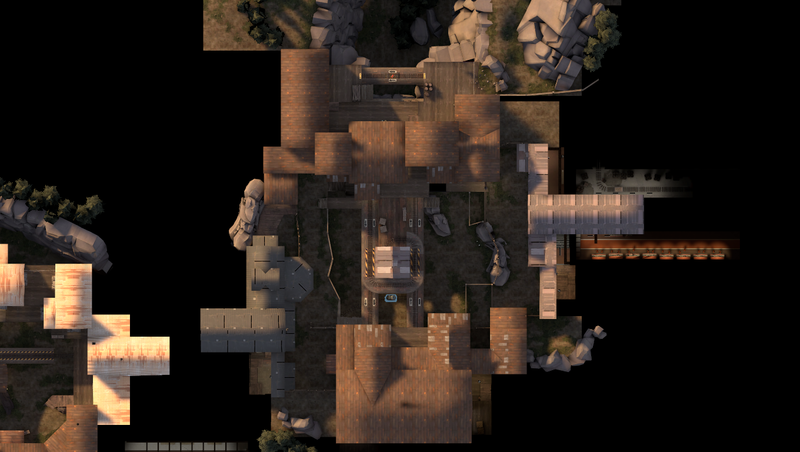
1 Spawn Yard 2 First cap 3 Balcony 4 Final Tower 5 Valley 6 Stairs 7 Gates 8 Second cap A BLU spawn B RED spawn
|
Upward
Old

Lolimsogreat21's version
| Upward - Locations |
|---|
|
Mouseover the markers to see the name of the location
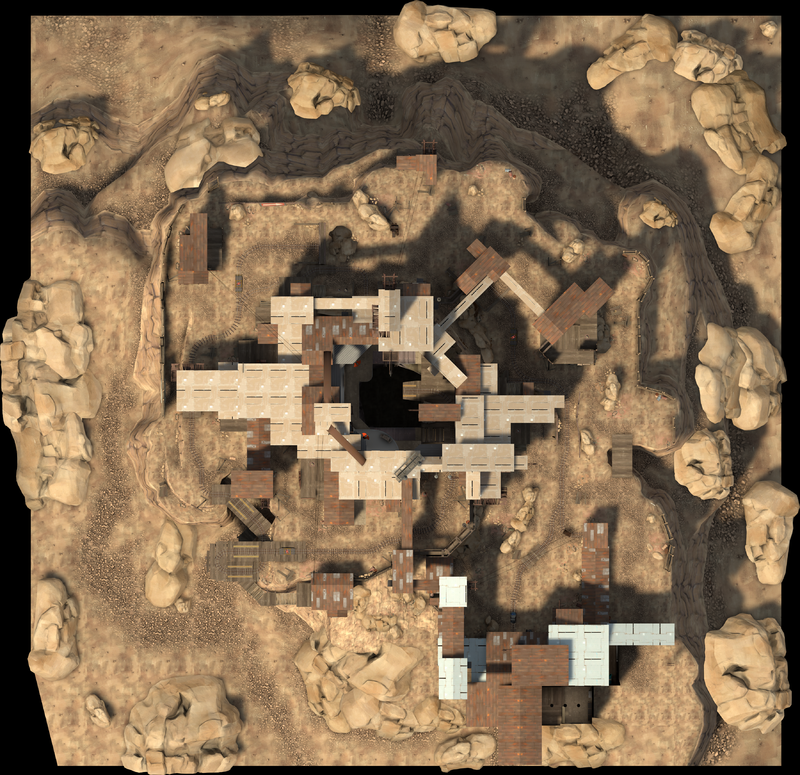
1 Roof 2 Behind roof 3 Slope 4 House 5 Cliff 6 Hill 7 Rocks 8 Flanking cliff 9 B hut 10 Apartments 11 Platform 12 Balcony 13 Spiraling bridge 14 Under bridge 15 C hut 16 Valley 17 Across buildings A BLU first spawn B BLU second spawn
C RED first spawn/ BLU third spawn D RED second spawn
|
Hassle Castle
Old

Lolimsogreat21's version
| Hassle Castle - Locations |
|---|
|
Mouseover the markers to see the name of the location
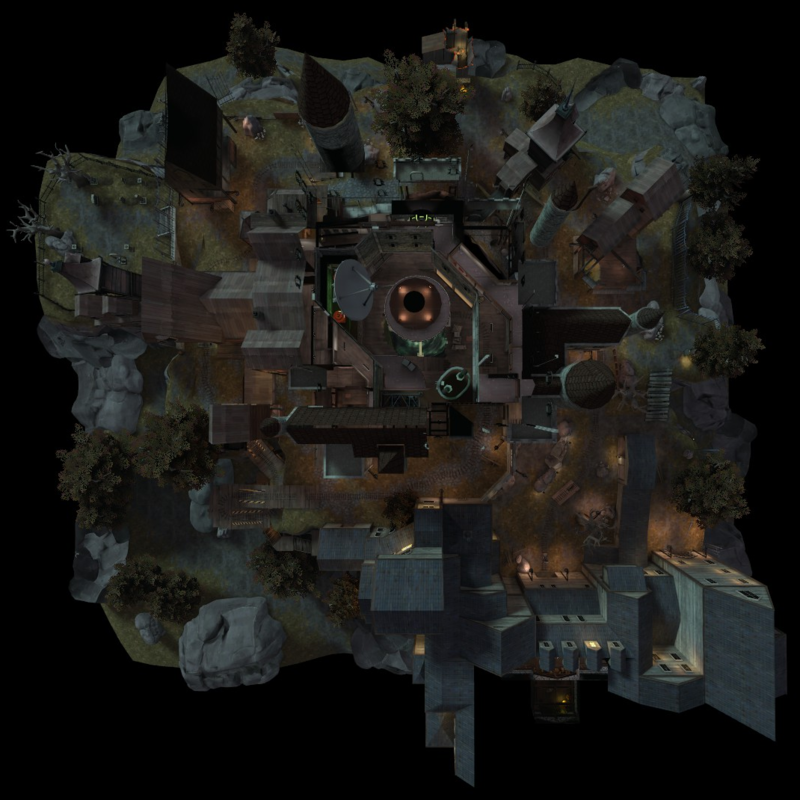
1 Roof 2 Behind roof 3 Slope 4 House 5 Cliff 6 Hill 7 Rocks 8 Flanking cliff 9 B hut 10 Apartments 11 Platform 12 Balcony 13 Spiraling bridge 14 Under bridge 15 C hut 16 Valley 17 Across buildings A BLU first spawn B BLU second spawn
C RED first spawn/ BLU third spawn D RED second spawn
|
Wutville
Old

Lolimsogreat21's version
| Wutville - Locations |
|---|
|
Mouseover the markers to see the name of the location
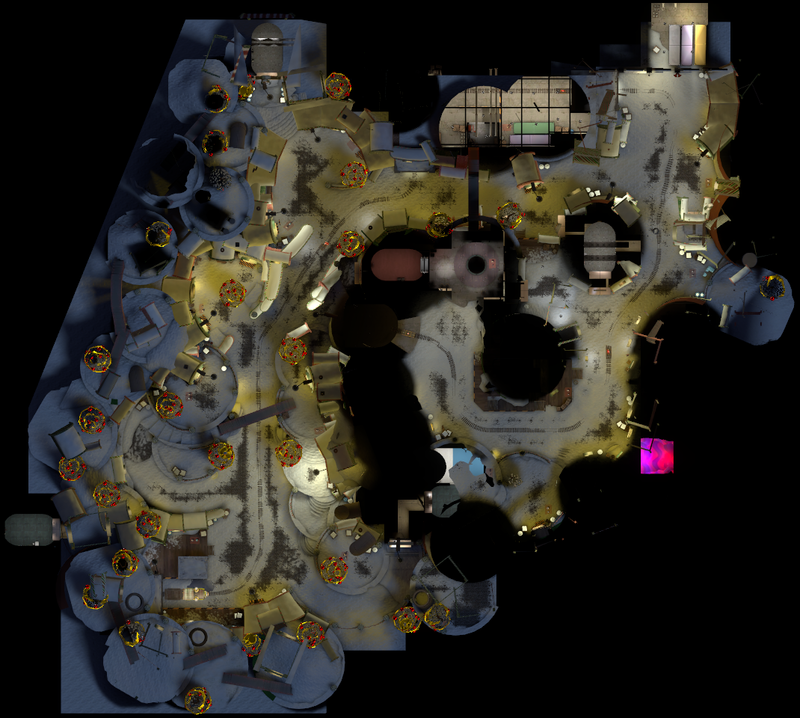
1 RÜDY's station 2 Arch 3 Plaza 4 Alleyway 5 Wooden path 6 Side path A BLU first spawn B BLU second spawn/RED first spawn
C BLU third spawn/RED second spawn D RED third spawn
|
PLR
Banana Bay
Old

Lolimsogreat21's version
| Banana Bay - Locations |
|---|
|
Mouseover the markers to see the name of the location
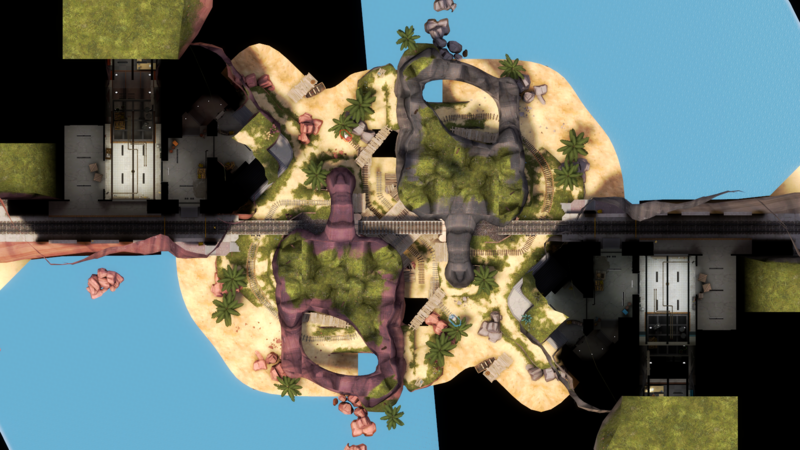
1 Highline 2 Incline 3 Platform 4 Deck 5 Sally Port 6 Docks 7 Start point 8 Siphon A RED spawn B BLU spawn
|
Helltower
Old

Lolimsogreat21's version
| Helltower - Locations |
|---|
|
Mouseover the markers to see the name of the location
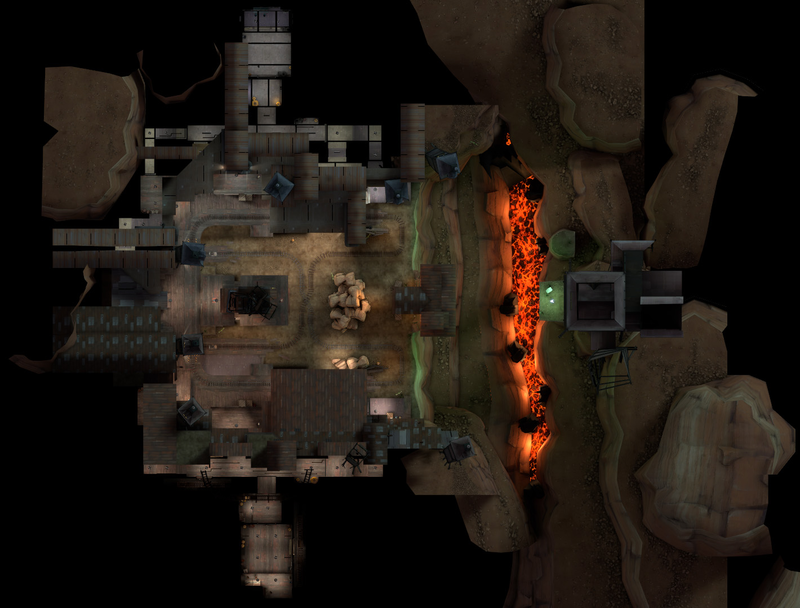
1 Tower Corridor 2 Balconies 3 Central Tower 4 Crossing 5 The Ramp 6 Cliff House 7 Clocktower A RED spawn B BLU spawn
|
CP (A/D)
Altitude
Brand new
| Altitude - Locations |
|---|
|
Mouseover the markers to see the name of the location
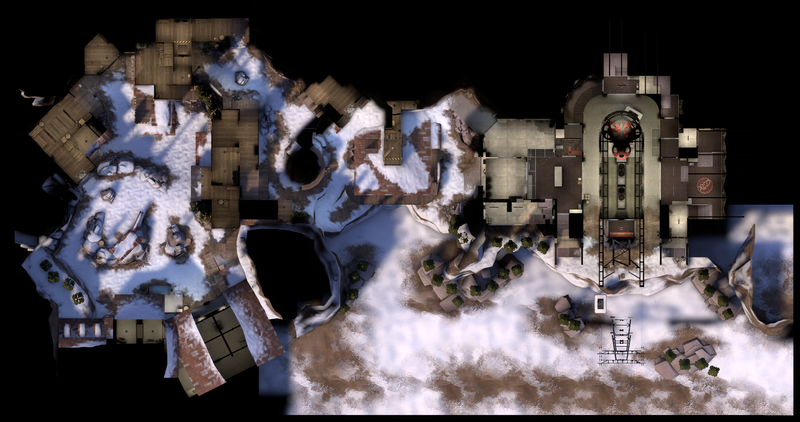
1 Warehouse 2 Cliffs 3 Cornerstone 4 Side Building 5 Cliff's Rocks.inc 6 Valley 7 Gated Shortcut 8 Water Tower 9 Triangular House 10 B Hut 11 Server room A BLU first spawn B BLU second spawn
C BLU third spawn D RED first spawn E RED second spawn
|
Dustbowl
Old

Lolimsogreat21's version
| Dustbowl - Locations |
|---|
|
Mouseover the markers to see the name of the location
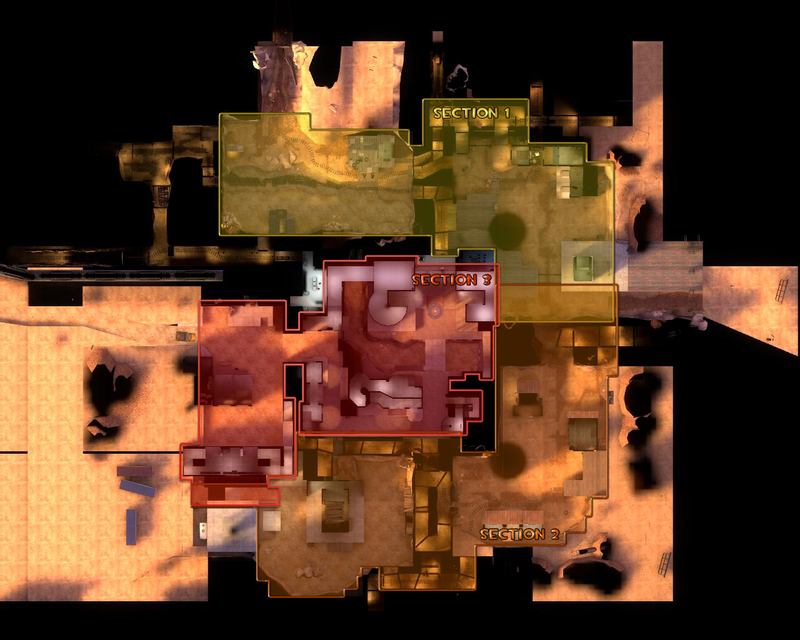
1 Right exit shed 2 Canyon 3 Left exit shed 4 Tunnels 5 Bridge 6 Platform 7 Dugout 8 Large shed 9 Control point building 10 Office 11 Mining tunnel 12 Double tunnels 13 Gated tunnel 14 Courtyard 15 Middle building 16 Loading dock 17 Ledge 18 Alleys 19 Valley A BLU first spawn B BLU second spawn/RED first spawn
C BLU third spawn/RED second spawn D RED final spawn
|
Egypt
Old

Lolimsogreat21's version
| Egypt - Locations |
|---|
|
Mouseover the markers to see the name of the location
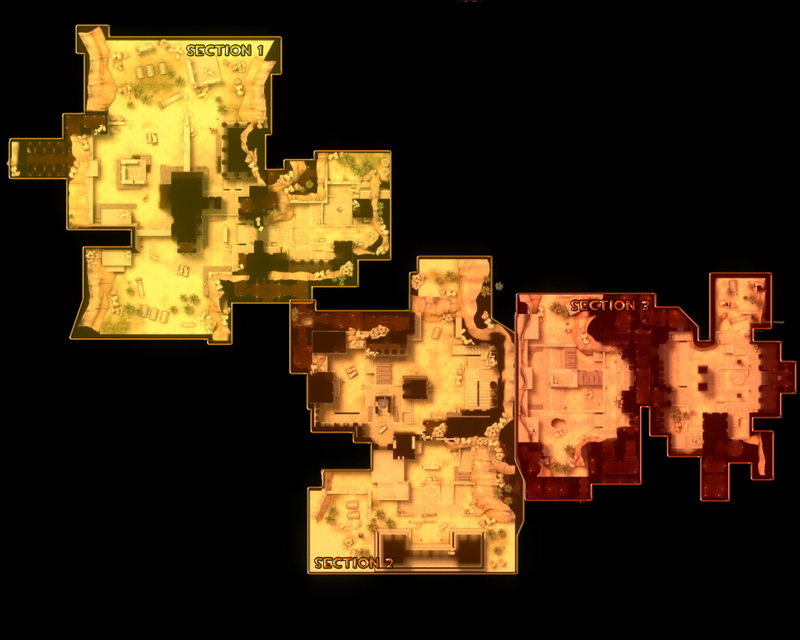
1 Ledges 2 Large courtyard 3 Small courtyard 4 Tunnels 5 Point courtyard 6 Stairs 7 Main building 8 Side path 9 Flank 10 Opening 11 Valley 12 Central pillar 13 Caves 14 Open courtyard A BLU first spawn B BLU second spawn
C BLU final spawn D RED first spawn E RED second spawn
|
Erebus
Lolimsogreat21's version
Stage 1
| Erebus, stage one - Locations |
|---|
|
Mouseover the markers to see the name of the location
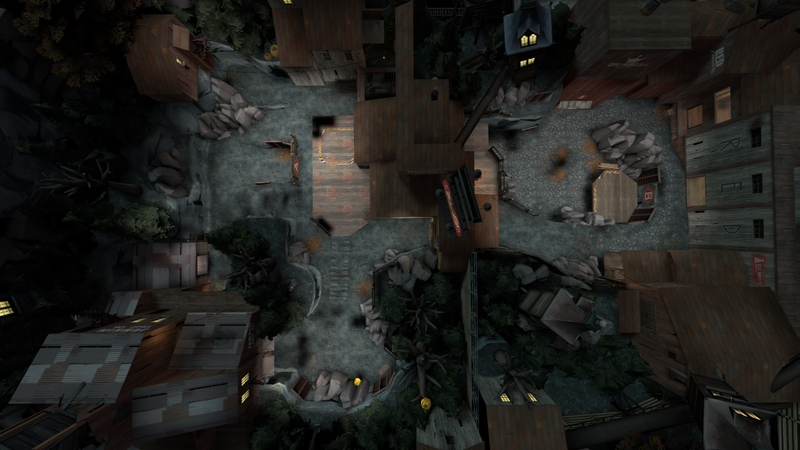
1 Tree Stunps 2 Lower area 3 Lumber Yard 4 Sawmill 5 Mineshafts A BLU spawn B RED spawn
|
Stage 2
| Erebus, stage two - Locations |
|---|
|
Mouseover the markers to see the name of the location
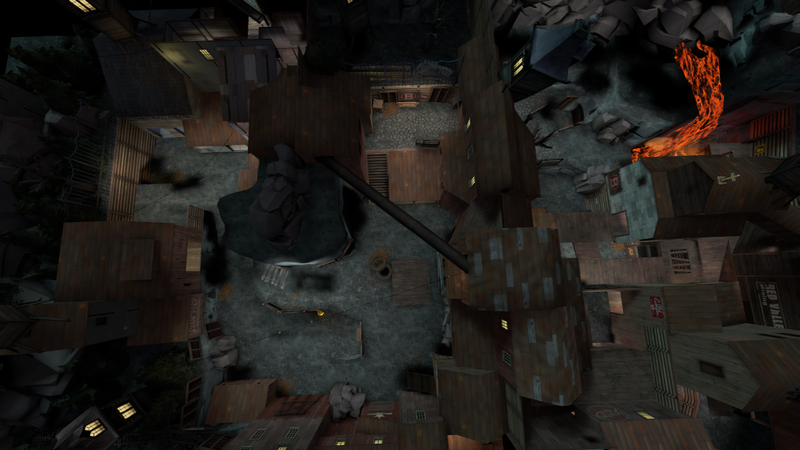
1 Ravine 2 Cliff 3 Cave 4 Sniper's Deck 5 Shed 6 Left Flank 7 Central area 8 Church A BLU spawn B RED spawn
|
Stage 3
| {{{title}}} |
|---|
|
Mouseover the markers to see the name of the location
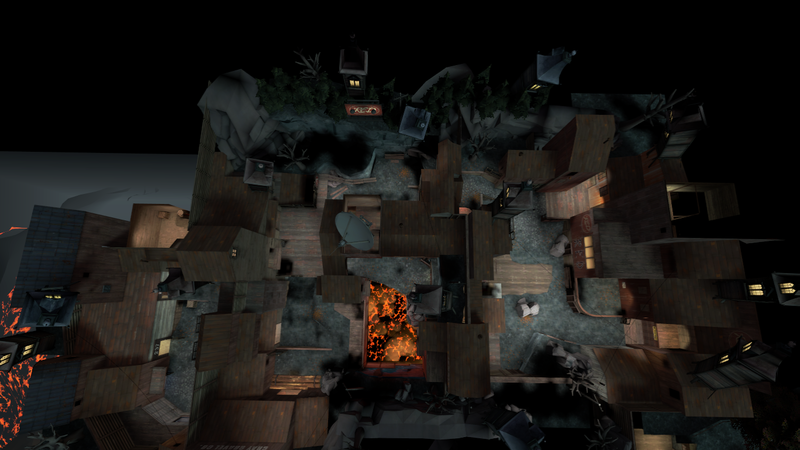
1 Building 237 2 Yard 3 Elevation 4 Computer room 5 Under Flank 6 Propane Yard 7 Red Shed A BLU spawn B RED spawn
|
Gorge
Old

Lolimsogreat21's version
| Gorge - Locations |
|---|
|
Mouseover the markers to see the name of the location
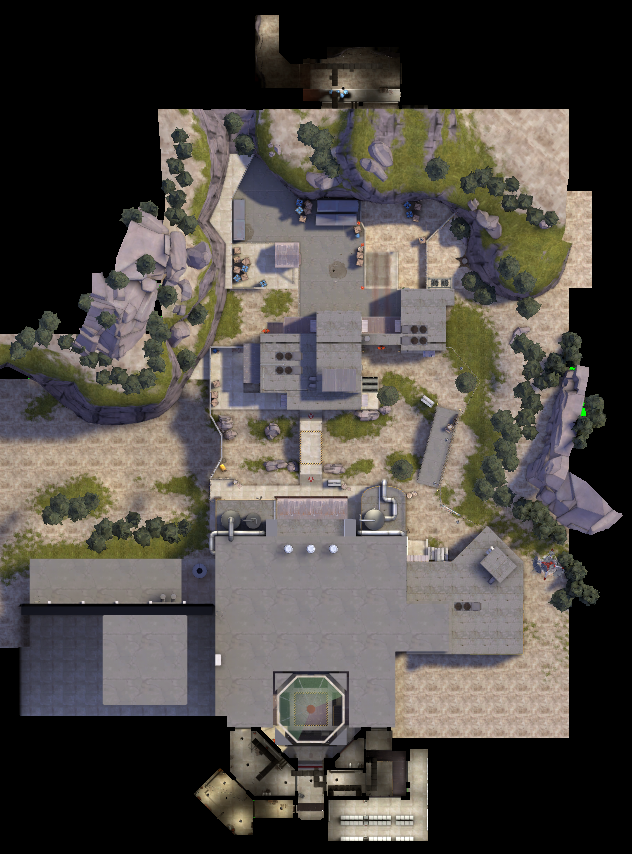
1 Entrance yard 2 Toll both 3 Upper deck 4 Checkpoint building 5 Gorge (valley) 6 Flank hallway 7 Main hallway 8 Second floor 9 Flank room A BLU first spawn B BLU second spawn
C RED only spawn
|
Gorge Event
Old

Lolimsogreat21's version
| Gorge Event - Locations |
|---|
|
Mouseover the markers to see the name of the location
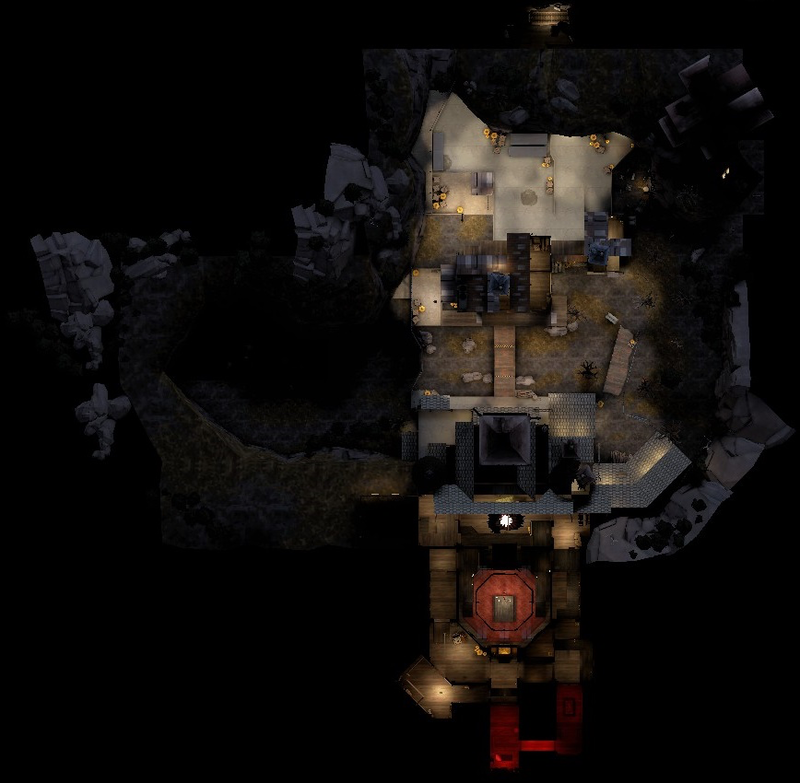
1 Entrance yard 2 Toll both 3 Upper deck 4 Checkpoint building 5 Gorge (valley) 6 Flank hallway 7 Main hallway 8 Second floor 9 Flank room A BLU first spawn B BLU second spawn
C RED only spawn
|
Gravel Pit
Old

Lolimsogreat21's version
| Gravel Pit - Locations |
|---|
|
Mouseover the markers to see the name of the location
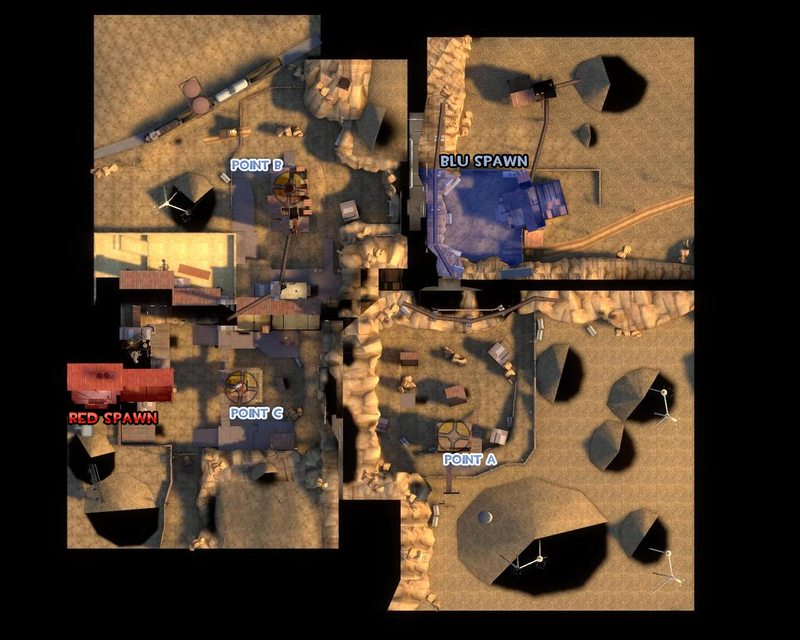
1 B side tunnel 2 Radar building 3 Shadow side 4 Balcony 5 A/B connector 6 A side tunnel 7 Path 8 Valley 9 Radio tower 10 Laser tower 11 Ground level A BLU spawn B RED spawn
|
Junction
Old

Lolimsogreat21's version
| Junction - Locations |
|---|
|
Mouseover the markers to see the name of the location
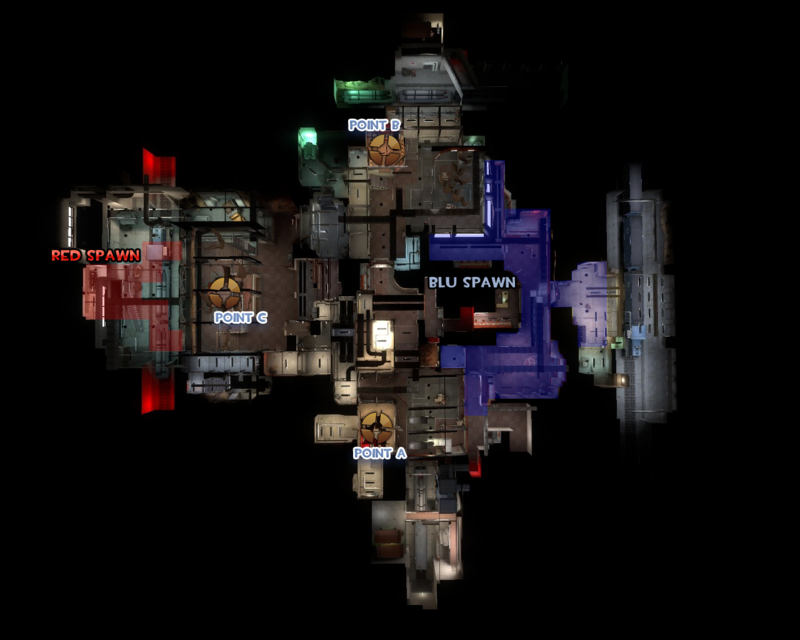
1 Balconies 2 B lobby 3 Balconies 4 B/C flank 5 Platform 6 A/C flank 7 A/B route 8 A lobby 9 Stairs A BLU spawn B RED spawn
|
Mercenary Park
Old

Lolimsogreat21's version
| Mercenary Park - Locations |
|---|
|
Mouseover the markers to see the name of the location
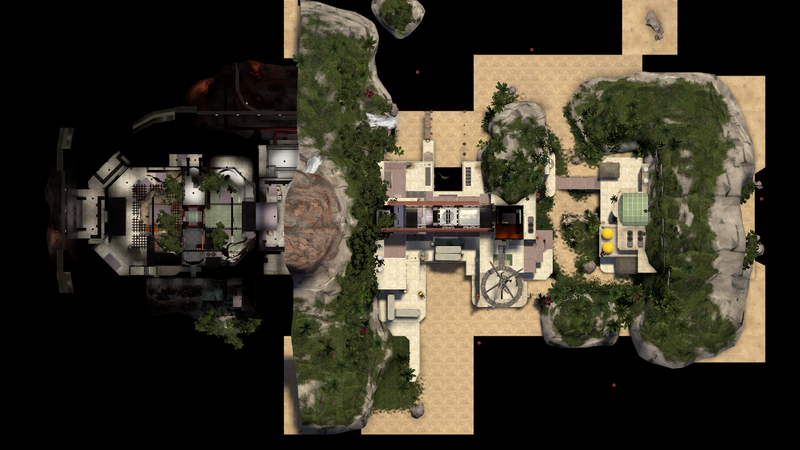
1 Gift shop 2 Playground 3 Mann.Co building 4 Transport cages 5 Catwalks 6 Server room 7 Elevator shaft 8 Institute for Research and Development (YTI Room) 9 Ventilation shaft 10 Side stairs 11 Platform A BLU first spawn B BLU second spawn
C BLU third spawn D RED first spawn E RED final spawn
|
Mossrock
Old

Lolimsogreat21's version
| Mossrock - Locations |
|---|
|
Mouseover the markers to see the name of the location
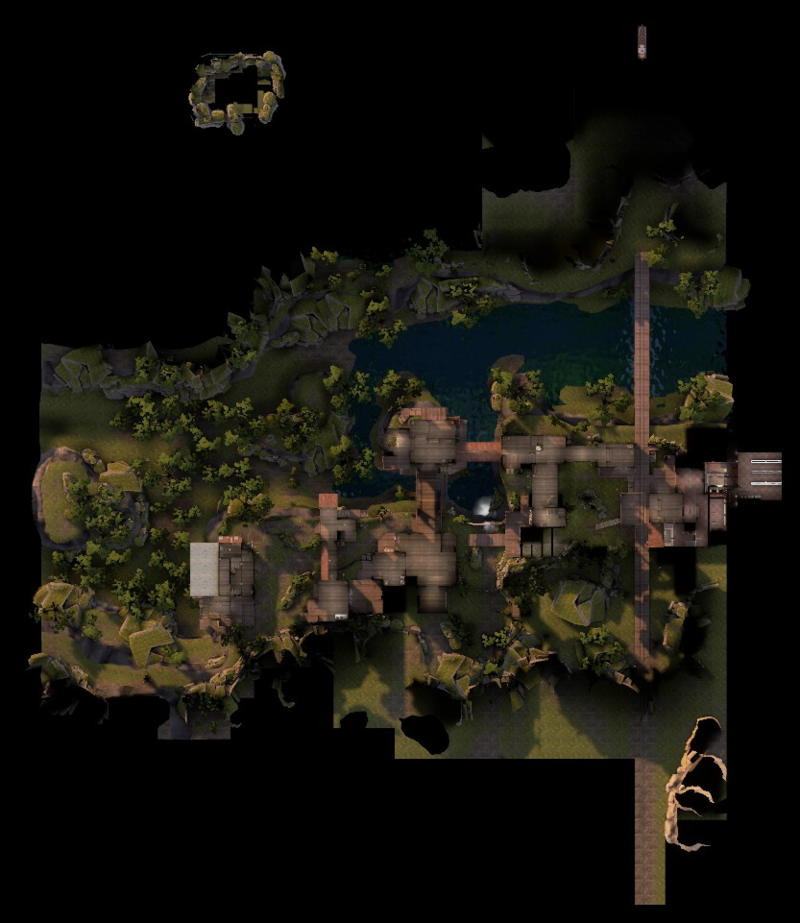
1 Captain Dan's Wood pulp 2 Casali Shafting Co. 3 Riverwalk 4 Radio Shack with Radio Room 5 Island flank 6 Jenkin Coal Co. 7 Shipping 8 One tree hill 9 Trestle A BLU first spawn B BLU second spawn
C RED spawn
|
Mountain Lab
Old

Lolimsogreat21's version
| Mountain Lab - Locations |
|---|
|
Mouseover the markers to see the name of the location
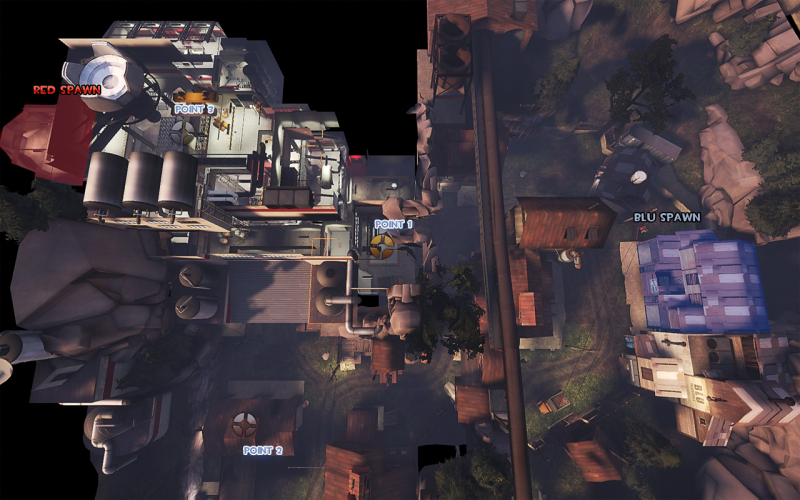
1 Yard 2 Warehouse 3 Shed 4 Tunnel 5 Small house 6 Cliffs 7 Upper entrance tunnels 8 Lower entrance tunnels 9 Top floor A BLU spawn B RED spawn
|
Mann Manor
Old

Lolimsogreat21's version
| Mann Manor - Locations |
|---|
|
Mouseover the markers to see the name of the location
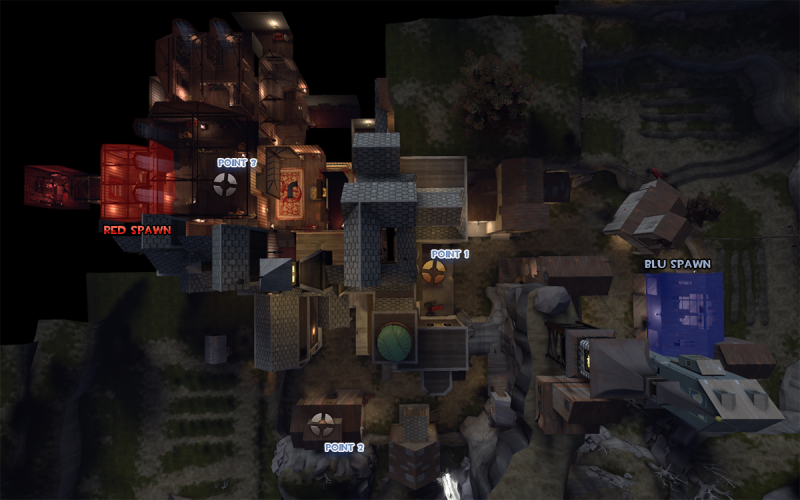
1 Yard 2 Warehouse 3 Shed 4 Tunnel 5 Small house 6 Cliffs 7 Upper entrance tunnels 8 Lower entrance tunnels 9 Top floor A BLU spawn B RED spawn
|
Snowplow
Old


Lolimsogreat21's version
Stage 1
| Snowplow, stage one - Locations |
|---|
|
Mouseover the markers to see the name of the location
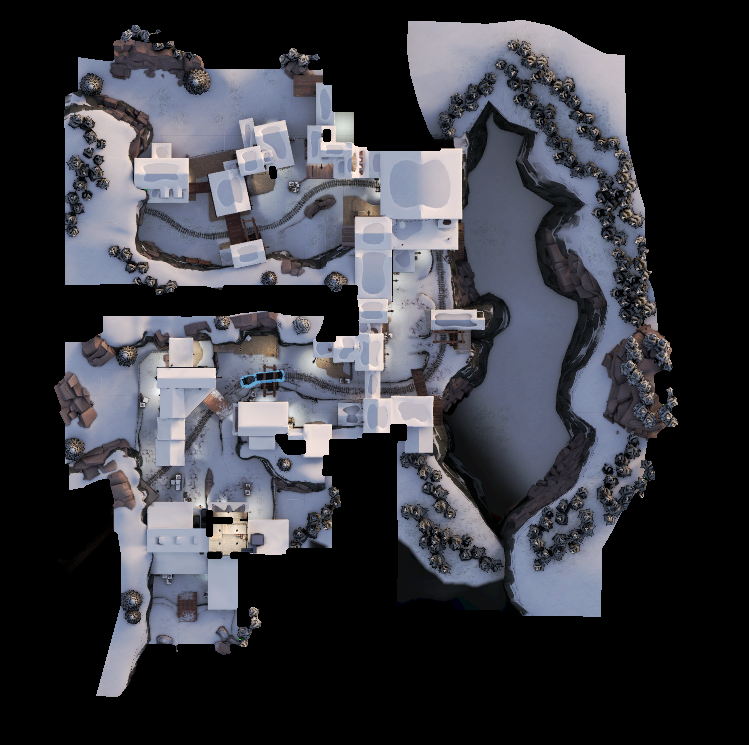
1 Left exit building 2 Right side building 3 Right side structure 4 Structural path 5 Warehouse 6 Wooden tower A BLU first spawn B BLU second spawn
C RED first spawn D RED second spawn
|
Stage 2
| Snowplow, stage two - Locations |
|---|
|
Mouseover the markers to see the name of the location
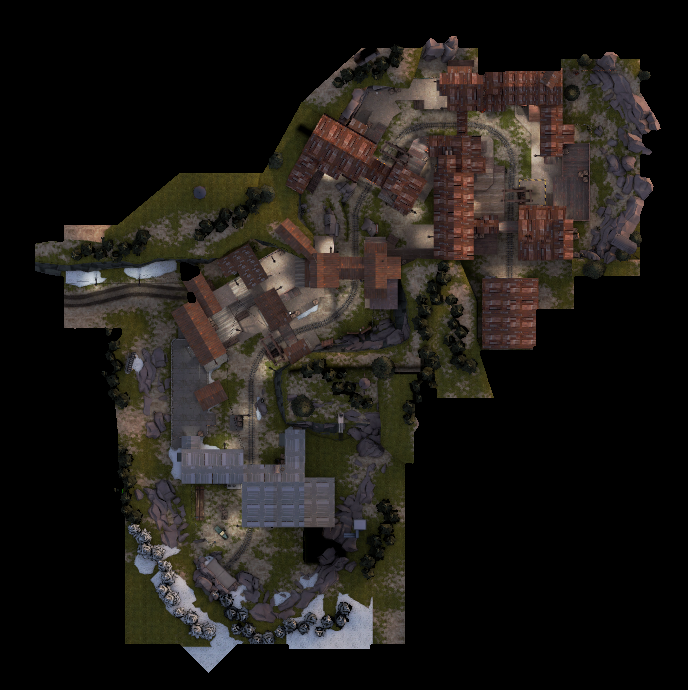
1 Supply shed 2 Left house 3 Battlements 4 Left path structure A BLU first spawn B BLU second spawn
C RED spawn
|
Steel
Old

Lolimsogreat21's version
| Steel - Locations |
|---|
|
Mouseover the markers to see the name of the location
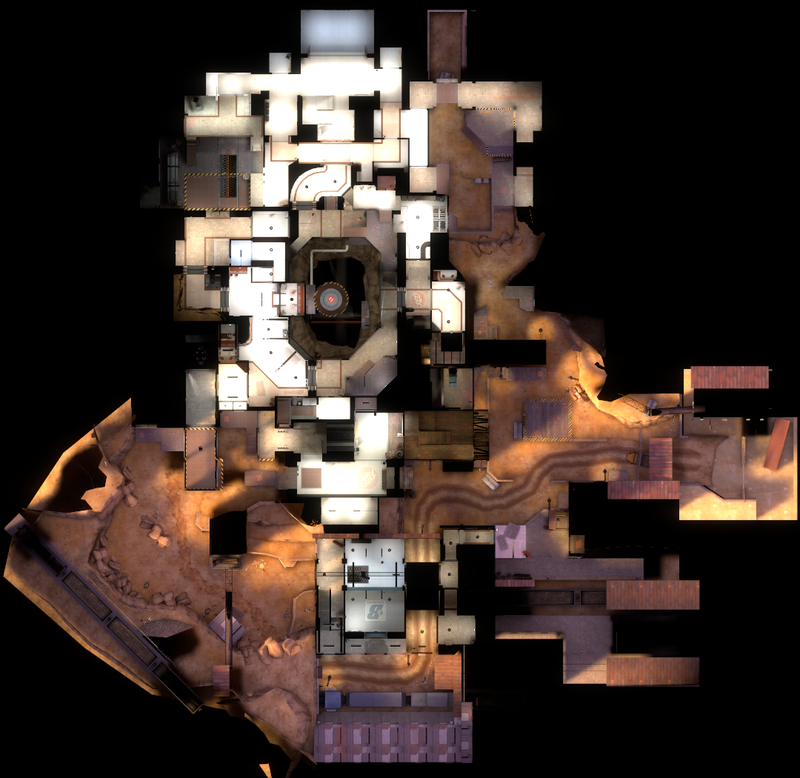
1 Hill 2 Cliffs 3 Shipping dock 4 Launch room 5 Storehouse 6 Canyon 7 Rocks 8 Truck yard 9 Wooden building 10 narrow building A BLU spawn B RED spawn
|
DeGroot Keep
Old

Lolimsogreat21's version
| DeGroot Keep - Locations |
|---|
|
Mouseover the markers to see the name of the location
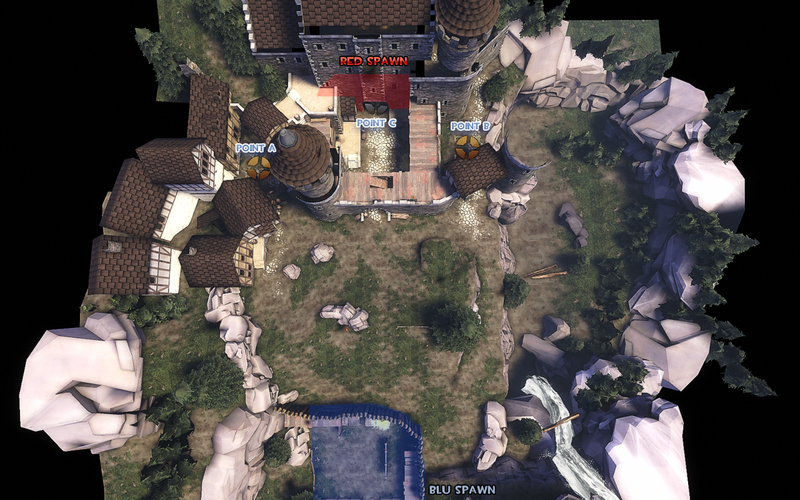
1 Rock 2 Main battlefield 3 Battlements 4 Castle halls
|
Standin
CP (Symmetric)
5Gorge
Old

Lolimsogreat21's version
| 5Gorge - Locations |
|---|
|
Mouseover the markers to see the name of the location
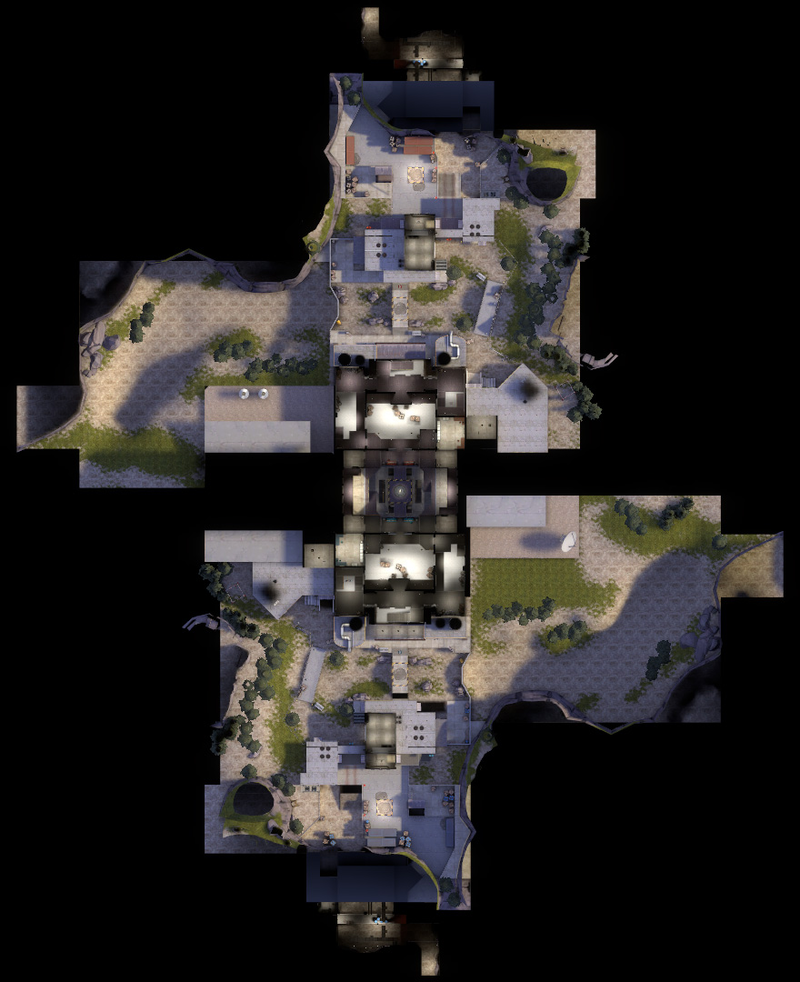
1 Pit 2 Upper ring 3 Lobby 4 Main hallway 5 Flank hallway 6 Valley (Gorge) 7 Main building 8 Second floor 9 Small shed 10 Crates A RED first spawn B RED second spawn
C RED third spawn
|
Badlands (Control Point)
Old
_overview_with_lines.png)
Lolimsogreat21's version
| Badlands (Control Point) - Locations |
|---|
|
Mouseover the markers to see the name of the location
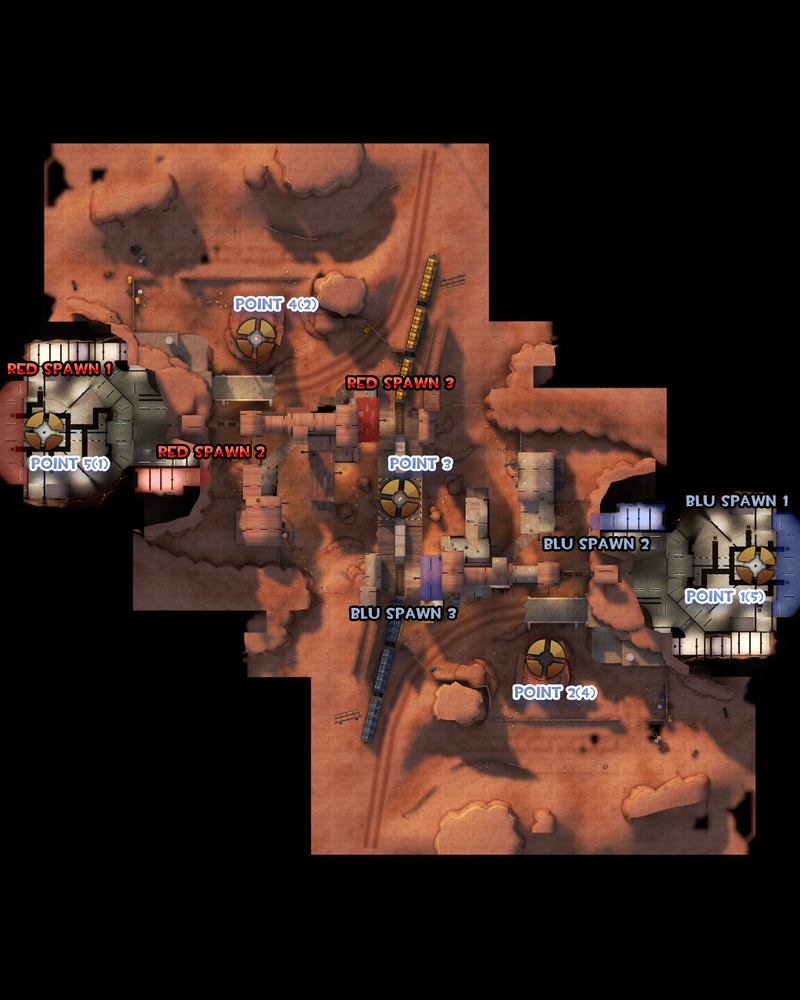
1 Rail cars 2 Pillars 3 Window and the Balcony 4 Valley 5 Ledge 6 Bridge 7 Battlements 8 Lower left entrance
|
Coldfront
Old

Lolimsogreat21's version
| Coldfront - Locations |
|---|
|
Mouseover the markers to see the name of the location
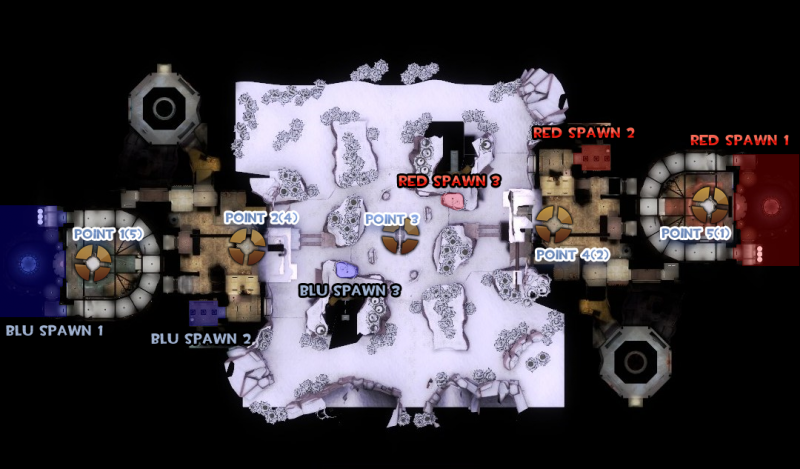
1 Rocks 2 High cliff 3 Yard 4 Garage 5 Platform 6 Silo 7 Outer ring 8 Side entrance A RED first spawn B RED second spawn
C RED third spawn
|
Fastlane
Old

Lolimsogreat21's version
| Fastlane - Locations |
|---|
|
Mouseover the markers to see the name of the location
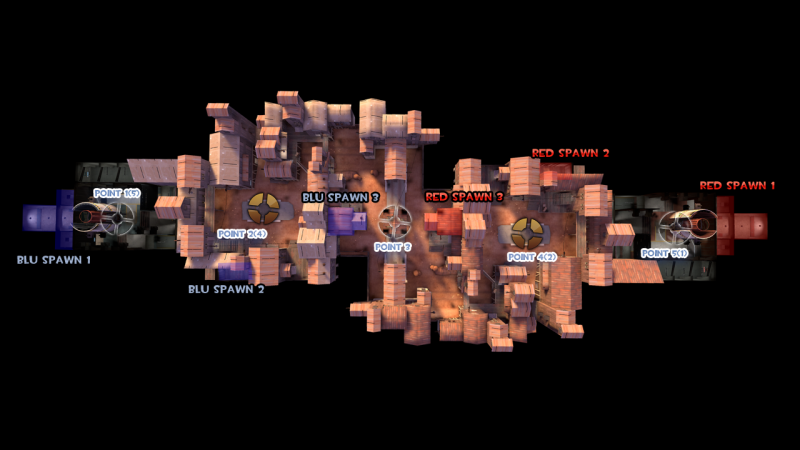
1 Shacks 2 Valley 3 House 4 Bridge 5 Lobby 6 Upper hallway A RED first spawn B RED second spawn
C RED third spawn
|
Foundry
Old

Lolimsogreat21's version
| Foundry - Locations |
|---|
|
Mouseover the markers to see the name of the location
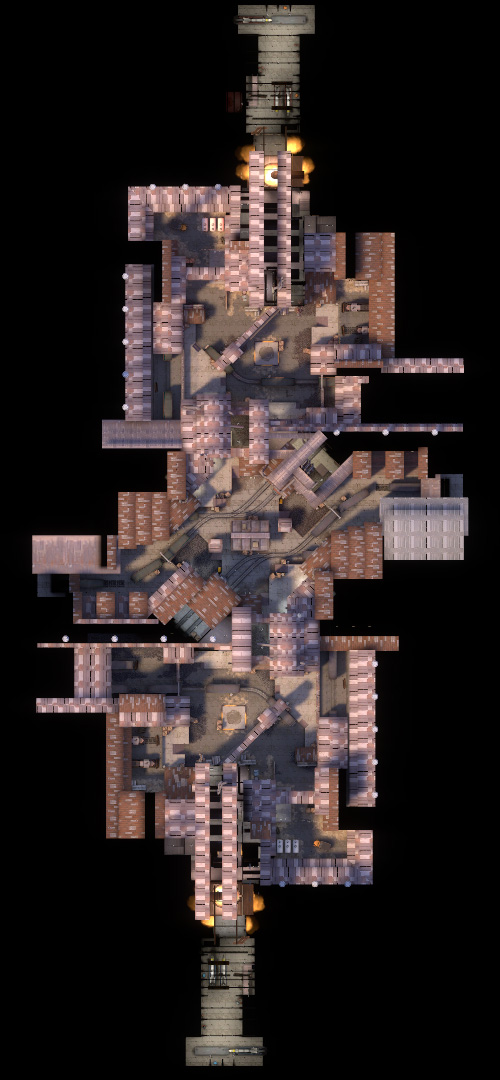
1 Roof and the central platform 2 Transition building 3 Platform 4 Yard 5 Side path 6 Upper walkway 7 Stairs 8 Foundry room A RED first spawn B RED second spawn
C RED third spawn
|
Freight
Old

Lolimsogreat21's version
| Freight - Locations |
|---|
|
Mouseover the markers to see the name of the location
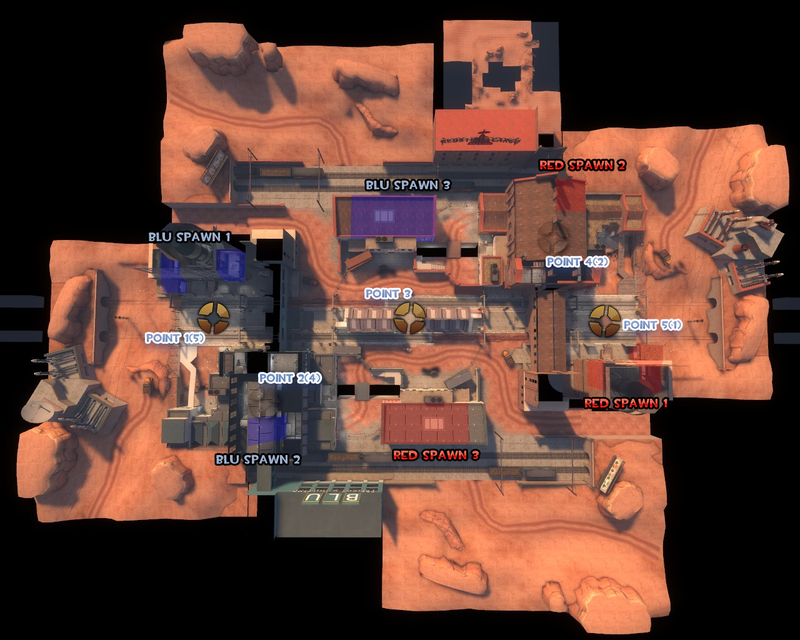
1 Central building 2 Yard 3 Stairs 4 Water 5 Main entrance 6 Flank entrance 7 Yard exit 8 Stairs to the second floor 9 Tracks A RED first spawn B RED second spawn
C RED third spawn
|
Granary (Control Point)
Old
_overview_with_lines.png)
Lolimsogreat21's version
| Granary (Control Point) - Locations |
|---|
|
Mouseover the markers to see the name of the location
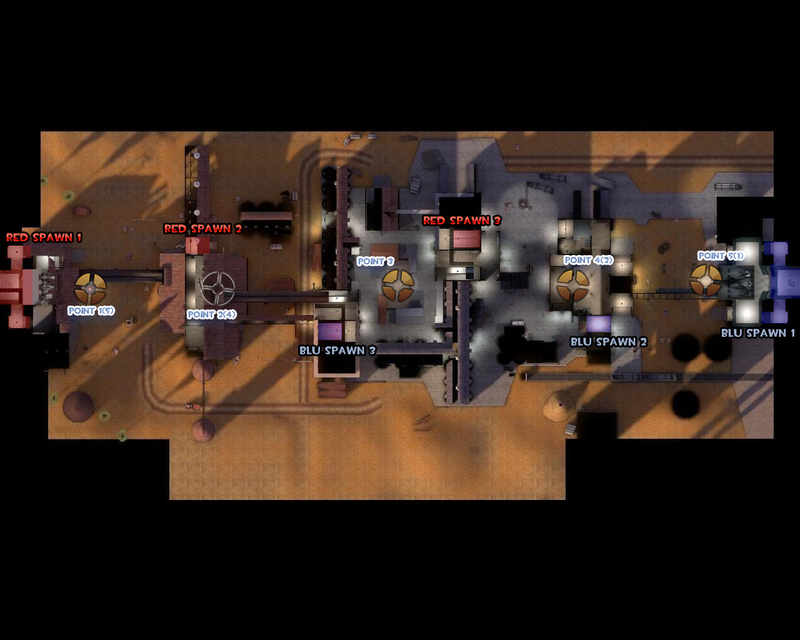
1 Crates 2 Garage 3 Choke 4 Left yard 5 Chute hallway 6 Right yard 7 Granary mill 8 Yard 9 Pipes 10 Yard 11 Headquarters
|
Gullywash
Brand new
| Gullywash - Locations |
|---|
|
Mouseover the markers to see the name of the location
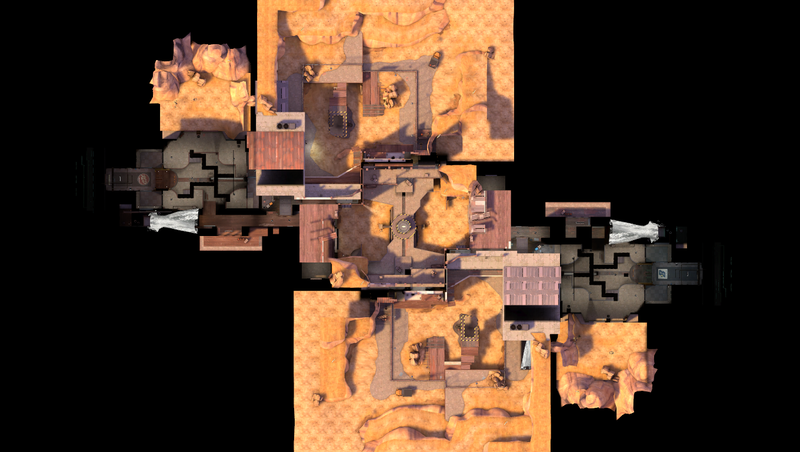
1 Lobby 2 Flanking route 3 Main Entrance 4 Balcony 5 Cover 6 Ramps A RED first spawn B RED second spawn
C BLU third spawn
|
Metalworks
Old

Lolimsogreat21's version
| Metalworks - Locations |
|---|
|
Mouseover the markers to see the name of the location
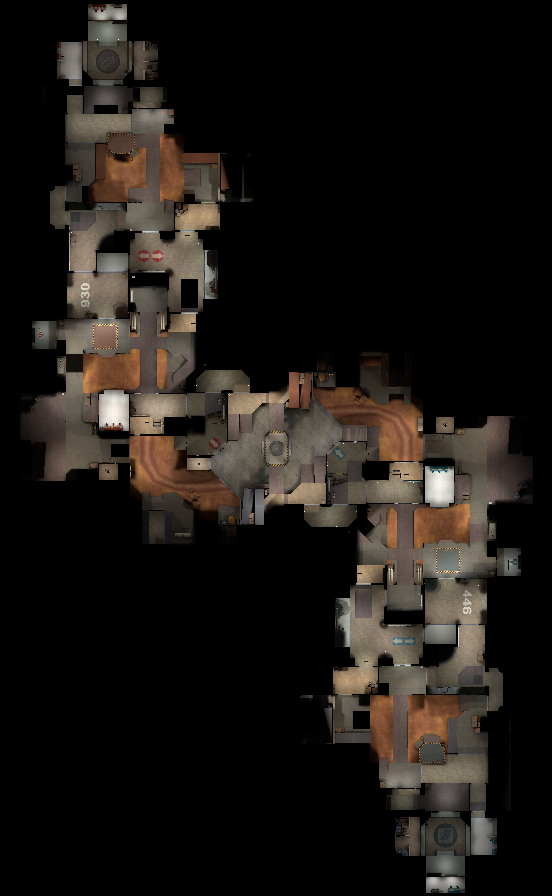
1 Control point bridge 2 Choke 3 Pipe room 4 Yard 5 Flank 6 bridge 7 Main building 8 Walkway 9 Front yard A RED first spawn B RED second spawn
C RED third spawn
|
Powerhouse
Old

Lolimsogreat21's version
| Powerhouse - Locations |
|---|
|
Mouseover the markers to see the name of the location
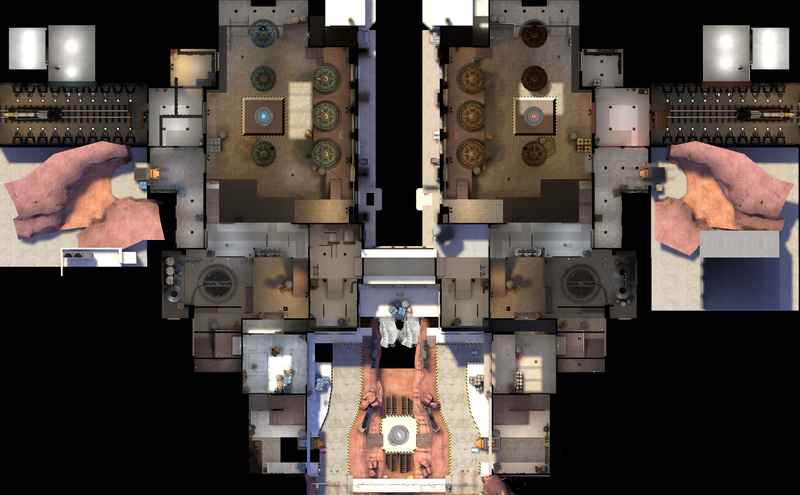
1 End of paths 2 Team sides 3 Water 4 Battlements 5 Chokepoint 6 Launch pad room 7 Control room A RED spawn B BLU spawn
|
Process
Old

Lolimsogreat21's version
| Process - Locations |
|---|
|
Mouseover the markers to see the name of the location
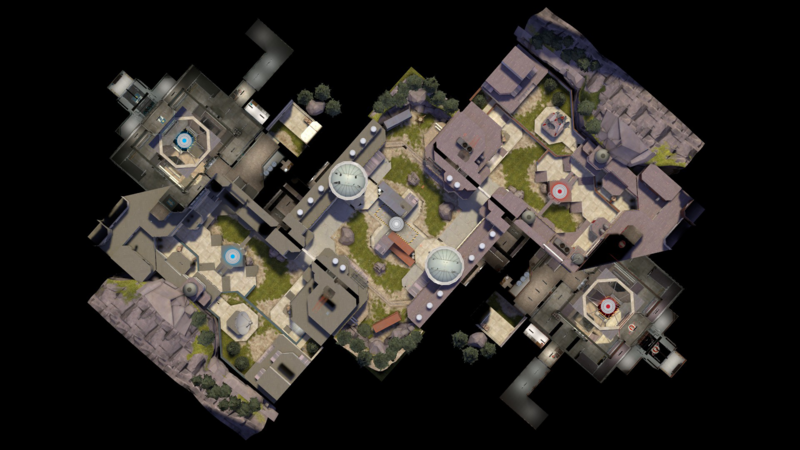
1 Platform 2 Behind 3 Sewers 4 Choke 5 IT/PC 6 Spiral 7 Balcony 8 Rollout 9 Tunnel 10 Upper A RED first spawn B RED second spawn
C RED third spawn
|
Snakewater
Old

Lolimsogreat21's version
| Snakewater - Locations |
|---|
|
Mouseover the markers to see the name of the location
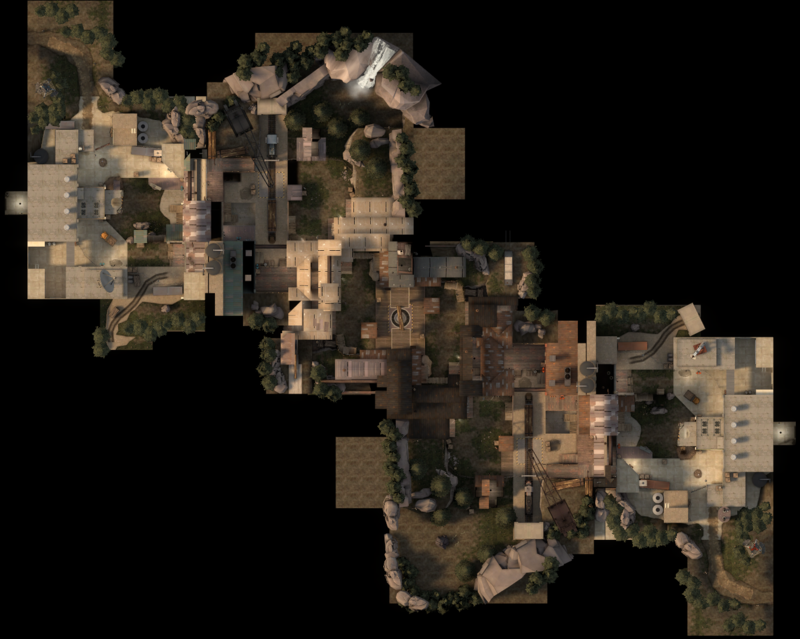
1 Kitchen/Shed 2 House 3 Buildings 4 Main 5 Cliff 6 Lobby 7 Right flank 8 Lower/Main 9 Left flank A RED first spawn B RED second spawn
C RED third spawn
|
Sunshine
Old

Lolimsogreat21's version
| Sunshine - Locations |
|---|
|
Mouseover the markers to see the name of the location
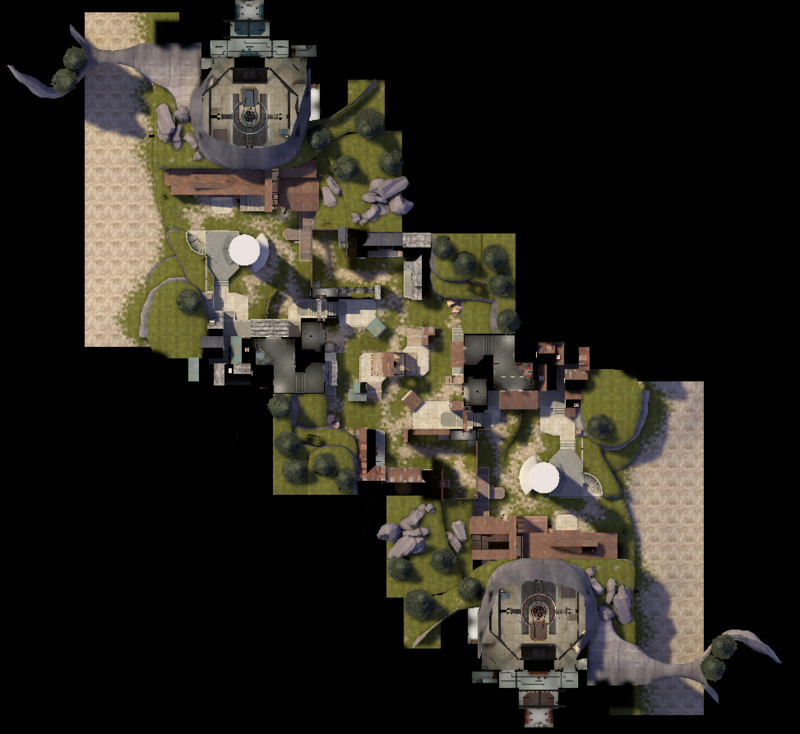
1 Shacks 2 Cafe 3 Chokepoint 4 Valley 5 Platform 6 Staircase 7 Wooden warehouse 8 Elevation 9 Wall 10 Crates A RED first spawn B RED second spawn
C RED third spawn
|
Sinshine
Old

Lolimsogreat21's version
| Sinshine - Locations |
|---|
|
Mouseover the markers to see the name of the location
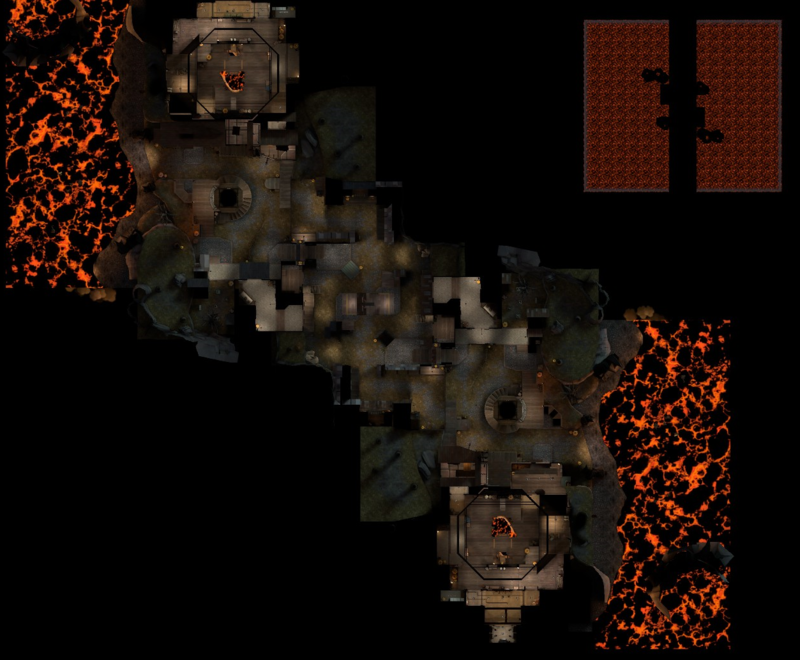
1 Shacks 2 Cafe 3 Chokepoint 4 Valley 5 Platform 6 Staircase 7 Wooden warehouse 8 Elevation 9 Wall 10 Crates A RED first spawn B RED second spawn
C RED third spawn
|
Vanguard
Old

Lolimsogreat21's version
| Vanguard - Locations |
|---|
|
Mouseover the markers to see the name of the location
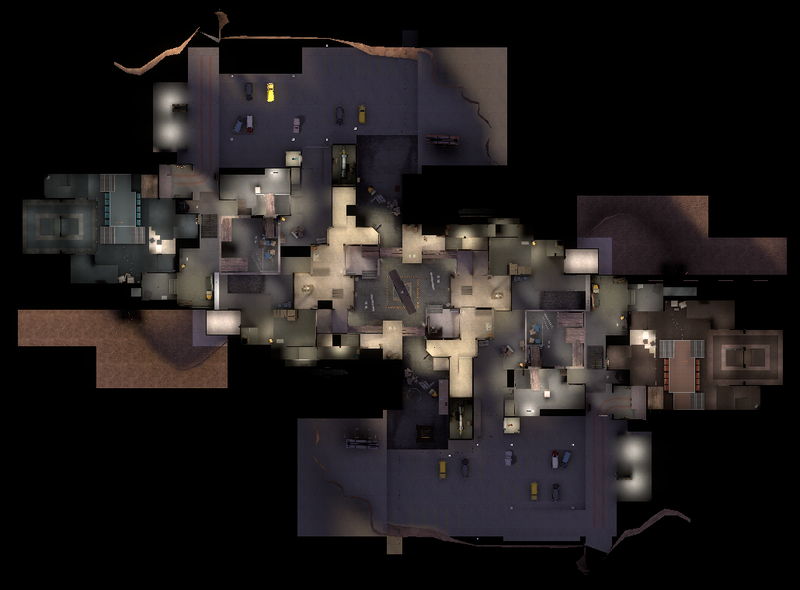
1 Center yard 2 Scaffoldings 3 Right balcony 4 Center Scaffoldings 5 Elevator 6 Left building 7 Observation room 8 Air vent A RED first spawn B RED second spawn
C RED third spawn
|
Well (Control Point)
Old
_overview_with_lines.png)
Lolimsogreat21's version
| Well (Control Point) - Locations |
|---|
|
Mouseover the markers to see the name of the location
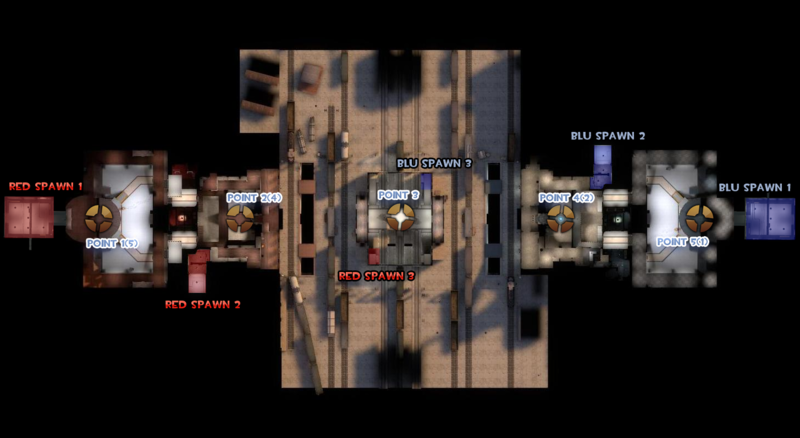
1 Main building 2 Yard 3 Swing door 4 Swing door 5 Battlements 6 Inner lobby 7 Command room 8 Catwalks A RED first spawn B RED second spawn
C RED third spawn
|
Yukon
Old

Lolimsogreat21's version
| Yukon - Locations |
|---|
|
Mouseover the markers to see the name of the location
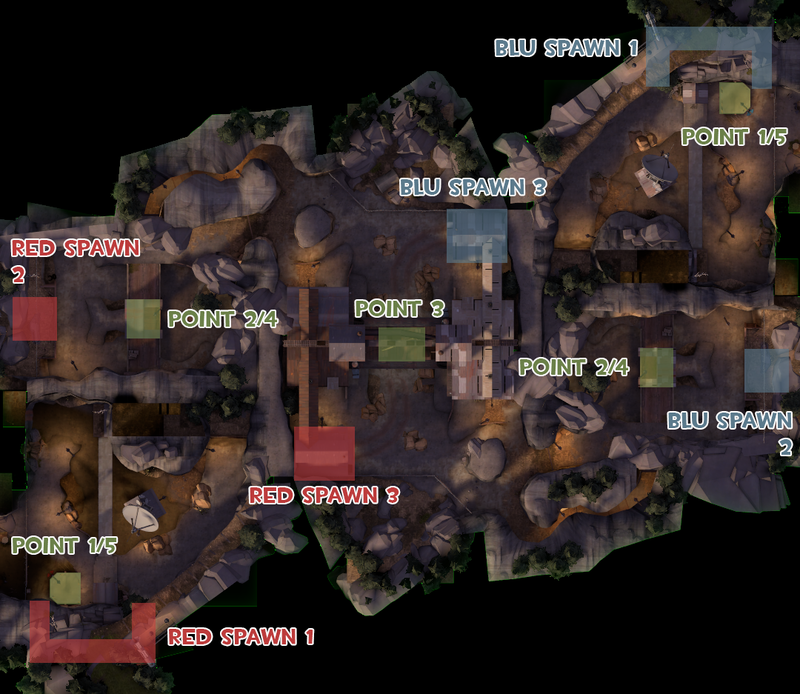
1 Bridge valley 2 Valley 3 Back path 4 Main path 5 Lower tunnel 6 Side tunnel 7 Bridge 8 Basin 9 Right path A RED first spawn B RED second spawn
C RED third spawn
|
KOTH
Badlands (King of the Hill)
Old
_overview_with_lines_2.png)
Lolimsogreat21's version
| Badlands (King of the Hill) - Locations |
|---|
|
Mouseover the markers to see the name of the location
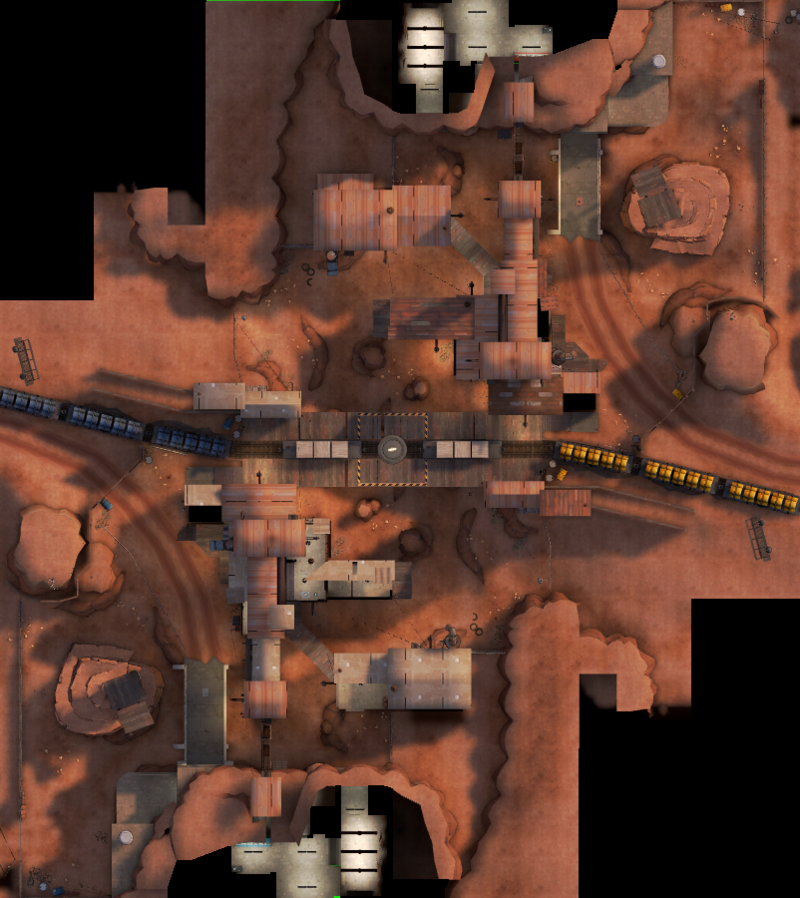
1 Rail cars 2 Rocky pillars 3 Balcony 4 Valley A RED spawn B BLU spawn
|
Brazil
Old

Lolimsogreat21's version
| Brazil - Locations |
|---|
|
Mouseover the markers to see the name of the location
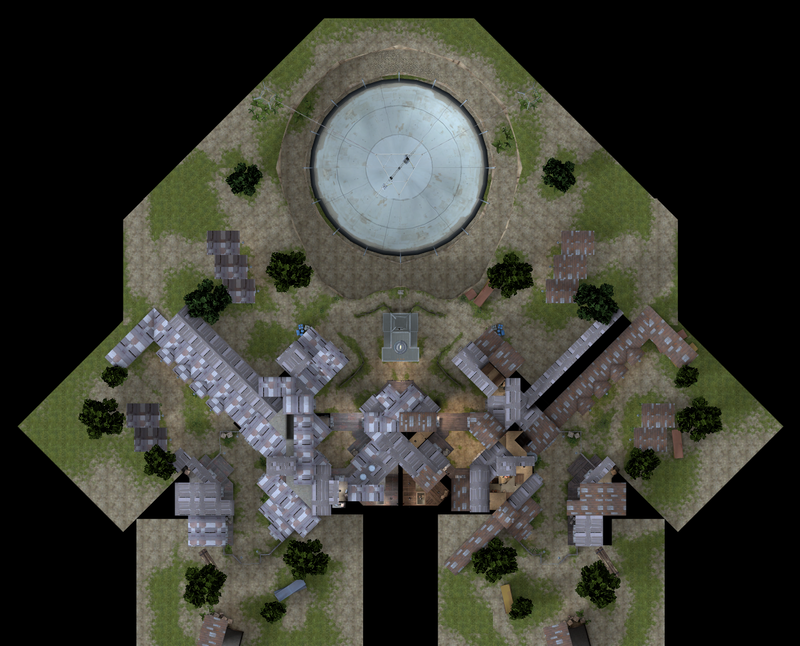
1 Spawn yard 2 Outside route 3 Middle route 4 Inside route 5 Vault room (Above the Alley) 6 Alley 7 Stairwell 8 Hurg perch 9 Coal house 10 Back road A BLU spawn B RED spawn
|
Cascade
Brand new
| Cascade - Locations |
|---|
|
Mouseover the markers to see the name of the location
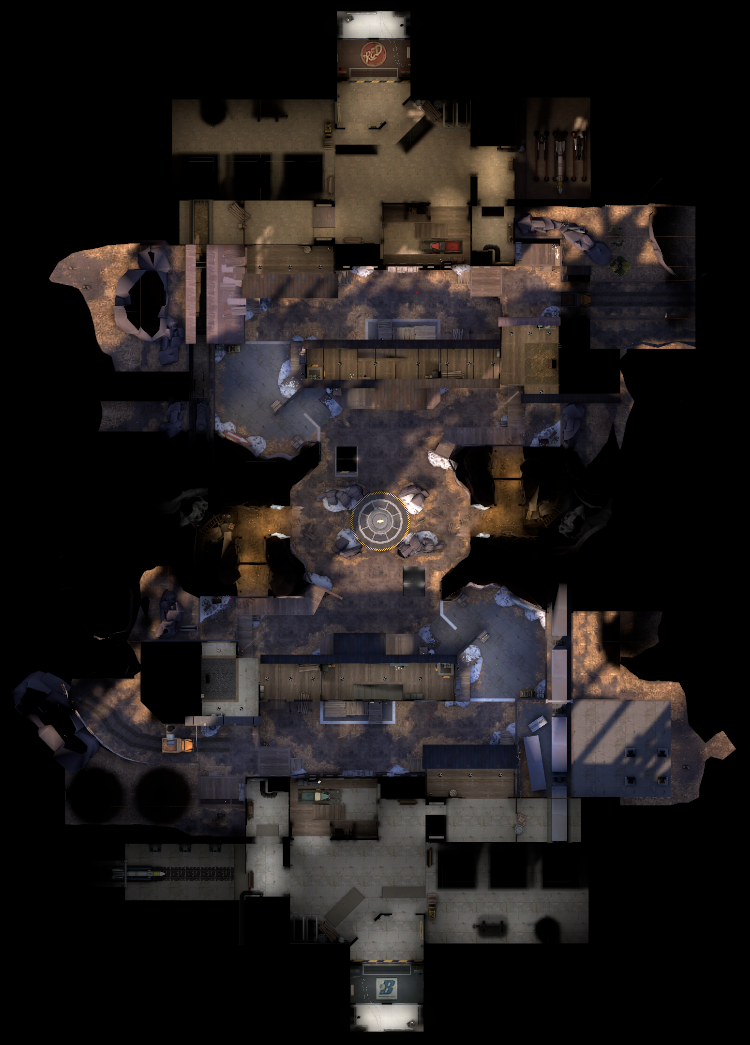
1 Spawn Area 2 Valley 3 Grain Pile 4 Binski Logging 5 Forklift 6 Date Servers (Entrance) 7 Mines A RED spawn B BLU spawn
|
Cauldron
Old

Lolimsogreat21's version
| Cauldron - Locations |
|---|
|
Mouseover the markers to see the name of the location
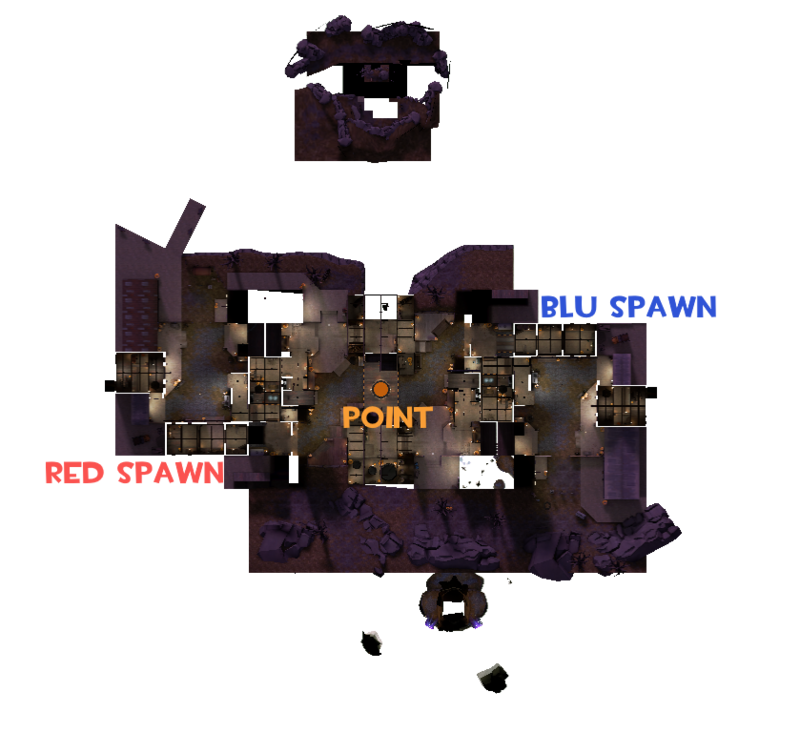
1 Spawn areas 2 Tracks/Ramp 3 Battlements 4 High ground 5 Side buildings A RED spawn B BLU spawn
|
Harvest
Old

Lolimsogreat21's version
| Harvest - Locations |
|---|
|
Mouseover the markers to see the name of the location

1 Center shed 2 Farmhouse 3 Side sheds A RED spawn B BLU spawn
|
Harvest Event
Old

Lolimsogreat21's version
| Harvest event - Locations |
|---|
|
Mouseover the markers to see the name of the location
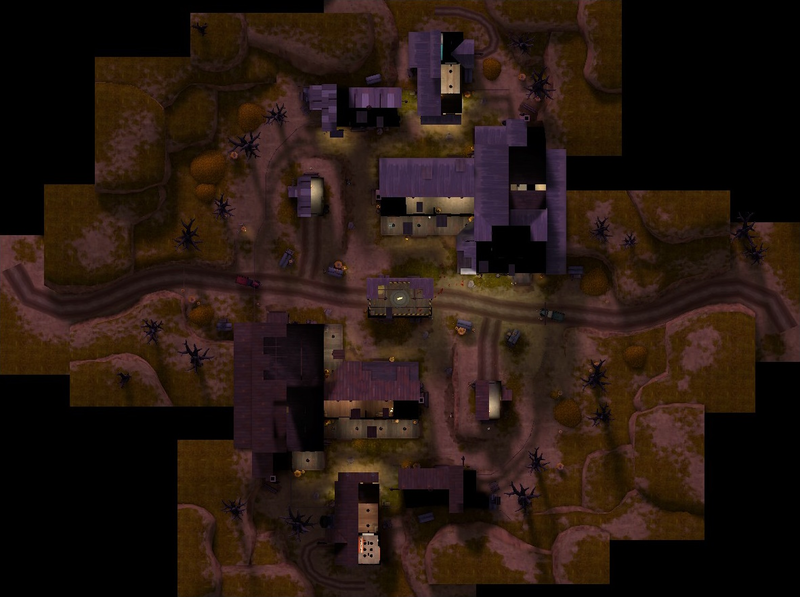
1 Center shed 2 Farmhouse 3 Side sheds A RED spawn B BLU spawn
|
Highpass
Old

Lolimsogreat21's version
| Highpass - Locations |
|---|
|
Mouseover the markers to see the name of the location
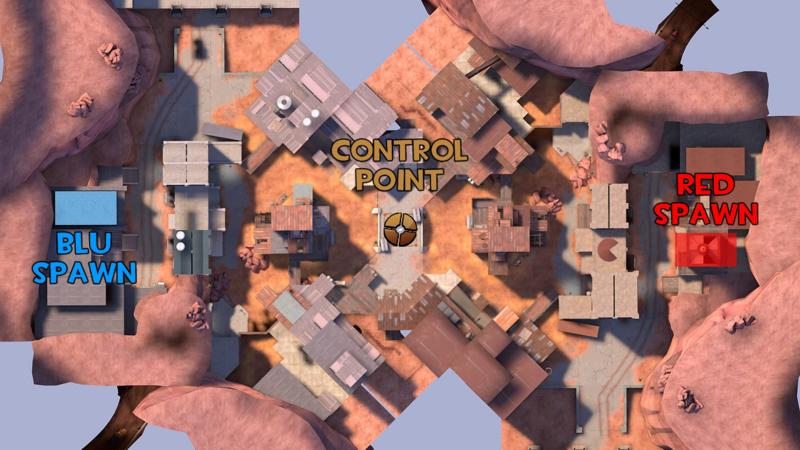
1 Bridge 2 Yard 3 Industrial houses A BLU spawn B RED spawn
|
Kong King
Old

Lolimsogreat21's version
| Kong King - Locations |
|---|
|
Mouseover the markers to see the name of the location
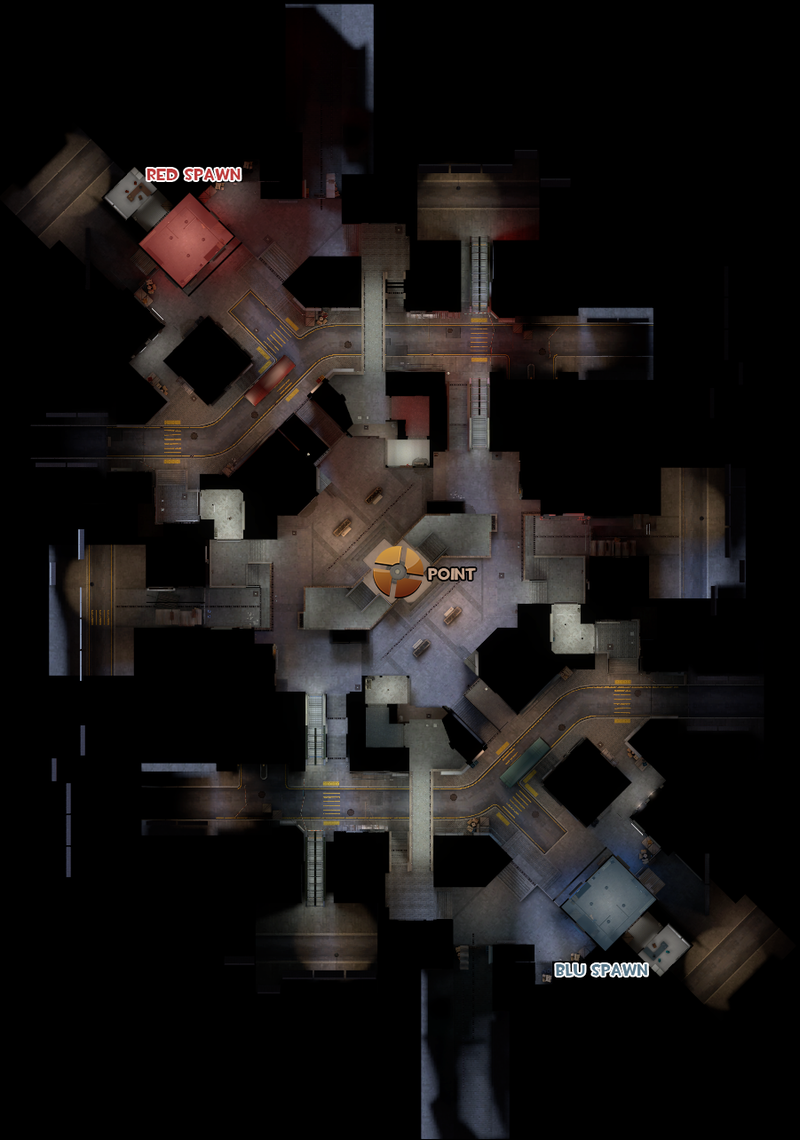
1 Alleyways 2 Buses 3 Covered bridges 4 Double stairs 5 Short stairs 6 Side stairs 7 Pillar rooms A RED spawn B BLU spawn
|
Lakeside
Old

Lolimsogreat21's version
| Lakeside - Locations |
|---|
|
Mouseover the markers to see the name of the location
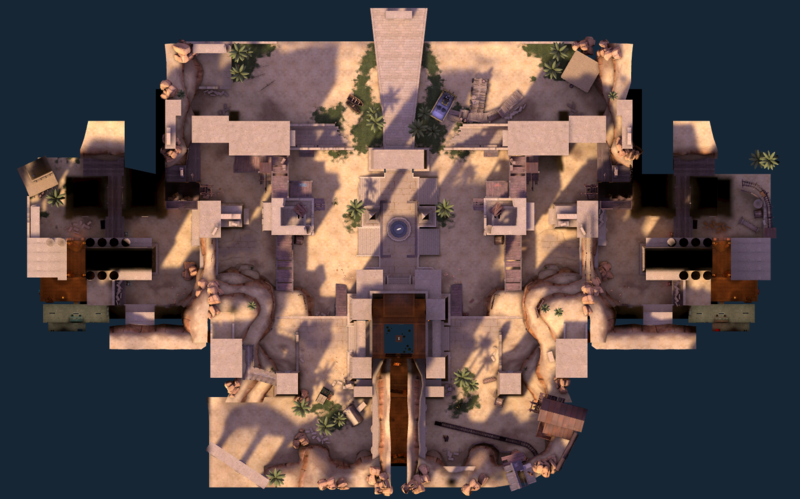
1 Team courtyards 2 Small wooden structure 3 Sandstone archway 4 Winding tunnel 5 Forts 6 Health room 7 Ammunition archway 8 Obelisk 9 Water temple A RED spawn B BLU spawn
|
Ghost Fort
Old

Lolimsogreat21's version
| Ghost Fort - Locations |
|---|
|
Mouseover the markers to see the name of the location
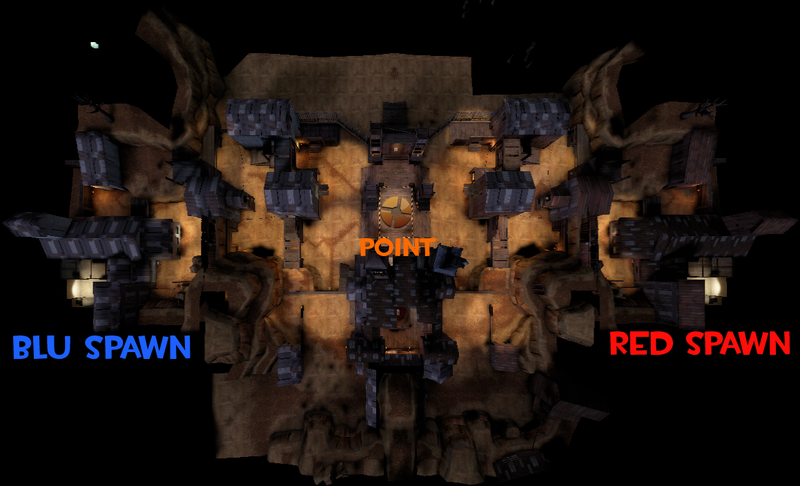
1 Team courtyards 2 Small wooden structure 3 Catwalks archway 4 Winding tunnel 5 Forts 6 Health room 7 Ammunition archway 8 Tower 9 Pit temple A RED spawn B BLU spawn
|
Los Muertos
Lolimsogreat21's version
| Los Muertos - Locations |
|---|
|
Mouseover the markers to see the name of the location
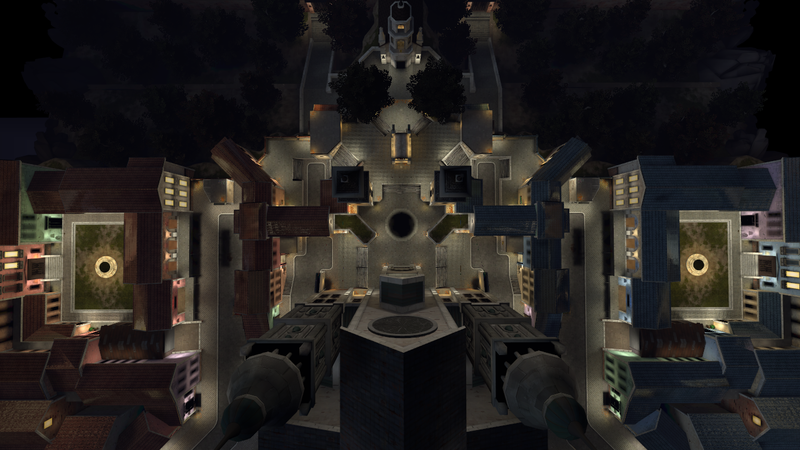
1 Bus 2 Terminal 3 Bakery 4 Alley (And the Balcony) 5 House 6 Street 7 Belltower 8 Cathedral (And the Sarcophagus (Tomb)) 9 Entrance 10 Town Square 11 Planters 12 Crypt 13 Church A RED spawn B BLU spawn
|
Laughter
Old

Lolimsogreat21's version
| Laughter - Locations |
|---|
|
Mouseover the markers to see the name of the location
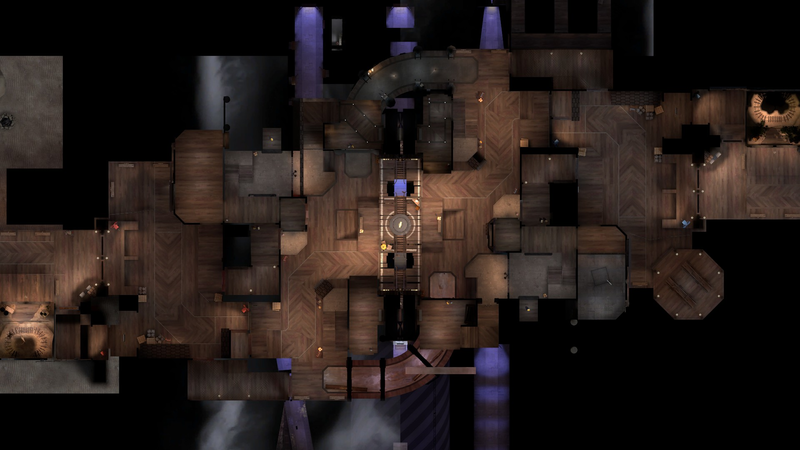
1 Badlands Bandito/Pirate's Blunder 2 Bottle Buster/Pumpkin Smash 3 Spawn Yard 4 Gift Shop/Arcade 5 Robotic Sideshow/Real Live Crocodiles 6 Stairs 7 Mike Toss/Hall of Mirrors 8 Balcony 9 Sawmill of Love/Mad Mansion A BLU spawn B RED spawn
|
Lazarus
Old

Lolimsogreat21's version
| Lazarus - Locations |
|---|
|
Mouseover the markers to see the name of the location
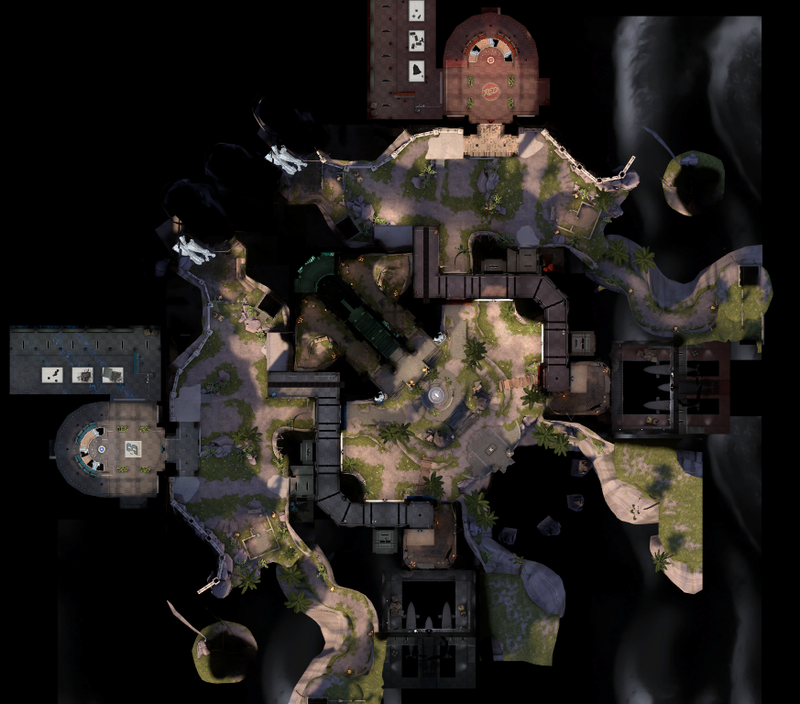
1 Yard 2 Outside exit 3 Low route 4 High rout 5 Digs 6 Corridor 7 Stairs 8 Garage 9 Altar A BLU spawn B RED spawn
|
Maple Ridge Event
Old

Lolimsogreat21's version
| Maple Ridge Event - Locations |
|---|
|
Mouseover the markers to see the name of the location

1 Yard 2 Hall 3 Flank fence 4 Library 5 Patio 6 Chapel 7 Pipes 8 Ramp 9 Redmond's house A RED spawn B BLU spawn
|
Megalo
Old

Lolimsogreat21's version
| Megalo - Locations |
|---|
|
Mouseover the markers to see the name of the location
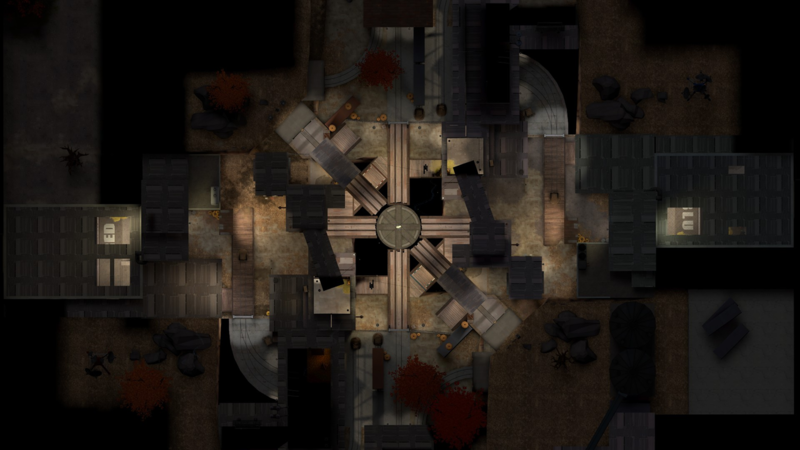
1 Yard 2 Valley 3 Factories A RED spawn B BLU spawn
|
Moldergrove
Old

Lolimsogreat21's version
| Moldergrove - Locations |
|---|
|
Mouseover the markers to see the name of the location
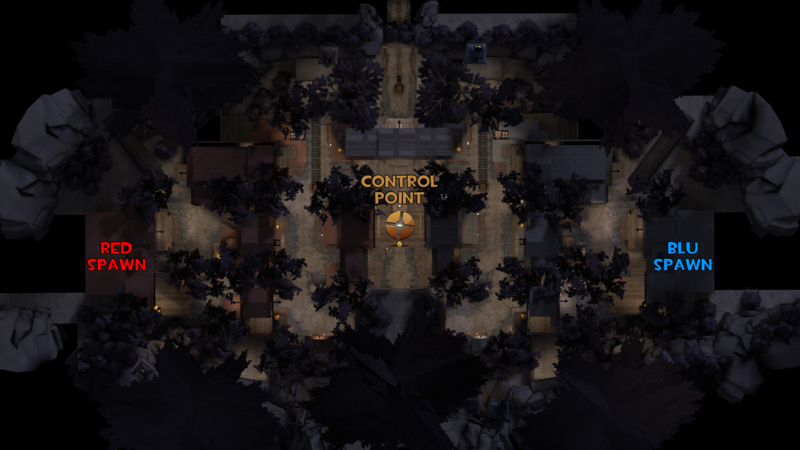
1 Spawn yard 2 Blinski Logging 3 End of the Line 4 Central building 5 Mine Pit 6 Red valley Mountain A RED spawn B BLU spawn
|
Moonshine Event
Old

Lolimsogreat21's version
| Moonshine Event - Locations |
|---|
|
Mouseover the markers to see the name of the location
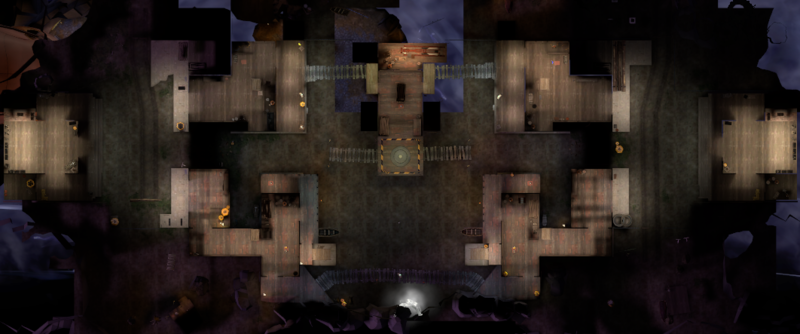
1 Spawn yard 2 Industrial Houses 3 Bayou Shipping House A RED spawn B BLU spawn
|
Nucleus (King of the Hill)
Old
_overview_with_lines.png)
Lolimsogreat21's version
| Nucleus (King of the Hill) - Locations |
|---|
|
Mouseover the markers to see the name of the location
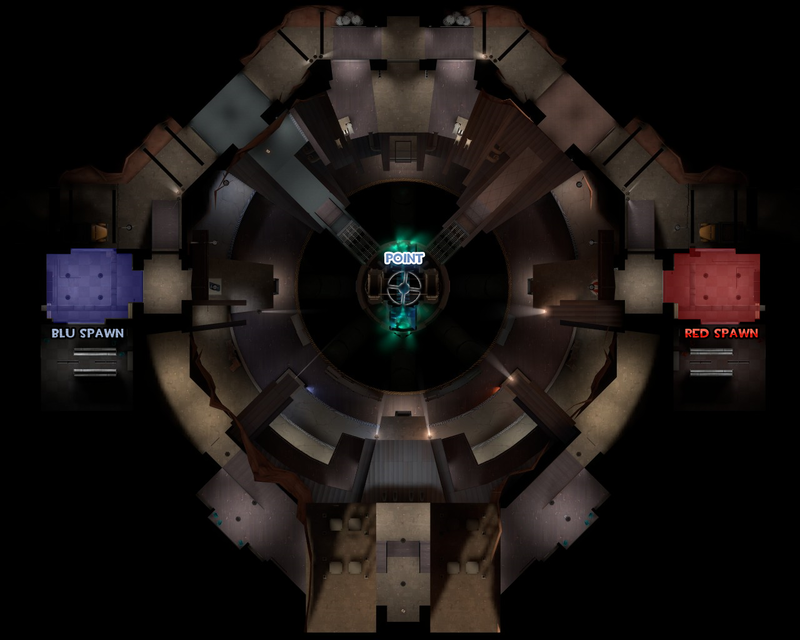
1 Perimiter 2 Roofs 3 Bridges 4 Flank buildings 5 Access Building A RED spawn B BLU spawn
|
Probed
Old

Lolimsogreat21's version
| Probed - Locations |
|---|
|
Mouseover the markers to see the name of the location
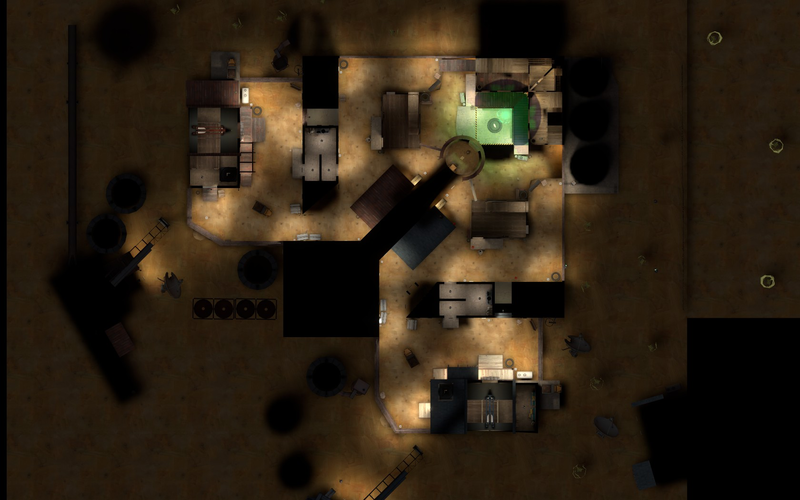
1 Spawn yard 2 Transition Building 3 Sheds 4 Grain Silo A RED spawn B BLU spawn
|
Sawmill (King of the Hill)
Old
_overview_with_lines.png)
Lolimsogreat21's version
| Sawmill (King of the Hill) - Locations |
|---|
|
Mouseover the markers to see the name of the location
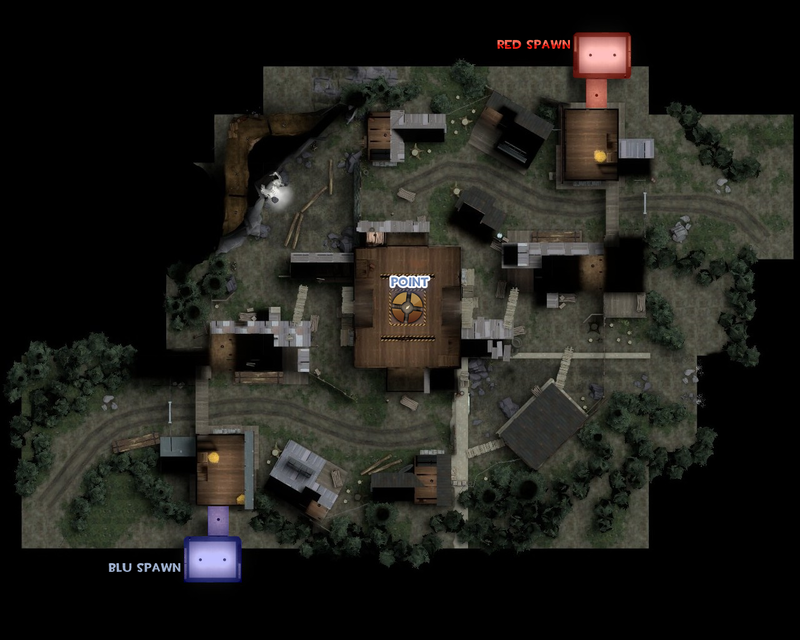
1 Rooftops 2 Cave 3 Waterfall 4 Alcoves 5 Center Shed 6 Log Shed A RED spawn B BLU spawn
|
Sinthetic
Lolimsogreat21's version
| Sinthetic - Locations |
|---|
|
Mouseover the markers to see the name of the location
1 Spawn Yard 2 Transitional Building 3 Valley 4 House 5 Flanks 6 Tunnels A RED spawn B BLU spawn
|
Slasher
Old

Lolimsogreat21's version
| Slasher - Locations |
|---|
|
Mouseover the markers to see the name of the location
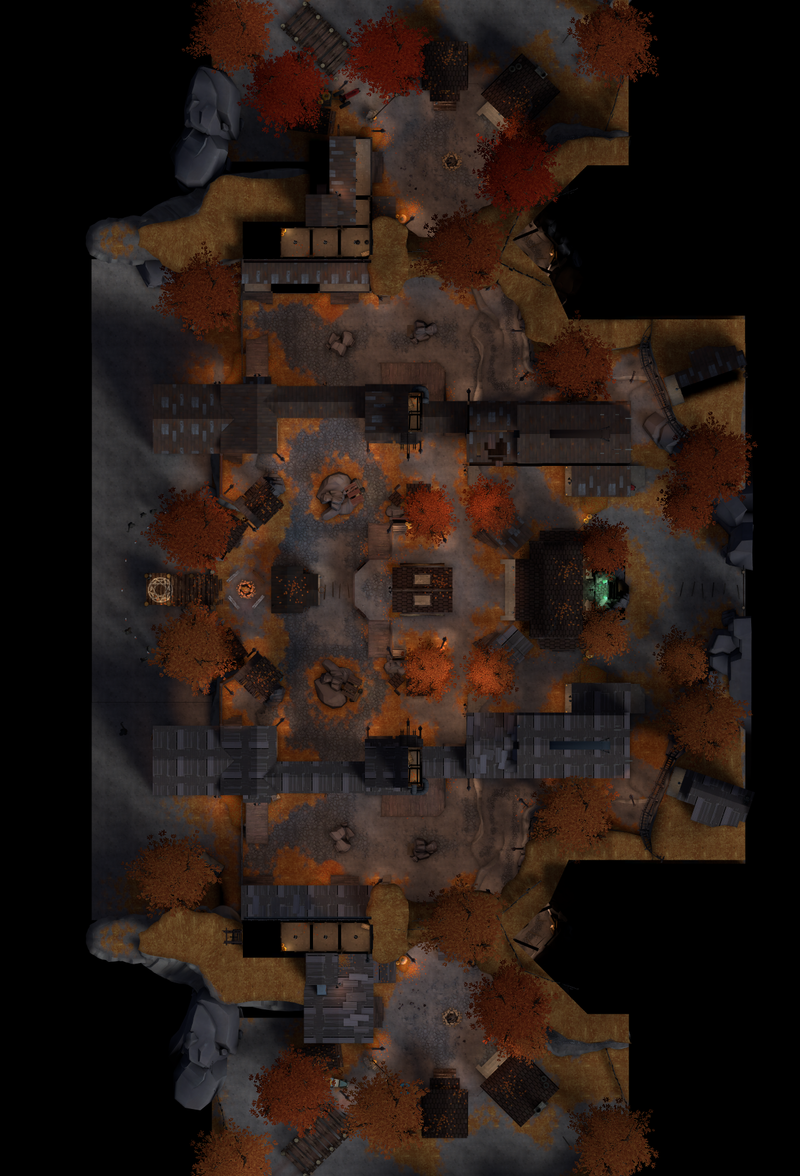
1 Campfire 2 Mines 3 Middle Entrance 4 Boat Rentals 5 Maintance 6 Boat dock 7 Bonfire 8 Supply Shed 9 Ramps 10 Ranger Lodge A RED spawn B BLU spawn
|
Suijin
Old

Lolimsogreat21's version
| Suijin - Locations |
|---|
|
Mouseover the markers to see the name of the location
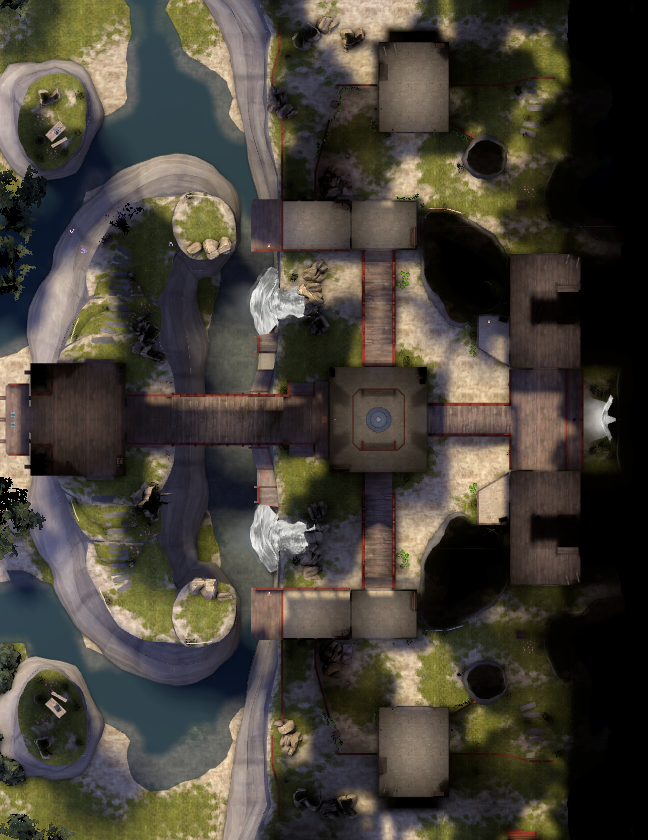
1 Far Islands 2 Cliffside Temple 3 Bamboo Buildings 4 Temple Tower 5 Calligraphy Temple A RED spawn B BLU spawn
|
Viaduct
Old

Lolimsogreat21's version
| Viaduct - Locations |
|---|
|
Mouseover the markers to see the name of the location
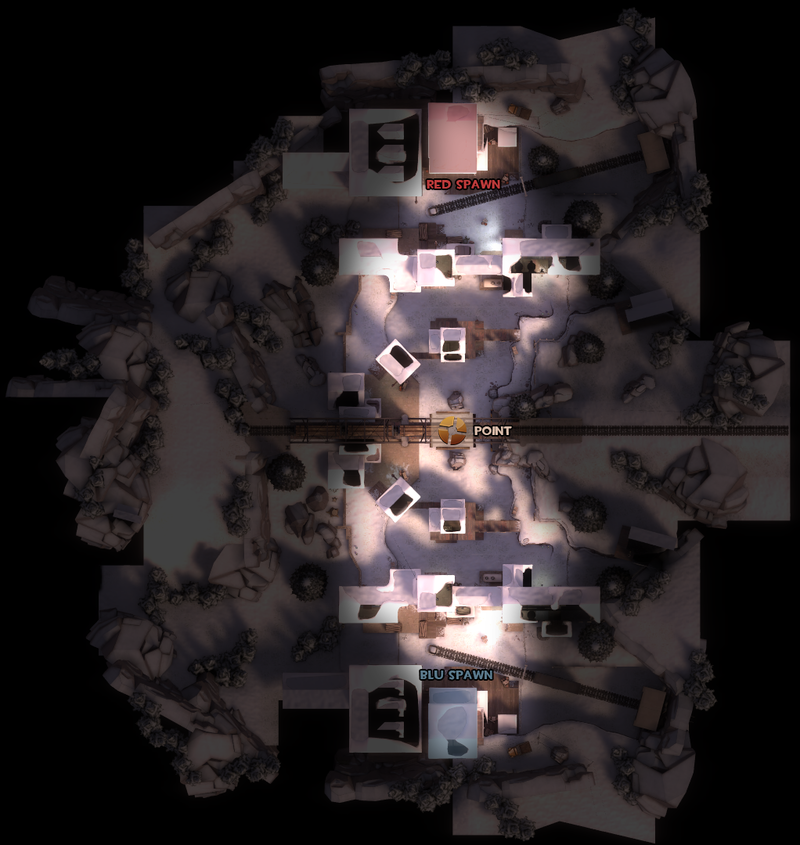
1 Spawn Yard 2 Transition building 3 Valley 4 Scullery (House) 5 Stairs 6 Hills 7 Summit with the point A RED spawn B BLU spawn
|
Eyeaduct
Old

New
| Eyeaduct - overview indicators |
|---|
|
Mouseover the markers to see the name of the location
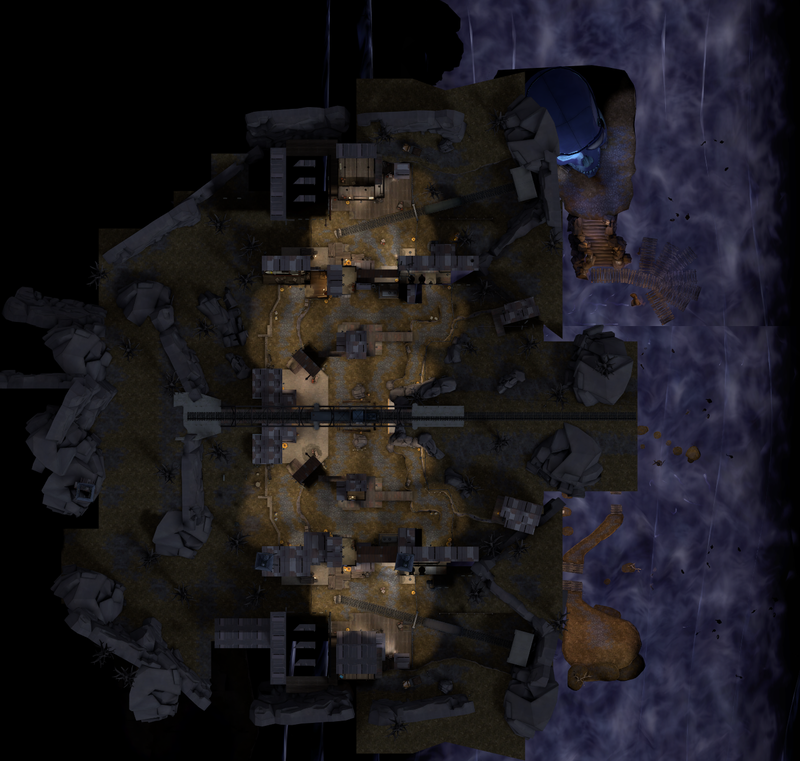
1 Spawn Yard 2 Transition Building 3 Valley 4 Scullery 5 Stairs 6 Hills 7 Summit A BLU spawn B RED spawn
|
CTF
2Fort
Old
Please note the following: The Blu side shows the first floor while the Red side shows the second floor. (this msg should ideally be nested somewhere inside the template)

Lolimsogreat21's version
| 2Fort - Locations |
|---|
|
Mouseover the markers to see the name of the location

1 Bridge 2 Entrance 3 Battlements 4 Grate 5 Entrance side room 6 Courtyard 7 Stairs 8 Basement 9 Spiral 10 Intelligence Room 11 Sewer exit A BLU spawn B BLU spawn
C RED spawn D RED spawn
|
2Fort Invasion
Old

Lolimsogreat21's version
| 2Fort Invasion - Locations |
|---|
|
Mouseover the markers to see the name of the location
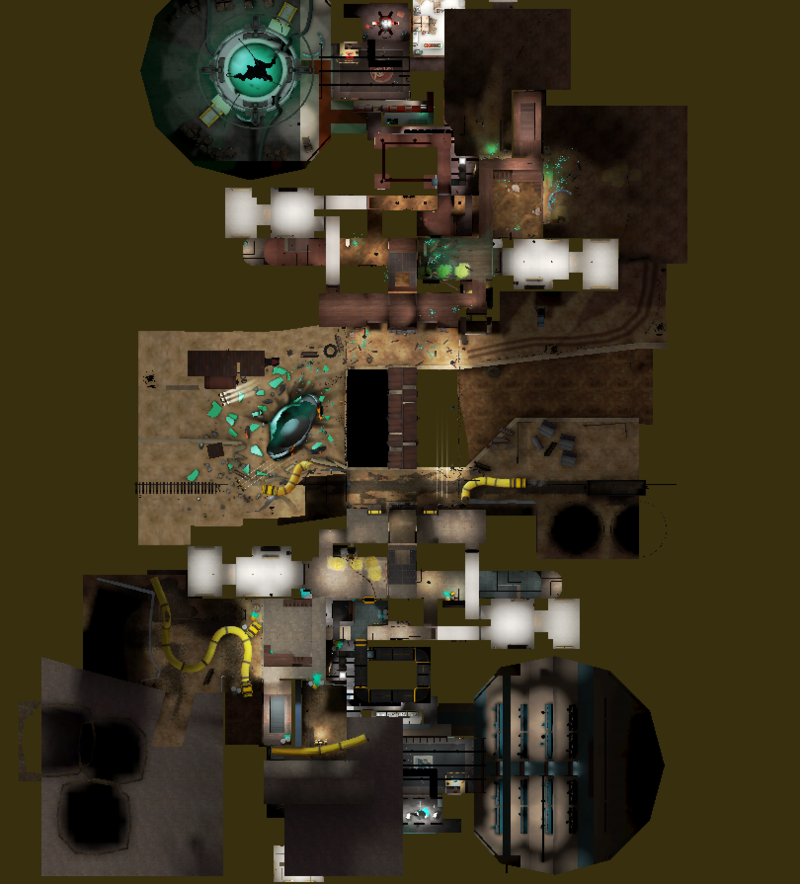
1 Bridge 2 Entrance 3 Battlements 4 Grate 5 Entrance side room 6 Courtyard 7 Stairs 8 Basement 9 Spiral 10 Intelligence Room 11 Sewer exit A BLU spawn B BLU spawn
C RED spawn D RED spawn
|
Double Cross
Old

Lolimsogreat21's version
| Double Cross - Locations |
|---|
|
Mouseover the markers to see the name of the location
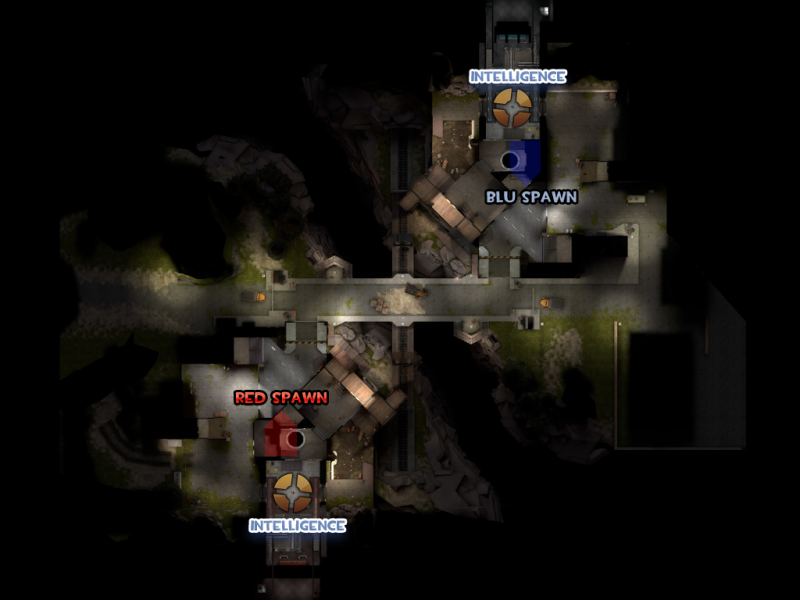
1 Main Bridge 2 Train Bridge 3 Battlements 4 Courtyard 5 Intelligence room A RED spawn B BLU spawn
|
Doublefrost
Brand New
Lolimsogreat21's version
| Doublefrost - Locations |
|---|
|
Mouseover the markers to see the name of the location
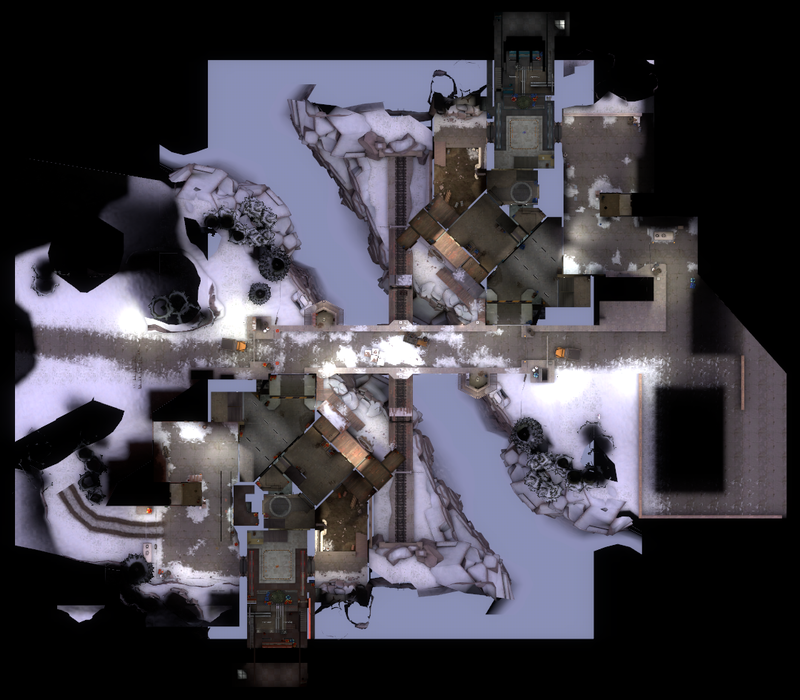
1 Main Bridge 2 Train Bridge 3 Battlements 4 Courtyard 5 Intelligence room A RED spawn B BLU spawn
|
Landfall
Old

Lolimsogreat21's version
| Landfall - Locations |
|---|
|
Mouseover the markers to see the name of the location
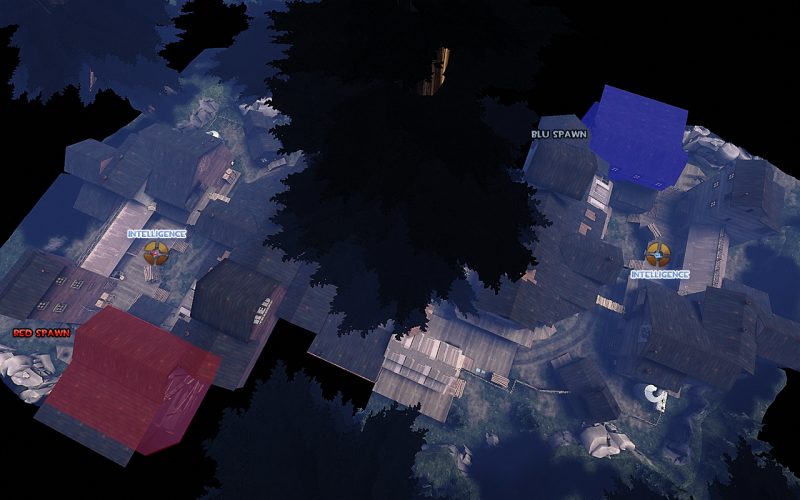
1 Tree 2 Resources deck 3 Lumber Building 4 Side route 5 Shack 6 Courtyard 7 Rooftops A RED spawn B BLU spawn
|
Snowfall
Old

Lolimsogreat21's version
| Snowfall - Locations |
|---|
|
Mouseover the markers to see the name of the location
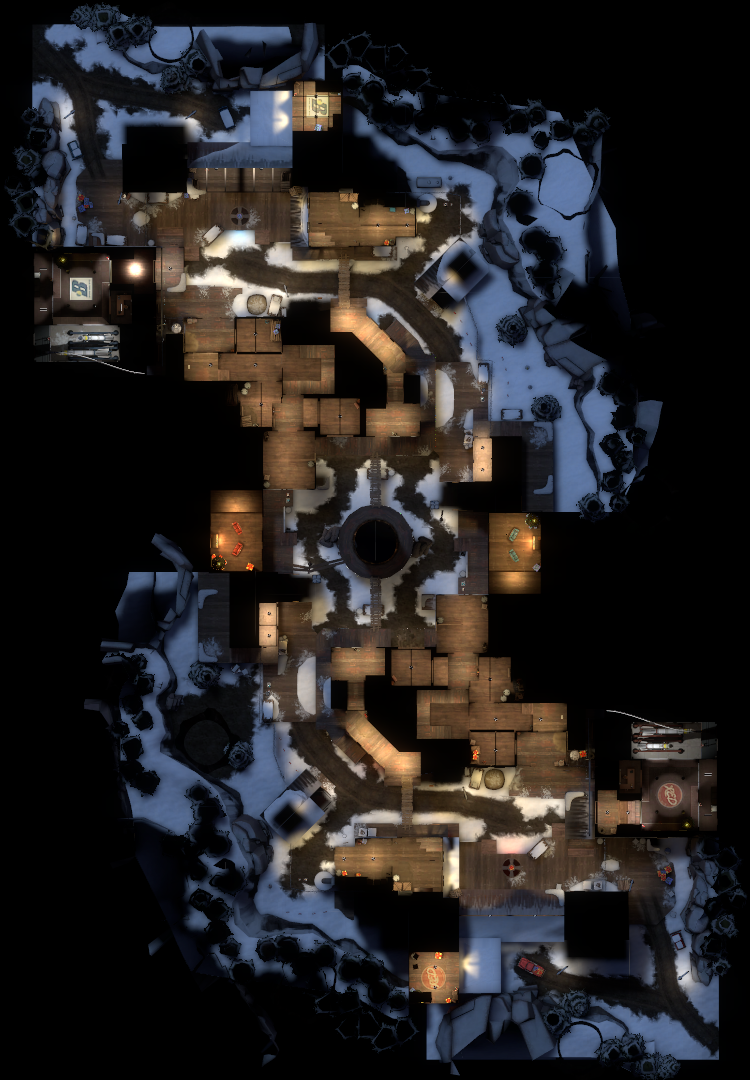
1 Tree 2 Resources deck 3 Lumber Building 4 Side route 5 Shack 6 Courtyard 7 Rooftops A BLU spawn B RED spawn
|
Sawmill (Capture the Flag)
Old
_overview_with_lines.png)
Lolimsogreat21's version
| Sawmill (Capture the Flag) - Locations |
|---|
|
Mouseover the markers to see the name of the location
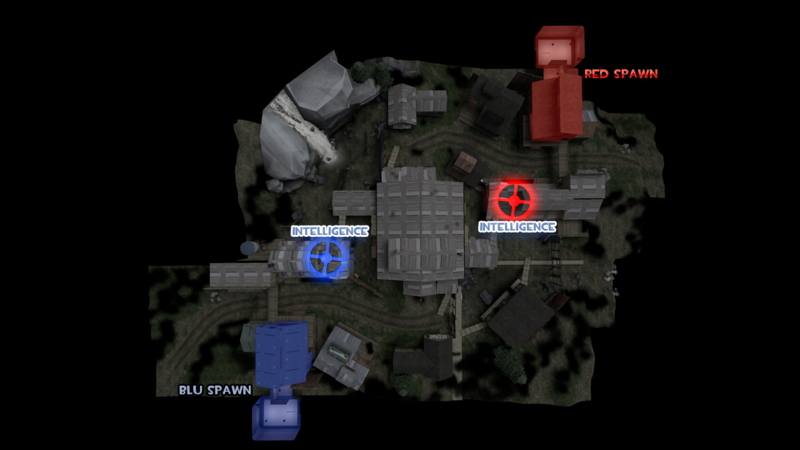
1 Rooftops 2 Cave 3 Watterfall 4 Alcoves 5 Center Shed 6 Log Shed A BLU spawn B RED spawn
|
Turbine
Old

Lolimsogreat21's version
| Turbine - Locations |
|---|
|
Mouseover the markers to see the name of the location
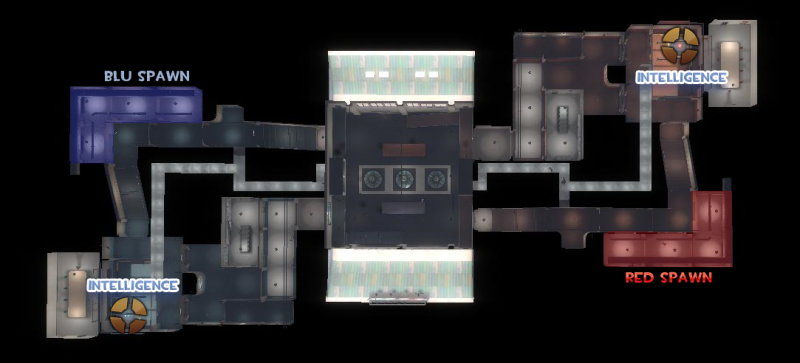
1 Turbines 2 Alcoves 3 Balcony 4 Vents 5 Main Hallway 6 Raised Platform A BLU spawn B RED spawn
|
Well (Capture the Flag)
Lolimsogreat21's version
| Well (Control Point) - Locations |
|---|
|
Mouseover the markers to see the name of the location
1 Main building 2 Yard 3 Swing door 4 Swing door 5 Battlements 6 Inner lobby 7 Command room 8 Catwalks A RED first spawn B RED second spawn
C RED third spawn
|
PD
Cursed Cove
Lolimsogreat21's version
| Cursed Cove - Locations |
|---|
|
Mouseover the markers to see the name of the location
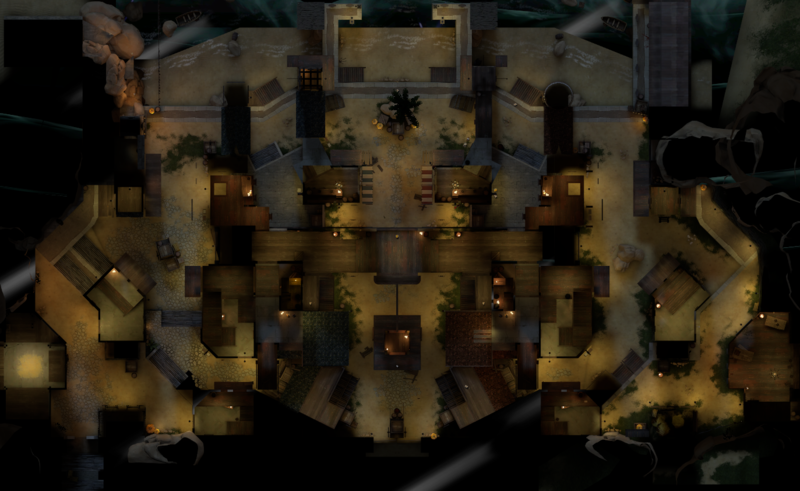
1 Beach 2 Docks 3 Port 4 Gate 5 Courtyard A BLU spawn B RED spawn
|
Farmageddon
Lolimsogreat21's version
| Farmageddon - Locations |
|---|
|
Mouseover the markers to see the name of the location
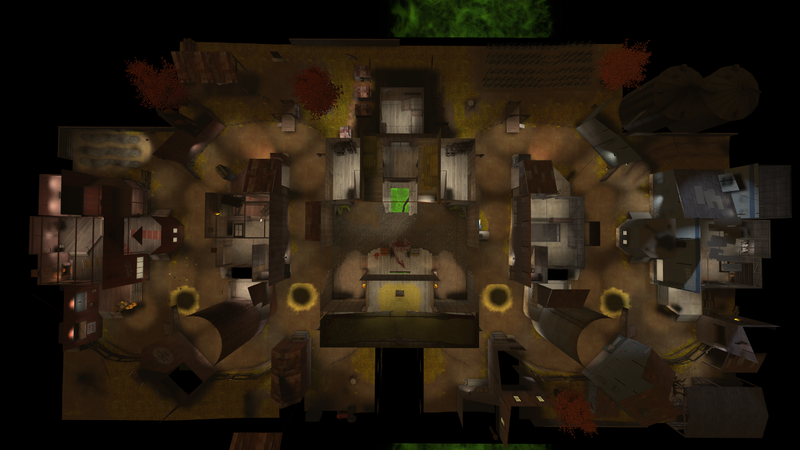
1 Grain Shed 2 Road 3 Hayrack Ride 4 Combine 5 Machine Shed 6 Machine room A RED spawn B BLU spawn
|
Monster Bash
Lolimsogreat21's version
| Monster Bash - Locations |
|---|
|
Mouseover the markers to see the name of the location
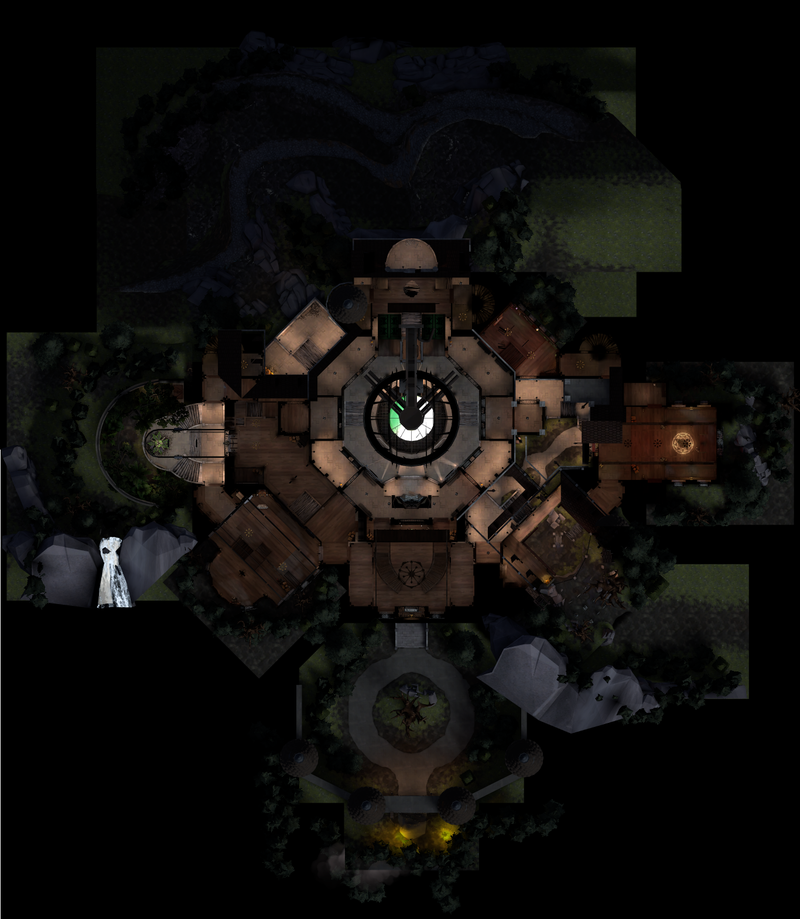
1 Chemicals 2 Courtyard 3 Causeway 4 Grand Foyer 5 Lab 6 Ballroom 7 Balcony 8 Patio 9 Gallery 10 Library A BLU spawn B RED spawn
|
Pit of Death
Lolimsogreat21's version
| Pit of Death - Locations |
|---|
|
Mouseover the markers to see the name of the location
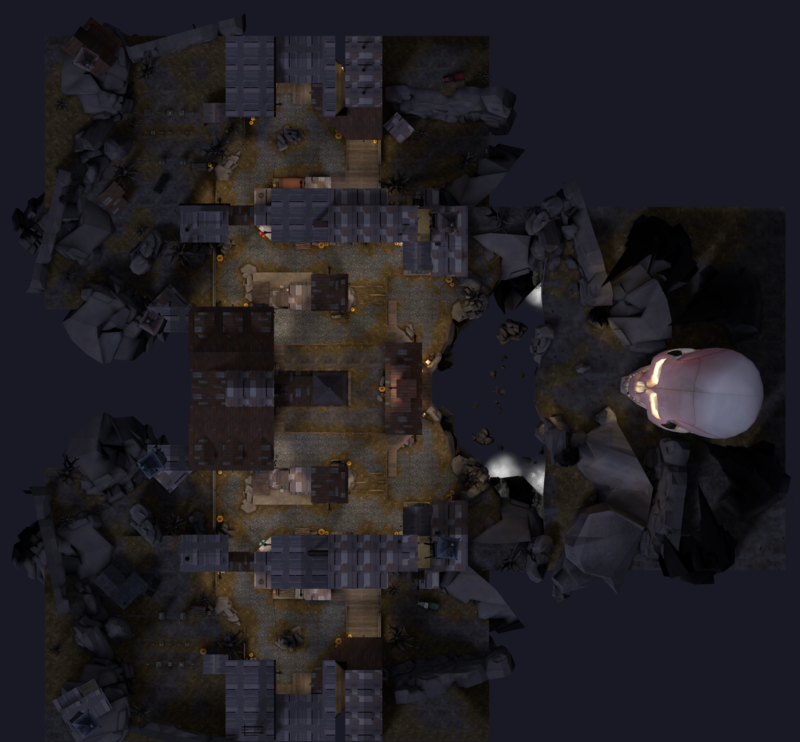
1 Courtyard 2 Bridge Route 3 Dock Route 4 Staircase 5 Rooftops (Above)/Hallway (Below) 6 Ledges 7 Pit Access 8 Basemenet 9 Pit Flanks 10 Overlook Building 11 Broken Bridge A RED spawn B BLU spawn
|
SnowVille
Lolimsogreat21's version
| SnowVille - Locations |
|---|
|
Mouseover the markers to see the name of the location
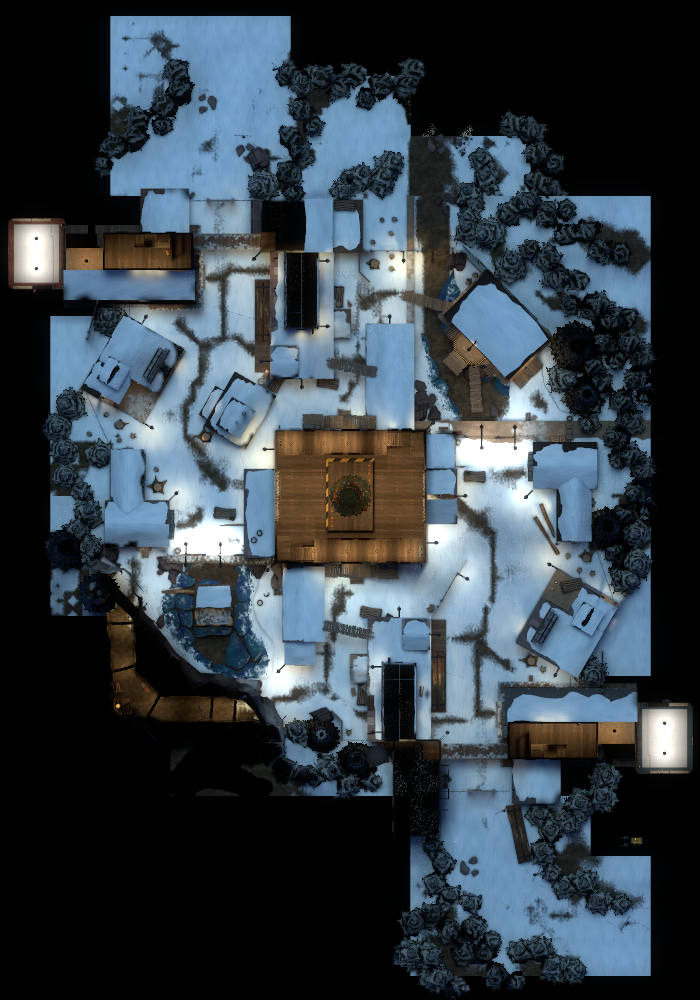
1 Wood Shed 2 Rooftops 3 Garage 4 Coal Shed 5 Alcoves 6 Center Shed 7 Sewers 8 Small Delivery Zone 9 Cave A RED spawn B BLU spawn
|
Watergate
Lolimsogreat21's version
| Watergate - Locations |
|---|
|
Mouseover the markers to see the name of the location
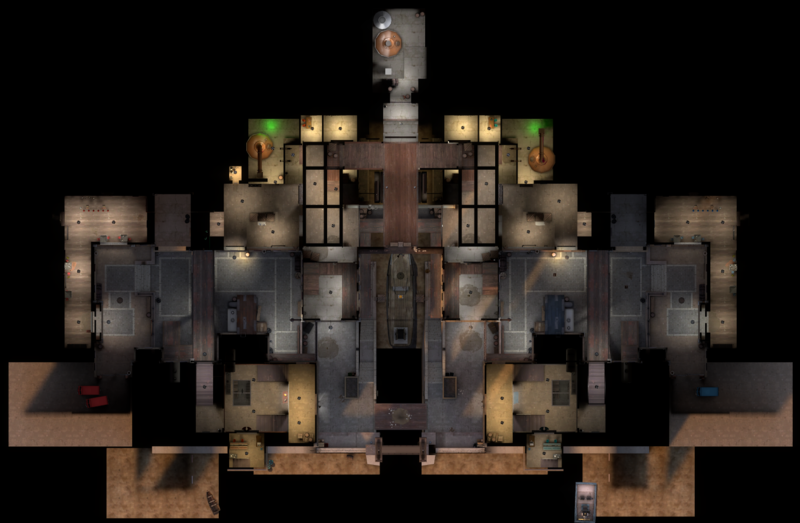
1 Open Alley 2 Catwalk 3 Gatehouse 4 Dropoff 5 Central Corridors 6 Cellars (Entrance) 7 Sewers 8 Overhead Bar (Above)/Central Sewer (Below) 9 Dilapidated Boat 10 Overhead Catwalks A RED spawn B BLU spawn
|
Arena
Badlands (Arena)
Lolimsogreat21's version
| Badlands (Arena) - Locations |
|---|
|
Mouseover the markers to see the name of the location
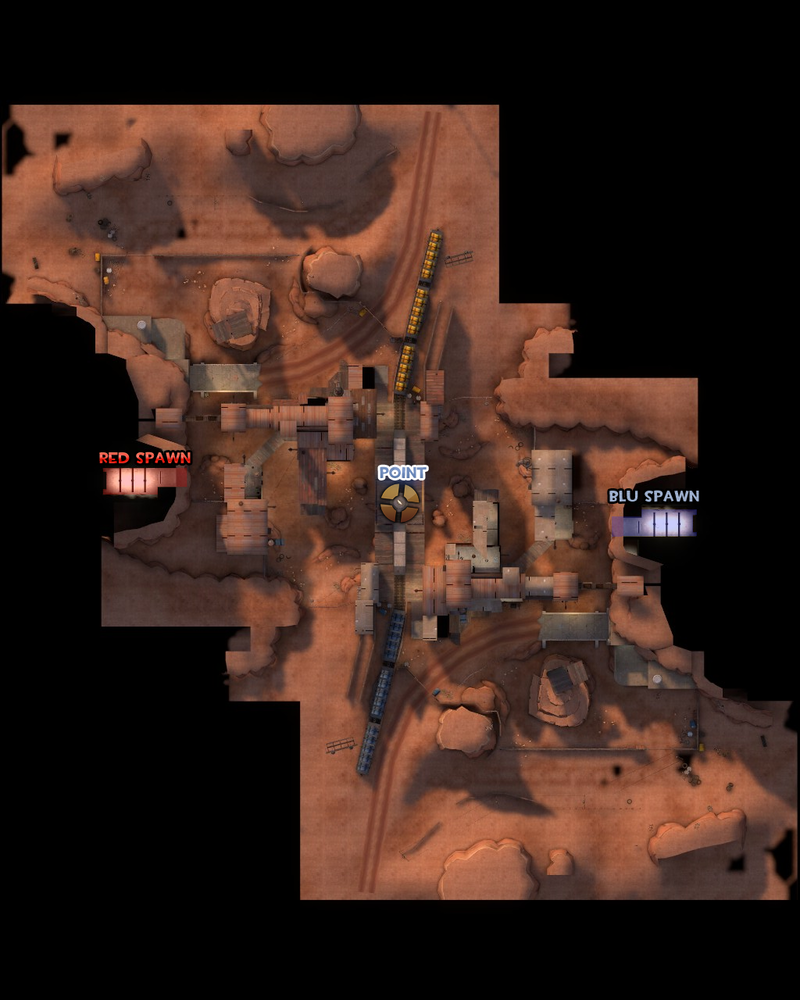
1 Closet 2 Rail Cars 3 Bridge 4 Pillars 5 House 6 Valley 7 Well 8 Spire (Blocked off)
|
Byre
Lolimsogreat21's version
| Byre - Locations |
|---|
|
Mouseover the markers to see the name of the location
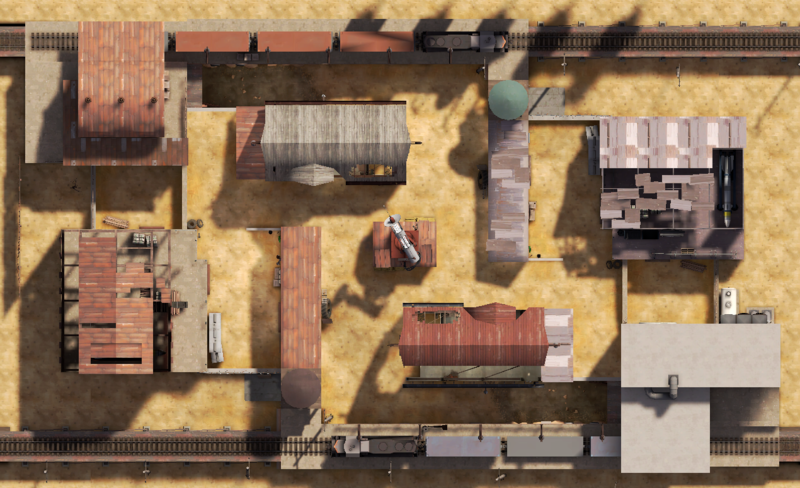
1 Ditch 2 Tool Barn 3 Tool Shed 4 Death ray A RED spawn B BLU spawn
|
Granary (Arena)
Lolimsogreat21's version
| Granary (Arena) - Locations |
|---|
|
Mouseover the markers to see the name of the location
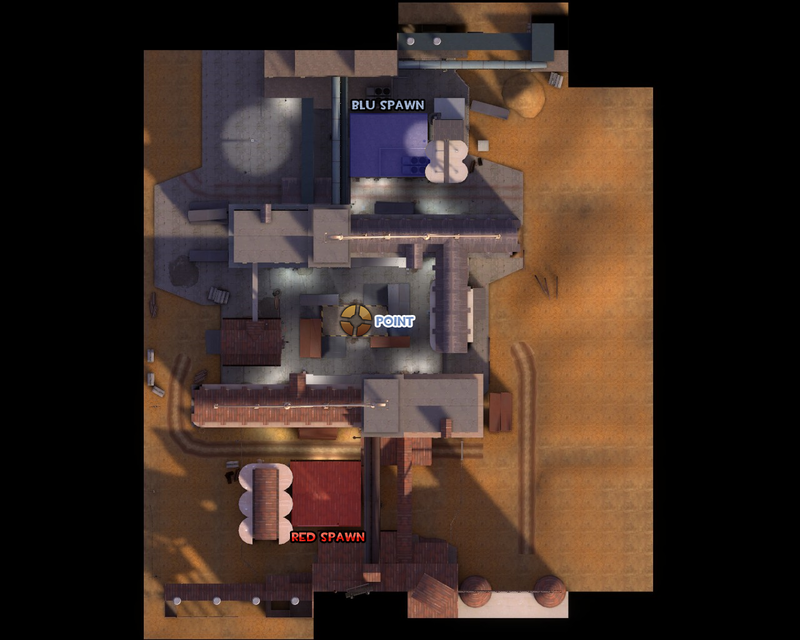
1 Ledge 2 Choke 3 Garage 4 Catwalks 5 Crates
|
Lumberyard
Lolimsogreat21's version
| Lumberyard - Locations |
|---|
|
Mouseover the markers to see the name of the location

1 Cliff Side 2 Central Building 3 Mountain Side
|
Graveyard
Lolimsogreat21's version
| Graveyard - Locations |
|---|
|
Mouseover the markers to see the name of the location
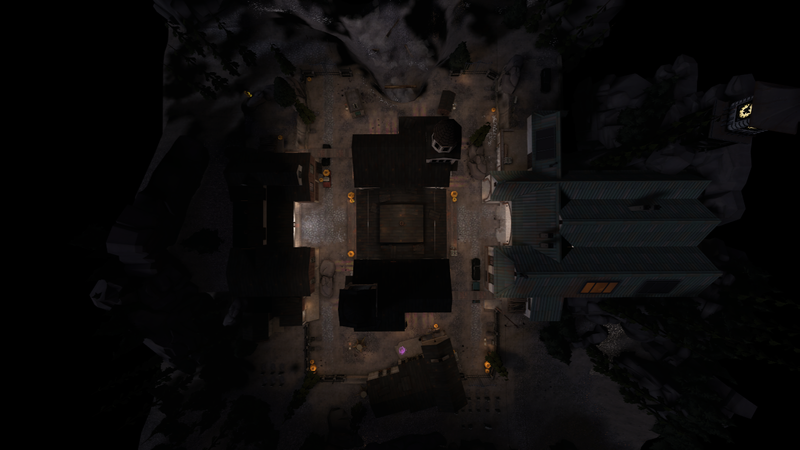
1 Cliff Side 2 Charnel Church 3 Mountain Side A RED spawn B BLU spawn
|
Nucleus (Arena)
Lolimsogreat21's version
| Nucleus (Arena) - Locations |
|---|
|
Mouseover the markers to see the name of the location
1 Perimiter 2 Roofs 3 Bridges 4 Flank buildings 5 Access Building
|
Offblast
Lolimsogreat21's version
| Offblast - Locations |
|---|
|
Mouseover the markers to see the name of the location
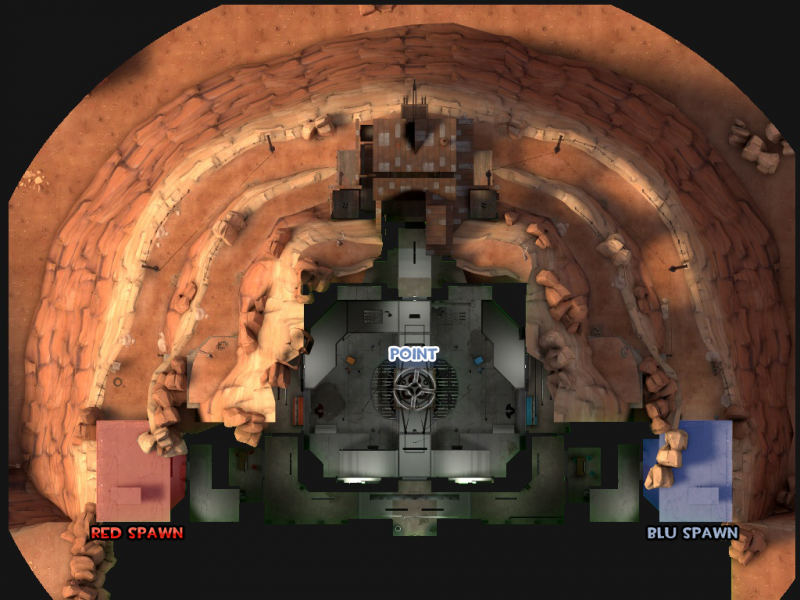
1 House 2 Cliff-Side 3 Top Floor 4 Main Floor 5 Top Floor
|
Ravine
Lolimsogreat21's version
| Ravine - Locations |
|---|
|
Mouseover the markers to see the name of the location
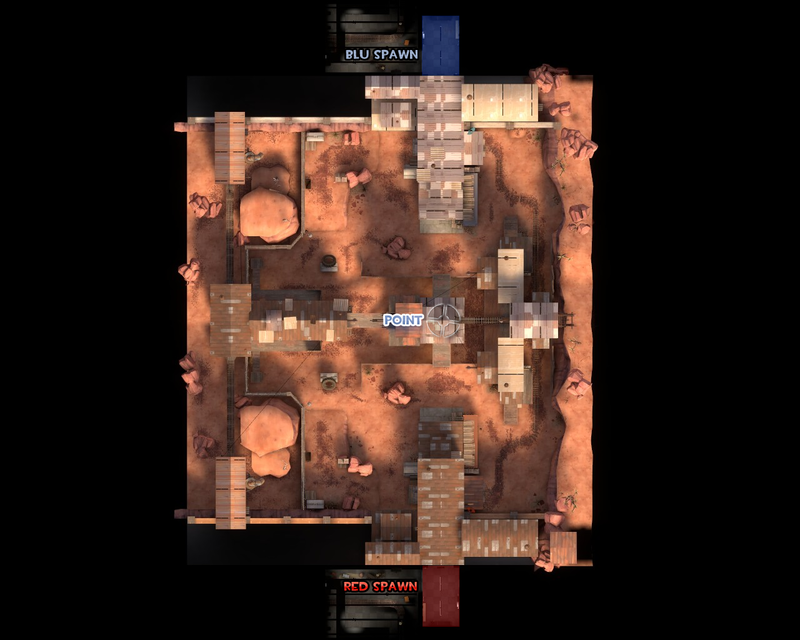
1 Yard 2 House 3 Shack 4 Well
|
Sawmill (Arena)
Lolimsogreat21's version
| Sawmill (Arena) - Locations |
|---|
|
Mouseover the markers to see the name of the location
1 Rooftops 2 Cave 3 Waterfall 4 Alcoves 5 Center Shed 6 Log Shed A RED spawn B BLU spawn
|
Watchtower
Lolimsogreat21's version
| Watchtower - Locations |
|---|
|
Mouseover the markers to see the name of the location
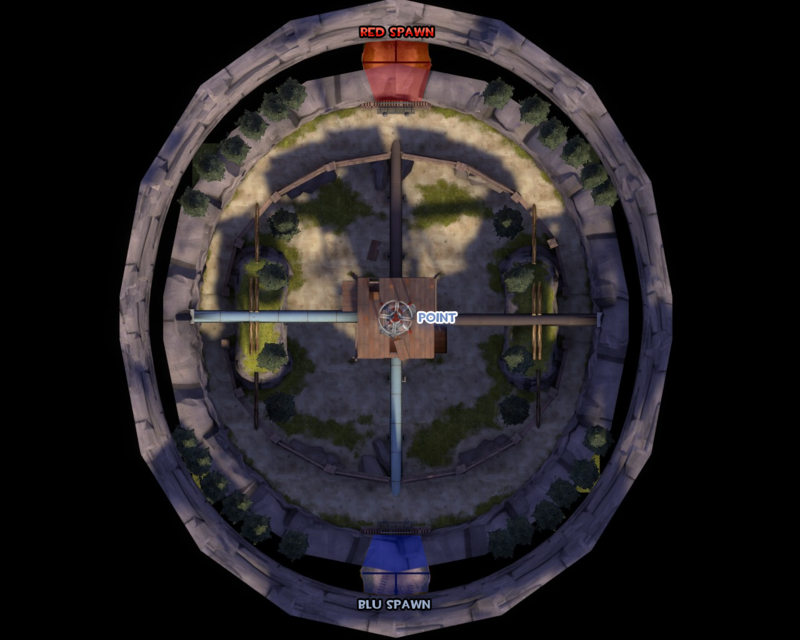
1 Tower Shack 2 Lower Pipe 3 Higher Pipe 4 Center Valley 5 External Ring
|
Well (Arena)
Lolimsogreat21's version
| Well (Arena) - Locations |
|---|
|
Mouseover the markers to see the name of the location
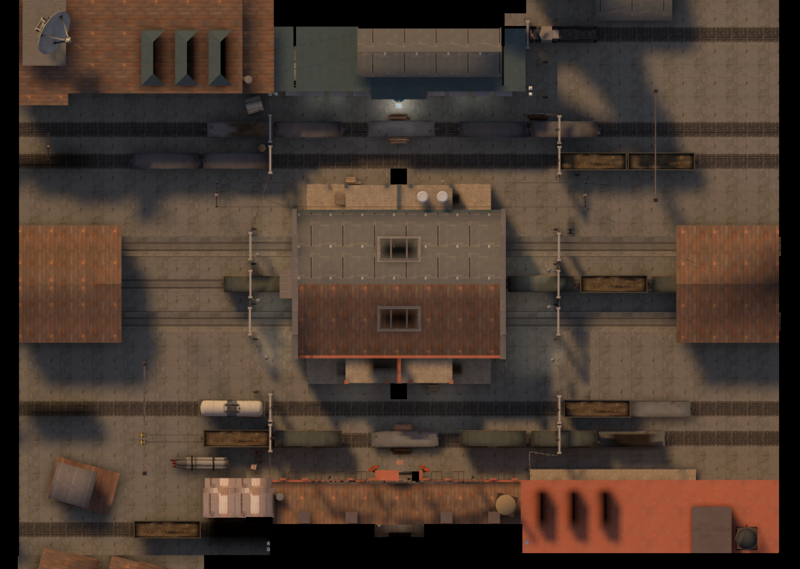
1 Boxcars 2 Waterways 3 Battlements 4 Train Rails 5 Catwalk A BLU spawn B RED spawn
|
MVM
Big Rock
Lolimsogreat21's version
| Big Rock - Locations |
|---|
|
Mouseover the markers to see the name of the location
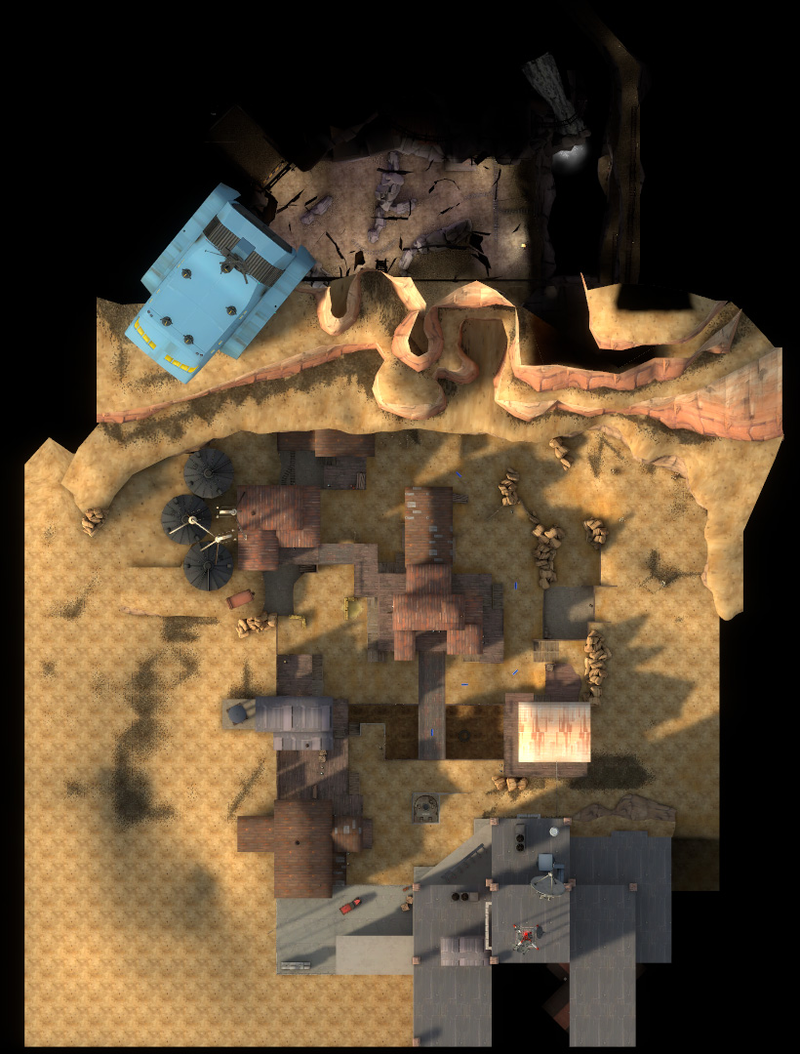
1 Left Catwalk 2 Center Bridge 3 Right Catwalk 4 Right Lane 5 Casali Shafting Co. 6 Left Lane 7 Entrance 8 Robot Cave A RED spawn B Robot spawn
C Tank spawn
|
Coal Town
Lolimsogreat21's version
| Coal Town - Locations |
|---|
|
Mouseover the markers to see the name of the location

1 Left Side Hotel 2 Mining Accident Simulator 3 Right Side Mann Mining 4 Right Lane 5 Salt Rock Interior 6 Rooftop 7 Left Lane A RED spawn B RED spawn
C Robot/Tank spawn
|
Ghost Town
Lolimsogreat21's version
| Ghost Town - Locations |
|---|
|
Mouseover the markers to see the name of the location
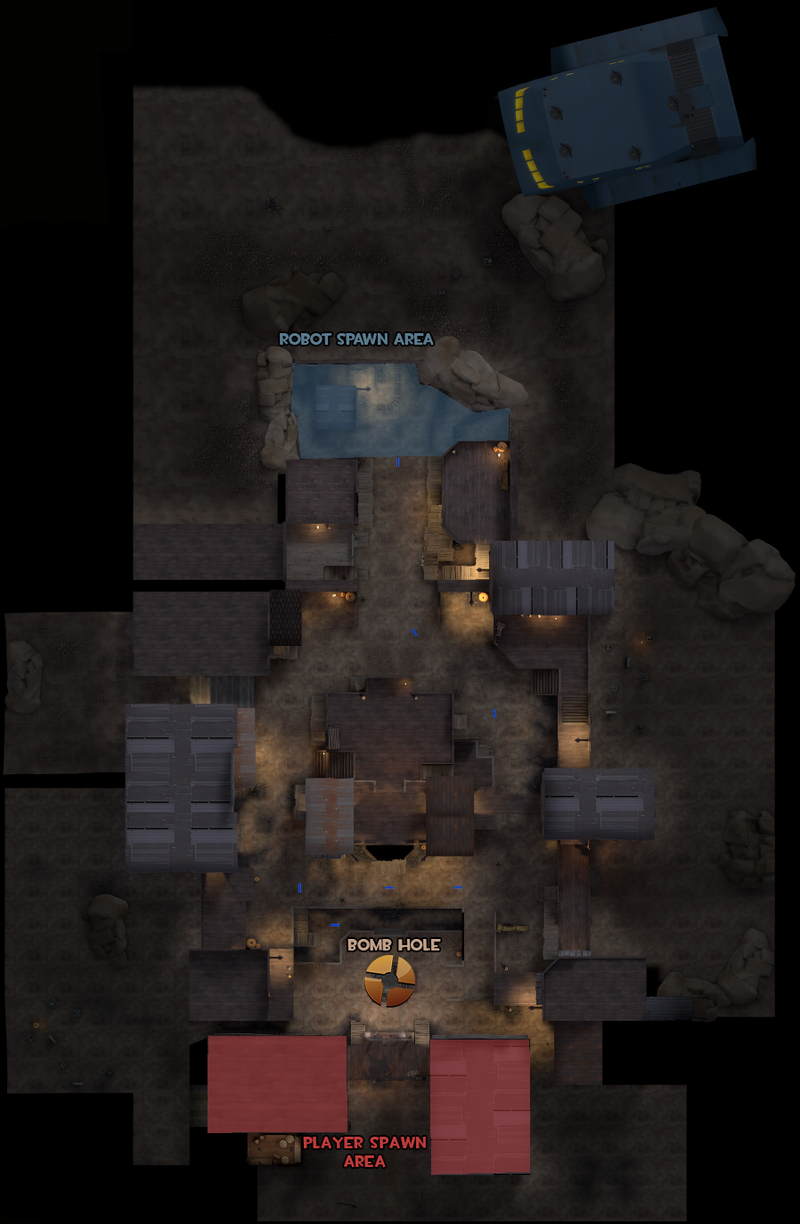
1 Left Side Hotel 2 Mining Accident Simulator 3 Right Side Mann Mining 4 Right Lane 5 Salt Rock Interior 6 Rooftop 7 Left Lane A RED spawn B RED spawn
C Robot/Tank spawn
|
Decoy
Lolimsogreat21's version
| Decoy - Locations |
|---|
|
Mouseover the markers to see the name of the location
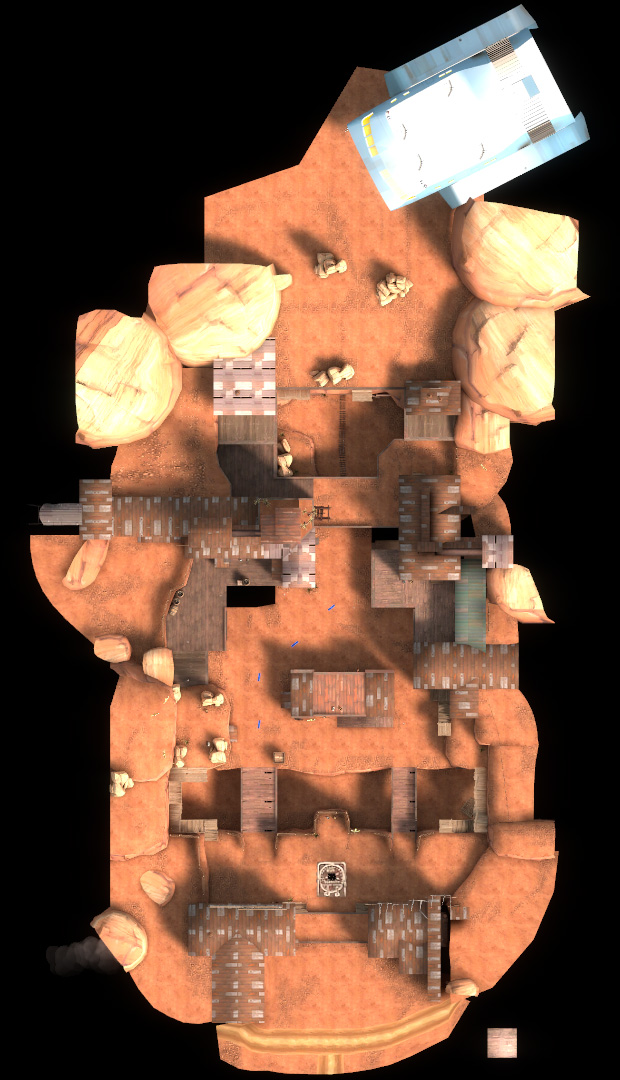
1 Mann Co. Hatch of Great Importance 2 Base Bridge 3 Base Bridge 4 Left Cliff 5 Center Structure 6 Right Structure 7 Structure Bridge 8 Left Structure A RED spawn B RED spawn
C Robot spawn
|
Rottenburg
Lolimsogreat21's version
| Rottenburg - Locations |
|---|
|
Mouseover the markers to see the name of the location
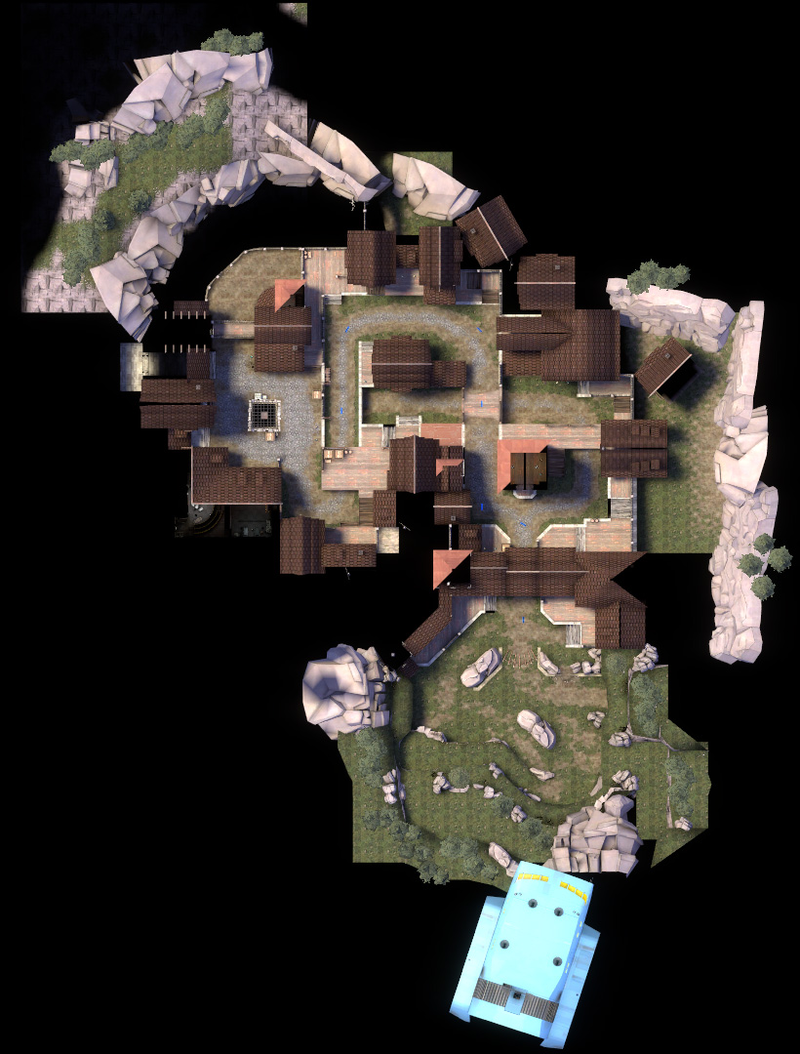
1 Hatch Area 2 Tank Path 3 Overhead Platform 4 Catwalks 5 Tunnel Entrance 6 Stone Tower 7 Pitchfork checkpoint 8 City Gates 9 Barricade 10 Field 11 Rightside Cliff A RED spawn B RED spawn
C Robot spawn D Robot/Tank spawn
|
Mannhattan
Lolimsogreat21's version
| Mannhattan - Locations |
|---|
|
Mouseover the markers to see the name of the location
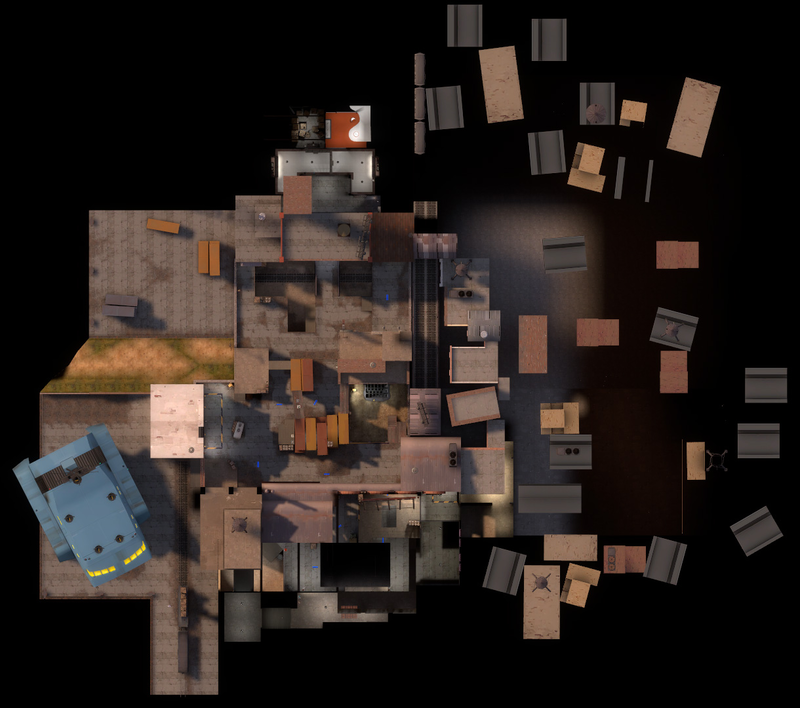
1 Warehouse 2 Shipping Containers 3 Grinder 4 Mannhattan Used Fireworks (And Repair) 5 Old Railway Ditch A Robot spawn #1 B Robot spawn #2
C Robot spawn #3 D RED spawn
|
Mannworks
Lolimsogreat21's version
| Mannworks - Locations |
|---|
|
Mouseover the markers to see the name of the location
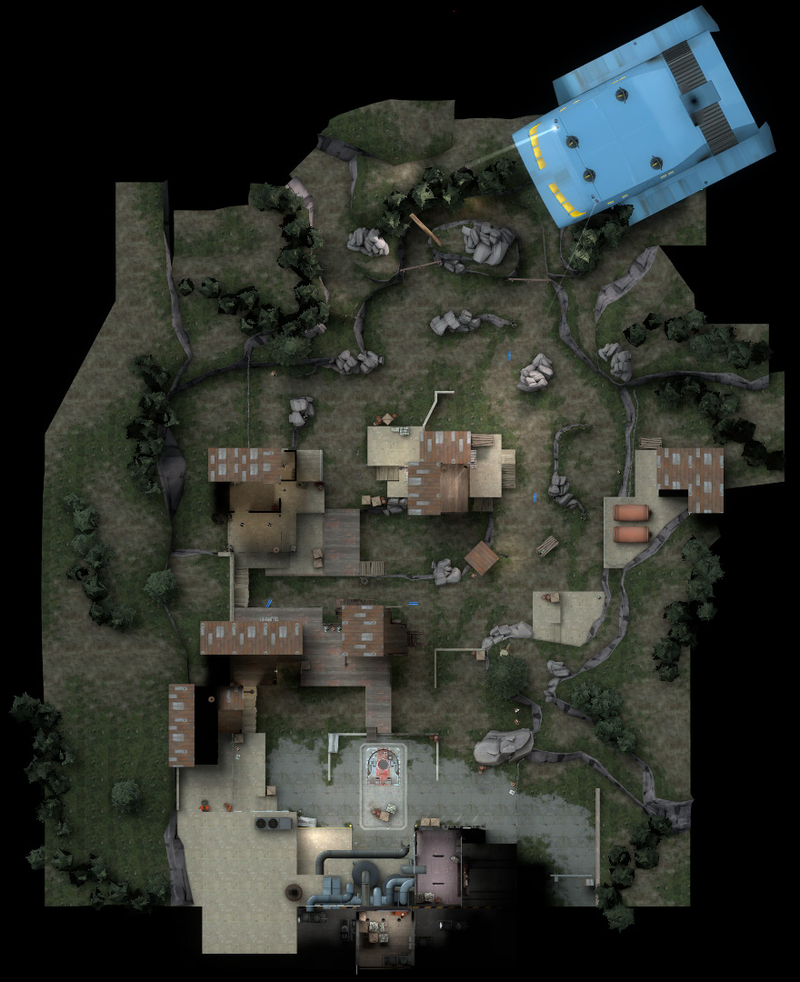
1 Central Hatch 2 Dual Structures 3 Red Structure 4 Center Structure 5 Valley A RED spawn B Robot spawn
|