Difference between revisions of "Team Fortress Wiki:April Fools' Day/2011/Demopan"
Benjamuffin (talk | contribs) m (→Primary) |
Benjamuffin (talk | contribs) m (→Secondary) |
||
| Line 45: | Line 45: | ||
{{main|Weapons}} | {{main|Weapons}} | ||
Note: Weapon damage is approximate and listed at base value. See individual weapon pages for additional figures. | Note: Weapon damage is approximate and listed at base value. See individual weapon pages for additional figures. | ||
| − | |||
| − | |||
| − | |||
| − | |||
| − | |||
| − | |||
| − | |||
| − | |||
| − | |||
| − | |||
| − | |||
| − | |||
| − | |||
| − | |||
| − | |||
| − | |||
| − | |||
| − | |||
| − | |||
| − | |||
| − | |||
| − | |||
| − | |||
| − | |||
| − | |||
| − | |||
| − | |||
| − | |||
| − | |||
| − | |||
| − | |||
| − | |||
| − | |||
| − | |||
| − | |||
| − | |||
| − | |||
| − | |||
| − | |||
| − | |||
| − | |||
| − | |||
| − | |||
| − | |||
| − | |||
| − | |||
| − | |||
| − | |||
| − | |||
| − | |||
| − | |||
| − | |||
| − | |||
| − | |||
| − | |||
| − | |||
| − | |||
| − | |||
| − | |||
| − | |||
| − | |||
| − | |||
| − | |||
| − | |||
| − | |||
| − | |||
| − | |||
| − | |||
| − | |||
| − | |||
| − | |||
| − | |||
| − | |||
| − | |||
| − | |||
| − | |||
| − | |||
| − | |||
| − | |||
| − | |||
| − | |||
| − | |||
| − | |||
| − | |||
===Melee=== | ===Melee=== | ||
Revision as of 06:13, 8 January 2011
| April Fools' Day/2011 | |
|---|---|

| |
| Basic Information | |
| Icon: | 40px |
| Type: | Defensive |
| Health: | 175 / 260 150 / 225 with the Eyelander or HHHH equipped 210 / 315 with the Eyelander or HHHH fully charged 160 / 240 with the Claidheamh Mòr equipped |
| Speed: | 93% 79% with the Scotsman's Skullcutter equipped 123% with the Eyelander or HHHH fully charged |
| “ | One crossed wire, one wayward pinch of potassium chlorate, one errant twitch...and kablooie!
Click to listen
— The Demoman
|
” |
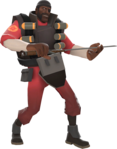
A scrumpy-swilling drunken demolitions expert from the Scottish highlands, the Demoman (real name Tavish DeGroot) is one of the more versatile members of the team. Though his weapons lack pinpoint long-range accuracy, the Demoman is a powerful (if unpredictable) asset, and can hold his own in just about any situation. He is a master of explosives, excelling at indirect, mid-range combat. Armed with his Grenade Launcher and Sticky bombs, the Demoman uses his only good eye and knowledge of the surrounding environment for well-timed detonations that send enemies skyward.
The Demoman excels at swift disassembly; he can bounce his grenades in creative angles to wreak havoc on enemy Sentry Gun emplacements while remaining safely out of sight. His sticky bombs are a perfect tool for area denial, and are effective in keeping opponents away from any carts, control points and Intelligence cases he deems off-limits.
The Demoman is voiced by Gary Schwartz.
Contents
Bio
|
Basic Strategy
Main articles: Demopan tips, Demopan strategy
- Hit MOUSE1 to attack with your Frying Pan, then MOUSE2 to offer your Stout Shako for two Refined Metal.
- With the Frying Pan, the longer you hold down the fire button, the more hats you equip at once.
- Throw the Frying Pan beneath your feet to ‘Demopan-jump' up to great heights.
- Hide your many hats inside walls and ceilings where they're hard to phish.
Weapons
Note: Weapon damage is approximate and listed at base value. See individual weapon pages for additional figures.
Melee
| Weapon | Kill Icon | Ammo Loaded |
Ammo Carried |
Damage Range | Notes / Special Abilities |
|---|---|---|---|---|---|
Stock Bottle |
N/A | N/A | Base: 65
Crit: 195 |
| |
Unlock / Craft / Drop Eyelander |
N/A | N/A | Base: 65
Crit: 195 |
| |
Craft / Drop / Uncrate Pain Train |
N/A | N/A | Base: 65
Crit: 195 |
| |
Craft / Drop Scotsman's Skullcutter |
N/A | N/A | Base: 78
Crit: 234 |
| |
Promotional Frying Pan |
N/A | N/A | Base: 65
Crit: 195 |
Promotional item from Left 4 Dead 2: The Sacrifice. | |
Craft Horseless Headless Horsemann's Headtaker |
N/A | N/A | Base: 65
Crit: 195 |
Halloween item. | |
Craft / Drop / Uncrate Claidheamh Mòr |
N/A | N/A | Base: 65
Crit: 195 |
| |
Craft / Drop Ullapool Caber |
N/A | N/A | Base: 35 (149) 1
Crit: 105 (300) 1 |
|
1 Explosion damage is determined by the distance from the explosion.
Taunt attack
 |
Associated item | Description | Kill Icon |
|---|---|---|---|
See also: Decapitation
The Demoman swings his sword around, slashes in front of him, then cleans the blade with his hand. |
|
Item sets
| The Expert's Ordnance | |
|---|---|
|
|
| Effect |
No effect |
- Wearing the Chargin' Targe with The Expert's Ordnance will only give the Demoman 55% Fire Damage Resistance instead of 60% because 50% of 100 is 50% (Chargin' Targe) and 10% of the remaining 50% is 5% (The Expert's Ordnance), which will add up to 55%.
- Wearing the Sticky Jumper with The Expert's Ordnace will only give the Demoman 80% Fire Damage Vulnerability instead of 90% because 100% plus 100% (Sticky Jumper) is 200% and 10% of the resulting 200% is 20% (The Expert's Ordnance), which will add up to 180% Fire Damage = +80%.
Hats
| |||||||||||||||||||||||||||||||||||||||||||||||||||||||||||||||||||||||||||||||||||||||||||||||||||||||||||||||||||||||||||||||||||||||||||
Official class avatars
| Official class avatars | ||
|---|---|---|
| Original set | RED ÜberCharged set | BLU ÜberCharged set |
| 128px | 128px | 128px |
| Get TF2 avatars on Steam: Original | ||
Achievements
 |
Main article: Demoman achievements
|
Bugs
- If you die while holding a sticky bomb launcher, and before you respawn you change it to the Chargin' Targe, you will appear to be holding an invisible bottle on respawn. This invisible bottle cannot attack. To fix this, just switch to a new weapon.
Trivia
- The Heavy and the Demoman are both voiced by Gary Schwartz.
- The beta prototype of the Demoman was supposed to have a stereotypically Scottish appearance, consisting of pale skin, red hair and a beard. It was later dropped for the actual black Scottish style both because the former lacked originality and because the latter was easier to differentiate from the other classes.
- The HUD icon of the Demoman is inverted horizontally, as he is depicted as left-handed. The Demoman's eye patch is also on the wrong eye.
- The WAR!: The Demoman lost the seven-day War waged between him and the Soldier, thus losing out on his chance to obtain the Gunboats.
- He was a part of the KritzKast contest as well, in which contestants submitted what they thought the Demoman says in the censored portion of the Meet the Demoman.
- The emblem on the Demoman's arm was originally a bomb, then later changed to a stick of dynamite, and is currently a sticky bomb, as of November 19, 2010.
- In Template:W, an image of the RED Demoman makes a cameo as the Jack card for the red suits (hearts and diamonds) in the "TF2" card deck.
- The Demoman's eyepatch and beanie make an appearance in Template:W as one of the hats selectable hat for the player's worms.
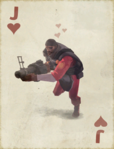
The Demoman playing card
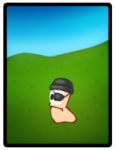
The Demoman's eyepatch and beanie as a selectable Worms: Reloaded worm hat


Related Merchandise
- Merch Demoman shirt.png


Reference
- ↑ a b Team Fortress 2 Trailer 2, released in September 2006.
See also
- Meet the Demoman
- Demoman match-ups
- Anti-Demoman Strategy
- Demoman taunts
- Demoman marketing poses
- Demoman responses
- Demoman voice commands
- Sticky jump
- Juggling
- Basic Demoman strategy
- Community Demoman strategy
- List of references (Demoman)
- Demoman (Classic)
- Merchandise
External links
- WAR! Update
- WAR! Update - The Demoman Update
- The Demoman comic
- TF2 Official Blog - A Grim Bloody Fable!
- TF2 Official Blog - Attention Employees...
- TF2 Official Blog - The War Update!
- TF2 Official Blog - It's a Bloodbath!
- TF2 Official Blog - War, Day 2
- TF2 Official Blog - Casualties of War!
| |||||
| ||||||||||||||||||||||||||||||||||||||||