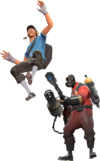
The Pyro is a relatively bulky class that excels at close range combat, particularly in confined areas where his Flamethrower is difficult to avoid. Due to the Flamethrower’s wide damage spread, the Pyro can focus more on outmaneuvering his opponents and has more leeway when fighting at close range. Additionally, the Pyro has access to the compression blast, a powerful source of utility that allows him to forcibly reposition enemies or reflect projectiles. The overall theme of the Pyro’s available weapons is close range power; because he lacks strong ranged weaponry, he is most vulnerable when distant from enemies or when in open areas.
General
 Role Role
|
- The Pyro finds success in ambushing opponents rather than approaching them head-on. Be aware of your surroundings; take note of what available routes he can take to ambush you.
|
 Health Health
|
- The Pyro has an above average amount of health and can be a hassle to take down if allowed to enter close range.
|
 Speed Speed
|
- Although the Pyro is relatively bulky, he only travels at the standard movement speed and is susceptible to being kited or even defeated before he gets too close.
|
 Power Power
|
- The Pyro is strong at close range but has very weak long range weaponry. Keeping your distance will prevent much of the Pyro's possible damage.
|
Weapon-specific
Primary weapons
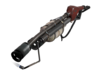
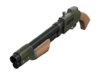
Flame Thrower + reskins
|
- It is very difficult to escape the Pyro's Flame Thrower once caught, so take note of routes he can take so that you can repel him before he reaches you.
- If you can't escape the Pyro, try to weaken him for your teammates.
- Extinguish yourself as soon as possible once he sets you on fire to reduce afterburn damage.
- Remember where medkits and bodies of water are located or stay close to friendly Pyros and Medics who can reliably extinguish you.
|
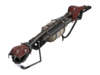
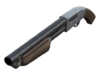
Backburner + reskins
|
- Watch your surroundings at all times to reduce the chances of a successful ambush by any Pyro.
- Never turn your back on a Pyro using the Backburner.
- The Backburner uses much more ammunition for compression blasts; forcing a Pyro to reflect projectiles with it will quickly deplete the weapon's ammo. Knowing this, a Backburner user will use their compression blast less often.
|
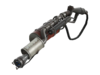
Degreaser
|
- The Degreaser allows a Pyro to quickly switch weapons. This makes weapon heckling ineffective.
- The Degreaser is not as strong as the Flamethrower; a Pyro may choose to finish you off with another weapon. Use the appropriate counter-measures for his secondary and melee weapons.
- Popular combinations include using the Reserve Shooter or Axtinguisher alongside the Degreaser.
|
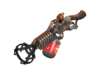
Phlogistinator
|
- The Phlogistinator promotes an aggressive playstyle. Don't allow the Pyro to easily enter close range or he will quickly fill his "Mmmph" meter.
- While a Pyro is taunting to activate the Phlogistinator's ability, he remains immobile. You can prepare for his attempted rampage by having your team focus fire him.
- Individually, class-specific methods for preparing include laying a carpet of Stickybombs, charging the Sniper Rifle, and getting into position for the Knife's backstab.
- The Phlogistinator has no compression blast, so you can freely use rockets, grenades, and other projectiles against it without fear of them being reflected.
|
Compression Blast
|
- The compression blast's most obvious use is to shove you into stage hazards, such as bottomless pits, or into corners and the air, where you are easier to target. Stay away from areas where a Pyro can easily pin you down or push you off.
- The compression blast can reflect projectiles; use bullets or fire your projectiles away from the Pyro's line of sight to reduce the chances of being struck by a reflected one.
- While the compression blast can reflect projectiles, there is a small cooldown time. Try overwhelming a Pyro with more projectiles than he can reflect.
- The compression blast uses a significant amount of ammunition; if you can trick the Pyro into wasting compression blasts, his offense will be diminished.
|
Secondary weapons
Shotgun + reskins
|
- The Shotgun is the Pyro's best secondary weapon against foes just outside the Flamethrower's range. Maintain a wide distance from Pyros to reduce the effectiveness of both their primary and this weapon.
|
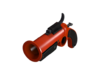
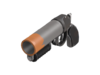
Flare Gun + reskins
|
- The Flare Gun's projectiles should be easy to avoid in open areas, even at close range, as long as your movement is difficult to predict.
- The Flare Gun's projectiles deal guaranteed critical hits to burning enemies. If you are set on fire from a distance, extinguish yourself before re-engaging the Pyro. If lit up close, move erratically to reduce a Pyro's chance of finishing you off with this weapon.
|
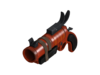
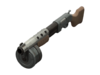
Detonator
|
- The Detonator functions similarly to the Flare Gun, but its flares can be remotely triggered by the Pyro to explode, creating a small blast that can ignite multiple targets. Stay scattered from your teammates to minimize the possible splash damage.
- Detonator flares only deal mini-crits to burning players, making it less effective at finishing enemies off.
- A Pyro can use the Detonator to perform a small Flare Jump. Stay aware of all possible routes that the Pyro can take to reach you.
|
Reserve Shooter
|
- The Reserve Shooter is capable of landing mini-crits on airborne targets, even if the target is simply jumping. A Pyro will typically combine compression blasts with this weapon in order to land guaranteed mini-crits.
- The Reserve Shooter's reduced magazine size makes the Pyro far less effective at anywhere outside close range, especially since the Pyro's only way to force an enemy into the air is the compression blast.
|

Manmelter
|
- The Manmelter has unlimited ammunition and faster projectiles, making it more effective at continuous long-range harassment. Keep moving and remain near sources of healing to reduce this weapon's effectiveness.
- The Manmelter's projectiles cannot deal increased damage to burning players, making it less effective at finishing foes off. A Pyro will likely engage you with his Flamethrower instead.
- Try to avoid allowing a Pyro using the Manmelter to be in the vicinity of burning teammates; every teammate extinguished with the weapon earns it critical hits the Pyro can later use against you and your team.
|
Scorch Shot
|
- The Scorch Shot can ignite multiple targets with one hit. Don't stay clustered, even when away from enemies.
- The Scorch Shot's main draw is how its flares can knock enemies back; the knock back increases if you already are on fire. Don't idle while crossing places with long falls or other environmental hazards.
- The Scorch Shot focuses on keeping enemies on fire rather than finishing them off. Remember where you can find healing to negate afterburn.
|
Panic Attack
|
- If you are chasing a weakened Pyro, know that he may silently load the Panic Attack as a last resort.
|
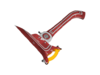
Melee weapons
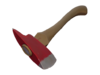
Fire Axe + reskins
|
- Most of the Pyro's alternate melee weapons outclass the Fire Axe in terms of utility, since the Pyro is already fighting at melee range with the Flamethrower.
- A Pyro attempting to use the Fire Axe in standard combat is likely out of Flamethrower ammunition; steal all nearby sources of ammo to prevent him from collecting more.
|
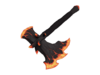
Axtinguisher + reskins
|
- The Axtinguisher is usually used alongside any fiery weaponry to quickly slay most classes. Keep vigilant to avoid being ambushed.
- Equipping the Degreaser or the Reserve Shooter allows a Pyro to switch to and attack with the Axtinguisher almost immediately. Repel the Pyro before he closes the gap.
- When burning, keep facing the Pyro to increase your chances of survival. The Axtinguisher deals only mini-crits from the front.
|
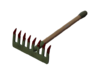
Homewrecker + reskins
|
- Pyros equipped with the Homewrecker often watch over their team's buildings, protecting them from Spies. This duty can leave them more susceptible to attacks from long distances.
- Spies will have increased difficulty sapping buildings that are guarded by a Pyro equipped with the Homewrecker. Coordinate with teammates to distract or eliminate the Pyro.
- Buildings should not be left unattended, as even just the Pyro's Flamethrower is fast enough at destroying them.
|
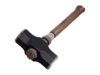
Powerjack
|
- The Powerjack grants the Pyro bonus movement speed while it is active, allowing him to outrun every class except the Scout.
- The Powerjack makes the Pyro take 20% more damage. If you catch him moving between areas with it out, you can get in free extra damage.
- In combat, the Pyro will usually switch to the Powerjack to finish you off and regain some health. The damage vulnerability it gives the Pyro gives you a chance to fend him off yourself.
|
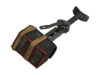
Back Scratcher
|
- Engage a Pyro wielding the Back Scratcher from a distance, as you will more likely lose in close combat.
- The Back Scratcher gives a Pyro that roams alone increased healing from medkits. Try to steal any nearby medkits.
|
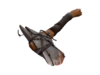
Sharpened Volcano Fragment
|
- A Pyro may use the Sharpened Volcano Fragment to conserve Flamethrower ammo, or as a last resort for lighting enemies ablaze. Regardless, never let the Pyro come close enough to reach you with the weapon.
|
Third Degree
|
- A Medic and his healing target should consider temporarily breaking off contact when approached by Pyro using the Third Degree to minimize the damage dealt.
- The Flamethrower is arguably more effective than the Third Degree when it comes to attacking a Medic and his patient. Either way, beware of possible ambushes.
|
Neon Annihilator
|
- A Pyro may try to finish you off with the Neon Annihilator if you are soaked. Keeping your distance remains a sound strategy.
- Beware fighting Scouts (who throw Mad Milk) and Snipers (who throw Jarate) in enemy territory; they may give opportunities to a Pyro trying to ambush you with the Neon Annihilator.
- The Neon Annihilator gives the Pyro one strong underwater weapon to use alongside his Shotgun. As when above land, keep a distance to minimize his effectiveness.
|
See also
 Pyro Pyro |
|---|
| | Weapons |
Primary | | | Secondary | | | Melee |
Fire Axe ( Frying Pan, Saxxy, Conscientious Objector, Freedom Staff, Bat Outta Hell, Memory Maker, Ham Shank, Golden Frying Pan, Necro Smasher, Crossing Guard, Prinny Machete) · Axtinguisher ( Postal Pummeler) · Homewrecker ( Maul) · Powerjack · Back Scratcher · Sharpened Volcano Fragment · Third Degree · Lollichop · Neon Annihilator · Hot Hand | | | | | | |
| | | Abilities | | | | Cosmetics | | | | Item sets | | | | Special taunts | | | | Achievements | | | | Character | | | | Strategy | | | | Other | |
|

