Difference between revisions of "Spectral Halloween Special"
(update) |
BrazilianNut (talk | contribs) m (→Additions) |
||
| Line 23: | Line 23: | ||
{{main|Weapons}} | {{main|Weapons}} | ||
{| class="wikitable" cellpadding=2 style="text-align:center;" | {| class="wikitable" cellpadding=2 style="text-align:center;" | ||
| − | | style="background: #6A5587 | + | | width="70px" style="background:#6A5587;" | '''{{class link|All Classes|br=yes|color=white}}''' |
| − | | | + | | style="background: #AD9DC3;" | {{item icon|Bat Outta Hell|80px}} |
| style="background: #F1ECF7;" | '''{{item link|Bat Outta Hell}}'''<sup>†</sup> | | style="background: #F1ECF7;" | '''{{item link|Bat Outta Hell}}'''<sup>†</sup> | ||
|- | |- | ||
| Line 34: | Line 34: | ||
{{main|Halloween Costumes}} | {{main|Halloween Costumes}} | ||
{| class="wikitable collapsible" cellpadding="2" style="text-align:center;" | {| class="wikitable collapsible" cellpadding="2" style="text-align:center;" | ||
| − | | width="70px" style="background:#6A5587;" rowspan="3" | {{ | + | | width="70px" style="background:#6A5587;" rowspan="3" | '''{{class link|Heavy|br=yes|color=white}}''' |
| − | | style="background:#E8E2F0;" rowspan="3" | ''' | + | | style="background:#E8E2F0;" rowspan="3" | '''{{item link|Grand Duchess}}'''<br/> |
| − | | | + | | style="background: #AD9DC3;" | {{icon item|Grand Duchess Tiara|80px}} |
| style="background: #F1ECF7;" | '''{{item link|Grand Duchess Tiara}}''' | | style="background: #F1ECF7;" | '''{{item link|Grand Duchess Tiara}}''' | ||
|- | |- | ||
| Line 50: | Line 50: | ||
{{main|Cosmetic items}} | {{main|Cosmetic items}} | ||
{| class="wikitable collapsible" cellpadding="2" style="text-align:center;" | {| class="wikitable collapsible" cellpadding="2" style="text-align:center;" | ||
| − | | width="60px" style="background: #6A5587;" rowspan="2" | {{ | + | | width="60px" style="background: #6A5587;" rowspan="2" | '''{{class link|Scout|br=yes|color=white}}''' |
| − | | | + | | style="background: #AD9DC3;" | {{item icon|Spooky Shoes|80px}} |
| style="background: #F1ECF7;" | '''{{item link|Spooky Shoes}}''' | | style="background: #F1ECF7;" | '''{{item link|Spooky Shoes}}''' | ||
|- | |- | ||
| − | | | + | | style="background: #AD9DC3;" | {{icon item|Voodoo-Cursed Scout Soul|80px}} |
| style="background: #F1ECF7;" | '''{{item link|Voodoo-Cursed Scout Soul}}''' | | style="background: #F1ECF7;" | '''{{item link|Voodoo-Cursed Scout Soul}}''' | ||
|- | |- | ||
| − | | style="background:#6A5587;" rowspan="2"| {{ | + | | style="background:#6A5587;" rowspan="2" | '''{{class link|Soldier|br=yes|color=white}}''' |
| − | | | + | | style="background: #AD9DC3;" | {{icon item|Voodoo-Cursed Soldier Soul|80px}} |
| style="background: #F1ECF7;" | '''{{item link|Voodoo-Cursed Soldier Soul}}''' | | style="background: #F1ECF7;" | '''{{item link|Voodoo-Cursed Soldier Soul}}''' | ||
|- | |- | ||
| − | | | + | | style="background: #AD9DC3;" | {{icon item|Zipperface|66px}} |
| style="background: #F1ECF7;" | '''{{item link|Zipperface}}''' | | style="background: #F1ECF7;" | '''{{item link|Zipperface}}''' | ||
|- | |- | ||
| − | | style="background: #6A5587;" rowspan="4"| {{ | + | | style="background: #6A5587;" rowspan="4" | '''{{class link|Pyro|br=yes|color=white}}''' |
| − | | | + | | style="background: #AD9DC3;" | {{icon item|Coffin Kit|80px}} |
| style="background: #F1ECF7;" | '''{{item link|Coffin Kit}}''' | | style="background: #F1ECF7;" | '''{{item link|Coffin Kit}}''' | ||
|- | |- | ||
| − | | | + | | style="background: #AD9DC3;" | {{icon item|Plutonidome|80px}} |
| style="background: #F1ECF7;" | '''{{item link|Plutonidome}}''' | | style="background: #F1ECF7;" | '''{{item link|Plutonidome}}''' | ||
|- | |- | ||
| − | | | + | | style="background: #AD9DC3;" | {{icon item|Voodoo-Cursed Pyro Soul|80px}} |
| style="background: #F1ECF7;" | '''{{item link|Voodoo-Cursed Pyro Soul}}''' | | style="background: #F1ECF7;" | '''{{item link|Voodoo-Cursed Pyro Soul}}''' | ||
|- | |- | ||
| − | | | + | | style="background: #AD9DC3;" | {{icon item|Wraith Wrap|80px}} |
| style="background: #F1ECF7;" | '''{{item link|Wraith Wrap}}''' | | style="background: #F1ECF7;" | '''{{item link|Wraith Wrap}}''' | ||
|- | |- | ||
| − | | style="background:#6A5587;" rowspan="2"| {{ | + | | style="background:#6A5587;" rowspan="2" | '''{{class link|Demoman|br=yes|color=white}}''' |
| − | | | + | | style="background: #AD9DC3;" | {{icon item|Voodoo Juju (Slight Return)|80px}} |
| style="background: #F1ECF7;" | '''{{item link|Voodoo Juju (Slight Return)}}''' | | style="background: #F1ECF7;" | '''{{item link|Voodoo Juju (Slight Return)}}''' | ||
|- | |- | ||
| − | | | + | | style="background: #AD9DC3;" | {{icon item|Voodoo-Cursed Demoman Soul|80px}} |
| style="background: #F1ECF7;" | '''{{item link|Voodoo-Cursed Demoman Soul}}''' | | style="background: #F1ECF7;" | '''{{item link|Voodoo-Cursed Demoman Soul}}''' | ||
|- | |- | ||
| − | | style="background: #6A5587;" rowspan="1"| {{ | + | | style="background: #6A5587;" rowspan="1" | '''{{class link|Heavy|br=yes|color=white}}''' |
| − | | | + | | style="background: #AD9DC3;" | {{icon item|Voodoo-Cursed Heavy Soul|80px}} |
| style="background: #F1ECF7;" | '''{{item link|Voodoo-Cursed Heavy Soul}}''' | | style="background: #F1ECF7;" | '''{{item link|Voodoo-Cursed Heavy Soul}}''' | ||
|- | |- | ||
| − | | style="background: #6A5587;" rowspan="2"| {{ | + | | style="background: #6A5587;" rowspan="2" | '''{{class link|Engineer|br=yes|color=white}}''' |
| − | | | + | | style="background: #AD9DC3;" | {{icon item|Master Mind|80px}} |
| style="background: #F1ECF7;" | '''{{item link|Master Mind}}''' | | style="background: #F1ECF7;" | '''{{item link|Master Mind}}''' | ||
|- | |- | ||
| − | | | + | | style="background: #AD9DC3;" | {{icon item|Voodoo-Cursed Engineer Soul|80px}} |
| style="background: #F1ECF7;" | '''{{item link|Voodoo-Cursed Engineer Soul}}''' | | style="background: #F1ECF7;" | '''{{item link|Voodoo-Cursed Engineer Soul}}''' | ||
|- | |- | ||
| − | | style="background: #6A5587;" | {{ | + | | style="background: #6A5587;" | '''{{class link|Medic|br=yes|color=white}}''' |
| − | | | + | | style="background: #AD9DC3;" | {{icon item|Voodoo-Cursed Medic Soul|80px}} |
| style="background: #F1ECF7;" | '''{{item link|Voodoo-Cursed Medic Soul}}''' | | style="background: #F1ECF7;" | '''{{item link|Voodoo-Cursed Medic Soul}}''' | ||
|- | |- | ||
| − | | style="background: #6A5587;" rowspan="2"| {{ | + | | style="background: #6A5587;" rowspan="2" | '''{{class link|Sniper|br=yes|color=white}}''' |
| − | | | + | | style="background: #AD9DC3;" | {{icon item|Sir Hootsalot|80px}} |
| style="background: #F1ECF7;" | '''{{item link|Sir Hootsalot}}''' | | style="background: #F1ECF7;" | '''{{item link|Sir Hootsalot}}''' | ||
|- | |- | ||
| − | | | + | | style="background: #AD9DC3;" | {{icon item|Voodoo-Cursed Sniper Soul|80px}} |
| style="background: #F1ECF7;" | '''{{item link|Voodoo-Cursed Sniper Soul}}''' | | style="background: #F1ECF7;" | '''{{item link|Voodoo-Cursed Sniper Soul}}''' | ||
|- | |- | ||
| − | | style="background: #6A5587;" rowspan="2"| {{ | + | | style="background: #6A5587;" rowspan="2" | '''{{class link|Spy|br=yes|color=white}}''' |
| − | | | + | | style="background: #AD9DC3;" | {{icon item|Scarecrow|80px}} |
| style="background: #F1ECF7;" | '''{{item link|scarecrow}}''' | | style="background: #F1ECF7;" | '''{{item link|scarecrow}}''' | ||
|- | |- | ||
| − | | | + | | style="background: #AD9DC3;" | {{icon item|Voodoo-Cursed Spy Soul|80px}} |
| style="background: #F1ECF7;" | '''{{item link|Voodoo-Cursed Spy Soul}}''' | | style="background: #F1ECF7;" | '''{{item link|Voodoo-Cursed Spy Soul}}''' | ||
|- | |- | ||
| style="background: #6A5587; padding:0.5em 1em; width:90px;" | <div style="float:left; text-align:left; margin-top:-1em; margin-bottom:0.5em;"><!-- | | style="background: #6A5587; padding:0.5em 1em; width:90px;" | <div style="float:left; text-align:left; margin-top:-1em; margin-bottom:0.5em;"><!-- | ||
| − | --><br />{{ | + | --><br />'''{{class link|Scout|color=white}}'''<!-- |
| − | --><br />{{ | + | --><br />'''{{class link|Demoman|color=white}}'''<!-- |
| − | --><br />{{ | + | --><br />'''{{class link|Heavy|color=white}}'''<!-- |
| − | --><br />{{ | + | --><br />'''{{class link|Engineer|color=white}}'''<!-- |
| − | --><br />{{ | + | --><br />'''{{class link|Sniper|color=white}}'''</div> |
| − | | | + | | style="background: #AD9DC3;" | {{icon item|Spooky Sleeves|80px}} |
| style="background: #F1ECF7;" | '''{{item link|Spooky Sleeves}}''' | | style="background: #F1ECF7;" | '''{{item link|Spooky Sleeves}}''' | ||
|- | |- | ||
| style="background: #6A5587; padding:0.5em 1em; width:90px;" | <div style="float:left; text-align:left; margin-top:-1em; margin-bottom:0.5em;"><!-- | | style="background: #6A5587; padding:0.5em 1em; width:90px;" | <div style="float:left; text-align:left; margin-top:-1em; margin-bottom:0.5em;"><!-- | ||
| − | --><br />{{ | + | --><br />'''{{class link|Soldier|color=white}}'''<!-- |
| − | --><br />{{ | + | --><br />'''{{class link|Pyro|color=white}}'''<!-- |
| − | --><br />{{ | + | --><br />'''{{class link|Demoman|color=white}}'''</div> |
| − | | | + | | style="background: #AD9DC3;" | {{item icon|Bonedolier|80px}} |
| style="background: #F1ECF7;" | '''{{item link|Bonedolier}}''' | | style="background: #F1ECF7;" | '''{{item link|Bonedolier}}''' | ||
|- | |- | ||
| style="background: #6A5587; padding:0.5em 1em; width:90px;" | <div style="float:left; text-align:left; margin-top:-1em; margin-bottom:0.5em;"><!-- | | style="background: #6A5587; padding:0.5em 1em; width:90px;" | <div style="float:left; text-align:left; margin-top:-1em; margin-bottom:0.5em;"><!-- | ||
| − | --><br />{{ | + | --><br />'''{{class link|Soldier|color=white}}'''<!-- |
| − | --><br />{{ | + | --><br />'''{{class link|Pyro|color=white}}'''<!-- |
| − | --><br />{{ | + | --><br />'''{{class link|Medic|color=white}}'''<!-- |
| − | --><br />{{ | + | --><br />'''{{class link|Spy|color=white}}'''</div> |
| − | | | + | | style="background: #AD9DC3;" | {{icon item|Exorcizor|80px}} |
| style="background: #F1ECF7;" | '''{{item link|Exorcizor}}''' | | style="background: #F1ECF7;" | '''{{item link|Exorcizor}}''' | ||
|- | |- | ||
| − | | | + | | style="background: #6A5587;" rowspan="8" | '''{{class link|All Classes|br=yes|color=white}}''' |
| − | | | + | | style="background: #AD9DC3;" | {{item icon|Boo Balloon|80px}} |
| style="background: #F1ECF7;" | '''{{item link|Boo Balloon}}''' | | style="background: #F1ECF7;" | '''{{item link|Boo Balloon}}''' | ||
|- | |- | ||
| − | | | + | | style="background: #AD9DC3;" | {{icon item|Crone's Dome|80px}} |
| style="background: #F1ECF7;" | '''{{item link|Crone's Dome}}''' | | style="background: #F1ECF7;" | '''{{item link|Crone's Dome}}''' | ||
|- | |- | ||
| − | | | + | | style="background: #AD9DC3;" | {{item icon|Dead Little Buddy|80px}} |
| style="background: #F1ECF7;" | '''{{item link|Dead Little Buddy}}''' | | style="background: #F1ECF7;" | '''{{item link|Dead Little Buddy}}''' | ||
|- | |- | ||
| − | | | + | | style="background: #AD9DC3;" | {{icon item|Executioner|80px}} |
| style="background: #F1ECF7;" | '''{{item link|Executioner}}''' | | style="background: #F1ECF7;" | '''{{item link|Executioner}}''' | ||
|- | |- | ||
| − | | | + | | style="background: #AD9DC3;" | {{icon item|Ghostly Gibus|80px}} |
| style="background: #F1ECF7;" | '''{{item link|Ghostly Gibus}}''' | | style="background: #F1ECF7;" | '''{{item link|Ghostly Gibus}}''' | ||
|- | |- | ||
| − | | | + | | style="background: #AD9DC3;" | {{item icon|Rump-o'-Lantern|80px}} |
| style="background: #F1ECF7;" | '''{{item link|Rump-o'-Lantern}}''' | | style="background: #F1ECF7;" | '''{{item link|Rump-o'-Lantern}}''' | ||
|- | |- | ||
| − | | | + | | style="background: #AD9DC3;" | {{icon item|Skull Island Topper|80px}} |
| style="background: #F1ECF7;" | '''{{item link|Skull Island Topper}}''' | | style="background: #F1ECF7;" | '''{{item link|Skull Island Topper}}''' | ||
|- | |- | ||
| − | | | + | | style="background: #AD9DC3;" | {{icon item|Unknown Monkeynaut|80px}} |
| style="background: #F1ECF7;" | '''{{item link|Unknown Monkeynaut}}''' | | style="background: #F1ECF7;" | '''{{item link|Unknown Monkeynaut}}''' | ||
| − | |||
|} | |} | ||
| Line 173: | Line 172: | ||
{| class="wikitable" cellpadding="2" style="text-align:center;" | {| class="wikitable" cellpadding="2" style="text-align:center;" | ||
|- style="height:20px; color: #FFF;" | |- style="height:20px; color: #FFF;" | ||
| − | ! style="background: #6A5587;" class="header" | | + | ! style="background: #6A5587;" class="header" | <span style="color:#FFF;"> Name |
| − | ! style="background: #6A5587;" class="header" | | + | ! style="background: #6A5587;" class="header" | <span style="color:#FFF;"> Picture |
| − | ! style="background: #6A5587;" class="header" | | + | ! style="background: #6A5587;" class="header" | <span style="color:#FFF;"> Game mode |
| − | ! style="background: #6A5587;" class="header" | | + | ! style="background: #6A5587;" class="header" | <span style="color:#FFF;"> File name |
|- | |- | ||
| style="background: #AD9DC3;" | '''[[Ghost Fort]]''' | | style="background: #AD9DC3;" | '''[[Ghost Fort]]''' | ||
| − | | | + | | style="background: #F1ECF7;" | [[File:Ghost Fort.png|200px|link=Ghost Fort]] |
| − | | style="background: #F1ECF7; | + | | style="background: #F1ECF7;" | '''[[King of the Hill]]'''<br/>[[File:Controlpoint.png|50px|link=King of the Hill]] |
| style="background: #F1ECF7;" | {{code|koth_lakeside_event}} | | style="background: #F1ECF7;" | {{code|koth_lakeside_event}} | ||
|- | |- | ||
| style="background: #AD9DC3;" | '''[[Ghost Town]]''' | | style="background: #AD9DC3;" | '''[[Ghost Town]]''' | ||
| − | | | + | | style="background: #F1ECF7;" | [[File:Mvm_coaltown_event.jpg|200px|link=Ghost Town]] |
| − | | style="background: #F1ECF7; | + | | style="background: #F1ECF7;" | '''[[Mann vs. Machine (game mode)|Mann vs. Machine]]'''<br/>[[File:Mvm_navicon.png|50px|link=Mann vs. Machine (game mode)]] |
| style="background: #F1ECF7;" | {{code|mvm_ghost_town}} | | style="background: #F1ECF7;" | {{code|mvm_ghost_town}} | ||
| − | |||
|} | |} | ||
Revision as of 20:48, 21 November 2019
| “ | In much the same way that most of the characters in the 1983 haunted elevator movie “The Lift” were warned – repeatedly - to take the stairs, we warned you that the frankly terrifying Scream Fortress Halloween event was coming. And now it’s here, and you’re scared, and you don’t have anyone to blame but yourself. This year, you’ll experience the tear-squirting terror of being trapped in a living nightmare with a vindictive ghost, just like everyone in M. Night Shyamalan’s epic of elevator haunting, “Devil”.
— TF2 Official Blog
|
” |
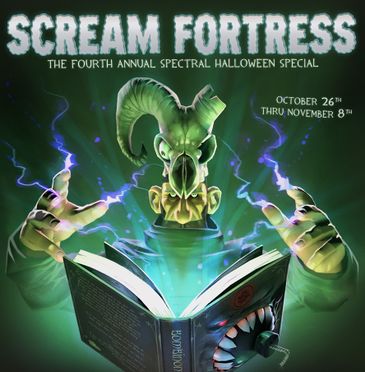
The Fourth Annual Spectral Halloween Special was the 2012 Halloween event, which included the new maps Ghost Town (a haunting of MVM Coal Town) and Ghost Fort (a haunted adaption of Lakeside that introduced Merasmus as a boss), new items, and two new Necromannchievements. The event also introduced Voodoo-Cursed Souls. Players that logged on during the event also received a Halloween Goodie Cauldron.
After three days of on-line teases, the event began with the October 26, 2012 Patch and concluded on November 8, 2012.
Contents
Timeline
On October 23, 2012, the head of the Spy portrait on the TF2 Official Blog was changed to resemble a skull. Clicking on the skull led to a hidden page, with a newspaper page titled "The Teufort Reader" reporting the theft of Voodoo-Cursed Items (later release into the game). The bottom of the newspaper is ripped, showing two cards with odd symbols.
The following day, October 24, a comic titled Doom-Mates was released. The comic details Merasmus' return home from his weekend at WizardCon, and his growing resentment towards the Soldier.
The next day, October 25, a page was posted that announced the event would begin the following day, October 26, and gave a link to the update page with all the info. It announced a new Mann vs. Machine mission called "Wave 666", where instead of fighting robots, the players fight zombies, and a new Halloween King of the Hill match (on koth_lakeside_event[1]) with Merasmus (with the Bombinomicon) as the boss. It added two new achievements and introduced Halloween Spells, which players can cast on other items in their backpack to give their items new effects, from shifting paint colors to flaming footsteps. Additionally, the Gift Drop system was changed; during the last two years, gifts spawned publicly and could be claimed by whoever arrived there first, while that year, players would receive private gift spawns that they can grab at their leisure.
Additions
Merasmus
Merasmus is a non-playable character wizard boss, who attacks both RED and BLU teams until he is slain. He has several attacks, including using the Bombinomicon to rain bombs around the Control Point. His health range varies from 50000 to around 100000, depending on the number of players in the server. Merasmus does not appear until ten or more players are present (not including spectators or bots).
Weapon
| Bat Outta Hell† | ||
| Notes | †Not available for the Engineer and the Spy. | |
Costume set
| The Grand Duchess |
Grand Duchess Tiara | ||
| Grand Duchess Fairy Wings | |||
| Grand Duchess Tutu |
Cosmetic items
Tools
Halloween Spells are single use tool items that are used to give various Halloween themed effects to weapons or hats depending on what spell it is. It should be noted that not only do the Spell Items expire on November 9th, but the spell effects upon other items expire on November 9th as well.
Maps
| Name | Picture | Game mode | File name |
|---|---|---|---|
| Ghost Fort | 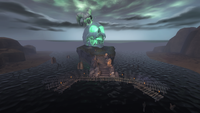
|
King of the Hill |
koth_lakeside_event
|
| Ghost Town | 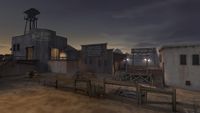
|
Mann vs. Machine |
mvm_ghost_town
|
Achievements
Necromannchievements
|
|


Trivia
- Several encoded messages appear on the update's pages, and they use Agathodaimon symbols.
- The first one, found on the Scout's card on the hidden page, translates to "Super Spped"(sic). The encoded message on the Heavy's card on the Spectral Halloween Special update page says "Small Head".
- On the Spectral Halloween Special update page, the first header says "Explo Capitus" while the second says "Barpo Kabalto".
Gallery
Spectral Halloween Special Update page.

The Spy as seen on the blog.
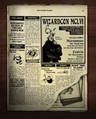
The hidden "Teufort Reader" page.


External links
References

| |||||
| |||||||||||||||||||||||||||||||||||||||||||||||||||||||||||||||||||||||||||||||||||||||||||||||