User:TheJosephWinchester/TFH3
 | “I built that.” This page contains information about a custom map that is not an officially released Team Fortress 2 map. All released Valve and Community-made TF2 maps can be found on the list of maps. |
| TheJosephWinchester | |
|---|---|

| |
| Basic Information | |
| Developer(s): | {{{map-developer}}} |
| Map Info | |
| Environment: | Город |
| Setting: | Ночь |
| Hazards: | Смертельная яма |
Casino City — это созданная сообществом карта Манн против Машин от BigfootBeto. Он представляет собой курортный город, с упором на азартные игры. Карта была разработана сообщество для Операции Canteen Crasher.
Casino City предоставляет с собой вторую систему по аналогии кредитами назваными - Чипами. Чипы выпадают с определённых роботов во время волны и могут быть использованы на улучшения предоставляемые самой картой и действую за пределами азартных мини-игр. Чипы распределяются между всеми игроками и их число сбрасывается полностью, если во время битвы игроки потерпели поражение.
На данной карте присутствует особый вид танка посреди волны. Эти танки имеют две турели третьего уровня с высоким уровнем здоровья расположенных на верху танка, на передней части танка располагается перед вагонетки "Малыша Чу-Чу" из карты Frontier, мгновенно убивает защитников которые слишком близка походят к пасти.
Две миссии были созданы для Операции Canteen Crasher: Poker Pummel (обычная) и Cashgrab Chaos (средняя). Для Операции Madness vs. Machines разработаны шесть миссии: Midnight Gambling (обычная), Cash Out Crash Out (средняя), Platinum Parade (средняя), Sketchy Swing (средняя), Vindicated Vices (средняя) и Gambler's Gambit (кошмар).
Contents
Games
All of the games present require Chips to play, with each game having different Chip outputs. They can only be entered in-between waves, as the entrances are blocked off while one is active.
- Slots: A three-reel slot machine that costs 1 Chip to play. Each reel stops automatically after a player starts them.
- Pachinko: A large pachinko board that costs 3 Chips to play. A coin is dropped after a player hits the start button, and payment is given based on which hole it drops into. The position of the coin being determined by a moving arrow at the top of the board.
- Roulette: A constantly spinning roulette board that costs 2 Chips to play. Rather than controlling when the game starts, players instead bet on which section of the board a ball on the board will rest on once the board stops rotating, with better payouts for smaller sections.
- Blackjack: A simulation of the real-world game that costs 4 Chips to play. Players play against a "Dealer" that draws to 16, and stands on 17. The deck is automatically shuffled after enough cards are drawn.
Chip Upgrades
Chip Upgrades offer unique upgrades that can be purchased at the defenders' spawn. Three categories of upgrades are available to purchase.
One Time Use
These upgrades can only be purchased once, and can be activated with a button after they are purchased. One Time Use upgrades only reset when a wave is lost or a new mission is loaded.
- EMP: Costs 30 Chips and temporarily stuns all robots and Engineer Robot buildings while playing an alarm for the duration of its effect.
- Nuke: Costs 50 Chips and instantly kills all robots and Engineer Robot buildings on the map, while giving the defenders' temporary ÜberCharge. Plays an air raid siren before going off.
- Special: A joke upgrade that costs 999 Chips. Confetti explodes near the purchase button with a party horn sound effect playing.
One Wave
These upgrades last for the entirety of a single wave, and players must walk into a field to gain the effects. Players lose the effect when a wave is over, and must purchase it again if they wish to continue using it. Both upgrades cost 15 Chips.
- Speed: Applies the Disciplinary Action's speed boost effect, but also causes the user to always take Mini-crit damage.
- Power: Applies the Buff Banner's Mini-crit boost effect, but also causes the user to always take Mini-crit damage.
Miscellaneous
These upgrades don't fit within the above two categories, and could be considered their own category.
- Shield: Costs 15 Chips and spawns a large shield that covers the hatch. This shield damages any robots within it, but wears off after enough damage is given.
- Helicopter: Costs 50 Chips and grants access to a controllable helicopter. The helicopter flies far above the game area, and rockets can be fired directly downwards to deal damage. Robots will not attempt to target the helicopter while players are in it.
Locations
The map is largely split in two, with an upper and lower level offering two routes each for robots to take.
Hatch
The hatch sits outside the defenders' spawn, within a semi-enclosed plaza.
- Beto Co. Resupply: The respawn station and Upgrade Station. This is also where players can purchase Chip Upgrades.
- Raised Platform: To the left of the respawn station is an elevated platform that gives a good sightline for the general area.
- Escalators: To the right of the hatch is an escalator that goes up to another elevated position, which connects to further parts of the map.
Outer Hatch Area
There are several paths robots can take to get into the inner hatch area.
- Underpass: The only lower route to the hatch for the robots, a platform is in the corner that gives limited cover.
- Overhang: Leads to the hatch from a left-side staircase and gives connections to a majority of the other routes in the map.
- Right Path: Neighbors the Underpass route and leads straight onto the hatch.
- Building: Flanks around the rest of the routes and ends at the right of the hatch.
Middle Lobbies
The middle part of the map is split into two levels:
- Upper Middle: An open area with a drop to the Lower Middle in the middle, the Pachinko and Roulette games can be accessed from here.
- Lower Middle: An enclosed, luxurious lobby with a road at the front. The Slots and Blackjack games can be accessed from here.
- Staircases: Two stairs on each side connects the Upper and Lower middle areas.
Roadway
A stretch of road connects the four bomb routes to a single long road.
- Left Platforms: Wrapping past the road is a series of platforms that leads to the Cliff.
- Ramp: Leads down to the Lower Mid route, some Tanks will take this path down.
- Right Platform: A platform leading to Upper Mid, with a building providing some cover.
- Right Ramp: A curved ramp that wraps down to the Lower Mid, some Tanks will also take this path down.
Front
- Cliff: One of the three routes the bomb can take at the front, a cliff sides next to it that can be used to push robots into, destroying them instantly.
- Road: A straight road leads into the Roadway, an Upgrade Station is within a building by the road that can be used in-between waves.
- Alley: A raised alley that ends near the Right Ramp.
- Left Tunnel: Flanks the left of the Ditch, some waves will have Tanks spawning from this tunnel.
- Right Garage: Flanks the right of the Ditch, some waves will have Tanks spawning from this garage.
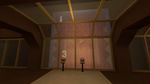
- Ditch: The area that robots drop into, with a fence splitting the area from the surrounding parts.
Trivia
- The "Special" Chip upgrade was originally an "H Bomb" upgrade in previous versions. This upgrade would crash the server when it was activated, with the same intro as the Nuke playing until an explosion went off, triggering the server crash.
- As chips are technically Briefcases, robots carrying them will gain the same buffs as bomb carriers.
Gallery
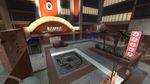
Бомболюк с местом появления красных.

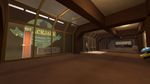
Средний маршрут на нижнем уровне.

Средний маршрут на верхнем уровне.

Фронт соединяющийся с проезжей частью.
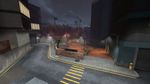
Фронт канавы с дорогой.
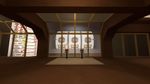
Игровая комната с Blackjack.
Игровая комната Слотов.
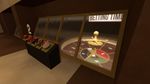
Игровая комната Рулетки.
Игровая комната Пачинко.


| ||||||||||||||||||||||||||||||||||||||||||||||||
| ||||||||||||||||||||||
Category:Mappers vs Machines Contest entries Category:Operation Canteen Crasher maps Category:Operation Memes vs Machines maps Category:Operation Madness vs Machines maps