Difference between revisions of "ÜberCharge"
Aka twitch (talk | contribs) (split Effects into separate sections for each secondary weapon's charge type, moved separate notes about HUD indicators to their own section) |
(edit formatting and some wording, add medigun icons; edit section headers, no need to capitalize words Like This when they are not proper nouns) |
||
| Line 2: | Line 2: | ||
{{Quotation|'''The Heavy''' on the finer mechanics of an ÜberCharge|'''I AM BULLETPROOF!'''|sound=Heavy_specialcompleted06.wav}} | {{Quotation|'''The Heavy''' on the finer mechanics of an ÜberCharge|'''I AM BULLETPROOF!'''|sound=Heavy_specialcompleted06.wav}} | ||
| − | '''ÜberCharge''' (German for "supercharge" or "overcharge", | + | '''ÜberCharge''' (German for "supercharge" or "overcharge", translated as "Überladung" in the German version) is an ability of the [[Medic]]. ÜberCharge is built up as the Medic heals teammates with his [[Medic#Secondary|secondary weapon]]. Each healing tool has its own unique ÜberCharge effect, which the Medic can unleash once his charge meter reaches 100%. |
| − | == | + | == Charge meter == |
| − | While the Medic has his secondary or melee weapon drawn, a bar showing how much ÜberCharge is built up appears where the [[ammo]] count usually is on the [[HUD]]. | + | While the Medic has his secondary or melee weapon drawn, a bar showing how much ÜberCharge is built up appears where the [[ammo]] count usually is on the [[HUD]]. If a friendly Medic is healing the player or is under the player's crosshair, a team-colored box pops up on the HUD, displaying the username of the Medic, the name of the healing gun they have equipped, and their ÜberCharge percentage. If the Medic uses a Name Tag on their secondary weapon, that name will be displayed instead of the weapon type. Medics with the [[Solemn Vow]] equipped and Spies will also see this information when their crosshairs are on an enemy Medic. |
| − | ==Charging== | + | == Charging == |
The ÜberCharge meter fills at different rates, depending on the state of the Medic's healing target. | The ÜberCharge meter fills at different rates, depending on the state of the Medic's healing target. | ||
| − | === | + | === Rates === |
{| class="wikitable grid" | {| class="wikitable grid" | ||
| − | ! class = "header" | | + | ! class="header" | Healing tool |
| − | ! class = "header" | | + | ! class="header" | Target health |
| − | ! class = "header" | | + | ! class="header" | {{tooltip|Fill rate|average percentage points per second}} |
| − | ! class = "header" | | + | ! class="header" | {{tooltip|Fill time| time necessary healing a target in the specified state to take the Medic's meter from 0% to 100%}} |
|- | |- | ||
| − | |rowspan="3"|[[Medi Gun]]||<142.5% Health||2.50000%||40 seconds | + | | rowspan="3" | [[Medi Gun]] || <142.5% Health || 2.50000% || 40 seconds |
|- | |- | ||
| − | |>142.5% Health||1.25000%||80 seconds | + | | >142.5% Health || 1.25000% || 80 seconds |
|- | |- | ||
| − | |>142.5% Health + 2nd Heal Beam||0.62500%||160 seconds | + | | >142.5% Health + 2nd Heal Beam || 0.62500% || 160 seconds |
|- | |- | ||
| − | |rowspan="3"|[[Kritzkrieg]]||<142.5% Health||3.12500%||32 seconds | + | | rowspan="3" | [[Kritzkrieg]] || <142.5% Health || 3.12500% || 32 seconds |
|- | |- | ||
| − | |>142.5% Health||1.56250%||64 seconds | + | | >142.5% Health || 1.56250% || 64 seconds |
|- | |- | ||
| − | |>142.5% Health + 2nd Heal Beam||0.78125%||128 seconds | + | | >142.5% Health + 2nd Heal Beam || 0.78125% || 128 seconds |
|- | |- | ||
| − | |rowspan="3"|[[Quick-Fix]]||<142.5% Health||3.12500%||32 seconds | + | | rowspan="3" | [[Quick-Fix]] || <142.5% Health || 3.12500% || 32 seconds |
|- | |- | ||
| − | |>142.5% Health||1.56250%||64 seconds | + | | >142.5% Health || 1.56250% || 64 seconds |
| + | |- | ||
| + | | >142.5% Health + 2nd Heal Beam || 0.78125% || 128 seconds | ||
|- | |- | ||
| − | |||
|} | |} | ||
| − | ====Notes==== | + | ==== Notes ==== |
* During [[Setup time]], the Medic's ÜberCharge meter will fill at the healing tool's maximum rate, regardless of the target's health. | * During [[Setup time]], the Medic's ÜberCharge meter will fill at the healing tool's maximum rate, regardless of the target's health. | ||
| − | * Fill rate is halved if the target is affected by an additional healing beam (such as from another Medic, a [[Dispenser]] or the [[Payload#Carts|Payload cart]].) | + | * Fill rate is halved if the target is affected by an additional healing beam (such as from another Medic, a [[Dispenser]] or the [[Payload#Carts|Payload cart]].) This was designed to encourage Medics to spread their healing around. |
| − | *As the Quick-Fix cannot overheal, its meter will generally fill at the maximum rate. | + | *As the Quick-Fix cannot overheal, its meter will generally fill at the maximum rate. If the target is buffed to 142.5% or higher by another source (Medi Gun healing, [[Powerjack]] kill etc,) then the Quick-Fix will prevent the buff's natural decay and its meter fill rate will be halved. |
* Accumulated charge does not carry over if the player changes secondary weapons. For example, if a Quick-Fix Medic with 75% charge switches to the Medi Gun at a [[Respawn#Resupply|Resupply Cabinet]], the ÜberCharge meter will be reduced to 0%. | * Accumulated charge does not carry over if the player changes secondary weapons. For example, if a Quick-Fix Medic with 75% charge switches to the Medi Gun at a [[Respawn#Resupply|Resupply Cabinet]], the ÜberCharge meter will be reduced to 0%. | ||
* Healing enemy Spies (disguised as one of your teammates) also fills the ÜberCharge meter. | * Healing enemy Spies (disguised as one of your teammates) also fills the ÜberCharge meter. | ||
* Healing performed by means other than the healing beam (such as the [[Crusader's Crossbow]], the [[Amputator]]'s [[Medicating Melody]] and the Kritzkrieg's [[Oktoberfest]] taunt, does not contribute to the ÜberCharge meter. | * Healing performed by means other than the healing beam (such as the [[Crusader's Crossbow]], the [[Amputator]]'s [[Medicating Melody]] and the Kritzkrieg's [[Oktoberfest]] taunt, does not contribute to the ÜberCharge meter. | ||
| − | ===Non- | + | === Non-healing meter effects === |
* Striking an enemy with the [[Übersaw]] fills the user's ÜberCharge by 25 percentage points per hit. | * Striking an enemy with the [[Übersaw]] fills the user's ÜberCharge by 25 percentage points per hit. | ||
**This can be done even during an active charge, although the meter will continue to drain and the effects of the charge will cease until the Medic draws his secondary weapon again. | **This can be done even during an active charge, although the meter will continue to drain and the effects of the charge will cease until the Medic draws his secondary weapon again. | ||
** Striking an enemy Scout under the effects of [[Bonk! Atomic Punch]] will deal no damage but still add 25% to the Medic's ÜberCharge meter. | ** Striking an enemy Scout under the effects of [[Bonk! Atomic Punch]] will deal no damage but still add 25% to the Medic's ÜberCharge meter. | ||
** Striking a disguised enemy Spy will not grant the boost, unless the strike kills him or triggers his [[Dead Ringer]]. | ** Striking a disguised enemy Spy will not grant the boost, unless the strike kills him or triggers his [[Dead Ringer]]. | ||
| − | ** The Übersaw's [[Spinal Tap|taunt attack]] also fills the Medic's ÜberCharge meter: 25% for the initial stunning thrust and 75% for the killing retraction. | + | ** The Übersaw's [[Spinal Tap|taunt attack]] also fills the Medic's ÜberCharge meter: 25% for the initial stunning thrust and 75% for the killing retraction. Note that it is possible for the thrust to connect and the retraction to miss, and vice versa. Each bonus is only awarded if that part affects an enemy target. |
| − | * If a Medic dies with the [[Vita-Saw]] equipped, he will respawn with up to 20 percentage points of his ÜberCharge meter preserved. | + | * If a Medic dies with the [[Vita-Saw]] equipped, he will respawn with up to 20 percentage points of his ÜberCharge meter preserved. This will work even if the player elects to respawn with a different melee weapon, but does not allow the Medic to carry over prior charge into [[Sudden Death]]. |
| − | * A Medic struck by a shot from the [[Pomson 6000]] will immediately lose 10 percentage points from his ÜberCharge meter. | + | * A Medic struck by a shot from the [[Pomson 6000]] will immediately lose 10 percentage points from his ÜberCharge meter. The Pomson deals damage multiple times as the bolt passes through its targets, but only inflicts the meter drain once per target. |
| + | |||
| + | == Activation == | ||
| + | Once the Medic's charge reaches 100%, the meter on the HUD will begin flashing and a [[Medic responses#Class-specific responses|voice response]] will be played, indicating to the Medic that he can unleash the ÜberCharge by pressing alternate fire (default key: {{key|MOUSE2}}) An ÜberCharge will only affect a player for as long as the healing beam is trained on them; if the Medic dies, deactivates the healing beam, changes healing targets, draws another weapon or is forced out of range, its benefit to the patient will end prematurely. Once activated, the ÜberCharge will continue to drain, regardless of the Medic's active weapon. With a single patient, an activated charge lasts 8 seconds, draining the meter at a rate of 12.5 points per second. The Medic is free to move his healing beam to another player, which will give the effects of the charge to the new patient, but the drain rate increases by 50% for each additional target. | ||
| + | |||
| + | == Effects == | ||
| + | === Medi Gun === | ||
| + | [[File:Item icon Medi Gun.png|256px|thumb|right|[[Medi Gun]]]] | ||
| + | {{main|Medi Gun}} | ||
| + | ==== Visual effects ==== | ||
| + | The Medic and his healing target will glow in their team color, with yellow or purple eyes and a metallic sheen across their bodies. A slight team-colored distortion will appear around the first-person view of the Medic and his patient. | ||
| − | == | + | ==== Immunities and vulnerabilities ==== |
| − | + | The stock Medi Gun's ÜberCharge makes the Medic and his patient invulnerable to most forms of damage. Both players are still vulnerable to [[Telefrag|telefragging]] and certain [[Environmental_death|environmental effects]] - [[saw blade]]s, [[train]]s and [[Environmental_death#Pitfalls|pitfalls]], but not [[Environmental_death#Drowning|drowning]] or [[fall damage]]. They are also still subject to [[knock back]] and the Pyro's [[compression blast]]. The [[Sandman]]'s alt-fire attack cannot [[stun]] them, but the initial strike of the [[Organ Grinder]], [[Skewer]] and [[Spinal Tap]] taunt attacks can (though they will still inflict no damage.) Stunning the charging Medic will temporarily break the healing beam and leave the patient vulnerable until the Medic has recovered. | |
| − | == | + | ==== Secondary effects ==== |
| − | + | The Medic's target will continue to be healed at the normal rate. Activating the Medi Gun's charge or applying it to a new target extinguishes [[fire]]. Invulnerability will linger for one second after breaking contact with the beam, allowing a dexterous Medic to grant invulnerability to multiple patients simultaneously. Medi Gun-charged players do not count towards pushing the [[Payload#Cart|Payload cart]] or capturing [[Control_point_(objective)|control points]] (although they can block enemy captures.) They cannot pick up the [[Capture_the_Flag#Intelligence|Intelligence]] while invulnerable. A Medic cannot activate a Medi Gun ÜberCharge while carrying the Intelligence, and applying the charge to an Intelligence carrier will not make him invulnerable. | |
| − | + | ||
| − | + | === Kritzkrieg === | |
| − | + | [[File:Item icon Kritzkrieg.png|256px|thumb|right|[[Kritzkrieg]]]] | |
| − | + | {{main|Kritzkrieg}} | |
| − | + | ==== Visual effects ==== | |
| − | The Medic's target will continue to be healed at the normal rate. | ||
| − | ===Kritzkrieg=== | ||
| − | ====Visual | ||
In addition to the yellow sparks that normally travel down the healing beam, it will pulse when the charge is active, while a team-colored glow and crackle of electricity will emit from the Kritzkrieg and the weapon of the Medic's patient. | In addition to the yellow sparks that normally travel down the healing beam, it will pulse when the charge is active, while a team-colored glow and crackle of electricity will emit from the Kritzkrieg and the weapon of the Medic's patient. | ||
| − | ====Benefits==== | + | |
| − | For the duration of the charge, all attacks made by the Medic's patient will be [[critical hits]], which deal 300% of the weapon's base damage to enemies, ignoring the distance modification and the random damage modification normal attacks are affected by. | + | ==== Benefits ==== |
| − | ====Weaknesses==== | + | For the duration of the charge, all attacks made by the Medic's patient will be [[critical hits]], which deal 300% of the weapon's base damage to enemies, ignoring the distance modification and the random damage modification normal attacks are affected by. [[Stickybomb]]s fired during the Kritzkrieg charge's duration will retain their critical effects even after the charge has ended. |
| − | While the Kritzkrieg will continue to heal its target at the normal rate, activating the charge grants no additional defensive benefits to the Medic or his patient. | + | |
| − | ===Quick-Fix=== | + | ==== Weaknesses ==== |
| − | ====Visual | + | While the Kritzkrieg will continue to heal its target at the normal rate, activating the charge grants no additional defensive benefits to the Medic or his patient. As [[buildings]] are immune to critical hits, the Kritzkrieg is a poor choice for assaulting an enemy [[Sentry Gun]] (though critical hits can easily dispatch any Engineers attending to the Sentry. |
| + | |||
| + | === Quick-Fix === | ||
| + | [[File:Item icon Quick-Fix.png|256px|thumb|right|[[Quick-Fix]]]] | ||
| + | {{main|Quick-Fix}} | ||
| + | ==== Visual effects ==== | ||
The Medic's healing beam will pulse and glow with greater intensity, and a team colored ring surrounds the Medic and his target. | The Medic's healing beam will pulse and glow with greater intensity, and a team colored ring surrounds the Medic and his target. | ||
| − | |||
| − | |||
| − | |||
| − | |||
| − | === | + | ==== Benefits ==== |
| − | + | The Medic and his healing target will be healed at an accelerated rate (from 100.8/s while under fire, up to 302.4/s if not wounded in the last 15 seconds.) Both players will also be immune to [[stun]] effects, [[slowdown]] and most forms of [[knock back]]. | |
| − | === | + | ==== Weaknesses ==== |
| − | + | While offering greater resiliency, the Quick-Fix's ÜberCharge provides no protection from bursts of high damage, such as [[Stickybomb]] traps, [[backstab]]s, [[headshot]]s or [[critical hits]]. Even discounting these threats, focused firepower can overcome this accelerated healing. The charge provides no protection from the Pyro's [[compression blast]], and it will not heal the Medic at the accelerated rate unless it is actively healing another player. | |
| − | ==Related | + | === Multiple charges === |
| − | ==={{ | + | Multiple ÜberCharges from multiple Medics deployed upon a single player at once do not multiply the effect. While combining charges on a single target yields no additional special effects, Medics with different secondary weapons can grant a single target a combination of their effects. For example, a player receiving a normal ÜberCharge and a Kritzkrieg ÜberCharge will receive the effects of both; invulnerability and guaranteed chance of critical hits. |
| + | |||
| + | === Enemy Spies === | ||
| + | A [[Spy]] can trick an enemy Medic into ÜberCharging them while they are [[disguise]]d, a tactic which can cripple pushes and give the Spy a surprise attack with the misplaced ÜberCharge. The Spy gains all the benefits of the charge. Until the Spy breaks disguise, they will appear to enemy players just as they would if they were on the enemy team (a Spy glowing in the color of the enemy team, in the case of a Medi Gun ÜberCharge, for example). To allies, and all players once the disguise is broken, the Spy and his ÜberCharge visual effects will appear in his own team colors (though dropping the disguise will terminate the healing beam and the charge's effects soon after). | ||
| + | |||
| + | == Related achievements == | ||
| + | === {{class link|Scout}} === | ||
{{Achievement table | {{Achievement table | ||
| 1 = {{Show achievement|Scout|Batting the Doctor}} | | 1 = {{Show achievement|Scout|Batting the Doctor}} | ||
| Line 93: | Line 108: | ||
}} | }} | ||
| − | ==={{ | + | === {{class link|Soldier}} === |
{{Achievement table | {{Achievement table | ||
| 1 = {{Show achievement|Soldier|S*M*A*S*H}} | | 1 = {{Show achievement|Soldier|S*M*A*S*H}} | ||
}} | }} | ||
| − | ==={{ | + | === {{class link|Pyro}} === |
{{Achievement table | {{Achievement table | ||
| 1 = {{Show achievement|Pyro|Burn Ward}} | | 1 = {{Show achievement|Pyro|Burn Ward}} | ||
| Line 104: | Line 119: | ||
}} | }} | ||
| − | ==={{ | + | === {{class link|Demoman}} === |
{{Achievement table | {{Achievement table | ||
| 1 = {{Show achievement|Demoman|Tam O'Shatter}} | | 1 = {{Show achievement|Demoman|Tam O'Shatter}} | ||
}} | }} | ||
| − | ==={{ | + | === {{class link|Heavy}} === |
{{Achievement table | {{Achievement table | ||
| 1 = {{Show achievement|Heavy|Photostroika}} | | 1 = {{Show achievement|Heavy|Photostroika}} | ||
| Line 116: | Line 131: | ||
}} | }} | ||
| − | ==={{ | + | === {{class link|Medic}} === |
{{Achievement table | {{Achievement table | ||
| 1 = {{Show achievement|Medic|Autoclave}} | | 1 = {{Show achievement|Medic|Autoclave}} | ||
| Line 135: | Line 150: | ||
}} | }} | ||
| − | ==={{ | + | === {{class link|Sniper}} === |
{{Achievement table | {{Achievement table | ||
| 1 = {{Show achievement|Sniper|Parting Shot}} | | 1 = {{Show achievement|Sniper|Parting Shot}} | ||
| Line 141: | Line 156: | ||
}} | }} | ||
| − | ==={{ | + | === {{class link|Spy}} === |
{{Achievement table | {{Achievement table | ||
| 1 = {{Show achievement|Spy|Dr. Nooooo}} | | 1 = {{Show achievement|Spy|Dr. Nooooo}} | ||
| Line 147: | Line 162: | ||
== Update history == | == Update history == | ||
| − | + | {{update history|1= | |
| − | {{update history| | ||
'''[[October 25, 2007 Patch]]''' | '''[[October 25, 2007 Patch]]''' | ||
* Fixed an exploit that allowed disconnected medics to continue Übercharging their target until they timed out. | * Fixed an exploit that allowed disconnected medics to continue Übercharging their target until they timed out. | ||
| Line 185: | Line 199: | ||
}} | }} | ||
| − | ==Trivia== | + | == Trivia == |
| − | *The textures for ÜberCharged classes, like the gibs, are for the old models from early versions of ''Team Fortress 2''. If you look closely, you can see that the ÜberCharge textures for the classes are misaligned in some places (such as the goggles crossing the [[Engineer]]'s nose). | + | * The textures for ÜberCharged classes, like the gibs, are for the old models from early versions of ''Team Fortress 2''. If you look closely, you can see that the ÜberCharge textures for the classes are misaligned in some places (such as the goggles crossing the [[Engineer]]'s nose). |
| − | *When you hit a Medi Gun ÜberCharged player with a critical hit, they will take no damage. However, the critical hit sound will still play and the letters that indicate a critical hit will appear above the enemy. | + | * When you hit a Medi Gun ÜberCharged player with a critical hit, they will take no damage. However, the critical hit sound will still play and the letters that indicate a critical hit will appear above the enemy. |
| − | *Invulnerable players are not immune to [[Jarate]] (whether applied from the [[Sydney Sleeper]] or the item) or [[Mad Milk]], although neither will have any effect while the ÜberCharge lasts. | + | * Invulnerable players are not immune to [[Jarate]] (whether applied from the [[Sydney Sleeper]] or the item) or [[Mad Milk]], although neither will have any effect while the ÜberCharge lasts. |
| − | ==Gallery== | + | == Gallery == |
<gallery> | <gallery> | ||
File:ÜberCharge Regular.png|The [[Medi Gun]]'s ÜberCharge | File:ÜberCharge Regular.png|The [[Medi Gun]]'s ÜberCharge | ||
| Line 196: | Line 210: | ||
</gallery> | </gallery> | ||
| − | ==See also== | + | == See also == |
| − | *[[ÜberCharge strategy]] | + | * [[ÜberCharge strategy]] |
| − | *[[Kritzkrieg]] | + | * [[Kritzkrieg]] |
| − | *[[Medi Gun]] | + | * [[Medi Gun]] |
| − | *[[Quick-Fix]] | + | * [[Quick-Fix]] |
| − | + | ||
| + | |||
{{Medic Nav}} | {{Medic Nav}} | ||
| − | |||
[[Category:Gameplay]] | [[Category:Gameplay]] | ||
| − | |||
| − | |||
Revision as of 05:34, 25 January 2012

| “ | I AM BULLETPROOF!
Click to listen
— The Heavy on the finer mechanics of an ÜberCharge
|
” |
ÜberCharge (German for "supercharge" or "overcharge", translated as "Überladung" in the German version) is an ability of the Medic. ÜberCharge is built up as the Medic heals teammates with his secondary weapon. Each healing tool has its own unique ÜberCharge effect, which the Medic can unleash once his charge meter reaches 100%.
Contents
Charge meter
While the Medic has his secondary or melee weapon drawn, a bar showing how much ÜberCharge is built up appears where the ammo count usually is on the HUD. If a friendly Medic is healing the player or is under the player's crosshair, a team-colored box pops up on the HUD, displaying the username of the Medic, the name of the healing gun they have equipped, and their ÜberCharge percentage. If the Medic uses a Name Tag on their secondary weapon, that name will be displayed instead of the weapon type. Medics with the Solemn Vow equipped and Spies will also see this information when their crosshairs are on an enemy Medic.
Charging
The ÜberCharge meter fills at different rates, depending on the state of the Medic's healing target.
Rates
| Healing tool | Target health | Fill rate | Fill time |
|---|---|---|---|
| Medi Gun | <142.5% Health | 2.50000% | 40 seconds |
| >142.5% Health | 1.25000% | 80 seconds | |
| >142.5% Health + 2nd Heal Beam | 0.62500% | 160 seconds | |
| Kritzkrieg | <142.5% Health | 3.12500% | 32 seconds |
| >142.5% Health | 1.56250% | 64 seconds | |
| >142.5% Health + 2nd Heal Beam | 0.78125% | 128 seconds | |
| Quick-Fix | <142.5% Health | 3.12500% | 32 seconds |
| >142.5% Health | 1.56250% | 64 seconds | |
| >142.5% Health + 2nd Heal Beam | 0.78125% | 128 seconds |
Notes
- During Setup time, the Medic's ÜberCharge meter will fill at the healing tool's maximum rate, regardless of the target's health.
- Fill rate is halved if the target is affected by an additional healing beam (such as from another Medic, a Dispenser or the Payload cart.) This was designed to encourage Medics to spread their healing around.
- As the Quick-Fix cannot overheal, its meter will generally fill at the maximum rate. If the target is buffed to 142.5% or higher by another source (Medi Gun healing, Powerjack kill etc,) then the Quick-Fix will prevent the buff's natural decay and its meter fill rate will be halved.
- Accumulated charge does not carry over if the player changes secondary weapons. For example, if a Quick-Fix Medic with 75% charge switches to the Medi Gun at a Resupply Cabinet, the ÜberCharge meter will be reduced to 0%.
- Healing enemy Spies (disguised as one of your teammates) also fills the ÜberCharge meter.
- Healing performed by means other than the healing beam (such as the Crusader's Crossbow, the Amputator's Medicating Melody and the Kritzkrieg's Oktoberfest taunt, does not contribute to the ÜberCharge meter.
Non-healing meter effects
- Striking an enemy with the Übersaw fills the user's ÜberCharge by 25 percentage points per hit.
- This can be done even during an active charge, although the meter will continue to drain and the effects of the charge will cease until the Medic draws his secondary weapon again.
- Striking an enemy Scout under the effects of Bonk! Atomic Punch will deal no damage but still add 25% to the Medic's ÜberCharge meter.
- Striking a disguised enemy Spy will not grant the boost, unless the strike kills him or triggers his Dead Ringer.
- The Übersaw's taunt attack also fills the Medic's ÜberCharge meter: 25% for the initial stunning thrust and 75% for the killing retraction. Note that it is possible for the thrust to connect and the retraction to miss, and vice versa. Each bonus is only awarded if that part affects an enemy target.
- If a Medic dies with the Vita-Saw equipped, he will respawn with up to 20 percentage points of his ÜberCharge meter preserved. This will work even if the player elects to respawn with a different melee weapon, but does not allow the Medic to carry over prior charge into Sudden Death.
- A Medic struck by a shot from the Pomson 6000 will immediately lose 10 percentage points from his ÜberCharge meter. The Pomson deals damage multiple times as the bolt passes through its targets, but only inflicts the meter drain once per target.
Activation
Once the Medic's charge reaches 100%, the meter on the HUD will begin flashing and a voice response will be played, indicating to the Medic that he can unleash the ÜberCharge by pressing alternate fire (default key: MOUSE2) An ÜberCharge will only affect a player for as long as the healing beam is trained on them; if the Medic dies, deactivates the healing beam, changes healing targets, draws another weapon or is forced out of range, its benefit to the patient will end prematurely. Once activated, the ÜberCharge will continue to drain, regardless of the Medic's active weapon. With a single patient, an activated charge lasts 8 seconds, draining the meter at a rate of 12.5 points per second. The Medic is free to move his healing beam to another player, which will give the effects of the charge to the new patient, but the drain rate increases by 50% for each additional target.
Effects
Medi Gun
Visual effects
The Medic and his healing target will glow in their team color, with yellow or purple eyes and a metallic sheen across their bodies. A slight team-colored distortion will appear around the first-person view of the Medic and his patient.
Immunities and vulnerabilities
The stock Medi Gun's ÜberCharge makes the Medic and his patient invulnerable to most forms of damage. Both players are still vulnerable to telefragging and certain environmental effects - saw blades, trains and pitfalls, but not drowning or fall damage. They are also still subject to knock back and the Pyro's compression blast. The Sandman's alt-fire attack cannot stun them, but the initial strike of the Organ Grinder, Skewer and Spinal Tap taunt attacks can (though they will still inflict no damage.) Stunning the charging Medic will temporarily break the healing beam and leave the patient vulnerable until the Medic has recovered.
Secondary effects
The Medic's target will continue to be healed at the normal rate. Activating the Medi Gun's charge or applying it to a new target extinguishes fire. Invulnerability will linger for one second after breaking contact with the beam, allowing a dexterous Medic to grant invulnerability to multiple patients simultaneously. Medi Gun-charged players do not count towards pushing the Payload cart or capturing control points (although they can block enemy captures.) They cannot pick up the Intelligence while invulnerable. A Medic cannot activate a Medi Gun ÜberCharge while carrying the Intelligence, and applying the charge to an Intelligence carrier will not make him invulnerable.
Kritzkrieg
Visual effects
In addition to the yellow sparks that normally travel down the healing beam, it will pulse when the charge is active, while a team-colored glow and crackle of electricity will emit from the Kritzkrieg and the weapon of the Medic's patient.
Benefits
For the duration of the charge, all attacks made by the Medic's patient will be critical hits, which deal 300% of the weapon's base damage to enemies, ignoring the distance modification and the random damage modification normal attacks are affected by. Stickybombs fired during the Kritzkrieg charge's duration will retain their critical effects even after the charge has ended.
Weaknesses
While the Kritzkrieg will continue to heal its target at the normal rate, activating the charge grants no additional defensive benefits to the Medic or his patient. As buildings are immune to critical hits, the Kritzkrieg is a poor choice for assaulting an enemy Sentry Gun (though critical hits can easily dispatch any Engineers attending to the Sentry.
Quick-Fix
Visual effects
The Medic's healing beam will pulse and glow with greater intensity, and a team colored ring surrounds the Medic and his target.
Benefits
The Medic and his healing target will be healed at an accelerated rate (from 100.8/s while under fire, up to 302.4/s if not wounded in the last 15 seconds.) Both players will also be immune to stun effects, slowdown and most forms of knock back.
Weaknesses
While offering greater resiliency, the Quick-Fix's ÜberCharge provides no protection from bursts of high damage, such as Stickybomb traps, backstabs, headshots or critical hits. Even discounting these threats, focused firepower can overcome this accelerated healing. The charge provides no protection from the Pyro's compression blast, and it will not heal the Medic at the accelerated rate unless it is actively healing another player.
Multiple charges
Multiple ÜberCharges from multiple Medics deployed upon a single player at once do not multiply the effect. While combining charges on a single target yields no additional special effects, Medics with different secondary weapons can grant a single target a combination of their effects. For example, a player receiving a normal ÜberCharge and a Kritzkrieg ÜberCharge will receive the effects of both; invulnerability and guaranteed chance of critical hits.
Enemy Spies
A Spy can trick an enemy Medic into ÜberCharging them while they are disguised, a tactic which can cripple pushes and give the Spy a surprise attack with the misplaced ÜberCharge. The Spy gains all the benefits of the charge. Until the Spy breaks disguise, they will appear to enemy players just as they would if they were on the enemy team (a Spy glowing in the color of the enemy team, in the case of a Medi Gun ÜberCharge, for example). To allies, and all players once the disguise is broken, the Spy and his ÜberCharge visual effects will appear in his own team colors (though dropping the disguise will terminate the healing beam and the charge's effects soon after).
Related achievements
 Scout
Scout
|
|


 Soldier
|

 Pyro
Pyro
|
|


 Demoman
|

 Heavy
Heavy
|
|


 Medic
Medic
|
|


 Sniper
|
|


 Spy
Spy
|

Update history
- Fixed an exploit that allowed disconnected medics to continue Übercharging their target until they timed out.
- Fixed Medic's Über-charge stats tracking.
- The Medic's Medi Gun now charges at an increased rate during Setup time, to remove the need for self-damage grinding.
- Fixed exploit where the Medi Gun ÜberCharge wouldn't drain if you switched weapons.
- Each extra player ÜberCharged drains the ÜberCharge an additional 50% faster.
- Fixed unlimited ÜberCharge exploit.
- Fixed another unlimited ÜberCharge exploit.
- Fixed rapid weapon switching allowing Medics to prevent deployed ÜberCharges from draining.
- Übercharged players can not be stunned.
- Fixed the Kritzkrieg charge deployed sound getting stuck on.
- Fixed removing the burning/jarated conditions on players who are being ÜberCharged by a Medic using the Kritzkrieg
- Added Mad Milk to the conditions that are cleared when players are made invulnerable by a Medic with an ÜberCharge
- [Undocumented] Added ÜberCharge overlay for Quick-Fix users during the Megaheal.
Trivia
- The textures for ÜberCharged classes, like the gibs, are for the old models from early versions of Team Fortress 2. If you look closely, you can see that the ÜberCharge textures for the classes are misaligned in some places (such as the goggles crossing the Engineer's nose).
- When you hit a Medi Gun ÜberCharged player with a critical hit, they will take no damage. However, the critical hit sound will still play and the letters that indicate a critical hit will appear above the enemy.
- Invulnerable players are not immune to Jarate (whether applied from the Sydney Sleeper or the item) or Mad Milk, although neither will have any effect while the ÜberCharge lasts.
Gallery
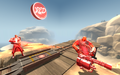
The Medi Gun's ÜberCharge
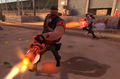
The Kritzkrieg's ÜberCharge


See also