Process
| Process | |
|---|---|

| |
| Basic Information | |
| Developer(s): | {{{map-developer}}} |
| Map Info | |
| Environment: | Alpine |
| Setting: | Daylight, sunny |
| Map Overview | |
 | |
Process is a control point map. It's set in an alpine facility with RED and BLU attempting to take control of the other team's base. The team that captures all 5 of the control points wins.
This map is very popular in the competitive 6v6 community, and is in rotation for ESEA, ETF2L, UGC, and ozfortress
Contents
Locations
Control Point 3
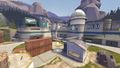
The Control Point is set in a large depression, surrounded by rocks and shipping containers
- Entrances: Each team has 3 entrances to the point. One behind the crates, one that leads to a platform near the crates, and a choke that leads out onto the rocks
- Platform: The platform exit directly looks over the point, and provides a nice height advantage to the player.
- Behind: The exit behind the crates is perpendicular to the platform, and adjacent to the rocks. It provides direct access to both team's platforms
- Choke: The choke is located in the corners of the mid. The sight line is blocked by a large rock.
- Control Point: The point is in the center of the area, flanked by two shipping containers. There's a small bridge connecting both crates directly above the point, that gives an aggressive player control of the point
Control Points 2 & 4
This control point has 3 connectors from mid. It is made up of a spire overlooking a valley, with a balcony on the opposite side.
- Entrances: There are multiple entrances to the point. There are two, above and below each other, from the platform exit on mid. There are two more from the back side entrance to mid, and a final entrance through the choke.
- Spire: The spire hold the control point. It is connected to the balcony by a bridge, and to the valley by a set of stairs.
- Valley: The valley is overshadowed by the spire. It separates the spire from the choke and backside entrance to mid.
- Balcony: The balcony is behind the spire, and leads to the last point. It is a very defensible position, only being shorter than the spire itself.
Control Points 1 & 5
The last control point is made up of a platform with the control point on it, overlooked by a balcony. It is connected to the second by hallways and a lobby.
- Lobby: The lobby is connected directly to the balcony of second, and spills onto the platform on last. It contains a medium health and ammo pack
- Platform: The platform sits directly in the middle of the room. It is overlooked by the balcony.
- Balcony: The balcony sits on the back of the room, above everything else. It provides a defensible position for the team
- Hallways: On one side of the last, there is a set of hallways leading to the second point. They are a prime defensive position being difficult to push into.
Screenshots
The middle point
- Cp process b2 1.jpg
The second point
- Cp process b2 3.jpg
The final point
- Cp process b2 6.jpg
The spawn point
| ||||||||||||||||||||||||||||||||||||||||||||||||