Difference between revisions of "Croissant"
ShadowMan44 (talk | contribs) m |
m |
||
| Line 1: | Line 1: | ||
{{custom map}} | {{custom map}} | ||
| − | |||
{{Map infobox | {{Map infobox | ||
| − | | map-image = Cp croissant.png | + | | map-status = custom |
| − | | game-type = Control Point | + | | map-workshopid = 458840209 |
| − | | file-name = cp_croissant_final | + | | map-name = Croissant |
| − | | | + | | map-image = Cp croissant.png |
| − | | developer = [https://tf2maps.net/members/arnold.1926/ Arnold] | + | | map-game-type = Control Point |
| − | | | + | | map-file-name = cp_croissant_final |
| − | | map-environment = Alpine / Spytech | + | | map-version = Final version |
| − | | map-setting = Daylight, sunny | + | | map-developer = [https://tf2maps.net/members/arnold.1926/ Arnold] |
| − | | map-hazards = [[Environmental death#Pitfalls|Pitfall]] | + | | map-links = [https://tf2maps.net/threads/croissant.16755/ TF2Maps.net] |
| − | | map-health | + | | map-environment = Alpine / Spytech |
| − | | map-health | + | | map-setting = Daylight, sunny |
| − | | map-ammo | + | | map-hazards = [[Environmental death#Pitfalls|Pitfall]] |
| − | | map-ammo | + | | map-pickups-health-small = 11 |
| + | | map-pickups-health-medium = 8 | ||
| + | | map-pickups-ammo-small = 14 | ||
| + | | map-pickups-ammo-medium = 9 | ||
}} | }} | ||
Revision as of 01:11, 18 January 2024
 | “I built that.” This page contains information about a custom map that is not an officially released Team Fortress 2 map. All released Valve and Community-made TF2 maps can be found on the list of maps. |
| Croissant | |
|---|---|

| |
| Basic Information | |
| Map type: | Control Point |
| File name: | cp_croissant_final
|
| Version: | Final version |
| Developer(s): | Arnold |
| Link(s): | TF2Maps.net |
| Map Info | |
| Environment: | Alpine / Spytech |
| Setting: | Daylight, sunny |
| Hazards: | Pitfall |
| Map Items | |

| “ | It's called croissant because it's shaped like a banana.
— The developer, on the name of the map
|
” |
Croissant is a community-made Symmetric Control Point map. It was the winner out of the 4 symmetrical entries to TF2Maps.net's (A)Symmetry CP Contest.
Contents
Locations
Control Point 3
- Control point: The control point is located on a bridge spanning between the large barn and the house by the cliff.
- Entrances to the control point: The control point can be reached either by a slanted ladder on either side, through a tunnel leading through the large barn, or through the house closest to the edge of the map.
- Under the bridge: Under and around the perimeter of the bridge there is a large courtyard containing slanted ladders on either side to climb up onto the bridge. Under the bridge itself there is a tunnel which leads to either side's courtyard. There are two respawn rooms which are utilised whenever the advancing team captures Control Point 2/4.
Control Points 2 & 4
- Control point: The control point is located on a large overhang facing a courtyard.
- Entrances to the control point: Both control points have a direct patch leading in from Control Point 3 but also can be entered from behind using the underpass and stairs.
- Under the control points: Under the control point is a second respawn room which are utilised whenever the advancing team captures Control Point 3. It leads in to a small room with one door leading in from Control Points 1/5 and one door leading out towards Control Point 3. There are stairs that go up towards the control point.
Control Points 1 & 5
- Control point: Both control points are located in a large room on top of some stairs in each respective base of the teams.
- Entrances to the control point: Both control points can be reached by staircases to the left and right of the control point which stem from the bottom of the room. A third way to reach the control point is running straight from Control Points 2/4 and down the small flight of stairs.
- Under the control point: Under the control points is a small open-roofed room with a column separating two corridors. There are another set of corridors, one of which leads to the main respawn rooms, and the other leading to an underpass which has a staircase leading to Control Points 2/4 and an outside path leading to Control Point 3.
Trivia
- There are a set of presents hidden behind the BLU team's blast doors and can only be reached by utilising
noclip.
Bugs
- An additional small health pack and ammo box are hidden under the map.
Gallery

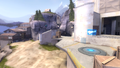
BLU Base.
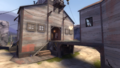
BLU Warehouse.
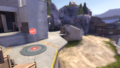
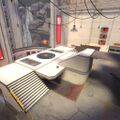
Central Control Point.
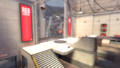
RED Warehouse.
RED Base.
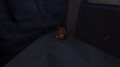
Hidden presents.
Steam Workshop image for Croissant.


| ||||||||||||||||||||||||||||||||||||||||||||||||