Difference between revisions of "Turtling"
m (Added some tips on being an effective Turtle. Attempting to expand a stub.) |
Slimyboi500 (talk | contribs) m |
||
| (73 intermediate revisions by 40 users not shown) | |||
| Line 1: | Line 1: | ||
| − | {{ | + | {{Redirects here|Turtle|Dell in the Shell}} |
| − | + | ||
| − | |||
{{Quotation|'''The Demoman'''|Don't hide behind your toys, lad!|sound=Demoman_dominationengineer01.wav}} | {{Quotation|'''The Demoman'''|Don't hide behind your toys, lad!|sound=Demoman_dominationengineer01.wav}} | ||
| − | '''Turtling''' is the | + | '''Turtling''' is a term that refers to a situation when a majority of team players purposefully decide to defend a specific location with the intent of not pushing forward. Just like a real turtle, the team hides inside of its "shell" to prevent the enemy from pushing further into their side of the map. Turtling usually takes place at [[chokepoint]]s found throughout the map as teams cannot avoid passing through these points. This strategy is usually associated with the [[Engineer]] class, which uses [[Sentry Gun]]s and [[Dispenser]]s to fortify a specific location. |
| + | |||
| + | Turtling is frowned upon by many players, as it is labeled a form of [[camping]] and considered a cheap strategy that doesn't require much skill. As such, turtling often occurs when a stronger team has pushed back the weaker opposition onto the last remaining control point one too many times. While it may seem beneficial to turtle, many teams prefer not to do it, as it prevents the turtling team from winning (unless their objective is to stall for time, such as on [[Attack/Defend|Attack/Defend maps]]). It is also discouraged during [[sudden death]] itself, as opposing Engineers can end up prolonging the round into a [[Match outcomes#Stalemate|stalemate]]. This strategy should be a last resort used by a losing team when the opposing team is stacked. | ||
| + | |||
| + | == How to Turtle == | ||
| + | *Position yourself at a choke point. Choke points are ideal locations because the opposing team must pass through these close-quarter locations in order to reach their destination. It's also a good idea to set up a fort in an alcove or somewhere tucked away, but also able to shoot at people. | ||
| + | *Make sure you can last at that location for an extended period of time; one issue with turtling is that the enemy team can whittle down your health and ammunition. Have an Engineer deploy a Dispenser to address this problem. A [[Medic]] is also very helpful, as the healing and [[ÜberCharge]]s are great for stopping enemy advances. | ||
| + | *There is strength in numbers. Multiple teammates are usually required for a successful turtle to occur. Large forts of three or four Engineers often require multiple ÜberCharges deployed within a minute of each other to be broken through. | ||
| + | |||
| + | == How to Break Through a Turtle == | ||
| + | *As with most strategies, a coordinated assault is the ideal way to break down a turtle. A Medic with an ÜberCharge paired with an assault class, especially a Heavy, is the most effective way to break through a turtle, since the invincibility will allow you to survive the enemy Sentry Guns and attacks as you break up the position. The rest of the team should follow in behind the invulnerable pair to provide support and clean up the area. The [[Spy]] can also sap the enemy team's buildings, allowing your team's heavy-hitting classes to quickly move in and eliminate the threat. | ||
| + | *[[Kritzkrieg]] ÜberCharges are not recommended, as [[Critical hits|Crits]] do not affect buildings. In addition, the lack of invincibility can leave you very vulnerable to enemy attacks. A couple of well-placed critical rockets, however, could kill the Engineers, allowing a Spy to sap the Sentry Guns. The best ubercharge for an assault on a sentry fort is the default one, as the massive combined firepower of Sentry Guns will take down anything apart from that. | ||
| + | *Single, uncoordinated ÜberCharges or lone Spies may fail, since they will not have enough firepower to take down the opposing team. While a single person may be able to take out some of the enemy's defenses, the enemy will quickly recover from the damages. | ||
| + | *The [[Scout]] can use [[Bonk! Atomic Punch]] to distract the Sentry Guns. Spies can sap the distracted sentry and other classes can destroy the distracted Sentry Guns. For a brief moment, a swarm of five Spies can manage to overcome a fort, but those Spies should quickly switch back into other classes after the job is done. | ||
| + | *Remember to destroy the Dispensers. If a Sentry Gun is destroyed but an Engineer's accompanying Dispenser is not, then a new level three Sentry can be rebuilt very quickly. The more damage you do to an Engineer's work, the more you can guarantee he won't be returning to that particular sentry spot. | ||
| + | *Sending a Spy to sap the [[Teleporter]] entrances will slow Engineers and other classes down. This might give other people in your team a chance to wipe out the turtle. Sometimes, an Engineer can weave through your defenses and set up a Teleporter somewhere unexpected. Destroying that sentry fort is key to preventing a constant barrage of assault troops materializing out of nowhere. | ||
| + | *When in sudden death, it's best to go for the Engineers immediately, as any buildings they have built will be destroyed upon their death. | ||
| + | *If the Engineer is in a well-fortified spot and Spies cannot get to the Engineer, using the [[Telefrag]] to kill the Engineer is always an option. Places where there are only one front to enter from are generally rare in Team Fortress 2. If your enemy finds one you can guarantee they'll be using it. | ||
| + | *Look for areas with a clear shot to the buildings that still lie outside of the Sentry Gun's range. If such a location is available, inform your team's Sniper. A single [[headshot]] will drop an Engineer and provide a Spy with ample time to sap through the defenses. Engineers are often easy targets for Snipers as they will be still as they upgrade their buildings. A smart Engineer, however, will deny a direct line of sight or an exposed helmet. | ||
| + | *A [[Demoman]] can lob his Stickybombs all around a turtle if defensive cover is available. An Engineer is forced to break his turtle in order to dispose of the bombs, leaving the buildings vulnerable. If the Engineer refuses to detach himself, simply detonate your Stickies and take out the whole nest. | ||
| + | *Have two Medics heal one target. One Medic uses the Stock Medi Gun, the other uses the Quick-Fix. The Quick-Fix provides immunity to knockback, while stock grants invincibility. Pyro, Demoman, and Direct Hit Soldier are the best choices for this tactic. | ||
| + | |||
| + | ==How to Prevent Turtling== | ||
| + | *Most of the time, the best action is to push forward with a strong offense. The main weakness of a turtle is the amount of time necessary to set up the proper defenses. If your team can swiftly move in before the enemy team has time to set up, then their turtle will not succeed. This, however, becomes a problem if the enemy team starts turtling at the very beginning of the round, creating strong defenses for you very early on. | ||
| + | *Watch for any warning signs; if the opposing team is not pushing forward, it's most likely that they've fallen back and built a turtle in their base. These can be deceptive, as a large horde of enemy troops may just appear and engage you as you scramble towards the control point. | ||
| + | *At the very beginning of a turtle, a good [[Spy]] can just come in and sap every building, then eliminate any other threat. The damage caused by the Spy when the [[Dispensers]] have a low level or are not even built will likely cause the turtle to fail or take a very long time to rebuild to the point that your team can easily come in and destroy any remaining buildings. | ||
| + | |||
| + | == Gallery == | ||
| + | <gallery> | ||
| + | File:Turtling 2Fort.png|Turtling inside RED's intel room inside [[2Fort]]. | ||
| + | </gallery> | ||
| − | + | ==Video Example== | |
| − | + | {{youtube|14wQsDeJ3JM}} | |
| − | |||
| − | |||
| − | |||
| − | |||
| − | |||
| − | |||
| − | |||
| − | |||
| − | |||
| − | |||
| − | |||
| + | == See also == | ||
| + | * [[Glossary of player terms]] | ||
[[Category:Strategy]] | [[Category:Strategy]] | ||
[[Category:Glossary]] | [[Category:Glossary]] | ||
| + | [[Category:Community strategy]] | ||
Latest revision as of 19:11, 15 December 2023
| “ | Don't hide behind your toys, lad!
Click to listen
— The Demoman
|
” |
Turtling is a term that refers to a situation when a majority of team players purposefully decide to defend a specific location with the intent of not pushing forward. Just like a real turtle, the team hides inside of its "shell" to prevent the enemy from pushing further into their side of the map. Turtling usually takes place at chokepoints found throughout the map as teams cannot avoid passing through these points. This strategy is usually associated with the Engineer class, which uses Sentry Guns and Dispensers to fortify a specific location.
Turtling is frowned upon by many players, as it is labeled a form of camping and considered a cheap strategy that doesn't require much skill. As such, turtling often occurs when a stronger team has pushed back the weaker opposition onto the last remaining control point one too many times. While it may seem beneficial to turtle, many teams prefer not to do it, as it prevents the turtling team from winning (unless their objective is to stall for time, such as on Attack/Defend maps). It is also discouraged during sudden death itself, as opposing Engineers can end up prolonging the round into a stalemate. This strategy should be a last resort used by a losing team when the opposing team is stacked.
Contents
How to Turtle
- Position yourself at a choke point. Choke points are ideal locations because the opposing team must pass through these close-quarter locations in order to reach their destination. It's also a good idea to set up a fort in an alcove or somewhere tucked away, but also able to shoot at people.
- Make sure you can last at that location for an extended period of time; one issue with turtling is that the enemy team can whittle down your health and ammunition. Have an Engineer deploy a Dispenser to address this problem. A Medic is also very helpful, as the healing and ÜberCharges are great for stopping enemy advances.
- There is strength in numbers. Multiple teammates are usually required for a successful turtle to occur. Large forts of three or four Engineers often require multiple ÜberCharges deployed within a minute of each other to be broken through.
How to Break Through a Turtle
- As with most strategies, a coordinated assault is the ideal way to break down a turtle. A Medic with an ÜberCharge paired with an assault class, especially a Heavy, is the most effective way to break through a turtle, since the invincibility will allow you to survive the enemy Sentry Guns and attacks as you break up the position. The rest of the team should follow in behind the invulnerable pair to provide support and clean up the area. The Spy can also sap the enemy team's buildings, allowing your team's heavy-hitting classes to quickly move in and eliminate the threat.
- Kritzkrieg ÜberCharges are not recommended, as Crits do not affect buildings. In addition, the lack of invincibility can leave you very vulnerable to enemy attacks. A couple of well-placed critical rockets, however, could kill the Engineers, allowing a Spy to sap the Sentry Guns. The best ubercharge for an assault on a sentry fort is the default one, as the massive combined firepower of Sentry Guns will take down anything apart from that.
- Single, uncoordinated ÜberCharges or lone Spies may fail, since they will not have enough firepower to take down the opposing team. While a single person may be able to take out some of the enemy's defenses, the enemy will quickly recover from the damages.
- The Scout can use Bonk! Atomic Punch to distract the Sentry Guns. Spies can sap the distracted sentry and other classes can destroy the distracted Sentry Guns. For a brief moment, a swarm of five Spies can manage to overcome a fort, but those Spies should quickly switch back into other classes after the job is done.
- Remember to destroy the Dispensers. If a Sentry Gun is destroyed but an Engineer's accompanying Dispenser is not, then a new level three Sentry can be rebuilt very quickly. The more damage you do to an Engineer's work, the more you can guarantee he won't be returning to that particular sentry spot.
- Sending a Spy to sap the Teleporter entrances will slow Engineers and other classes down. This might give other people in your team a chance to wipe out the turtle. Sometimes, an Engineer can weave through your defenses and set up a Teleporter somewhere unexpected. Destroying that sentry fort is key to preventing a constant barrage of assault troops materializing out of nowhere.
- When in sudden death, it's best to go for the Engineers immediately, as any buildings they have built will be destroyed upon their death.
- If the Engineer is in a well-fortified spot and Spies cannot get to the Engineer, using the Telefrag to kill the Engineer is always an option. Places where there are only one front to enter from are generally rare in Team Fortress 2. If your enemy finds one you can guarantee they'll be using it.
- Look for areas with a clear shot to the buildings that still lie outside of the Sentry Gun's range. If such a location is available, inform your team's Sniper. A single headshot will drop an Engineer and provide a Spy with ample time to sap through the defenses. Engineers are often easy targets for Snipers as they will be still as they upgrade their buildings. A smart Engineer, however, will deny a direct line of sight or an exposed helmet.
- A Demoman can lob his Stickybombs all around a turtle if defensive cover is available. An Engineer is forced to break his turtle in order to dispose of the bombs, leaving the buildings vulnerable. If the Engineer refuses to detach himself, simply detonate your Stickies and take out the whole nest.
- Have two Medics heal one target. One Medic uses the Stock Medi Gun, the other uses the Quick-Fix. The Quick-Fix provides immunity to knockback, while stock grants invincibility. Pyro, Demoman, and Direct Hit Soldier are the best choices for this tactic.
How to Prevent Turtling
- Most of the time, the best action is to push forward with a strong offense. The main weakness of a turtle is the amount of time necessary to set up the proper defenses. If your team can swiftly move in before the enemy team has time to set up, then their turtle will not succeed. This, however, becomes a problem if the enemy team starts turtling at the very beginning of the round, creating strong defenses for you very early on.
- Watch for any warning signs; if the opposing team is not pushing forward, it's most likely that they've fallen back and built a turtle in their base. These can be deceptive, as a large horde of enemy troops may just appear and engage you as you scramble towards the control point.
- At the very beginning of a turtle, a good Spy can just come in and sap every building, then eliminate any other threat. The damage caused by the Spy when the Dispensers have a low level or are not even built will likely cause the turtle to fail or take a very long time to rebuild to the point that your team can easily come in and destroy any remaining buildings.
Gallery
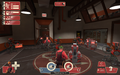
Turtling inside RED's intel room inside 2Fort.
