Difference between revisions of "User:Lolimsogreat21/Sandbox1"
(→General Strategy) |
(→Class-specific strategy) |
||
| Line 47: | Line 47: | ||
== Class-specific strategy == | == Class-specific strategy == | ||
=== {{class link|Scout}} === | === {{class link|Scout}} === | ||
| + | ====Offense==== | ||
| + | * Up until the Sentry Deck, you should be able to quite easily dominate the battlefield on checkpoint A. | ||
| + | * If you wish to flank behind the Red defenses on point A, you can do so through the A Point Building, since it is the only route not covered by the appropriately named Sentry Deck. | ||
| + | ** However, there is sometimes a [[Sentry Gun]] inside the A Point Building itself, so beware. | ||
| + | * As the defenders are retreating from Point A, you can surprise them from their sides by flanking through either the Chute, or the A Point Building. | ||
| + | * The [[Bonk! Atomic Punch]] is useful when attempting to break through the Checkpoint B's defenses. | ||
| + | * You can utilize one of your jump-extending weapons, such as the [[Atomizer]] or the [[Winger]], in order to climb up the Dropdown. | ||
| + | * The Dropdown can be used in order to completely circumnavigate the Point C, thus allowing you to reach the Red spawn and subsequently backline. | ||
| + | * Be careful when traversing through the Factory, as you will be vulnerable to explosives in its tight rooms and corridors. Use your speed to get out of an unfavourable situation. | ||
| + | * The Final point usually becomes infested with Red Sentry Guns, which can either be bypassed with the Bonk! Atomic Punch or spammed out from a far with the [[Pistol]]. | ||
=== {{class link|Soldier}} === | === {{class link|Soldier}} === | ||
Revision as of 21:55, 11 January 2022
| “Sun Tzu's got nothing on us!” This article is a Community strategy stub. As such, it is not complete. You can help the Team Fortress Wiki Community Strategy Project by expanding it. |
| Lolimsogreat21 | |
|---|---|

| |
| Basic Information | |
| Developer(s): | {{{map-developer}}} |
| Map Info | |
| Environment: | Smissmas |
| Setting: | Night, snowy |
| Hazards: | Pitfalls |
| Map Photos | |
This article is about Community Polar strategy.
Note: It is recommended to read the main Polar article first to become familiar with the names of key map locations used in this article.
Contents
General Strategy
Offense
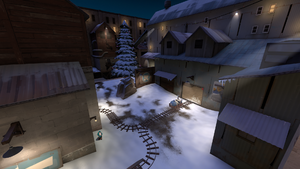
- Defenders often like to overextend into the Christmas tree, opening up an opportunity to encircle and destroy them.
- The Brick Building acts as a powerful shortcut directly to checkpoint A. It is often the best position from which to assault the Sentry Deck.
- If the attackers are capable of successfully reaching the A Point Building, they will be granted with High ground directly overlooking the Sentry Deck.
- Later in the round, the A Point Building is also very important when assaulting the checkpoint B.
- Flanking classes can make use of the Chute in order to flank around the defenders which are retreating from checkpoint A.
- Although the Jenkin Coal.co might seem as good route to point B, it is often more safer to directly follow the Cart's tracks, as they are much wider and not as "chokey".
- Meanwhile, the aforementioned Jenkin Coal.co is better suited for an Über push, rather then dry-pushing.
- Having Soldiers which can reach the Dropdown and use its immense height advantage to bombard the Reds defending point C below, is very powerful.
- The Flank can be used to discretely reach the Red's third spawn.
- On Checkpoint D, taking control over the Factory is simply imperative for winning the round.
- To do this, a Teleporter can be setup in the room above the Dropdown, from which attackers can launch assault after assault onto the Factory's upper floors.
Defense
- As the attackers are pushing the Cart up to Checkpoint A, it is possible to put them in a crossfire between the Sentry Deck and the A Point Building.
- Keeping an eye on the Brick Building is important, since the attacking team often utilizes it for offensive purposes.
- The Concrete platform and the Jenkin Coal.co can work together to put the attackers advancing on point B in a crossfire.
- Holding on to the Jenkin Coal.co is not absolutely necessary, but it is useful for certain diversion and flanking tactics, which can come in handy.
- For defending checkpoint C, it is important to keep an eye out on the Dropdown, since attackers often love to setup in there, as well as use it to flank above the Gates.
- The Factory is immensely important on point D and should be defended at all costs. This task is best achieved by Soldiers and Pyros, due to their close-ranged nature.
Class-specific strategy
 Scout
Scout
Offense
- Up until the Sentry Deck, you should be able to quite easily dominate the battlefield on checkpoint A.
- If you wish to flank behind the Red defenses on point A, you can do so through the A Point Building, since it is the only route not covered by the appropriately named Sentry Deck.
- However, there is sometimes a Sentry Gun inside the A Point Building itself, so beware.
- As the defenders are retreating from Point A, you can surprise them from their sides by flanking through either the Chute, or the A Point Building.
- The Bonk! Atomic Punch is useful when attempting to break through the Checkpoint B's defenses.
- You can utilize one of your jump-extending weapons, such as the Atomizer or the Winger, in order to climb up the Dropdown.
- The Dropdown can be used in order to completely circumnavigate the Point C, thus allowing you to reach the Red spawn and subsequently backline.
- Be careful when traversing through the Factory, as you will be vulnerable to explosives in its tight rooms and corridors. Use your speed to get out of an unfavourable situation.
- The Final point usually becomes infested with Red Sentry Guns, which can either be bypassed with the Bonk! Atomic Punch or spammed out from a far with the Pistol.
