Community Fastlane strategy
| “Sun Tzu's got nothing on us!” This article is a Community strategy stub. As such, it is not complete. You can help the Team Fortress Wiki Community Strategy Project by expanding it. Notes: Expand the "General Strategy" section to cover map locations in more detail. Potentially look at the class-specific strategies as well. |
| Fastlane | |
|---|---|

| |
| Basic Information | |
| Map type: | Control Point |
| File name: | cp_fastlane
|
| Released: | June 19, 2008 Patch (Pyro Update) |
| Developer(s): | Arttu "SK" Mäki |
| Map Info | |
| Environment: | Desert |
| Setting: | Daylight, sunny |
| Map Items | |
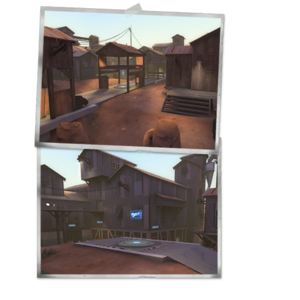
| Map Photos | |
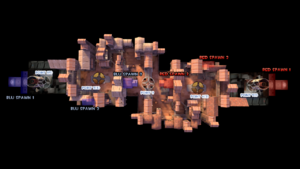
| Map Overview | |
This article is about Community Fastlane strategy.
Note: It is recommended to read the main Fastlane article first to become familiar with the names of key map locations used in this article.
General strategy
- The buildings and areas between the midpoint and a team's base are good territory for Pyros, as those areas are rather tight to get through and have a lot of corners. Demomen and Soldiers also do well inside the buildings.
- Conversely, control points 2-4 have very open spaces that good Snipers will thrive off of.
- You can rocket jump and sticky jump onto the structure at Control point 3, thus having high ground advantage and the ability to surprise people who are capping the point.
Class-specific strategy
 Scout
Scout
The Scout has great potential on this map. There are a lot of crates and obstacles lying around both indoors and outdoors. Make this map your playground and you will harass a mass of opponents and help your team to win the round.
Offense
Attacking Control Point 3
- Fastlane is a good map for Scouts; the routes to the middle point all more or less take the same amount of time, Scouts always get there first, and the map is very open with many flanking routes.
- On the middle point, Scouts need to be dealing with enemy Scouts first and foremost, as usual, and then either capturing the control point if the enemy team is slow, or running around behind using the left building or right valley routes.
- Due to the openness of the area it is quite easy to dodge explosives, so you can stay in the main area and harass the enemy team this way.
- However, the openness of the area means you will need to be constantly watching all possible areas for enemies attacking you or your team from, with most of your attention being focused on the areas near the health kits.
- You may find it impossible to do huge amounts of damage here due to the height advantage given by the point itself; however, you can do a good deal of damage to an enemy team by cleaning up people with low health.
- The final thing you need to do is be on the lookout for enemy Snipers, who will appear on the balcony on the far right. Take these out as quickly as possible.
Attacking Control Point 2/4
- The strategy for this area is very similar to attacking the middle point, except the enemy team will often have an ÜberCharge ready.
- Your best bet is to run on and off the point as usual to cap it off while harassing the enemy team, going behind here is of limited use unless you're going for a back-cap.
- If you do go for a back-cap, the best way to go is usually the top tunnel, though this is more easily seen by enemies, or the bottom right tunnel.
- Once again, the openness of the area allows you to easily dodge explosives here, so you may be able to get an easy kill on an enemy Demoman.
Attacking Control Point 1/5
- In this area, Scouts are somewhat limited as it is very enclosed. However, the upper balcony, if not covered by Sentry Guns, is a very good place to harass the enemy from.
- Other than distracting the enemy from your team, watching for people escaping out to the second point to back-cap, and attempting to cap the final point yourself, a Scout has nothing to do here.
- The upper area is usually the best place to go, as if someone does run for a back-cap, you can quickly get back to the second point to deal with them.
Defense
Defending Control Point 3
- Defending this area as a Scout is very straightforward: you only need to watch two areas, and your team will do the rest.
- First of all, the left side house is a good place to watch, especially if you can get inside, as it is a place that Demomen like to place sticky traps, and so you can easily ambush them here before they get the chance to set up. Furthermore, you can prevent enemy Scouts from getting behind your team here.
- Secondly, the right valley needs to be watched, again for enemy Scouts, but also for Snipers attempting to pick off people entering the middle point.
- Aside from this, defending the middle point is usually a waiting game to see which team is going to attack the other first, as it is very hard to get behind the enemy without being noticed here.
Defending Control Point 2/4
- While defending this area you have two choices: straight up defense or full on attack.
- The areas you need to stand in for both these choices are much the same, you can attack down the left and right flanking routes to get behind the enemy, or you can defend said flanking routes, occasionally checking the middle.
- When the enemy moves in to attack you, hiding in the houses around the point can allow you to come out and pick them off as they try and capture the point.
Defending Control Point 1/5
- Scouts should be trying to flank the enemy team by dropping down from the catwalks to kill enemy medics and pick off enemies trying to reach health packs.
- Aside from this, getting out down the left areas to back-cap the enemy is the only other thing you can do. Be prepared to get out as quickly as possible once the enemy starts moving in.
 Soldier
General
- At the central point, Soldiers should avoid being caught in the open, where hitting enemies with rockets is more difficult. Aggressive players may find it helpful to rocket jump to the roof directly above the control point, or to slow the enemy down by firing rockets at the doorways on the opposing side.
- While defending the final control point, Soldiers may chose to stay on the walkways overlooking the point. From here, players can guard against enemies approaching from the lower hallways or from the battlements. The straight-line path of rockets enables Soldiers to block foes moving through these straight paths, and inflict damage from above upon enemies standing on the point itself.
 Pyro
Pyro
General
- The open yards of Fastlane's middle and central points can be very dangerous for Pyros, who may find it difficult to retaliate from a distance or to find cover. Sticking to narrower paths and hallways can enable Pyros to set up ambushes and easily trap foes with the Compression blast of their primary weapons.
 Demoman
General
- The blind corners and doorways present in every part of Fastlane provide Demomen with easily watched sticky bomb traps. In fact, at the central point, Demomen can plant bombs on the pillars and walls to trap unsuspecting enemies.
- The second point can be dangerous for Demomen standing on the point itself. Staying on either side offers a good view of the point and its defenders without placing the Demoman out in the open.
 Heavy
Heavy
General
- Heavies shine as a defensive class here, especially on the final two points. It is very easy to rack up kills in either area of the base.
 Engineer
General
- There are very few good spots for Engineers to set up here. It may be better to set up early at your base's entrance if your team is losing the midpoint, to prepare for the enemies to come through. A decent spot to set up for defending Control point 2/4 is on the catwalk connecting the side area to the main base if the second point still needs defending, but it has low range from up here and is susceptible to Spies. Another common placement is at the bottom of the stairs leading through to the central point, as this usually isn't noticed until it's too late but if attacked from the gully, Demomen will be able to destroy it.
- However, there are many corners in the map that work as places to put Sentry Guns, as enemies are not likely to check them. Using this strategy, Sentry Guns should be moved after every few kills to keep the enemy on their toes.
- When you are defending the last point, a good spot for a Sentry Gun would be at the doorway into your base that is accessed from the catwalk, or down the end of the hallway the doorway at the catwalk leads to.
- For defending nearer to the final point's room than the aforementioned examples, a good spot to set up a Sentry Gun is on the catwalk shortly up the ramp to the left from the spawn room. Putting up a Dispenser in the doorway closer to the second floor exit might seem useless and a waste of time due to the nearby metal, but it's a good idea to block out Soldiers from attacking from a distance, and keeping enemies (namely, Spies) from coming in from behind (as they cannot pass through Dispensers).
 Medic
Medic
General
- The middle and second points provide very long sight lines for Medics. Danger can be seen from far away, and avoided with ease. This is not true in the narrower hallways connecting each point to the next. While moving though these areas, stay behind your Medic buddy to avoid an unexpected and inescapable death.
 Sniper
General
- Snipers benefit more than any other class from the open nature of Fastlane's three middle points. In these areas, sniping from doorways can provide a clear shot at a large portion of the map without exposing the Sniper to danger.
 Spy
Spy
General
- Spies do wonders in the open areas, but have trouble getting to them. Going through either of the buildings rather than around makes it less likely to bump into people and be discovered.
- There are many corners which are excellent for Spies to hide in, because the enemy will be facing away from you to go through doorways, letting you uncloak for a quick backstab. A great place to do this is in the building that leads to the last point (for either team). This is best done while your team tries to capture the fourth point, as there will be many Snipers going to the catwalk. After a few kills, it's wise to move up a few feet or so, as they will be anticipating you around that corner.
- Spies can use the Cloak and Dagger camp below staircases to recharge their Cloak without being seen. For example, the small staircase leading to the larger staircase to the catwalk is an ideal place for enemy Spies to camp at, as there is a large bush which Spies can hide in and peer down through the cracks of the stair's boards.

