 | Cette page est en cours de traduction en français.
Si vous parlez français, écrivez sur la page de discussion ou contactez ceux qui ont déjà contribué à cette page (en regardant l'historique).
|
Le Scout est une classe rapide et agile capable de d'attaques éclairs, et qui compense sa faible résistance aux dégâts par sa grande puissance à courte portée. Les Scouts excellent dans l'art de l'esquive, car ils peuvent changer brusquement de direction en plein saut grâce à leur double saut. En général, le meilleur endroit pour les attaquer est dans des lieux étroits, afin de les empêcher de tirer profit de leur agilité. Souvenez vous qu'en fonction de leur équipiement, les Scouts peuvent assomer leurs ennemis, s'éteindre et éteindre leurs alliés des flammes de Pyro, ou encore devenir invulnérables au dégâts pendant quelques secondes. Les attaquer à distance est généralement le meilleur moyen de les mettre en difficulté, à cause de leur manque d'armes efficaces à longue distance.
Général
 Rôle Rôle
|
- Lorsque vous voyez un scout tentant de prendre votre équipe à revers ou atteindre un objectif par un chemin detourné, gardez toujours l'oeil ouvert sur lui, de façon à avoir le temps de réagir s'il tente de s'en prendre à vous par derrière.
- Un Scout transportant vos documents tentera en général d'éviter les combats directs sur le chemin du retour vers sa base, en prenant des chemins detournés ou praticables seulement par lui et sa capacité de double saut. Essayez de bloquer ces routes ou d'utiliser des armes avec recul, pour le projeter vers vos alliés ou dans le vide.
- Si un Scout essaie de tendre une embuscade à un allié peu vigilent, prévenez toujours l'allié et aidez le pour vous débarrasser du Scout avant qu'il ne fuit.
|
 Santé Santé
|
- Sa faible resistance aux dégâts le rend très vulnérable aux dégâts directs d'une roquette ou d'une grenade; elles le laisseront quasi mort.
- Si un Scout a été gravement blessé par votre roquette, changez pour votre fusil à pompe, afin d'économiser vos munitions et de vous débarrasser du gêneur plus rapidement.
|
 Vitesse Vitesse
|
- Vous devez penser plus vite que le Scout lui même afin d'anticiper ses mouvements rapides. Souvenez vous qu'il est la classe la plus rapide du jeu.
- Essayez d'anticiper où le Scout attériera après son double saut pour tirer vos projectiles à cet endroit, il ne pourra pas les éviter.
|
 Puissance Puissance
|
- Le Scout est vraiment dévastateur à courte portée avec ses armes primaires, essayez donc de le combattre à moyenne ou longue distance de façon à éviter de prendre des dégâts supplémentaires.
- Les Scouts les moins expérimentés tendent à surcompenser leur manque d'éxpérience en tirant aléatoirement dans votre direction avec de larges mouvements de souris et en courant dans tous les sens pour éviter vos dommages. Parfois, si vous restez quasiment immobiles ces Scouts tireront autour de vous sans vous toucher, en essayant d'anticiper vos mouvements.
|
Armes spécifiques
Une liste d'astuces utiles à propos des outils du Scout
Armes primaires
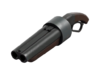
Fusil à Dispersion
|
- The Scattergun has more damage ramp-up at close range than other weapons, so it may be best to keep Scouts at mid range.
- The Scattergun is much less effective if few pellets hit its target. If a Scout is attacking you, jump around and move erratically to minimize the damage that you take.
|
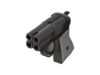
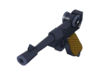
Force-de-la-Nature
|
- The Force-A-Nature has only two shots to a clip and takes a while to reload. Take advantage of this and attack the Scout between reloads.
- The Force-A-Nature has a knock back ability, meaning he can push enemy players into environmental hazards such as saw blades, trains and off cliffs. Avoid this by trying to flank around him and away from said hazard.
|
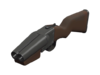
Shortstop
|
- The Shortstop has a tight spread suited to medium range. If you close the distance, the Scout may find it more difficult to hit you.
|
Armes secondaires
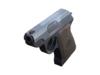 
Pistolet / Lugermorph
|
- When a Scout uses his Pistol, his primary weapon may be out of ammo. Move in and attack, as the Pistol is less effective at close range.
- The Pistol can only hold 4 full clips of ammo. If you catch a Scout who is low on Pistol ammunition, fight at mid-range to take advantage of his inability to use his secondary weapon.
|

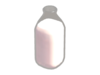
Bonk! Atomic Punch
|
- Bonk! is designed to get a Scout past choke points. Impede his movement until the effect runs out by just body blocking him, or by using Knockbac, Stun, or Slowdown.
|

Crit-a-Cola
|
- Crit-a-Cola is excellent for ambushing; however, if you are watchful, the attacking Scout's advantage will disappear.
|
Mad Milk
|
- If you get hit by Mad Milk, try to retreat or deal with your assailant quickly, as he will have the advantage in a protracted battle.
|
Armes de mélée
- The Scout's mobility makes it difficult to retreat from or fend off a melee attack. Try to keep the Scout in your view, and use your own melee/close-range weapons to deal with him. Weapons with knock back effects may prove useful in dispatching your assailant.
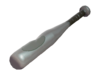 
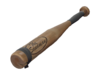
Batte / Maquereau Sacré
|
- The Bat deals less damage than most other melee weapons. Just be careful and watch for Scouts who may try to circle-strafe you while attacking with the Bat.
|
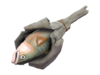
Marchand de Sable
|
- While stunned, try to stay alive and keep your aim on the Scout so that you can immediately counter-attack once the effect wears off.
- You can still attempt a Taunt Kill if stunned; this can kill a Scout rushing towards you.
|
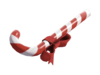
Sucre d'orge
|
- When equipped with this weapon, the Scout has a 25% explosion damage vulnerability. Switch to an explosive weapon for additional damage.
- With this weapon equipped, enemies killed or assisted in being killed by the Scout will drop small Health kits. Try to steal them before the Scout can heal.
|
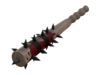
Bastonneur Bostonien
|
- Jump away from Scouts rushing forward with the Boston Basher. If you're lucky, the Scout will miss his swing, take damage from the miss, and be distracted by the bleeding effect.
|
Set de classe
La Livraison Spéciale
|
- Be aware of the extra 25 health granted by the item set, and fight accordingly. The Mad Milk increases the Scout's chances for survival even further, so attack him with as much firepower as you can muster.
|
Voir aussi


