Difference between revisions of "Smissmas 2014/ko"
m (→무기 변경사항) |
|||
| Line 42: | Line 42: | ||
| width="60px" style="background: #6B0000;" rowspan="4" | {{icon class|Scout}}<br/>'''[[Scout|<span style="color: #FFF;">Scout</span>]]''' | | width="60px" style="background: #6B0000;" rowspan="4" | {{icon class|Scout}}<br/>'''[[Scout|<span style="color: #FFF;">Scout</span>]]''' | ||
| align="center" style="background: #990000;" | {{item icon|Co-Pilot|75px}} | | align="center" style="background: #990000;" | {{item icon|Co-Pilot|75px}} | ||
| − | | style="background: #FAE5E5;"| '''[[Co-Pilot]]''' | + | | style="background: #FAE5E5;"| '''[[Co-Pilot/ko|Co-Pilot]]''' |
|- | |- | ||
| align="center" style="background: #990000;" | {{item icon|Courtier's Collar|75px}} | | align="center" style="background: #990000;" | {{item icon|Courtier's Collar|75px}} | ||
| − | | style="background: #FAE5E5;"| '''[[Courtier's Collar]]''' | + | | style="background: #FAE5E5;"| '''[[Courtier's Collar/ko|Courtier's Collar]]''' |
|- | |- | ||
| align="center" style="background: #990000;" | {{item icon|Harlequin's Hooves|75px}} | | align="center" style="background: #990000;" | {{item icon|Harlequin's Hooves|75px}} | ||
| − | | style="background: #FAE5E5;"| '''[[Harlequin's Hooves]]''' | + | | style="background: #FAE5E5;"| '''[[Harlequin's Hooves/ko|Harlequin's Hooves]]''' |
|- | |- | ||
| align="center" style="background: #990000;" | {{item icon|Mountebank's Masque|75px}} | | align="center" style="background: #990000;" | {{item icon|Mountebank's Masque|75px}} | ||
| − | | style="background: #FAE5E5;"| '''[[Mountebank's Masque]]''' | + | | style="background: #FAE5E5;"| '''[[Mountebank's Masque/ko|Mountebank's Masque]]''' |
|- | |- | ||
| width="60px" style="background: #6B0000;" | {{icon class|Soldier}}<br/>'''[[Soldier|<span style="color: #FFF;">Soldier</span>]]''' | | width="60px" style="background: #6B0000;" | {{icon class|Soldier}}<br/>'''[[Soldier|<span style="color: #FFF;">Soldier</span>]]''' | ||
| align="center" style="background: #990000;" | {{item icon|Skullcap|75px}} | | align="center" style="background: #990000;" | {{item icon|Skullcap|75px}} | ||
| − | | style="background: #FAE5E5;"| '''[[Skullcap]]''' | + | | style="background: #FAE5E5;"| '''[[Skullcap/ko|Skullcap]]''' |
|- | |- | ||
| width="60px" style="background: #6B0000;" rowspan="5" | {{icon class|Pyro}}<br/>'''[[Pyro|<span style="color: #FFF;">Pyro</span>]]''' | | width="60px" style="background: #6B0000;" rowspan="5" | {{icon class|Pyro}}<br/>'''[[Pyro|<span style="color: #FFF;">Pyro</span>]]''' | ||
| align="center" style="background: #990000;" | {{item icon|Black Knight's Bascinet|75px}} | | align="center" style="background: #990000;" | {{item icon|Black Knight's Bascinet|75px}} | ||
| − | | style="background: #FAE5E5;"| '''[[Black Knight's Bascinet]]''' | + | | style="background: #FAE5E5;"| '''[[Black Knight's Bascinet/ko|Black Knight's Bascinet]]''' |
|- | |- | ||
| align="center" style="background: #990000;" | {{item icon|Charred Chainmail|75px}} | | align="center" style="background: #990000;" | {{item icon|Charred Chainmail|75px}} | ||
| − | | style="background: #FAE5E5;"| '''[[Charred Chainmail]]''' | + | | style="background: #FAE5E5;"| '''[[Charred Chainmail/ko|Charred Chainmail]]''' |
|- | |- | ||
| align="center" style="background: #990000;" | {{item icon|Pyromancer's Hood|75px}} | | align="center" style="background: #990000;" | {{item icon|Pyromancer's Hood|75px}} | ||
| − | | style="background: #FAE5E5;"| '''[[Pyromancer's Hood]]''' | + | | style="background: #FAE5E5;"| '''[[Pyromancer's Hood/ko|Pyromancer's Hood]]''' |
|- | |- | ||
| align="center" style="background: #990000;" | {{item icon|Pyromancer's Raiments|75px}} | | align="center" style="background: #990000;" | {{item icon|Pyromancer's Raiments|75px}} | ||
| − | | style="background: #FAE5E5;"| '''[[Pyromancer's Raiments]]''' | + | | style="background: #FAE5E5;"| '''[[Pyromancer's Raiments/ko|Pyromancer's Raiments]]''' |
|- | |- | ||
| align="center" style="background: #990000;" | {{item icon|Torcher's Tabard|75px}} | | align="center" style="background: #990000;" | {{item icon|Torcher's Tabard|75px}} | ||
| − | | style="background: #FAE5E5;"| '''[[Torcher's Tabard]]''' | + | | style="background: #FAE5E5;"| '''[[Torcher's Tabard/ko|Torcher's Tabard]]''' |
|- | |- | ||
| width="60px" style="background: #6B0000;" rowspan="3" | {{icon class|Demoman}}<br/>'''[[Demoman|<span style="color: #FFF;">Demoman</span>]]''' | | width="60px" style="background: #6B0000;" rowspan="3" | {{icon class|Demoman}}<br/>'''[[Demoman|<span style="color: #FFF;">Demoman</span>]]''' | ||
| align="center" style="background: #990000;" | {{item icon|Scot Bonnet|75px}} | | align="center" style="background: #990000;" | {{item icon|Scot Bonnet|75px}} | ||
| − | | style="background: #FAE5E5;"| '''[[Scot Bonnet]]''' | + | | style="background: #FAE5E5;"| '''[[Scot Bonnet/ko|Scot Bonnet]]''' |
|- | |- | ||
| align="center" style="background: #990000;" | {{item icon|Storm Stompers|75px}} | | align="center" style="background: #990000;" | {{item icon|Storm Stompers|75px}} | ||
| − | | style="background: #FAE5E5;"| '''[[Storm Stompers]]''' | + | | style="background: #FAE5E5;"| '''[[Storm Stompers/ko|Storm Stompers]]''' |
|- | |- | ||
| align="center" style="background: #990000;" | {{item icon|Valhalla Helm|75px}} | | align="center" style="background: #990000;" | {{item icon|Valhalla Helm|75px}} | ||
| − | | style="background: #FAE5E5;"| '''[[Valhalla Helm]]''' | + | | style="background: #FAE5E5;"| '''[[Valhalla Helm/ko|Valhalla Helm]]''' |
|- | |- | ||
| width="60px" style="background: #6B0000;" rowspan="2" | {{icon class|Heavy}}<br/>'''[[Heavy|<span style="color: #FFF;">Heavy</span>]]''' | | width="60px" style="background: #6B0000;" rowspan="2" | {{icon class|Heavy}}<br/>'''[[Heavy|<span style="color: #FFF;">Heavy</span>]]''' | ||
| align="center" style="background: #990000;" | {{item icon|Old Man Frost|75px}} | | align="center" style="background: #990000;" | {{item icon|Old Man Frost|75px}} | ||
| − | | style="background: #FAE5E5;"| '''[[Old Man Frost]]''' | + | | style="background: #FAE5E5;"| '''[[Old Man Frost/ko|Old Man Frost]]''' |
|- | |- | ||
| align="center" style="background: #990000;" | {{item icon|Siberian Facehugger|75px}} | | align="center" style="background: #990000;" | {{item icon|Siberian Facehugger|75px}} | ||
| − | | style="background: #FAE5E5;"| '''[[Siberian Facehugger]]''' | + | | style="background: #FAE5E5;"| '''[[Siberian Facehugger/ko|Siberian Facehugger]]''' |
|- | |- | ||
| width="60px" style="background: #6B0000;" rowspan="5" | {{icon class|Engineer}}<br/>'''[[Engineer|<span style="color: #FFF;">Engineer</span>]]''' | | width="60px" style="background: #6B0000;" rowspan="5" | {{icon class|Engineer}}<br/>'''[[Engineer|<span style="color: #FFF;">Engineer</span>]]''' | ||
| align="center" style="background: #990000;" | {{item icon|Clubsy The Seal|75px}} | | align="center" style="background: #990000;" | {{item icon|Clubsy The Seal|75px}} | ||
| − | | style="background: #FAE5E5;"| '''[[Clubsy The Seal]]''' | + | | style="background: #FAE5E5;"| '''[[Clubsy The Seal/ko|Clubsy The Seal/ko]]''' |
|- | |- | ||
| align="center" style="background: #990000;" | {{item icon|Conagher's Combover|75px}} | | align="center" style="background: #990000;" | {{item icon|Conagher's Combover|75px}} | ||
| − | | style="background: #FAE5E5;"| '''[[Conagher's Combover]]''' | + | | style="background: #FAE5E5;"| '''[[Conagher's Combover/ko|Conagher's Combover]]''' |
|- | |- | ||
| align="center" style="background: #990000;" | {{item icon|Cop Caller|75px}} | | align="center" style="background: #990000;" | {{item icon|Cop Caller|75px}} | ||
| − | | style="background: #FAE5E5;"| '''[[Cop Caller]]''' | + | | style="background: #FAE5E5;"| '''[[Cop Caller/ko|Cop Caller]]''' |
|- | |- | ||
| align="center" style="background: #990000;" | {{item icon|Holstered Heaters|75px}} | | align="center" style="background: #990000;" | {{item icon|Holstered Heaters|75px}} | ||
| − | | style="background: #FAE5E5;"| '''[[Holstered Heaters]]''' | + | | style="background: #FAE5E5;"| '''[[Holstered Heaters/ko|Holstered Heaters]]''' |
|- | |- | ||
| align="center" style="background: #990000;" | {{item icon|Thermal Insulation Layer|75px}} | | align="center" style="background: #990000;" | {{item icon|Thermal Insulation Layer|75px}} | ||
| − | | style="background: #FAE5E5;"| '''[[Thermal Insulation Layer]]''' | + | | style="background: #FAE5E5;"| '''[[Thermal Insulation Layer/ko|Thermal Insulation Layer]]''' |
|- | |- | ||
| width="60px" style="background: #6B0000;" rowspan="2" | {{icon class|Medic}}<br/>'''[[Medic|<span style="color: #FFF;">Medic</span>]]''' | | width="60px" style="background: #6B0000;" rowspan="2" | {{icon class|Medic}}<br/>'''[[Medic|<span style="color: #FFF;">Medic</span>]]''' | ||
| align="center" style="background: #990000;" | {{item icon|Surgeon's Shako|75px}} | | align="center" style="background: #990000;" | {{item icon|Surgeon's Shako|75px}} | ||
| − | | style="background: #FAE5E5;"| '''[[Surgeon's Shako]]''' | + | | style="background: #FAE5E5;"| '''[[Surgeon's Shako/ko|Surgeon's Shako]]''' |
|- | |- | ||
| align="center" style="background: #990000;" | {{item icon|Unknown Mann|75px}} | | align="center" style="background: #990000;" | {{item icon|Unknown Mann|75px}} | ||
| − | | style="background: #FAE5E5;"| '''[[Unknown Mann]]''' | + | | style="background: #FAE5E5;"| '''[[Unknown Mann/ko|Unknown Mann]]''' |
|- | |- | ||
| width="60px" style="background: #6B0000;" rowspan="4" | {{icon class|Sniper}}<br/>'''[[Sniper|<span style="color: #FFF;">Sniper</span>]]''' | | width="60px" style="background: #6B0000;" rowspan="4" | {{icon class|Sniper}}<br/>'''[[Sniper|<span style="color: #FFF;">Sniper</span>]]''' | ||
| align="center" style="background: #990000;" | {{item icon|Bushman's Bristles|75px}} | | align="center" style="background: #990000;" | {{item icon|Bushman's Bristles|75px}} | ||
| − | | style="background: #FAE5E5;"| '''[[Bushman's Bristles]]''' | + | | style="background: #FAE5E5;"| '''[[Bushman's Bristles/ko|Bushman's Bristles]]''' |
|- | |- | ||
| align="center" style="background: #990000;" | {{item icon|Marksman's Mohair|75px}} | | align="center" style="background: #990000;" | {{item icon|Marksman's Mohair|75px}} | ||
| − | | style="background: #FAE5E5;"| '''[[Marksman's Mohair]]''' | + | | style="background: #FAE5E5;"| '''[[Marksman's Mohair/ko|Marksman's Mohair]]''' |
|- | |- | ||
| align="center" style="background: #990000;" | {{item icon|Professional's Ushanka|75px}} | | align="center" style="background: #990000;" | {{item icon|Professional's Ushanka|75px}} | ||
| − | | style="background: #FAE5E5;"| '''[[Professional's Ushanka]]''' | + | | style="background: #FAE5E5;"| '''[[Professional's Ushanka/ko|Professional's Ushanka]]''' |
|- | |- | ||
| align="center" style="background: #990000;" | {{item icon|Wally Pocket|75px}} | | align="center" style="background: #990000;" | {{item icon|Wally Pocket|75px}} | ||
| − | | style="background: #FAE5E5;"| '''[[Wally Pocket]]''' | + | | style="background: #FAE5E5;"| '''[[Wally Pocket/ko|Wally Pocket]]''' |
|- | |- | ||
| width="60px" style="background: #6B0000;" rowspan="3" | {{icon class|Spy}}<br/>'''[[Spy|<span style="color: #FFF;">Spy</span>]]''' | | width="60px" style="background: #6B0000;" rowspan="3" | {{icon class|Spy}}<br/>'''[[Spy|<span style="color: #FFF;">Spy</span>]]''' | ||
| align="center" style="background: #990000;" | {{item icon|Pocket Momma|75px}} | | align="center" style="background: #990000;" | {{item icon|Pocket Momma|75px}} | ||
| − | | style="background: #FAE5E5;"| '''[[Pocket Momma]]''' | + | | style="background: #FAE5E5;"| '''[[Pocket Momma/ko|Pocket Momma]]''' |
|- | |- | ||
| align="center" style="background: #990000;" | {{item icon|Puffy Provocateur|75px}} | | align="center" style="background: #990000;" | {{item icon|Puffy Provocateur|75px}} | ||
| − | | style="background: #FAE5E5;"| '''[[Puffy Provocateur]]''' | + | | style="background: #FAE5E5;"| '''[[Puffy Provocateur/ko|Puffy Provocateur]]''' |
|- | |- | ||
| align="center" style="background: #990000;" | {{item icon|Stealthy Scarf|75px}} | | align="center" style="background: #990000;" | {{item icon|Stealthy Scarf|75px}} | ||
| − | | style="background: #FAE5E5;"| '''[[Stealthy Scarf]]''' | + | | style="background: #FAE5E5;"| '''[[Stealthy Scarf/ko|Stealthy Scarf]]''' |
|- | |- | ||
|} | |} | ||
Revision as of 03:26, 25 December 2014
 | 이 페이지는 한국어로 번역 중입니다. 한국어를 능숙하게 하신다면 토론 페이지에 글을 남기거나 문서 역사를 참고하여 문서 번역에 참여한 번역가들과 이를 상의하시기 바랍니다. |
| “ | Smissmas is almost upon us, and everybody here on the TF2 team's been busy getting gifts ready and standing as a group under the Valve mistletoe. The smooch count's currently at zero, but we're in this for the long haul. That's right, we'll stand here all damn week if there's some make-outs in it for us. Just try and get past us, DOTA2 team. You too, CS:GO.
— TF2 Blog
|
” |

스미스마스 2014은 2014년 12월 22일 패치에 발표된 팀포트리스2의 주요 내용 업데이트 입니다. 이것은 또한 밸브의 요청과 크리스마스 워크샵 허가에 의한 community-made 업데이트의 후속작입니다.
이 업데이트에서는 28개의 겨울테마의 치장 아이템과 7개의 페스티벌 무기가 추가되었습니다. 이 업데이트의 하이라이트는 새로운 베타 게임모드인 만파워와 두 개의 새로운 베타 맵인. Fourdry (깃발 쟁탈전) 그리고 Goge (깃발쟁탈전)입니다. 많은 데모맨의 기존무기가 변경되었습니다. 또한 세가지의 새로운 무기인 Quickiebomb Launcher,Iron Bomber,the Panic Attack이 추가되었습니다.
추가내용
무기
Demoman |
Iron Bomber | |
| Quickiebomb Launcher | ||
Soldier Pyro Heavy Engineer |
Panic Attack |
치장 아이템
축제장식 무기
Scout |
축제장식 봉크! 원자맛 음료 | |
Pyro |
축제장식 백버너 | |
Demoman |
축제장식 돌격방패 | |
Medic |
축제장식 뼈톱 | |
Sniper |
축제장식 기관단총 | |
Spy |
축제장식 리볼버 | |
Soldier Pyro Heavy Engineer |
축제장식 산탄총 |
도구
| 못된 겨울상자 열쇠 2014 | 못된 겨울상자 2014를 열기위해 사용됩니다.이 열쇠는 멋진 겨울상자를 열지 못합니다. 2015년 2월 16일이후, 이 열쇠는 일반열쇠로 바뀝니다. | |
| 멋진 겨울상자 열쇠 2014 | 멋진 겨울상자 2014를 열기위해 사용됩니다. 이 열쇠는 못된 겨울상자를 열지 못합니다. 2015년 2월 16일이후, 이 열쇠는 일반열쇠로 바뀝니다. |
맵
| Name | Picture | Game mode | File name |
|---|---|---|---|
| Gorge (Capture the Flag) | 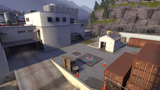
|
Capture the Flag |
ctf_gorge
|
| Foundry (Capture the Flag) | 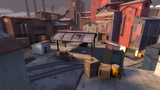
|
Capture the Flag |
ctf_foundry
|
무기 변경사항
| 병과 | 무기 | 변경사항 |
|---|---|---|
데모맨 |
모든 폭발성 기본무기와 보조무기 | |
| ||
유탄 발사기 | ||
점착 폭탄 발사기 | ||
| ||
통제불능 대포 | ||
| ||
로크 앤 로드 | ||
| ||
알리 바바의 조막만한 신발 밀주업자 | ||
| ||
조류 조타기 | ||
| ||
스코틀랜드식 저항운동 | ||
스코틀랜드인의 머리따개 | ||
클레이브 모어 | ||
외부 링크
| ||||||||||||||||||||
| |||||||||||||||||||||||||||||||||||||||||||||||||||||||||||||||||||||||||||||||||||||||||||||||