Gullywash (competitive)
The community competitive scene changes frequently. Some or all info may be outdated.
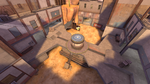
Gullywash_pro is the final version of a community map made by Arnold. It is smaller than other maps that are played, this means that teams can run a permanent Heavy due to short distances that the Heavy has to run. The map has some interesting control points that have more than one tier, the middle point is a good example; Soldiers and Demomen can jump on the top of the point and start to capture it, Scouts and other classes that can't reach the top can also capture the point by standing close to the side. This isn't as good as standing on top of the capture point because you can be hit by splash damage.
The objective of Gullywash is to control all five capture points. Each team starts with their second and final control points locked, leaving only the middle point available.
Whilst not as popular as Badlands, Gullywash is still regularly played. It is a good map for utilities as there are many situations where they can be useful, a Sniper can be used during the middle battle and when pushing last for example.
Locations
All place names are given from the perspective of defense as their primary name (in terms of left and right), except obviously for the middle control point.
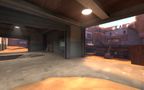
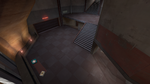
Control Point 3

Because of the symmetrical style of Badlands, each team share a similar landmark/location on their respective sides of the middle point. A popular method to counteract this is to add the prefix "our" or "their"
- Big Door: This is where the heavy classes such as the Soldiers, Demoman and Medic will come out of normally. If the enemy team are running a Sniper, this is the normal place for them to stand, it allows them to be able to headshot people who are on top of, or near to the point.
- Choke: The Demoman and scouts normally come out here, from here the Demoman can sticky up the point and Big Door, this means that the combo will take some damage getting onto middle or they will be unable to do so at all.
- Below: This is what the area under the point is referred to, it stretches from the enemies Big Door, to your Big Door.

Choke.
Below.


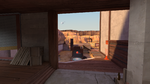
Control Points 2/4

The second point uses the same features that the middle point does, there are two tiers that can capture the point, the capture can be blocked if an enemy stands on either of the tiers. This point is very open with a lot of height advantage.
- Upper: This is the high ground that the defenders can hold if they have Ubercharge disadvantage, it's akin to the Badlands Upper Lobby hold.
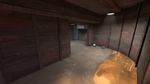
- Flank: If Big Door is the entrance then this is the exit. It also leads into Lower Lobby.
- Choke: If the team has its full compliment of heavies then they can hold choke, much like you would in Badlands.
- Lobby: When retreating from the point teams quite often come through here, it has a medium health and ammo kit.
Upper.
Flank/Big Door.
Choke.
Lobby.


