Badlands (competitive)
The community competitive scene changes frequently. Some or all info may be outdated.
| Badlands | |
|---|---|

| |
| Basic Information | |
| Map type: | Control Point |
| File name: | cp_badlands
|
| Developer(s): | Valve |
| Map Info | |
| Environment: | Desert |
| Setting: | Dusk, cloudy |
| Map Items | |
| Map Photos | |
 | |
| Map Overview | |
_overview.png) | |
Badlands is a remake of the classic CTF_Badlands from Team Fortress Classic. Much of the map has been changed and the map type has been changed from capture the flag to control point. The map consists of a base for each team, an open second point for each team located on the top of a hill, and a center point on the bridge.
The objective of Badlands is to control all five capture points. Each team starts with their second and final control points locked, leaving only the middle point available.
In competitive play, Badlands is arguably the most popular map played in both official matches and unofficial matches. Along with Granary, Badlands is perhaps the first map players new to competitive TF2 will play.
Contents
Place names
All place names are given from the perspective of defense as their primary name (in terms of left and right), except obviously for the middle control point.
Control Points 1/5

- Lower Left: This is the side route that can be found directly left of the final point. It stretches from Lower Lobby, rises to Upper Lobby and goes back down to a lower level directly left of the point. Scouts will usually try and capture the point quickly and unnoticed using this doorway. On defense, the roaming Soldier should watch this door and spam it so flankers are discouraged from pushing through there; a tactic with a similar goal involves placing a Scout near the doorway to deter flanks. Demomen can put a few sticky bombs on this door, however, if there is a Soldier or Heavy physically guarding the point.
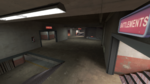
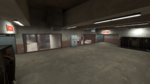
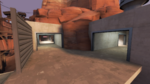
- Lower Lobby/Main Lobby: This is the room which accommodates the main entrance into the base. It can be reached whilst attacking through the main entrance from Gray Bridge as well as the side entrance from Back Spire. This is usually the sight of an initial plan of attacking last as if there are few of the enemy team, players maybe tempted to attack the final capture point through Main Hallway.
- Main: This is the corridor connecting lower lobby with the final capture point. You can also reach Upper Lobby through the stairs in Main Hallway. This is usually the stage for any rushes onto last as well as where a majority of Snipers will sight down to get a quick pick. There are barrels in the hallway that can also be used for cover.
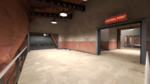
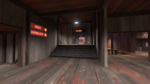
- Top Lobby: This refers to the room across from the spawn room which can overlook the final points. This room can be accessed through a number of ways from both the final capture point and from the previous capture point. This is where a majority of pushes onto the final capture point will take place as the entrances through towards the control point offer such much needed height for the heavier classes.
Lower left.
Main.
Top Lobby.
Spawn room.


Control Points 2/4

Many people refer to this control point as "Spire" because of the points location.
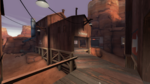
- Spire: The most prominent structure at second point, as the control point rests on top of the spire. There are many positional and maneuvering tricks a player can do here, especially Soldiers and Scouts. Height advantage among the various levels should be cherished and should always be utilized.
- Balcony/Battlements/Batts: The Sniper deck that overlooks Spire, Stone Bridge up to choke. This is a popular spot for defensive Snipers because of the long sightlines. This is a common place for defensive players to be seen jumping or attempting to spam onto Spire.
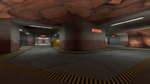
- Dropout/Dropoff: The square exit that is used to exit the base that leads to Resupply. It is commonly used during the initial Rollout to reach middle. When attempting to contest Spire, Scouts and Soldiers frequently use the Dropoff to get inside the enemy base unseen in order to flank and attack unaware enemies.
- House Balcony/Platform/Porch: The small platform outside of the House entrance. This provides a small height advantage and should always be controlled by a roaming Soldier on Defense. This is a big choke point so pushing through should only really be done when there is a clear advantage and with flanks pushing Choke.
- Launch Pad: Refers to the small cliff near spire. It is commonly used by Soldiers and Demos to rocket/sticky jump off onto spire. Scouts can also use launch pad to double jump onto spire.
- Resupply/Forward Respawn: Shortened sometimes as "Re-sup", this is the forward respawn, when your team has captured the middle point. However, you may enter this at any time to quickly regain health and ammo.
- Stone Bridge/Bridge: The bridge in front of the main entrance to the base. This is where any pushes into the enemy base, if any resistance is predicted, will take place. If the defending team has lost a lot of players during their mid-fight, remaining players will surrender choke and move back to Stone Bridge to try and resist any attempts by the enemy to capture Spire.
- Trash/Back Spire: The area behind Spire. Most players will hold this area to guard the side exit and Lower Lobby.
- Wooden Bridge/Diagonal/Diag/Flank: The bridge that overlooks Valley and is directly in front of Resupply. This should always be watched by the Scouts so as to prevent flanks.
- Valley: The flank that links Middle Point with Stone Bridge via Resupply and Diagonal. This is a popular route for Scouts and roaming Soldiers.
Balcony.
Re-sup.


Control Point 3
Because of the symmetrical style of Badlands, each team share a similar landmark/location on their respective sides of the middle point. A popular method to counteract this is to add the prefix "our" or "their", e.g. "their Choke". Some players may also refer the middle point as "Mid" or even "Bridge" because of, like the 2nd/4th point, the landmark it is located on.
- Balcony/Window: This is the balcony to the right of house. This is where some Demoman and Soldiers jump so they can get onto the enemy Crates. Many Demomen spam from here too, as it provides cover through distance and is detached from the heat of the action.
- Choke: Refers to the area beyond the train cars which connects the area around spire with the mid point. This route is used frequently with the heavier classes because of its directness to the 2nd/4th control point.
- House: The building that overlooks the middle point. It has three entrances: one from wooden bridge, one from the middle capture point and one from spire. This is where a majority of team roll outs will finish on their way to mid. During mid fights the Demoman will attempt to spam into house to deny the enemy access to the point and force them back to choke.
- Z/Shithouse: The small building directly opposite of house which connects the bridge to a short pathway leading down to Valley. This is a popular route for Scouts who are attempting to get behind the enemy, note that a majority of teams will have either a Soldier or Demoman watching this area when they reach middle. When a team is running a Pyro, this is a popular route for them, as as well going underneath the point, because it leaves them undetected until they are close to the enemy.
- Train/Crates: This refers to the flatbed train cars on either side of the point. This is a popular location for Soldiers because this is the highest location at mid.
- Underneath/Under Bridge: Refers to the area directly under the point. This is where some Scout battles may occur.
- Valley: This is used by some teams where the Soldiers, Demoman and Medic push from Valley and try and catch the enemy off guard expecting resistance from house; this is usually referred to as a "valley push".
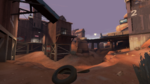
Valley.
House.


Tactics
Because of the maps popularity in competitive play, a number of strategies have been employed in this map. The more effective ones have become standard for teams wishing to either employ the tactic as it is or build upon them so they adapt better for their team mates.
Positioning
Positioning is very important for teams to understand as they form the defensive parts of their play.
- Defending Control Point 1/5
- If the team has a designated roaming Soldier, they should be the one standing on the point until stickies are placed; calling Snipers looking through and pushes coming from main. If a Scout has changed class to Heavy, the roamer can leave the point and support his team elsewhere.
- The combo will stand guard on the platform on the top right. Soldier should position himself near the top of the staircase from floor as he can get a good view of the entrance from upper lobby as well as the entrance from main. Medic generally stand slightly backwards from his Soldier but should have sight of his roaming Soldier on the point although some prefer standing half way down the stairs giving them cover from pushes although this tactic will deny them a retreat back to spawn.
- If there is a Sniper then the Medic can hide behind the first pillar to the left as you come out of the right hand side of spawn; or down the stairs. The former position is preferred as it allows you to easily retreat into the spawn if you don't have a counter uber. Standing on the stairs makes you an easier target for Spies and daring Scouts.
- The lower left entrance is usually watched by the Demoman. The common mindset is to lay a sticky trap getting a quick kill on Scouts trying to "ninja cap".
- If your team has uber disadvantage then the Demoman should stand on the right hand side of the point whilst the left hand side is looked after by the roamer and Scout. However, if the ÜberCharges are equal, or you have an advantage then the demo should be on the left and the two Soldiers should be on the right.
- The position of the utilities depends on what class they are playing although one of the two should be playing as a Scout in order to effectively push out of the base. If the team has employed a Sniper, the common position is for them to stand behind the cap slightly to the right so he can overlook the main entrance or to stand in the right hand side of spawn so that they can quickly change to another class should the need arise. If the roaming Soldier feels uncomfortable standing on the point the team can employ a Heavy to stand on the point instead who can happily absorb damage and also can divert attention of the enemy team when they're pushing onto the point.
- Defending Control Point 2/4
- The position of the heavy classes and Medic varies on how confident they are holding choke. If they are then they should be around their side of choke:
- The Demoman stands at the very front commonly with a sticky trap waiting either on the floor or against the wall ready for when the enemy push through choke.
- The combo should stand slightly behind the Demo giving him cover from Scouts trying to make a pick on him. Medics should stand either on launch pad or in the ditch infront of spire so he can keep with his Soldiers and Demo but be able to readily retreat.
- The roamer stays close with his combo but keeps a close eye on the exit from house for Scouts attempting to pick the Medic.
- The position of the pack changes when the team cannot feel they can hold choke. Instead they all move to trash to gain cover from enemy spam but still make them able to hold spire.
- Regardless of where the enemy is with regard to choke, Scouts should always be holding valley and calling enemies that are attempting to run behind.
- If the team are in Upper Lobby then the Demoman can defend the point by walking towards the point from the right hand side of Battlements where it is harder to spam the Demoman from.
- Defending Control Point 3
- The soldiers should stand on the crates with the Medic standing behind, healing them.
- Demomen usually have a sticky trap set up on the choke.
- The Scouts should try and push from valley, going for a distraction play or a pick on the Medic or Demoman.
Ubercharge Advantage
- Like when defending spire via choke, the Demoman should be leading the defensive line placing stickies either against the wall or at the base of the stairs in order to deter the enemy from pushing and, assuming they push with an uber, make the enemy activate uber earlier than they wish.
- The combo should sit on or around the train nearest to choke with the Medic preferably sitting side-house side of the train in order to avoid spam.
- The roamer can either assist his Scouts in house or aid the combo and Demo holding choke. It varies on which side needs the most assistance although the default position should be with the main pack.
- Scouts should be keeping watch over house with one Scout looking over balcony of house so he can watch over valley as well as house with the other Scout near the entrance to house as to address any Scouts that try and sneak under the balcony, avoiding the Scout watching there, and denying him a chance to get a pick on one of the heavy classes.
Ubercharge Disadvantage
- The combo and demo should be holding their train getting ready to fall out of middle when the enemy team enter. When the Ubercharge has worn off then they can regroup (hopefully no one has died) and push back in with Uber and health advantage.
- The Roamer and Scouts should be holding slightly further forward with the Roamer standing on their train and one Scout watching Valley whilst the other stays near the point.
- The combo should try and fall out via choke and the Roamer and Scouts should try to fall out via house, this stops the team getting too clustered up and easily spam-able.
Roll-outs
Video of the Demoman Rollout:
Video of the Soldier Rollout:
Demoman
The usual route for the Demoman will see him Sticky jump out of spawn, placing a bomb on the wall around where the red/blue meets the grey, he should strafe and aim for main. His second jump, arguably one of the more difficult jumps of this roll out, involves the Demoman jumping from the bottom of the stairs and gliding over the stairs, avoiding the top lip of the doorway, onto the top floor of his team's base — preferably landing near the pills. The third jump through the vent, another difficult jump, involves a sticky placed on the closest of the corrugated sheets to the left, preferably near the bottom, aiming to land on the wooden bridge. Demomen can either pick to jump from wooden bridge onto the balcony, although a majority of Demomen will take the safer route and walk through house and pick up the health kit inside. Demomen that play at a division one level can consistently reach the health pack with 9:45 on the clock using this roll out.
Soldier
After leaving spawn the Soldier rocket jumps off the wall directly to his right where he can either drop down through main or go through the right upper lobby entrance. If the Soldier is going through main, he should try and emulate the Demoman and jump over the stairs although they should aim to reach the floor just before the door so the Medic can heal them. If the Soldier is going through upper lobby, he should go through the second doorway and rocket jump off the wall to his right and aim to get onto the area where the pills should spawn, by now the Demoman should have picked them up. The final jump of this roll out sees the Soldier dropped down from the vent and perform a standard rocket jump onto the wooden bridge.
If the Escape Plan is allowed, only one Soldier needs to do the roll-out whereas the other Soldier can fire two rockets to take himself below 80 health, and then whip out the Escape Plan. There is no need to risk killing yourself during roll-out just to get the fastest speed, after all, you only have to wait for the Medic if you're too quick. You should have enough time during freezetime to damage yourself and reload both of the rockets.
Scout
After leaving spawn the Scout runs straight ahead and jumps over the gap in front of him. He then goes left and around the wall in front of him, and continues towards the top of the stairs. Once there, he takes a left and jumps out of the hole in the wall, onto a small rocky spire. As soon as he lands on the spire, he double jumps left around the small wall in front of him, and lands on the bridge. He then proceeds through the house, and jumps onto Mid.
An alternate rollout is instead of jumping onto the small spire, he ignores the spire and the bridge and instead jump straight ahead. He goes down and takes a left around the house. The benefit of this rollout is the Scout goes under Capture Point 3's bridge the fastest, and you minimal damage from the enemy Demoman.
| |||||||||||||||||||||||||||||||