Difference between revisions of "Granary (Control Point)/zh-hant"
m (moved Granary/zh-hant to Granary (Control Point)/zh-hant: Redirected) |
BrazilianNut (talk | contribs) m |
||
| (26 intermediate revisions by 7 users not shown) | |||
| Line 1: | Line 1: | ||
| − | |||
{{DISPLAYTITLE:Granary/糧倉}} | {{DISPLAYTITLE:Granary/糧倉}} | ||
{{Map infobox | {{Map infobox | ||
| − | |game-type=Control Point | + | | map-status = official |
| − | |file-name=cp_granary | + | | map-game-type = Control Point |
| − | |map-image=TF2 Granary Map.jpg | + | | map-file-name = cp_granary |
| − | | map-environment = 農場 | + | | map-image = TF2 Granary Map.jpg |
| − | | map-setting = 日間、晴天 | + | | map-released = {{Patch name|10|10|2007|date-only=yes}} |
| − | | map-health | + | | map-released-major = Launch |
| − | | map-health | + | | map-environment = 農場 |
| − | | map-ammo | + | | map-setting = 日間、晴天 |
| + | | map-pickups-health-small = 6 | ||
| + | | map-pickups-health-medium = 6 | ||
| + | | map-pickups-ammo-medium = 8 | ||
| + | | map-has-bots = yes | ||
}} | }} | ||
| − | |||
| − | '''Granary/糧倉(控制點模式)'''是一個[[Control Point (game mode)#Standard Control Point/zh-hant|標準 5 控制點佔領模式]]地圖。 | + | '''Granary/糧倉(控制點模式)'''是一個[[Control Point (game mode)/zh-hant#Standard Control Point/zh-hant|標準 5 控制點佔領模式]]地圖。 |
兩隊的目標是佔領全部5個的[[control point (objective)/zh-hant|控制點]]以贏得回合。回合開始時最接近兩隊的各兩個控制點已經是屬於兩隊的了, | 兩隊的目標是佔領全部5個的[[control point (objective)/zh-hant|控制點]]以贏得回合。回合開始時最接近兩隊的各兩個控制點已經是屬於兩隊的了, | ||
只有已經解鎖的中央控制點尚沒有被佔領。 | 只有已經解鎖的中央控制點尚沒有被佔領。 | ||
就像其他標準 5 控制點佔領模式地圖,如[[Well/zh-hant|Well(控制點模式)]]一樣,只有最接近對方佔領點的那個控制點才可以被佔領, | 就像其他標準 5 控制點佔領模式地圖,如[[Well/zh-hant|Well(控制點模式)]]一樣,只有最接近對方佔領點的那個控制點才可以被佔領, | ||
| − | 其他控制點在[[ | + | 其他控制點在[[Heads-up display/zh-hant|HUD]]上會出現一個鎖的圖案,無法被佔領。(舉例來說:當三號控制點被敵方佔領,我方只能佔領敵方的三號控制點而不能佔領其四號控制點;同樣,敵方也只能佔領我方的二號控制點而不能佔領一號控制點。) |
== 介紹影片 == | == 介紹影片 == | ||
| Line 24: | Line 26: | ||
== 地點 == | == 地點 == | ||
| − | + | ||
===控制點 1&5=== | ===控制點 1&5=== | ||
| Line 36: | Line 38: | ||
<gallery widths=140px heights=80px> | <gallery widths=140px heights=80px> | ||
| − | File:Cp granary spawn. | + | File:Cp granary spawn.png| 重生室的外面 |
| − | File:granaryspawn. | + | File:granaryspawn.png| 紅隊的主補給室 |
| − | File:Cp granary cp1a. | + | File:Cp granary cp1a.png | 控制點一 |
| − | File:granarylasthouse. | + | File:granarylasthouse.png| 木屋 |
</gallery> | </gallery> | ||
| Line 47: | Line 49: | ||
由於它在擁有七個不同方向的狹窄入口,在這裡很將很有機會發生激烈的戰鬥。 | 由於它在擁有七個不同方向的狹窄入口,在這裡很將很有機會發生激烈的戰鬥。 | ||
| − | *''' | + | *'''左院區:''' 第二控制點的一端就是院區。院區的左邊有兩個通往中央控制點的入口。左邊的一個小棚屋可以讓玩家取得一點高度優勢。 |
| − | *''' | + | *'''右院匿:''' 院區的右邊有一個在木箱後面、面向斜道室的區域。院區的兩邊都可以從第二控制點和中央控制點進入。 |
| − | *'''Z | + | *'''Z 型轉角:''' 隊伍主要會使用連接院區的主入口及在主入口對面的"Z 型轉角"來攻擊第二控制點。 |
| − | *''' | + | *'''廠房:''' 在"Z 型轉角"的右邊是一個連接院區的極右邊及可以循兩層繞到敵人後方的區域:第一層通往一間在控制點後的房間,也正對著一扇通往最終控制點區的閘門; |
| − | *''' | + | 此外也可以經樓梯到達第二層一條俯瞰整個控制點的走道,它也是除了爆炸性跳躍外唯一一條可以到達通往最終控制點的兩個房間的路線。 |
| − | *''' | + | *'''運輸通道:''' 在廠房的樓梯走到頂後右轉可以通往一條狹窄的運輸通道,在運輸通道的盡頭有一個小洞可以讓玩家直接跳到斜道室的前面。 |
| − | + | *'''第一前線重生點:''' 第一前線重生點位於第二控制點建築二樓的左邊,只有一個前往院區的出入口。此重生點只供佔領了中央控制點的隊伍使用。 | |
<gallery widths=140px heights=80px perrow=5> | <gallery widths=140px heights=80px perrow=5> | ||
| − | File:Cp granary cp2a. | + | File:Cp granary cp2a.png | 第二控制點建築 |
| − | File:Cp granary cp2b. | + | File:Cp granary cp2b.png | 右院區 |
| − | File:granary2ndleftyard. | + | File:granary2ndleftyard.png| 左院區 |
| − | File:granary2ndgarage. | + | File:granary2ndgarage.png | 廠房 |
| − | File:granary2ndZ. | + | File:granary2ndZ.png| Z 型轉角 |
| − | File:granarychute. | + | File:granarychute.png| 運輸通道出口 |
| − | File:granarysecondchutehallway. | + | File:granarysecondchutehallway.png | 運輸通道 |
| − | File:granary2ndforwardspawn. | + | File:granary2ndforwardspawn.png | 第一前線重生點 |
</gallery> | </gallery> | ||
| − | === | + | ===控制點 3=== |
| − | + | 第三控制點(或中央控制點)位於地圖的正中央。作為兩隊的半途控制點,大多數的戰鬥都會發生在這兒。中央控制點有著一個大,及稍稍升高的控制點區。 | |
| + | 整個控制點被可以為玩家提供高度優勢的貨櫃箱所包圍。在此區域的補給品包括有在兩端的中型[[health/zh-hant|補血包]]、在貨櫃箱上的兩個小型[[health/zh-hant|補血包]]以及分別位於四邊的四個小型[[ammo/zh-hant|彈藥盒]]。 | ||
| − | *''' | + | *'''廠房:''' 它是通往中央區域的主要入口,也在控制點的正對面。廠房的內部有一條斜道連接著上面的走道和一個通往第二控制點右院區的小入口。 |
| − | *''' | + | *'''走道:''' 走道可以俯瞰整個中央區域。它位於廠房斜道的頂部,在中央的區域的兩端分別有一條走道。走道提供一個平台讓所有職業跳到貨櫃箱之上。 |
| − | *''' | + | *'''貨櫃箱:''' 貨櫃箱包圍著中央控制點,可以讓玩家取得高度優勢或作為掩體之用。 |
| − | *''' | + | *'''阻氣門:''' 中央區域一個較小的入口。由於其空間相當狹窄,所以經常被大量爆炸物攻擊。 |
<gallery widths=140px heights=80px perrow=5> | <gallery widths=140px heights=80px perrow=5> | ||
| − | File:Cp granary cp3b. | + | File:Cp granary cp3b.png | 廠房 |
| − | File:Cp granary cp3a. | + | File:Cp granary cp3a.png | 中央區域 |
| − | File:granarymidcatwalks. | + | File:granarymidcatwalks.png | 走道 |
| − | File:granarymidchoke. | + | File:granarymidchoke.png | 阻氣門入口 |
| − | File:granarymidgarage. | + | File:granarymidgarage.png | 廠房入口 |
</gallery> | </gallery> | ||
| − | == | + | == 策略 == |
| − | {{hatnote| | + | {{hatnote|參見 [[Community Granary (CP) strategy|社群 Granary(控制點)策略]]}} |
| − | == | + | == 佔點所需時間 == |
{{Control Point Timing/Official Map}} | {{Control Point Timing/Official Map}} | ||
| − | == | + | == 相關成就 == |
| − | === [[Image:Achieved.png|20px|link=Achievements{{if lang}}]] [[achievements| | + | === [[Image:Achieved.png|20px|link=Achievements{{if lang}}]] [[achievements/zh-hant|一般成就]] === |
{{Achievement table | {{Achievement table | ||
| {{Show achievement|General|World Traveler}} | | {{Show achievement|General|World Traveler}} | ||
}} | }} | ||
| − | == | + | == 更新紀錄 == |
{{Update history | '''{{Patch name|11|15|2007}}''' | {{Update history | '''{{Patch name|11|15|2007}}''' | ||
| − | * | + | * 修改了第一(第五)控制點處的障礙物數量:減少防守的一方的視野,使得攻擊方可以更容易佔領。 |
| − | * | + | * 現在隊伍佔領的控制點越多,等待重生的時間就越短(只有優勢的一方才能獲得這獎勵)。這能幫助攻擊方增加他們的攻擊勢力。 |
| − | * | + | * 對藍隊那一側的控制點二和三之間做了小部分的視覺調整。 |
| − | * | + | * 刪除中央控制點一處爆破兵的黏彈跳可以跳到的高處。 |
| − | * | + | * 將回合預設時間增加至 10 分鐘。 |
| − | * | + | * 為第二(第四)控制點的穀倉二樓增加了一扇可以直接看到最終控制點的窗戶。 |
| − | * | + | * 對中央控制點區的燈光照明進行微調。 |
| − | * | + | * 將地圖中央的重生室往前移(可以讓重裝兵跑至第二(第四)控制點的時間減少 6~7 秒鐘)。 |
| − | * | + | * 現在當佔領/防守最後一個控制點時,重生的時間從-/+10秒減為-/+6秒。 |
| − | * | + | * 修正火箭重生室(最開始的重生室)內的材質以及模型問題。 |
'''{{Patch name|1|14|2008}}''' | '''{{Patch name|1|14|2008}}''' | ||
| − | * | + | * 在佔領 Granary 中央點時,縮減兩隊重生所需的時間。 |
'''{{Patch name|2|14|2008}}''' | '''{{Patch name|2|14|2008}}''' | ||
| − | * | + | * 取消了佔領中央控制點後的重生時間獎勵(從縮短 3 秒變為 0 秒) |
| − | * | + | * 修正了一些模型的貼圖漏洞(紅藍隊第一控制點大門、和藍隊第二控制點附近的管線) |
| − | * | + | * 修正了玩家會卡在一些貨櫃或是飛彈井之間的錯誤。 |
| − | * | + | * 修正了一個當玩家站在紅色貨櫃上會看起來像是浮起來的錯誤。 |
| − | '''{{Patch name|4|29|2008}}''' ([[Gold Rush Update]]) | + | '''{{Patch name|4|29|2008}}''' ([[Gold Rush Update/zh-hant|淘金熱更新]]) |
| − | * | + | * 在中央控制點附近新增大門,並新增準備時間。 |
| − | * | + | * 修正其中一道藍隊大門的標誌對齊問題。 |
| + | * 微幅修正紅/藍隊重生室的燈光問題。 | ||
'''{{Patch name|10|21|2008}}''' | '''{{Patch name|10|21|2008}}''' | ||
| − | * | + | * 更新地圖 Granary 以修復幾個漏洞。 |
| − | * | + | * 移除地圖 Granary 的回合準備時間和通道大門。 |
'''{{Patch name|8|13|2009}}''' | '''{{Patch name|8|13|2009}}''' | ||
| − | * | + | * 根據競賽型社群的意見,更動地圖中的幾處地方來修正平衡。 |
'''{{patch name|12|8|2010|beta}}''' | '''{{patch name|12|8|2010|beta}}''' | ||
| − | * | + | * 對斜坡入口房間旁的平台幾個更新: |
| − | ** | + | ** 增加了平台的長度 |
| − | ** | + | ** 令藍隊和紅隊的平台上方的光線模型變得對稱 |
| − | ** | + | ** 修正藍隊平台旁木堆的高度使其與紅隊的一樣。(讓偵察兵使用) |
* More playerclips to ease snagging on trim geometry | * More playerclips to ease snagging on trim geometry | ||
'''{{Patch name|2|3|2011}}''' | '''{{Patch name|2|3|2011}}''' | ||
| − | * | + | * 在紅隊/藍隊的斜坡入口房間各增加一個新的出入口。 |
| − | * | + | * 針對模型重疊、光線以及地圖效能進行改進。 |
'''{{Patch name|8|10|2012}}''' | '''{{Patch name|8|10|2012}}''' | ||
| − | * {{Undocumented}} | + | * {{Undocumented}}在地圖 Granary 的天景圖像新增戰鬥要塞。 |
| + | |||
| + | '''{{Patch name|7|10|2013}}''' | ||
| + | * 修正不適當的箭頭標誌方向。 | ||
| + | * 修正玩家能夠爬上紅隊較高的重生室的問題。 | ||
| + | * 修正玩家能夠在重生室內的貨櫃上建造建築的問題。 | ||
| + | * 修補天景幾何圖像的破洞。 | ||
| + | * 移除紅隊重生室上方掛著的燈的模型碰撞問題。 | ||
| + | * 移除紅隊和藍隊重生室上方監視器的模型碰撞問題。 | ||
| + | * 將藍隊和紅隊最終控制點附近的圍欄空間調整成一致。 | ||
| + | * 修改最終控制點戰區的石塊配置。 | ||
| + | * 修改第一重生室的各種配置,使紅隊和藍隊版本互相符合。 | ||
| + | }} | ||
| − | == | + | == 相關細節 == |
| − | *''[[Meet the Soldier]]'' | + | *''[[Meet the Soldier/zh-hant|拜見火箭兵]]'' 拍攝的地方是調整過的 Granary地圖。紅隊繞過了連接第二和最終控制點的建築物外面去攻擊,那些區域本來應該是被圍欄隔開而無法進入的。 |
| − | *Granary | + | *Granary 作為其中一個要塞在''[[Worms: Reloaded/zh-hant|百戰天蟲:重裝上陣]]''中出現。 |
| − | * | + | *現在不時在主選單的背景中出現的''[[Gravel Pit/zh-hant|Gravel Pit]]''圖像本來應該是用上 Granary 的圖像的。 |
| − | == | + | == 畫廊 == |
<gallery> | <gallery> | ||
| − | File:Worms reloaded tf2 scout fort.jpg| | + | File:Worms reloaded tf2 scout fort.jpg|在''[[Worms: Reloaded/zh-hant|百戰天蟲:重裝上陣]]''中出現的[[Scout/zh-hant|偵察兵]]和 Granary 。 |
</gallery> | </gallery> | ||
| − | == | + | == 參見 == |
| − | *[[:Category:Granary images|Granary | + | *[[:Category:Granary images|Granary 畫廊]] |
| − | *[[Control point timing#Granary|Granary | + | *[[Control point timing#Granary/zh-hant|Granary 佔點所需時間]] |
| − | *[[Granary (Arena)]] | + | *[[Granary (Arena)/zh-hant|Granary(競技場)]] |
{{Maps nav}} | {{Maps nav}} | ||
| + | [[Category:Quickplay maps/zh-hant]] | ||
Latest revision as of 16:15, 22 February 2024
| Granary (Control Point) | |
|---|---|

| |
| 資訊 | |
| 種類: | 控制點模式 |
| 檔案名稱: | cp_granary
|
| 釋出時間: | 2007年10月10日 (發售時即有) |
| Variants: | 競技場模式 |
| 開發者: | Valve |
| 地圖資料 | |
| 所處地區: | 農場 |
| 環境設定: | 日間、晴天 |
| Bot support: | 可 |
| 地圖物品 | |
| 地圖相片 | |
 | |
| 地圖的俯瞰圖 | |
_overview.png) | |
Granary/糧倉(控制點模式)是一個標準 5 控制點佔領模式地圖。 兩隊的目標是佔領全部5個的控制點以贏得回合。回合開始時最接近兩隊的各兩個控制點已經是屬於兩隊的了, 只有已經解鎖的中央控制點尚沒有被佔領。
就像其他標準 5 控制點佔領模式地圖,如Well(控制點模式)一樣,只有最接近對方佔領點的那個控制點才可以被佔領, 其他控制點在HUD上會出現一個鎖的圖案,無法被佔領。(舉例來說:當三號控制點被敵方佔領,我方只能佔領敵方的三號控制點而不能佔領其四號控制點;同樣,敵方也只能佔領我方的二號控制點而不能佔領一號控制點。)
內容
介紹影片
地點
控制點 1&5
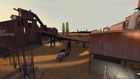
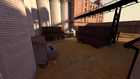
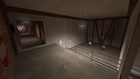
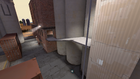
在地圖兩邊的邊緣就是雙方的最終控制點,位於兩隊的重生點之外。
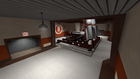
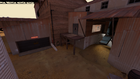
- 總部 (重生區): 最初的重生點和補給區 是一個導彈發射井,擁有兩個通往最終控制點的出口。
兩個 補給櫃 分別放在兩個重生點出口的走道牆上。
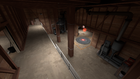
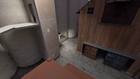
- 院區: 位於補給基地外的一個開放院區,同時也是最終控制點所在的位置。在控制點後方有一條小樓梯和斜道通往一條橫跨整個區域的管道,可以通往第二/第四控制點所在木屋的二樓。而第二條較高的管道位於第一條管道的右邊,可以藉由上述木屋的二樓或是爆炸性跳躍抵達高管道之上。
- 木屋: 在橫跨整個區域的管道的盡頭是第二/四控制點木屋的二樓。木屋二樓有一個直接連接著較低管道的出口,而較高的管道則在一個可以跳下到院區的窗戶旁邊。
重生室的外面

紅隊的主補給室
控制點一

木屋


控制點 2&4
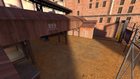
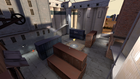
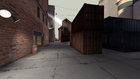
控制點二和四位於中央院區和最終控制點之間的廠房之中。它們是 Granary 的五個控制點中唯一位於室內的控制點。 由於它在擁有七個不同方向的狹窄入口,在這裡很將很有機會發生激烈的戰鬥。
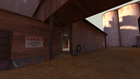
- 左院區: 第二控制點的一端就是院區。院區的左邊有兩個通往中央控制點的入口。左邊的一個小棚屋可以讓玩家取得一點高度優勢。
- 右院匿: 院區的右邊有一個在木箱後面、面向斜道室的區域。院區的兩邊都可以從第二控制點和中央控制點進入。
- Z 型轉角: 隊伍主要會使用連接院區的主入口及在主入口對面的"Z 型轉角"來攻擊第二控制點。
- 廠房: 在"Z 型轉角"的右邊是一個連接院區的極右邊及可以循兩層繞到敵人後方的區域:第一層通往一間在控制點後的房間,也正對著一扇通往最終控制點區的閘門;
此外也可以經樓梯到達第二層一條俯瞰整個控制點的走道,它也是除了爆炸性跳躍外唯一一條可以到達通往最終控制點的兩個房間的路線。
- 運輸通道: 在廠房的樓梯走到頂後右轉可以通往一條狹窄的運輸通道,在運輸通道的盡頭有一個小洞可以讓玩家直接跳到斜道室的前面。
- 第一前線重生點: 第一前線重生點位於第二控制點建築二樓的左邊,只有一個前往院區的出入口。此重生點只供佔領了中央控制點的隊伍使用。
第二控制點建築
右院區
左院區
廠房
Z 型轉角
運輸通道出口
運輸通道
第一前線重生點


控制點 3
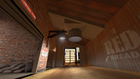
第三控制點(或中央控制點)位於地圖的正中央。作為兩隊的半途控制點,大多數的戰鬥都會發生在這兒。中央控制點有著一個大,及稍稍升高的控制點區。 整個控制點被可以為玩家提供高度優勢的貨櫃箱所包圍。在此區域的補給品包括有在兩端的中型補血包、在貨櫃箱上的兩個小型補血包以及分別位於四邊的四個小型彈藥盒。
- 廠房: 它是通往中央區域的主要入口,也在控制點的正對面。廠房的內部有一條斜道連接著上面的走道和一個通往第二控制點右院區的小入口。
- 走道: 走道可以俯瞰整個中央區域。它位於廠房斜道的頂部,在中央的區域的兩端分別有一條走道。走道提供一個平台讓所有職業跳到貨櫃箱之上。
- 貨櫃箱: 貨櫃箱包圍著中央控制點,可以讓玩家取得高度優勢或作為掩體之用。
- 阻氣門: 中央區域一個較小的入口。由於其空間相當狹窄,所以經常被大量爆炸物攻擊。
廠房
中央區域
走道
阻氣門入口
廠房入口


策略
佔點所需時間
| 控制點模式 | 玩家人數 | 秒 | ||
|---|---|---|---|---|
| 控制點模式 1 以及 5 | ×1 |
| ||
| ×2 |
| |||
| ×3 |
| |||
| ×4 |
| |||
| 控制點模式 2 以及 4 | ×1 |
| ||
| ×2 |
| |||
| ×3 |
| |||
| ×4 |
| |||
| 控制點模式 3 | ×1 |
| ||
| ×2 |
| |||
| ×3 |
| |||
| ×4 |
|
相關成就
 一般成就
一般成就
|

更新紀錄
2007年11月15日更新
- 修改了第一(第五)控制點處的障礙物數量:減少防守的一方的視野,使得攻擊方可以更容易佔領。
- 現在隊伍佔領的控制點越多,等待重生的時間就越短(只有優勢的一方才能獲得這獎勵)。這能幫助攻擊方增加他們的攻擊勢力。
- 對藍隊那一側的控制點二和三之間做了小部分的視覺調整。
- 刪除中央控制點一處爆破兵的黏彈跳可以跳到的高處。
- 將回合預設時間增加至 10 分鐘。
- 為第二(第四)控制點的穀倉二樓增加了一扇可以直接看到最終控制點的窗戶。
- 對中央控制點區的燈光照明進行微調。
- 將地圖中央的重生室往前移(可以讓重裝兵跑至第二(第四)控制點的時間減少 6~7 秒鐘)。
- 現在當佔領/防守最後一個控制點時,重生的時間從-/+10秒減為-/+6秒。
- 修正火箭重生室(最開始的重生室)內的材質以及模型問題。
- 在佔領 Granary 中央點時,縮減兩隊重生所需的時間。
- 取消了佔領中央控制點後的重生時間獎勵(從縮短 3 秒變為 0 秒)
- 修正了一些模型的貼圖漏洞(紅藍隊第一控制點大門、和藍隊第二控制點附近的管線)
- 修正了玩家會卡在一些貨櫃或是飛彈井之間的錯誤。
- 修正了一個當玩家站在紅色貨櫃上會看起來像是浮起來的錯誤。
- 在中央控制點附近新增大門,並新增準備時間。
- 修正其中一道藍隊大門的標誌對齊問題。
- 微幅修正紅/藍隊重生室的燈光問題。
- 更新地圖 Granary 以修復幾個漏洞。
- 移除地圖 Granary 的回合準備時間和通道大門。
- 根據競賽型社群的意見,更動地圖中的幾處地方來修正平衡。
- 對斜坡入口房間旁的平台幾個更新:
- 增加了平台的長度
- 令藍隊和紅隊的平台上方的光線模型變得對稱
- 修正藍隊平台旁木堆的高度使其與紅隊的一樣。(讓偵察兵使用)
- More playerclips to ease snagging on trim geometry
- 在紅隊/藍隊的斜坡入口房間各增加一個新的出入口。
- 針對模型重疊、光線以及地圖效能進行改進。
- [未記載]在地圖 Granary 的天景圖像新增戰鬥要塞。
- 修正不適當的箭頭標誌方向。
- 修正玩家能夠爬上紅隊較高的重生室的問題。
- 修正玩家能夠在重生室內的貨櫃上建造建築的問題。
- 修補天景幾何圖像的破洞。
- 移除紅隊重生室上方掛著的燈的模型碰撞問題。
- 移除紅隊和藍隊重生室上方監視器的模型碰撞問題。
- 將藍隊和紅隊最終控制點附近的圍欄空間調整成一致。
- 修改最終控制點戰區的石塊配置。
- 修改第一重生室的各種配置,使紅隊和藍隊版本互相符合。
相關細節
- 拜見火箭兵 拍攝的地方是調整過的 Granary地圖。紅隊繞過了連接第二和最終控制點的建築物外面去攻擊,那些區域本來應該是被圍欄隔開而無法進入的。
- Granary 作為其中一個要塞在百戰天蟲:重裝上陣中出現。
- 現在不時在主選單的背景中出現的Gravel Pit圖像本來應該是用上 Granary 的圖像的。
畫廊

參見