Difference between revisions of "Upward (Competitive)"
m (Diesel, you can't use the correct form of "to", it seems. I'll revisit this tonight when I am not at college to polish the changes off.) |
|||
| Line 20: | Line 20: | ||
}} | }} | ||
| − | Upward is a single-stage [[Payload]] map with 4 points | + | Upward is a single-stage [[Payload]] map with 4 points. All these points must be captured for the attacking team to win, and the defending team must defend the points within the time limit. Every time a point is captured, time is added to the clock. Like most maps, the [[RED]] team must defend the points whilst the [[BLU]] team must attack these points by standing near the payload cart. This map is played in most [[Highlander]] leagues and is one of the most popular Payload maps. It is very rarely played in [[6v6]]. |
[[Image:Upward overview.png|thumb|top|Overview of the map.(Large file)]] | [[Image:Upward overview.png|thumb|top|Overview of the map.(Large file)]] | ||
| Line 28: | Line 28: | ||
*'''The left cliff:''' A small rocky platform which is a common place for the attacking [[Heavy]], [[Demoman]] and the [[Medic]] to push out from. | *'''The left cliff:''' A small rocky platform which is a common place for the attacking [[Heavy]], [[Demoman]] and the [[Medic]] to push out from. | ||
*'''The Right Bridge:''' A wooden bridge which leads to the right flank, with a [[pitfall]] hazard to the far right. | *'''The Right Bridge:''' A wooden bridge which leads to the right flank, with a [[pitfall]] hazard to the far right. | ||
| − | *'''The Valley:''' Where the payload will be pushed down | + | *'''The Valley:''' Where the payload will be pushed down; the metal structure can be jumped on and is a common place for the [[Sniper]] to get picks. |
<gallery widths=140px heights=80px> | <gallery widths=140px heights=80px> | ||
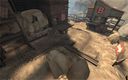
Image:Upward1.jpg|First Checkpoint | Image:Upward1.jpg|First Checkpoint | ||
</gallery> | </gallery> | ||
=== Checkpoint B === | === Checkpoint B === | ||
| − | *'''The Over-watch:''' (Also known as the '''Hut''' and the '''right-flank''') is a wooden staircase which leads to a over-watch hut with open windows. This is a common place for the combo to push from, especially | + | *'''The Over-watch:''' (Also known as the '''Hut''' and the '''right-flank''') is a wooden staircase which leads to a over-watch hut with open windows. This is a common place for the Medic combo to push from, especially if his pocket is a Heavy. The defending Engineer is likely to set up underneath the hut near the "rolling-spawn" to defend Checkpoint B. |
| − | *'''The tunnel:''' The payload cart will be pushed out of this tunnel onto the point, the tunnel has wooden supports and | + | *'''The tunnel:''' The payload cart will be pushed out of this tunnel onto the point, the tunnel has wooden supports and a flank on both the left and the right which both lead up to the surface. Above the Tunnel is a wooden structure and a hill which is a very common place for defending [[Engineers]] to set up and defend Checkpoint A. The Tunnel also has a wooden balcony which is perfect for ambushing and the Blu teams next spawn point. |
| − | *'''The Side path:''' (Also known as the '''Left flank''') is a common place for the Spy | + | *'''The Side path:''' (Also known as the '''Left flank''') is a common place for the Spy to flank the defending team. It is also common with Snipers and Soldiers who can quickly get important picks and harass the [[Sentry Gun]]. It is a small footpath which leads to the tunnel supported by wooden scaffolding, it also has a pitfall hazard. |
<gallery> | <gallery> | ||
| − | Image:Upward2.jpg|Second Checkpoint | + | Image:Upward2.jpg|Second Checkpoint |
</gallery> | </gallery> | ||
=== Checkpoint C === | === Checkpoint C === | ||
| − | *'''The Balcony:''' The Balcony consists of a long wooden structure to a flanking root inside the house. It is common for the Blu team to push through this way and also underneath it. It also makes a good spot for the attacking Engineer to place a Teleporter and a Dispenser as it is close | + | *'''The Balcony:''' The Balcony consists of a long wooden structure to a flanking root inside the house. It is common for the Blu team to push through this way and also underneath it. It also makes a good spot for the attacking Engineer to place a Teleporter and a Dispenser as it is close to a ammo pack and a [[health pack]]. The Balcony also allows the Blu team to flank behind the Red team to their last point. |
| − | *'''Scaffolding:''' The payload cart will be pushed on this "wooden scaffolding" which is very close | + | *'''Scaffolding:''' The payload cart will be pushed on this "wooden scaffolding" which is very close to point C and also has some small ramps which the payload will slide down if not being pushed. Underneath allows players to drop onto a health kit which is used by defending [[Spy|Spies]] to escape. |
| − | *'''The House:''' The House is on the left flank, it is a small metal hut with an [[ammo pack]] leading | + | *'''The House:''' The House is on the left flank, it is a small metal hut with an [[Pickups|ammo pack]] leading to a health kit which is under the '''Scaffolding'''. It isn't used often as Demomen can easily spam into the house and kill anyone inside it. |
<gallery> | <gallery> | ||
Image:Upward3.jpg|Third Checkpoint | Image:Upward3.jpg|Third Checkpoint | ||
</gallery> | </gallery> | ||
=== Checkpoint D (The Last Checkpoint) === | === Checkpoint D (The Last Checkpoint) === | ||
| − | *'''The Balcony:''' The Balcony is a long stretch of high ground opposite | + | *'''The Balcony:''' The Balcony is a long stretch of high ground opposite to the Red's final [[spawn room]]. It is a common place for the attacking [[combo]] to hold and allows the attacking Sniper to have an overview of the enemy team. |
| − | *'''Main entrance:''' The payload cart will come through this large entrance onto more scaffolding | + | *'''Main entrance:''' The payload cart will come through this large entrance onto more scaffolding to be finally dropped into a large pitfall hazard. Attacking Scouts can easily push the cart into the pitfall without being damaged due to his small [[hitbox]] size. |
| − | *'''The under-passage:''' Underneath the '''main entrance''' is a small platform which leads | + | *'''The under-passage:''' Underneath the '''main entrance''' is a small platform which leads to Checkpoint C, it is commonly used by Spys to escape or flank the opposing team. |
<gallery> | <gallery> | ||
Image:Upward4.jpg|Final Terminus | Image:Upward4.jpg|Final Terminus | ||
</gallery> | </gallery> | ||
| − | |||
| − | |||
== Gallery == | == Gallery == | ||
Revision as of 13:44, 23 June 2014
| “You are so small! Is funny to me!” This article is a stub. As such, it is not complete. You can help Team Fortress Wiki by expanding it. |
This article is for competitive play, based on the standard community competitive format. For the generic article on this topic, see: Upward.
The community competitive scene changes frequently. Some or all info may be outdated.
The community competitive scene changes frequently. Some or all info may be outdated.
| Upward (Competitive) | |
|---|---|

| |
| Basic Information | |
| Developer(s): | {{{map-developer}}} |
| Map Info | |
| Environment: | Desert |
| Setting: | Daylight, sunny |
| Hazards: | Pitfall |
| Map Photos | |
 | |
Upward is a single-stage Payload map with 4 points. All these points must be captured for the attacking team to win, and the defending team must defend the points within the time limit. Every time a point is captured, time is added to the clock. Like most maps, the RED team must defend the points whilst the BLU team must attack these points by standing near the payload cart. This map is played in most Highlander leagues and is one of the most popular Payload maps. It is very rarely played in 6v6.

Contents
Locations
Checkpoint A
- The left cliff: A small rocky platform which is a common place for the attacking Heavy, Demoman and the Medic to push out from.
- The Right Bridge: A wooden bridge which leads to the right flank, with a pitfall hazard to the far right.
- The Valley: Where the payload will be pushed down; the metal structure can be jumped on and is a common place for the Sniper to get picks.
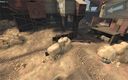
First Checkpoint

Checkpoint B
- The Over-watch: (Also known as the Hut and the right-flank) is a wooden staircase which leads to a over-watch hut with open windows. This is a common place for the Medic combo to push from, especially if his pocket is a Heavy. The defending Engineer is likely to set up underneath the hut near the "rolling-spawn" to defend Checkpoint B.
- The tunnel: The payload cart will be pushed out of this tunnel onto the point, the tunnel has wooden supports and a flank on both the left and the right which both lead up to the surface. Above the Tunnel is a wooden structure and a hill which is a very common place for defending Engineers to set up and defend Checkpoint A. The Tunnel also has a wooden balcony which is perfect for ambushing and the Blu teams next spawn point.
- The Side path: (Also known as the Left flank) is a common place for the Spy to flank the defending team. It is also common with Snipers and Soldiers who can quickly get important picks and harass the Sentry Gun. It is a small footpath which leads to the tunnel supported by wooden scaffolding, it also has a pitfall hazard.
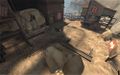
Second Checkpoint

Checkpoint C
- The Balcony: The Balcony consists of a long wooden structure to a flanking root inside the house. It is common for the Blu team to push through this way and also underneath it. It also makes a good spot for the attacking Engineer to place a Teleporter and a Dispenser as it is close to a ammo pack and a health pack. The Balcony also allows the Blu team to flank behind the Red team to their last point.
- Scaffolding: The payload cart will be pushed on this "wooden scaffolding" which is very close to point C and also has some small ramps which the payload will slide down if not being pushed. Underneath allows players to drop onto a health kit which is used by defending Spies to escape.
- The House: The House is on the left flank, it is a small metal hut with an ammo pack leading to a health kit which is under the Scaffolding. It isn't used often as Demomen can easily spam into the house and kill anyone inside it.
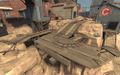
Third Checkpoint

Checkpoint D (The Last Checkpoint)
- The Balcony: The Balcony is a long stretch of high ground opposite to the Red's final spawn room. It is a common place for the attacking combo to hold and allows the attacking Sniper to have an overview of the enemy team.
- Main entrance: The payload cart will come through this large entrance onto more scaffolding to be finally dropped into a large pitfall hazard. Attacking Scouts can easily push the cart into the pitfall without being damaged due to his small hitbox size.
- The under-passage: Underneath the main entrance is a small platform which leads to Checkpoint C, it is commonly used by Spys to escape or flank the opposing team.
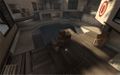
Final Terminus

Gallery
First Checkpoint
Second Checkpoint

Third Checkpoint

Final Terminus