Difference between revisions of "User:Lolimsogreat21/Sandbox2/Scout"
(Improving helpful overviews...in my sandbox.) |
m (→Brimstone) |
||
| (48 intermediate revisions by the same user not shown) | |||
| Line 323: | Line 323: | ||
===Brimstone=== | ===Brimstone=== | ||
| − | {{User: | + | {{User:Wookipan/Map overview |
| title = Brimstone - overview indicators | | title = Brimstone - overview indicators | ||
| image = Brimstone (map) overview.png | | image = Brimstone (map) overview.png | ||
| Line 1,008: | Line 1,008: | ||
}} | }} | ||
| − | == | + | ===Terror=== |
| − | |||
{{User:Wookipan/Map overview | {{User:Wookipan/Map overview | ||
| − | | title = | + | | title = Terror - overview indicators |
| − | | image = | + | | image = Terror overview.png |
| + | | - | ||
| + | | spawn1 = BLU first spawn | ||
| + | | spawn-color1 = blu | ||
| + | | xA = 665px | ||
| + | | yA = 170px | ||
| + | | spawn2 = BLU second spawn | ||
| + | | spawn-color2 = blu | ||
| + | | xB = 245px | ||
| + | | yB = 144px | ||
| + | | spawn3 = RED first spawn | ||
| + | | spawn-color3 = red | ||
| + | | xC = 300px | ||
| + | | yC = 310px | ||
| + | | spawn4 = RED second spawn | ||
| + | | spawn-color4 = red | ||
| + | | xD = 230px | ||
| + | | yD = 215px | ||
| + | | spawn5 = RED third spawn | ||
| + | | spawn-color5 = red | ||
| + | | xE = 53px | ||
| + | | yE = 333px | ||
| - | | - | ||
| − | | area1 = | + | | area1 = Front Yard |
| − | | x1 = | + | | x1 = 580px |
| − | | y1 = | + | | y1 = 183px |
| − | | area2 = | + | | area2 = Low Hanging Roof |
| − | | x2 = | + | | x2 = 570px |
| − | | y2 = | + | | y2 = 236px |
| − | | area3 = | + | | area3 = RED shed |
| − | | x3 = | + | | x3 = 519px |
| − | | y3 = | + | | y3 = 196px |
| − | | area4 = | + | | area4 = Rocks |
| − | | x4 = | + | | x4 = 477px |
| − | | y4 = | + | | y4 = 234px |
| + | | area5 = Crossing | ||
| + | | x5 = 440px | ||
| + | | y5 = 216px | ||
| + | | area6 = Slope | ||
| + | | x6 = 410px | ||
| + | | y6 = 259px | ||
| + | | area7 = Cliffside Shed | ||
| + | | x7 = 384px | ||
| + | | y7 = 332px | ||
| + | | area8 = Old Geeser | ||
| + | | x8 = 375px | ||
| + | | y8 = 240px | ||
| + | | area9 = Bridge | ||
| + | | x9 = 345px | ||
| + | | y9 = 254px | ||
| + | | area10 = Mann Mannor | ||
| + | | x10 = 310px | ||
| + | | y10 = 266px | ||
| + | | area11 = Tree | ||
| + | | x11 = 320px | ||
| + | | y11 = 195px | ||
| + | | area12 = Casali Shafting | ||
| + | | x12 = 200px | ||
| + | | y12 = 250px | ||
| + | | area13 = Flank House | ||
| + | | x13 = 183px | ||
| + | | y13 = 320px | ||
| + | | area14 = Pit | ||
| + | | x14 = 145px | ||
| + | | y14 = 275px | ||
| + | | area15 = Outhouse | ||
| + | | x15 = 110px | ||
| + | | y15 = 303px | ||
}} | }} | ||
| − | === | + | ===Chilly=== |
{{User:Wookipan/Map overview | {{User:Wookipan/Map overview | ||
| − | | title = | + | | title = Chilly - overview indicators |
| − | | image = | + | | image = Chilly overview.png |
| - | | - | ||
| spawn1 = BLU first spawn | | spawn1 = BLU first spawn | ||
| spawn-color1 = blu | | spawn-color1 = blu | ||
| − | | xA = | + | | xA = 615px |
| − | | yA = | + | | yA = 155px |
| − | | spawn2 = BLU second | + | | spawn2 = BLU second spawn |
| − | | spawn-color2 = | + | | spawn-color2 = blu |
| − | | xB = | + | | xB = 280px |
| − | | yB = | + | | yB = 160px |
| − | | spawn3 = | + | | spawn3 = RED first spawn |
| − | | spawn-color3 = | + | | spawn-color3 = red |
| − | | xC = | + | | xC = 330px |
| − | | yC = | + | | yC = 270px |
| − | | spawn4 = RED | + | | spawn4 = RED second spawn |
| spawn-color4 = red | | spawn-color4 = red | ||
| − | | xD = | + | | xD = 275px |
| − | | yD = | + | | yD = 195px |
| + | | spawn5 = RED third spawn | ||
| + | | spawn-color5 = red | ||
| + | | xE = 110px | ||
| + | | yE = 305px | ||
| - | | - | ||
| − | | area1 = | + | | area1 = Front Yard |
| − | | x1 = | + | | x1 = 555px |
| − | | y1 = | + | | y1 = 190px |
| − | | area2 = | + | | area2 = Low Hanging Roof |
| − | | x2 = | + | | x2 = 540px |
| − | | y2 = | + | | y2 = 225px |
| − | | area3 = | + | | area3 = RED shed |
| − | | x3 = | + | | x3 = 495px |
| − | | y3 = | + | | y3 = 190px |
| − | | area4 = | + | | area4 = Rocks |
| − | | x4 = | + | | x4 = 470px |
| − | | y4 = | + | | y4 = 225px |
| − | | area5 = | + | | area5 = Crossing |
| − | | x5 = | + | | x5 = 430px |
| − | | y5 = | + | | y5 = 215px |
| − | | area6 = | + | | area6 = Slope |
| − | | x6 = | + | | x6 = 415px |
| − | | y6 = | + | | y6 = 250px |
| − | | area7 = | + | | area7 = Cliffside Shed |
| − | | x7 = | + | | x7 = 385px |
| − | | y7 = | + | | y7 = 295px |
| − | | area8 = | + | | area8 = Old Geeser |
| − | | x8 = | + | | x8 = 390px |
| − | | y8 = | + | | y8 = 230px |
| − | | area9 = | + | | area9 = Bridge |
| − | | x9 = | + | | x9 = 365px |
| − | | y9 = | + | | y9 = 235px |
| − | | area10 = | + | | area10 = Mann Mannor |
| − | | x10 = | + | | x10 = 335px |
| − | | y10 = | + | | y10 = 240px |
| − | | area11 = | + | | area11 = Tree |
| − | | x11 = | + | | x11 = 350px |
| − | | y11 = | + | | y11 = 200px |
| − | | area12 = | + | | area12 = Casali Shafting |
| − | | x12 = | + | | x12 = 235px |
| − | | y12 = | + | | y12 = 220px |
| − | | area13 = | + | | area13 = Flank House |
| − | | x13 = | + | | x13 = 240px |
| − | | y13 = | + | | y13 = 285px |
| − | | area14 = | + | | area14 = Pit |
| − | | x14 = | + | | x14 = 215px |
| − | | y14 = | + | | y14 = 255px |
| − | | area15 = | + | | area15 = Outhouse |
| − | | x15 = 325px | + | | x15 = 185px |
| − | | | + | | y15 = 270px |
| − | | | + | }} |
| − | | | + | |
| − | | | + | ==Payload Race== |
| − | | | + | ===Banana Bay=== |
| − | | | + | {{User:Wookipan/Map overview |
| − | | | + | | title = Banana Bay - overview indicators |
| − | | | + | | image = Banana Bay overview.png |
| − | | | + | | - |
| − | | | + | | spawn1 = RED spawn |
| − | | | + | | spawn-color1 = red |
| − | | | + | | xA = 110px |
| − | | | + | | yA = 140px |
| + | | spawn2 = BLU spawn | ||
| + | | spawn-color2 = blu | ||
| + | | xB = 650px | ||
| + | | yB = 270px | ||
| + | | - | ||
| + | | area1 = Highline | ||
| + | | x1 = 382px | ||
| + | | y1 = 209px | ||
| + | | area2 = Incline | ||
| + | | x2 = 526px | ||
| + | | y2 = 157px | ||
| + | | area3 = Platform | ||
| + | | x3 = 600px | ||
| + | | y3 = 247px | ||
| + | | area4 = Deck | ||
| + | | x4 = 540px | ||
| + | | y4 = 270px | ||
| + | | area5 = Sally Port | ||
| + | | x5 = 580px | ||
| + | | y5 = 325px | ||
| + | | area6 = Docks | ||
| + | | x6 = 485px | ||
| + | | y6 = 337px | ||
| + | | area7 = Start point | ||
| + | | x7 = 430px | ||
| + | | y7 = 305px | ||
| + | | area8 = Siphon | ||
| + | | x8 = 370px | ||
| + | | y8 = 292px | ||
| + | }} | ||
| + | |||
| + | ===Helltower=== | ||
| + | {{User:Wookipan/Map overview | ||
| + | | title = Helltower - overview indicators | ||
| + | | image = Helltower overview.png | ||
| + | | - | ||
| + | | spawn1 = RED spawn | ||
| + | | spawn-color1 = red | ||
| + | | xA = 250px | ||
| + | | yA = 526px | ||
| + | | spawn2 = BLU spawn | ||
| + | | spawn-color2 = blu | ||
| + | | xB = 250px | ||
| + | | yB = 25px | ||
| + | | - | ||
| + | | area1 = Tower Corridor | ||
| + | | x1 = 130px | ||
| + | | y1 = 280px | ||
| + | | area2 = Balconies | ||
| + | | x2 = 155px | ||
| + | | y2 = 196px | ||
| + | | area3 = Central Tower | ||
| + | | x3 = 240px | ||
| + | | y3 = 290px | ||
| + | | area4 = Crossing | ||
| + | | x4 = 290px | ||
| + | | y4 = 288px | ||
| + | | area5 = The Ramp | ||
| + | | x5 = 360px | ||
| + | | y5 = 207px | ||
| + | | area6 = Cliff House | ||
| + | | x6 = 410px | ||
| + | | y6 = 289px | ||
| + | | area7 = Clocktower | ||
| + | | x7 = 570px | ||
| + | | y7 = 287px | ||
| + | }} | ||
| + | |||
| + | ==Attack'n'Defend== | ||
| + | ===DeGroot Keep=== | ||
| + | {{User:Wookipan/Map overview | ||
| + | | title = DeGroot Keep - overview indicators | ||
| + | | image = DeGroot Keep overview.png | ||
| + | | - | ||
| + | | area1 = Rock | ||
| + | | x1 = 329px | ||
| + | | y1 = 300px | ||
| + | | area2 = Main battlefield | ||
| + | | x2 = 352px | ||
| + | | y2 = 252px | ||
| + | | area3 = Battlements | ||
| + | | x3 = 368px | ||
| + | | y3 = 173px | ||
| + | | area4 = Castle halls | ||
| + | | x4 = 314px | ||
| + | | y4 = 114px | ||
}} | }} | ||
| − | === | + | ===Dustbowl=== |
{{User:Wookipan/Map overview | {{User:Wookipan/Map overview | ||
| − | | title = | + | | title = Dustbowl - overview indicators |
| − | | image = | + | | image = Dustbowl overview.png |
| - | | - | ||
| spawn1 = BLU first spawn | | spawn1 = BLU first spawn | ||
| spawn-color1 = blu | | spawn-color1 = blu | ||
| − | | xA = | + | | xA = 172px |
| − | | yA = | + | | yA = 106px |
| − | | spawn2 = BLU second spawn | + | | spawn2 = BLU second spawn/RED first spawn |
| − | | spawn-color2 = | + | | spawn-color2 = mix |
| − | | xB = | + | | xB = 568px |
| − | | yB = | + | | yB = 225px |
| − | | spawn3 = BLU | + | | spawn3 = BLU third spawn/RED second spawn |
| − | | spawn-color3 = | + | | spawn-color3 = mix |
| − | | xC = | + | | xC = 220px |
| − | | yC = | + | | yC = 500px |
| − | | spawn4 = RED | + | | spawn4 = RED final spawn |
| spawn-color4 = red | | spawn-color4 = red | ||
| − | | xD = | + | | xD = 367px |
| − | | yD = | + | | yD = 235px |
| − | |||
| − | |||
| − | |||
| − | |||
| - | | - | ||
| − | | area1 = | + | | area1 = Right exit shed |
| − | | x1 = | + | | x1 = 227px |
| − | | y1 = | + | | y1 = 139px |
| − | | area2 = | + | | area2 = Canyon |
| − | | x2 = | + | | x2 = 260px |
| − | | y2 = | + | | y2 = 170px |
| − | | area3 = | + | | area3 = Left exit shed |
| − | | x3 = | + | | x3 = 266px |
| − | | y3 = | + | | y3 = 212px |
| area4 = Tunnels | | area4 = Tunnels | ||
| − | | x4 = | + | | x4 = 427px |
| − | | y4 = | + | | y4 = 116px |
| − | | area5 = | + | | area5 = Bridge |
| − | | x5 = | + | | x5 =485px |
| − | | y5 = | + | | y5 = 161px |
| − | | area6 = | + | | area6 = Platform |
| − | | x6 = | + | | x6 = 473px |
| − | | y6 = | + | | y6 = 206px |
| − | | area7 = | + | | area7 = Dugout |
| − | | x7 = | + | | x7 = 566px |
| − | | y7 = | + | | y7 = 326px |
| − | | area8 = | + | | area8 = Large shed |
| − | | x8 = | + | | x8 = 521px |
| − | | y8 = | + | | y8 = 378px |
| − | | area9 = | + | | area9 = Control point building |
| − | | x9 = | + | | x9 = 576px |
| − | | y9 = | + | | y9 = 441px |
| − | | area10 = | + | | area10 = Office |
| − | | x10 = | + | | x10 = 508px |
| − | | y10 = | + | | y10 = 507px |
| − | | area11 = | + | | area11 = Mining tunnel |
| − | | x11 = | + | | x11 = 450px |
| − | | y11 = | + | | y11 = 558px |
| − | | area12 = | + | | area12 = Double tunnels |
| − | | x12 = | + | | x12 = 420px |
| − | | y12 = | + | | y12 = 495px |
| − | | area13 = | + | | area13 = Gated tunnel |
| − | | x13 = | + | | x13 = 409px |
| − | | y13 = | + | | y13 = 436px |
| − | | area14 = | + | | area14 = Courtyard |
| − | | x14 = | + | | x14 = 370px |
| − | | y14 = | + | | y14 = 489px |
| + | | area15 = Middle building | ||
| + | | x15 = 325px | ||
| + | | y15 = 498px | ||
| + | | area16 = Loading dock | ||
| + | | x16 = 222px | ||
| + | | y16 = 371px | ||
| + | | area17 = Ledge | ||
| + | | x17 = 317px | ||
| + | | y17 = 314px | ||
| + | | area18 = Alleys | ||
| + | | x18 = 351px | ||
| + | | y18 = 400px | ||
| + | | area19 = Valley | ||
| + | | x19 = 390px | ||
| + | | y19 = 345px | ||
}} | }} | ||
| − | === | + | ===Egypt=== |
{{User:Wookipan/Map overview | {{User:Wookipan/Map overview | ||
| − | | title = | + | | title = Egypt - overview indicators |
| − | | image = | + | | image = Egypt overview.png |
| - | | - | ||
| spawn1 = BLU first spawn | | spawn1 = BLU first spawn | ||
| spawn-color1 = blu | | spawn-color1 = blu | ||
| − | | xA = | + | | xA = 36px |
| − | | yA = | + | | yA = 120px |
| spawn2 = BLU second spawn | | spawn2 = BLU second spawn | ||
| spawn-color2 = blu | | spawn-color2 = blu | ||
| − | | xB = | + | | xB = 335px |
| − | | yB = | + | | yB = 290px |
| − | | spawn3 = | + | | spawn3 = BLU final spawn |
| − | | spawn-color3 = | + | | spawn-color3 = blu |
| − | | xC = | + | | xC = 534px |
| − | | yC = | + | | yC = 438px |
| + | | spawn4 = RED first spawn | ||
| + | | spawn-color4 = red | ||
| + | | xD = 255px | ||
| + | | yD = 249px | ||
| + | | spawn5 = RED second spawn | ||
| + | | spawn-color5 = red | ||
| + | | xE = 473px | ||
| + | | yE = 446px | ||
| - | | - | ||
| − | | area1 = | + | | area1 = Ledges |
| − | | x1 = | + | | x1 = 161px |
| − | | y1 = | + | | y1 = 157px |
| − | | area2 = | + | | area2 = Large courtyard |
| − | | x2 = | + | | x2 = 165px |
| − | | y2 = | + | | y2 = 253px |
| − | | area3 = | + | | area3 = Small courtyard |
| − | | x3 = | + | | x3 = 208px |
| − | | y3 = | + | | y3 = 168px |
| − | | area4 = | + | | area4 = Tunnels |
| − | | x4 = | + | | x4 = 280px |
| − | | y4 = | + | | y4 = 178px |
| − | | area5 = | + | | area5 = Point courtyard |
| − | | x5 = | + | | x5 = 318px |
| − | | y5 = | + | | y5 = 224px |
| − | | area6 = | + | | area6 = Stairs |
| − | | x6 = | + | | x6 = 338px |
| − | | y6 = | + | | y6 = 403px |
| − | | area7 = Main | + | | area7 = Main building |
| − | | x7 = | + | | x7 = 378px |
| − | | y7 = | + | | y7 = 448px |
| − | | area8 = | + | | area8 = Side path |
| − | | x8 = | + | | x8 = 435px |
| − | | y8 = | + | | y8 = 368px |
| − | | area9 = Flank | + | | area9 = Flank |
| − | | x9 = | + | | x9 = 604px |
| − | | y9 = | + | | y9 = 451px |
| + | | area10 = Opening | ||
| + | | x10 = 551px | ||
| + | | y10 = 414px | ||
| + | | area11 = Valley | ||
| + | | x11 = 568px | ||
| + | | y11 = 394px | ||
| + | | area12 = Central pillar | ||
| + | | x12 = 556px | ||
| + | | y12 = 367px | ||
| + | | area13 = Caves | ||
| + | | x13 = 630px | ||
| + | | y13 = 313px | ||
| + | | area14 = Open courtyard | ||
| + | | x14 = 686px | ||
| + | | y14 = 373px | ||
}} | }} | ||
| − | === | + | ===Erebus=== |
| + | ====Stage 1==== | ||
| + | {{User:Wookipan/Map overview | ||
| + | | title = Erebus, stage 1 - overview indicators | ||
| + | | image = Cp ambush event0001.png | ||
| + | |- | ||
| + | | spawn1 = BLU spawn | ||
| + | | spawn-color1 = blu | ||
| + | | xA = 170px | ||
| + | | yA = 310px | ||
| + | | spawn2 = RED spawn | ||
| + | | spawn-color2 = red | ||
| + | | xB = 750px | ||
| + | | yB = 160px | ||
| + | | - | ||
| + | | area1 = Tree Stunps | ||
| + | | x1 = 330px | ||
| + | | y1 = 335px | ||
| + | | area2 = Lower area | ||
| + | | x2 = 230px | ||
| + | | y2 = 150px | ||
| + | | area3 = Lumber Yard | ||
| + | | x3 = 320px | ||
| + | | y3 = 155px | ||
| + | | area4 = Sawmill | ||
| + | | x4 = 395px | ||
| + | | y4 = 120px | ||
| + | | area5 = Mineshafts | ||
| + | | x5 = 460px | ||
| + | | y5 = 260px | ||
| + | }} | ||
| + | |||
| + | ====Stage 2==== | ||
{{User:Wookipan/Map overview | {{User:Wookipan/Map overview | ||
| − | | title = | + | | title = Erebus, stage 2 - overview indicators |
| − | | image = | + | | image = Cp ambush event0003.png |
| - | | - | ||
| − | | spawn1 = BLU | + | | spawn1 = BLU spawn |
| spawn-color1 = blu | | spawn-color1 = blu | ||
| − | | xA = | + | | xA = 190px |
| − | | yA = | + | | yA = 90px |
| − | | spawn2 = BLU second spawn | + | | spawn2 = RED spawn |
| + | | spawn-color2 = red | ||
| + | | xB = 730px | ||
| + | | yB = 340px | ||
| + | | - | ||
| + | | area1 = Ravine | ||
| + | | x1 = 220px | ||
| + | | y1 = 260px | ||
| + | | area2 = Cliff | ||
| + | | x2 = 285px | ||
| + | | y2 = 275px | ||
| + | | area3 = Cave | ||
| + | | x3 = 280px | ||
| + | | y3 = 190px | ||
| + | | area4 = Sniper's Deck | ||
| + | | x4 = 485px | ||
| + | | y4 = 235px | ||
| + | | area5 = Shed | ||
| + | | x5 = 400px | ||
| + | | y5 = 165px | ||
| + | | area6 = Left Flank | ||
| + | | x6 = 545px | ||
| + | | y6 = 125px | ||
| + | | area7 = Central area | ||
| + | | x7 = 565px | ||
| + | | y7 = 220px | ||
| + | | area8 = Church | ||
| + | | x8 = 635px | ||
| + | | y8 = 180px | ||
| + | }} | ||
| + | |||
| + | ====Stage 3==== | ||
| + | {{User:Wookipan/Map overview | ||
| + | | tile = Erebus, stage 3 - overview indicators | ||
| + | | image = Cp ambush event0002.png | ||
| + | | - | ||
| + | | spawn1 = BLU spawn | ||
| + | | spawn-color1 = blu | ||
| + | | xA = 90px | ||
| + | | yA = 370px | ||
| + | | spawn2 = RED spawn | ||
| + | | spawn-color2 = red | ||
| + | | xB = 600px | ||
| + | | yB = 220px | ||
| + | | - | ||
| + | | area1 = Building 237 | ||
| + | | x1 = 120px | ||
| + | | y1 = 320px | ||
| + | | area2 = Yard | ||
| + | | x2 = 295px | ||
| + | | y2 = 320px | ||
| + | | area3 = Elevation | ||
| + | | x3 = 280px | ||
| + | | y3 = 210px | ||
| + | | area4 = Computer room | ||
| + | | x4 = 355px | ||
| + | | y4 = 205px | ||
| + | | area5 = Under Flank | ||
| + | | x5 = 375px | ||
| + | | y5 = 165px | ||
| + | | area6 = Propane Yard | ||
| + | | x6 = 515px | ||
| + | | y6 = 260px | ||
| + | | area7 = Red Shed | ||
| + | | x7 = 470px | ||
| + | | y7 = 320px | ||
| + | }} | ||
| + | |||
| + | ===Gorge=== | ||
| + | {{User:Wookipan/Map overview | ||
| + | | title = Gorge - overview indicators | ||
| + | | image = Gorge overview.png | ||
| + | | - | ||
| + | | spawn1 = BLU first spawn | ||
| + | | spawn-color1 = blu | ||
| + | | xA =431px | ||
| + | | yA = 65px | ||
| + | | spawn2 = BLU second spawn | ||
| spawn-color2 = blu | | spawn-color2 = blu | ||
| − | | xB = | + | | xB = 418px |
| − | | yB = | + | | yB = 437px |
| spawn3 = RED only spawn | | spawn3 = RED only spawn | ||
| spawn-color3 = red | | spawn-color3 = red | ||
| − | | xC = | + | | xC = 283px |
| − | | yC = | + | | yC = 986px |
| - | | - | ||
| area1 = Entrance yard | | area1 = Entrance yard | ||
| − | | x1 = | + | | x1 = 320px |
| − | | y1 = | + | | y1 = 257px |
| area2 = Toll both | | area2 = Toll both | ||
| − | | x2 = | + | | x2 = 353px |
| − | | y2 = | + | | y2 = 309px |
| area3 = Upper deck | | area3 = Upper deck | ||
| − | | x3 = | + | | x3 = 511px |
| − | | y3 = | + | | y3 = 367px |
| area4 = Checkpoint building | | area4 = Checkpoint building | ||
| − | | x4 = | + | | x4 = 364px |
| − | | y4 = | + | | y4 = 473px |
| area5 = Gorge (valley) | | area5 = Gorge (valley) | ||
| − | | x5 = | + | | x5 = 436px |
| − | | y5 = | + | | y5 = 557px |
| area6 = Flank hallway | | area6 = Flank hallway | ||
| − | | x6 = | + | | x6 = 396px |
| − | | y6 = | + | | y6 = 673px |
| area7 = Main hallway | | area7 = Main hallway | ||
| − | | x7 = | + | | x7 = 295px |
| − | | y7 = | + | | y7 = 727px |
| area8 = Second floor | | area8 = Second floor | ||
| − | | x8 = | + | | x8 = 381px |
| − | | y8 = | + | | y8 = 812px |
| area9 = Flank room | | area9 = Flank room | ||
| − | | x9 = | + | | x9 = 440px |
| − | | y9 = | + | | y9 = 957px |
}} | }} | ||
| − | === | + | ===Gorge Event=== |
{{User:Wookipan/Map overview | {{User:Wookipan/Map overview | ||
| − | | title = | + | | title = Gorge Event - overview indicators |
| − | | image = | + | | image = Gorge Event overview.png |
| - | | - | ||
| − | | spawn1 = BLU spawn | + | | spawn1 = BLU first spawn |
| spawn-color1 = blu | | spawn-color1 = blu | ||
| − | | xA = | + | | xA = 533px |
| − | | yA = | + | | yA = 62px |
| − | | spawn2 = | + | | spawn2 = BLU second spawn |
| − | | spawn-color2 = | + | | spawn-color2 = blu |
| − | | xB = | + | | xB = 480px |
| − | | yB = | + | | yB = 246px |
| + | | spawn3 = RED only spawn | ||
| + | | spawn-color3 = red | ||
| + | | xC = 416px | ||
| + | | yC = 658px | ||
| - | | - | ||
| − | | area1 = | + | | area1 = Entrance yard |
| − | | x1 = | + | | x1 = 455px |
| − | | y1 = | + | | y1 = 131px |
| − | | area2 = | + | | area2 = Toll both |
| − | | x2 = | + | | x2 = 472px |
| − | | y2 = | + | | y2 = 170px |
| − | | area3 = | + | | area3 = Upper deck |
| − | | x3 = | + | | x3 = 587px |
| − | | y3 = | + | | y3 = 216px |
| − | | area4 = | + | | area4 = Checkpoint building |
| − | | x4 = | + | | x4 = 520px |
| − | | y4 = | + | | y4 = 272px |
| − | | area5 = | + | | area5 = Gorge (valley) |
| − | | x5 = | + | | x5 = 564px |
| − | | y5 = | + | | y5 = 333px |
| − | | area6 = | + | | area6 = Flank hallway |
| − | | x6 = | + | | x6 = 500px |
| − | | y6 = | + | | y6 = 420px |
| − | | area7 = | + | | area7 = Main hallway |
| − | | x7 = | + | | x7 = 427px |
| − | | y7 = | + | | y7 = 465px |
| − | | area8 = | + | | area8 = Second floor |
| − | | x8 = | + | | x8 = 522px |
| − | | y8 = | + | | y8 = 542px |
| − | | area9 = | + | | area9 = Flank room |
| − | | x9 = | + | | x9 = 541px |
| − | | y9 = | + | | y9 = 641px |
| − | |||
| − | |||
| − | |||
| − | |||
| − | |||
| − | |||
}} | }} | ||
| − | === | + | ===Gravel Pit=== |
{{User:Wookipan/Map overview | {{User:Wookipan/Map overview | ||
| − | | title = | + | | title = Gravel Pit - overview indicators |
| − | | image = | + | | image = Gravel Pit overview.png |
| - | | - | ||
| spawn1 = BLU spawn | | spawn1 = BLU spawn | ||
| spawn-color1 = blu | | spawn-color1 = blu | ||
| − | | xA = | + | | xA = 470px |
| − | | yA = | + | | yA = 190px |
| spawn2 = RED spawn | | spawn2 = RED spawn | ||
| spawn-color2 = red | | spawn-color2 = red | ||
| − | | xB = | + | | xB = 83px |
| − | | yB = | + | | yB = 347px |
| - | | - | ||
| − | | area1 = | + | | area1 = B side tunnel |
| − | | x1 = | + | | x1 = 398px |
| − | | y1 = | + | | y1 = 134px |
| − | | area2 = | + | | area2 = Radar building |
| − | | x2 = | + | | x2 = 265px |
| − | | y2 = | + | | y2 = 168px |
| − | | area3 = | + | | area3 = Shadow side |
| − | | x3 = | + | | x3 = 229px |
| − | | y3 = | + | | y3 = 194px |
| − | | area4 = | + | | area4 = Balcony |
| − | | x4 = | + | | x4 = 300px |
| − | | y4 = | + | | y4 = 268px |
| − | | area5 = | + | | area5 = A/B connector |
| − | | x5 = | + | | x5 = 378px |
| − | | y5 = | + | | y5 = 258px |
| − | | area6 = A | + | | area6 = A side tunnel |
| − | | x6 = | + | | x6 = 455px |
| − | | y6 = | + | | y6 = 289px |
| − | | area7 = | + | | area7 = Path |
| − | | x7 = | + | | x7 = 448px |
| − | | y7 = | + | | y7 = 356px |
| − | | area8 = | + | | area8 = Valley |
| − | | x8 = | + | | x8 = 482px |
| − | | y8 = | + | | y8 = 381px |
| − | | area9 = | + | | area9 = Radio tower |
| − | | x9 = | + | | x9 = 435px |
| − | | y9 = | + | | y9 = 416px |
| + | | area10 = Laser tower | ||
| + | | x10 = 225px | ||
| + | | y10 = 365px | ||
| + | | area11 = Ground level | ||
| + | | x11 = 190px | ||
| + | | y11 = 402px | ||
}} | }} | ||
| − | === | + | ===Junction=== |
{{User:Wookipan/Map overview | {{User:Wookipan/Map overview | ||
| − | | title = | + | | title = Junction - overview indicators |
| − | | image = | + | | image = Junction overview.png |
| − | | - | + | | - |
| − | | spawn1 = BLU | + | | spawn1 = BLU spawn |
| spawn-color1 = blu | | spawn-color1 = blu | ||
| − | | xA = | + | | xA = 580px |
| − | | yA = | + | | yA = 270px |
| − | | spawn2 = | + | | spawn2 = RED spawn |
| − | | spawn-color2 = | + | | spawn-color2 = red |
| − | | xB = | + | | xB = 90px |
| − | | yB = | + | | yB = 253px |
| − | |||
| − | |||
| − | |||
| − | |||
| − | |||
| − | |||
| − | |||
| − | |||
| − | |||
| − | |||
| − | |||
| − | |||
| - | | - | ||
| − | | area1 = | + | | area1 = Balconies |
| − | | x1 = | + | | x1 = 438px |
| − | | y1 = | + | | y1 = 113px |
| − | | area2 = | + | | area2 = B lobby |
| − | | x2 = | + | | x2 = 420px |
| − | | y2 = | + | | y2 = 160px |
| − | | area3 = | + | | area3 = Balconies |
| − | | x3 = | + | | x3 = 341px |
| − | | y3 = | + | | y3 = 204px |
| − | | area4 = | + | | area4 = B/C flank |
| − | | x4 = | + | | x4 = 308px |
| − | | y4 = | + | | y4 = 235px |
| − | | area5 = | + | | area5 = Platform |
| − | | x5 = | + | | x5 = 191px |
| − | | y5 = | + | | y5 = 286px |
| − | | area6 = | + | | area6 = A/C flank |
| − | | x6 = | + | | x6 = 304px |
| − | | y6 = | + | | y6 = 343px |
| − | | area7 = | + | | area7 = A/B route |
| − | | x7 = | + | | x7 = 390px |
| − | | y7 = | + | | y7 = 315px |
| − | | area8 = | + | | area8 = A lobby |
| − | | x8 = | + | | x8 = 415px |
| − | | y8 = | + | | y8 = 405px |
| − | | area9 = | + | | area9 = Stairs |
| − | | x9 = | + | | x9 = 360px |
| − | | y9 = | + | | y9 = 463px |
| − | |||
| − | |||
| − | |||
| − | |||
| − | |||
| − | |||
}} | }} | ||
| − | === | + | ===Mercenary Park=== |
{{User:Wookipan/Map overview | {{User:Wookipan/Map overview | ||
| − | | title = | + | | title = Mercenary Park - overview indicators |
| − | | image = | + | | image = Mercenary Park (map) overview.png |
| − | | - | + | | - |
| spawn1 = BLU first spawn | | spawn1 = BLU first spawn | ||
| spawn-color1 = blu | | spawn-color1 = blu | ||
| − | | xA = | + | | xA = 624px |
| − | | yA = | + | | yA = 158px |
| spawn2 = BLU second spawn | | spawn2 = BLU second spawn | ||
| spawn-color2 = blu | | spawn-color2 = blu | ||
| − | | xB = | + | | xB = 482px |
| − | | yB = | + | | yB = 256px |
| − | | spawn3 = | + | | spawn3 = BLU third spawn |
| − | | spawn-color3 = | + | | spawn-color3 = blu |
| − | | xC = | + | | xC = 260px |
| − | | yC = | + | | yC = 218px |
| + | | spawn4 = RED first spawn | ||
| + | | spawn-color4 = red | ||
| + | | xD = 332px | ||
| + | | yD = 100px | ||
| + | | spawn5 = RED final spawn | ||
| + | | spawn-color5 = red | ||
| + | | xE = 64px | ||
| + | | yE = 169px | ||
| - | | - | ||
| − | | area1 = | + | | area1 = Gift shop |
| − | | x1 = | + | | x1 = 594px |
| − | | y1 = | + | | y1 = 158px |
| − | | area2 = | + | | area2 = Playground |
| − | | x2 = | + | | x2 = 563px |
| − | | y2 = | + | | y2 = 212px |
| − | | area3 = | + | | area3 = Mann.Co building |
| − | | x3 = | + | | x3 = 498px |
| − | | y3 = | + | | y3 = 234px |
| − | | area4 = | + | | area4 = Transport cages |
| − | | x4 = | + | | x4 = 439px |
| − | | y4 = | + | | y4 = 237px |
| − | | area5 = | + | | area5 = Catwalks |
| − | | x5 = | + | | x5 = 414px |
| − | | y5 = | + | | y5 = 184px |
| − | | area6 = | + | | area6 = Server room |
| − | | x6 = | + | | x6 = 330px |
| − | | y6 = | + | | y6 = 173px |
| − | | area7 = | + | | area7 = Elevator shaft |
| − | | x7 = | + | | x7 = 189px |
| − | | y7 = | + | | y7 = 200px |
| − | | area8 = | + | | area8 = Institute for Research and Development (YTI Room) |
| − | | x8 = | + | | x8 = 183px |
| − | | y8 = | + | | y8 = 241px |
| − | | area9 = | + | | area9 = Ventilation shaft |
| − | | x9 = | + | | x9 = 161px |
| − | | y9 = | + | | y9 = 275px |
| + | | area10 = Side stairs | ||
| + | | x10 = 108px | ||
| + | | y10 = 249px | ||
| + | | area11 = Platform | ||
| + | | x11 = 128px | ||
| + | | y11 = 202px | ||
}} | }} | ||
| − | === | + | ===Mossrock=== |
{{User:Wookipan/Map overview | {{User:Wookipan/Map overview | ||
| − | | title = | + | | title = Mossrock - overview indicators |
| − | | image = | + | | image = Mossrock overview.png |
| - | | - | ||
| − | | spawn1 = BLU spawn | + | | spawn1 = BLU first spawn |
| spawn-color1 = blu | | spawn-color1 = blu | ||
| − | | xA = | + | | xA = 220px |
| − | | yA = | + | | yA = 537px |
| − | | spawn2 = | + | | spawn2 = BLU second spawn |
| − | | spawn-color2 = | + | | spawn-color2 = blu |
| − | | xB = | + | | xB = 416px |
| − | | yB = | + | | yB = 572px |
| + | | spawn3 = RED spawn | ||
| + | | spawn-color3 = red | ||
| + | | xC = 748px | ||
| + | | yC = 430px | ||
| - | | - | ||
| − | | area1 = | + | | area1 = Captain Dan's Wood pulp |
| − | | x1 = | + | | x1 = 318px |
| − | | y1 = | + | | y1 = 547px |
| − | | area2 = | + | | area2 = Casali Shafting Co. |
| − | | x2 = | + | | x2 = 401px |
| − | | y2 = | + | | y2 = 541px |
| − | | area3 = | + | | area3 = Riverwalk |
| − | | x3 = | + | | x3 = 415px |
| − | | y3 = | + | | y3 = 499px |
| − | | area4 = | + | | area4 = Radio Shack with Radio Room |
| − | | x4 = | + | | x4 = 415px |
| − | | y4 = | + | | y4 = 430px |
| − | | area5 = | + | | area5 = Island flank |
| − | | x5 = | + | | x5 = 461px |
| − | | y5 = | + | | y5 = 463px |
| − | | area6 = | + | | area6 = Jenkin Coal Co. |
| − | | x6 = | + | | x6 = 527px |
| − | | y6 = | + | | y6 = 474px |
| − | | | + | | area7 = Shipping |
| − | | | + | | x7 = 580px |
| − | | | + | | y7 = 438px |
| − | | | + | | area8 = One tree hill |
| − | | | + | | x8 = 585px |
| − | | | + | | y8 = 487px |
| − | | area9 = | + | | area9 = Trestle |
| − | | x9 = | + | | x9 = 629px |
| − | | y9 = | + | | y9 = 496px |
}} | }} | ||
| − | === | + | ===Mountain Lab=== |
{{User:Wookipan/Map overview | {{User:Wookipan/Map overview | ||
| − | | title = | + | | title = Mountain Lab - overview indicators |
| − | | image = | + | | image = Mountain Lab overview.png |
| - | | - | ||
| spawn1 = BLU spawn | | spawn1 = BLU spawn | ||
| spawn-color1 = blu | | spawn-color1 = blu | ||
| − | | xA = | + | | xA = 698px |
| − | | yA = | + | | yA = 232px |
| spawn2 = RED spawn | | spawn2 = RED spawn | ||
| spawn-color2 = red | | spawn-color2 = red | ||
| − | | xB = | + | | xB = 37px |
| − | | yB = | + | | yB = 100px |
| - | | - | ||
| area1 = Yard | | area1 = Yard | ||
| − | | x1 = | + | | x1 = 601px |
| − | | y1 = | + | | y1 = 271px |
| area2 = Warehouse | | area2 = Warehouse | ||
| − | | x2 = | + | | x2 = 550px |
| − | | y2 = | + | | y2 = 198px |
| area3 = Shed | | area3 = Shed | ||
| − | | x3 = | + | | x3 = 454px |
| − | | y3 = | + | | y3 = 142px |
| area4 = Tunnel | | area4 = Tunnel | ||
| − | | x4 = | + | | x4 = 432px |
| − | | y4 = | + | | y4 = 298px |
| area5 = Small house | | area5 = Small house | ||
| − | | x5 = | + | | x5 = 355px |
| − | | y5 = | + | | y5 = 455px |
| area6 = Cliffs | | area6 = Cliffs | ||
| − | | x6 = | + | | x6 = 330px |
| − | | y6 = | + | | y6 = 324px |
| area8 = Lower entrance tunnels | | area8 = Lower entrance tunnels | ||
| − | | x8 = | + | | x8 = 319px |
| − | | y8 = | + | | y8 = 186px |
| area7 = Upper entrance tunnels | | area7 = Upper entrance tunnels | ||
| − | | x7 = | + | | x7 = 210px |
| − | | y7 = | + | | y7 = 228px |
| area9 = Top floor | | area9 = Top floor | ||
| − | | x9 = | + | | x9 = 219px |
| − | | y9 = | + | | y9 = 120px |
}} | }} | ||
| − | === | + | ===Mann Manor=== |
| − | |||
{{User:Wookipan/Map overview | {{User:Wookipan/Map overview | ||
| − | | title = | + | | title = Mann Manor - overview indicators |
| − | | image = | + | | image = Mann Manor overview.png |
| - | | - | ||
| − | | spawn1 = BLU | + | | spawn1 = BLU spawn |
| spawn-color1 = blu | | spawn-color1 = blu | ||
| − | | xA = | + | | xA = 680px |
| − | | yA = | + | | yA = 287px |
| − | | spawn2 = | + | | spawn2 = RED spawn |
| − | | spawn-color2 = | + | | spawn-color2 = red |
| − | | xB = | + | | xB = 120px |
| − | | yB | + | | yB = 151px |
| − | |||
| − | |||
| − | |||
| − | |||
| − | |||
| − | |||
| − | |||
| − | |||
| - | | - | ||
| − | | area1 = | + | | area1 = Yard |
| − | | x1 = | + | | x1 = 618px |
| − | | y1 = | + | | y1 = 286px |
| − | | area2 = | + | | area2 = Warehouse |
| − | | x2 = | + | | x2 = 567px |
| − | | y2 = | + | | y2 = 260px |
| − | | area3 = | + | | area3 = Shed |
| − | | x3 = | + | | x3 = 495px |
| − | | y3 = | + | | y3 = 195px |
| − | | area4 = | + | | area4 = Tunnel |
| − | | x4 = | + | | x4 = 477px |
| − | | y4 = | + | | y4 = 323px |
| − | | area5 = | + | | area5 = Small house |
| − | | x5 = | + | | x5 = 404px |
| − | | y5 = | + | | y5 = 429px |
| − | | area6 = | + | | area6 = Cliffs |
| − | | x6 = | + | | x6 = 377px |
| − | | y6 = | + | | y6 = 347px |
| + | | area8 = Lower entrance tunnels | ||
| + | | x8 = 374px | ||
| + | | y8 = 231px | ||
| + | | area7 = Upper entrance tunnels | ||
| + | | x7 = 284px | ||
| + | | y7 = 287px | ||
| + | | area9 = Top floor | ||
| + | | x9 = 271px | ||
| + | | y9 = 173px | ||
}} | }} | ||
| − | ====Stage | + | ===Snowplow=== |
| + | ====Stage 1==== | ||
{{User:Wookipan/Map overview | {{User:Wookipan/Map overview | ||
| − | | title = Snowplow, stage | + | | title = Snowplow, stage 1 - overview indicators |
| − | | image = Snowplow Overview | + | | image = Snowplow Overview 1.png |
| - | | - | ||
| spawn1 = BLU first spawn | | spawn1 = BLU first spawn | ||
| spawn-color1 = blu | | spawn-color1 = blu | ||
| − | | xA = | + | | xA = 212px |
| − | | yA = | + | | yA = 537px |
| spawn2 = BLU second spawn | | spawn2 = BLU second spawn | ||
| − | | xB = | + | | spawn-color2 = blu |
| − | | yB = | + | | xB = 319px |
| − | | spawn3 = RED spawn | + | | yB = 430px |
| − | | xC = | + | | spawn3 = RED first spawn |
| − | | yC = | + | | spawn-color3 = red |
| + | | xC = 347px | ||
| + | | yC = 133px | ||
| + | | spawn4 = RED second spawn | ||
| + | | spawn-color4 = red | ||
| + | | xD = 160px | ||
| + | | yD = 151px | ||
| - | | - | ||
| − | | area1 = | + | | area1 = Left exit building |
| − | | x1 = | + | | x1 =170px |
| − | | y1 = | + | | y1 = 450px |
| − | | area2 = | + | | area2 = Right side building |
| − | | x2 = | + | | x2 = 272px |
| − | | y2 = | + | | y2 = 434px |
| − | | area3 = | + | | area3 = Right side structure |
| − | | x3 = | + | | x3 = 421px |
| − | | y3 = | + | | y3 = 420px |
| − | | area4 = | + | | area4 = Structural path |
| − | | x4 = | + | | x4 = 381px |
| − | | y4 = | + | | y4 = 355px |
| + | | area5 = Warehouse | ||
| + | | x5 = 430px | ||
| + | | y5 = 189px | ||
| + | | area6 = Wooden tower | ||
| + | | x6 = 249px | ||
| + | | y6 = 254px | ||
}} | }} | ||
| − | === | + | ====Stage 2==== |
{{User:Wookipan/Map overview | {{User:Wookipan/Map overview | ||
| − | | title = | + | | title = Snowplow, stage 2 - overview indicators |
| − | | image = | + | | image = Snowplow Overview 2.png |
| - | | - | ||
| − | | spawn1 = BLU spawn | + | | spawn1 = BLU first spawn |
| spawn-color1 = blu | | spawn-color1 = blu | ||
| − | | xA = 384px | + | | xA = 299px |
| − | | yA = 447px | + | | yA = 540px |
| − | | spawn2 = RED spawn | + | | spawn2 = BLU second spawn |
| − | | spawn-color2 = red | + | | xB = 328px |
| − | | xB = 366px | + | | yB = 238px |
| − | | yB = 13px | + | | spawn3 = RED spawn |
| + | | xC = 616px | ||
| + | | yC = 240px | ||
| + | | - | ||
| + | | area1 = Supply shed | ||
| + | | x1 = 233px | ||
| + | | y1 = 445px | ||
| + | | area2 = Left house | ||
| + | | x2 = 260px | ||
| + | | y2 = 300px | ||
| + | | area3 = Battlements | ||
| + | | x3 = 424px | ||
| + | | y3 = 179px | ||
| + | | area4 = Left path structure | ||
| + | | x4 = 616px | ||
| + | | y4 = 92px | ||
| + | }} | ||
| + | |||
| + | ===Steel=== | ||
| + | {{User:Wookipan/Map overview | ||
| + | | title = Steel - overview indicators | ||
| + | | image = Steel overview.png | ||
| + | | - | ||
| + | | spawn1 = BLU spawn | ||
| + | | spawn-color1 = blu | ||
| + | | xA = 384px | ||
| + | | yA = 447px | ||
| + | | spawn2 = RED spawn | ||
| + | | spawn-color2 = red | ||
| + | | xB = 366px | ||
| + | | yB = 13px | ||
| - | | - | ||
| area1 = Hill | | area1 = Hill | ||
| Line 1,930: | Line 2,263: | ||
| y2 = 253px | | y2 = 253px | ||
| area3 = Choke | | area3 = Choke | ||
| − | | x3 = | + | | x3 = 451px |
| y3 = 327px | | y3 = 327px | ||
| area4 = Left yard | | area4 = Left yard | ||
| Line 2,793: | Line 3,126: | ||
| yB = 150px | | yB = 150px | ||
| - | | - | ||
| − | | area1 = Yard | + | | area1 = Yard |
| − | | x1 = 200px | + | | x1 = 200px |
| − | | y1 = 227px | + | | y1 = 227px |
| − | | area2 = Valley | + | | area2 = Valley |
| − | | x2 = 275px | + | | x2 = 275px |
| − | | y2 = 243px | + | | y2 = 243px |
| − | | area3 = Factories | + | | area3 = Factories |
| − | | x3 = 315px | + | | x3 = 315px |
| − | | y3 = 184px | + | | y3 = 184px |
| + | }} | ||
| + | |||
| + | ===Moldergrove=== | ||
| + | {{User:Wookipan/Map overview | ||
| + | | title = Moldergrove - overview indicators | ||
| + | | image = Moldergrove overview.png | ||
| + | | - | ||
| + | | spawn1 = RED spawn | ||
| + | | spawn-color1 = red | ||
| + | | xA = 87px | ||
| + | | yA = 190px | ||
| + | | spawn2 = BLU spawn | ||
| + | | spawn-color2 = blu | ||
| + | | xB = 687px | ||
| + | | yB = 190px | ||
| + | | - | ||
| + | | area1 = Spawn yard | ||
| + | | x1 = 169px | ||
| + | | y1 = 207px | ||
| + | | area2 = Blinski Logging | ||
| + | | x2 = 210px | ||
| + | | y2 = 150px | ||
| + | | area3 = End of the Line | ||
| + | | x3 = 297px | ||
| + | | y3 = 170px | ||
| + | | area4 = Central building | ||
| + | | x4 = 340px | ||
| + | | y4 = 198px | ||
| + | | area5 = Mine Pit | ||
| + | | x5 = 386px | ||
| + | | y5 = 120px | ||
| + | | area6 = Red valley Mountain | ||
| + | | x6 = 385px | ||
| + | | y6 = 311px | ||
| + | }} | ||
| + | |||
| + | ===Moonshine Event=== | ||
| + | {{User:Wookipan/Map overview | ||
| + | | title = Moonshine Event - overview indicators | ||
| + | | image = Moonshine Event overview.png | ||
| + | | - | ||
| + | | spawn1 = RED spawn | ||
| + | | spawn-color1 = red | ||
| + | | xA = 30px | ||
| + | | yA = 112px | ||
| + | | spawn2 = BLU spawn | ||
| + | | spawn-color2 = blu | ||
| + | | xB = 740px | ||
| + | | yB = 112px | ||
| + | | - | ||
| + | | area1 = Spawn yard | ||
| + | | x1 = 114px | ||
| + | | y1 = 119px | ||
| + | | area2 = Industrial Houses | ||
| + | | x2 = 245px | ||
| + | | y2 = 88px | ||
| + | | area3 = Bayou Shipping House | ||
| + | | x3 = 385px | ||
| + | | y3 = 90px | ||
| + | }} | ||
| + | |||
| + | ===Nucleus (King of the Hill)=== | ||
| + | {{User:Wookipan/Map overview | ||
| + | | title = Nucleus (King of the Hill) - overview indicators | ||
| + | | image = Nucleus (Arena) overview.png | ||
| + | | - | ||
| + | | spawn1 = RED spawn | ||
| + | | spawn-color1 = red | ||
| + | | xA = 706px | ||
| + | | yA = 262px | ||
| + | | spawn2 = BLU spawn | ||
| + | | spawn-color2 = blu | ||
| + | | xB = 76px | ||
| + | | yB = 262px | ||
| + | | - | ||
| + | | area1 = Perimiter | ||
| + | | x1 = 243px | ||
| + | | y1 = 499px | ||
| + | | area2 = Roofs | ||
| + | | x2 = 388px | ||
| + | | y2 = 455px | ||
| + | | area3 = Bridges | ||
| + | | x3 = 390px | ||
| + | | y3 = 347px | ||
| + | | area4 = Flank buildings | ||
| + | | x4 = 281px | ||
| + | | y4 = 165px | ||
| + | | area5 = Access Building | ||
| + | | x5 = 390px | ||
| + | | y5 = 84px | ||
| + | }} | ||
| + | |||
| + | ===Probed=== | ||
| + | {{User:Wookipan/Map overview | ||
| + | | title = Probed - overview indicators | ||
| + | | image = Probed overview.png | ||
| + | | - | ||
| + | | spawn1 = RED spawn | ||
| + | | spawn-color1 = red | ||
| + | | xA = 200px | ||
| + | | yA = 129px | ||
| + | | spawn2 = BLU spawn | ||
| + | | spawn-color2 = blu | ||
| + | | xB = 476px | ||
| + | | yB = 368px | ||
| + | | - | ||
| + | | area1 = Spawn yard | ||
| + | | x1 = 260px | ||
| + | | y1 = 116px | ||
| + | | area2 = Transition Building | ||
| + | | x2 = 306px | ||
| + | | y2 = 135px | ||
| + | | area3 = Sheds | ||
| + | | x3 = 387px | ||
| + | | y3 = 112px | ||
| + | | area4 = Grain Silo | ||
| + | | x4 = 450px | ||
| + | | y4 = 140px | ||
| + | }} | ||
| + | |||
| + | ===Sawmill (King of the Hill)=== | ||
| + | {{User:Wookipan/Map overview | ||
| + | | title = Sawmill (King of the Hill) - overview indicators | ||
| + | | image = Sawmill (Arena) overview.png | ||
| + | | - | ||
| + | | spawn1 = RED spawn | ||
| + | | spawn-color1 = red | ||
| + | | xA = 590px | ||
| + | | yA = 24px | ||
| + | | spawn2 = BLU spawn | ||
| + | | spawn-color2 = blu | ||
| + | | xB = 200px | ||
| + | | yB = 525px | ||
| + | | - | ||
| + | | area1 = Rooftops | ||
| + | | x1 = 222px | ||
| + | | y1 = 330px | ||
| + | | area2 = Cave | ||
| + | | x2 = 225px | ||
| + | | y2 = 172px | ||
| + | | area3 = Waterfall | ||
| + | | x3 = 274px | ||
| + | | y3 = 198px | ||
| + | | area4 = Alcoves | ||
| + | | x4 = 354px | ||
| + | | y4 = 296px | ||
| + | | area5 = Center Shed | ||
| + | | x5 = 390px | ||
| + | | y5 = 290px | ||
| + | | area6 = Log Shed | ||
| + | | x6 = 519px | ||
| + | | y6 = 412px | ||
| + | }} | ||
| + | |||
| + | ===Slasher=== | ||
| + | {{User:Wookipan/Map overview | ||
| + | | title = Slasher - overview indicators | ||
| + | | image = Slasher overview.png | ||
| + | | - | ||
| + | | spawn1 = RED spawn | ||
| + | | spawn-color1 = red | ||
| + | | xA = 334px | ||
| + | | yA = 185px | ||
| + | | spawn2 = BLU spawn | ||
| + | | spawn-color2 = blu | ||
| + | | xB = 334px | ||
| + | | yB = 970px | ||
| + | | - | ||
| + | | area1 = Campfire | ||
| + | | x1 = 380px | ||
| + | | y1 = 830px | ||
| + | | area2 = Mines | ||
| + | | x2 = 490px | ||
| + | | y2 = 790px | ||
| + | | area3 = Middle Entrance | ||
| + | | x3 = 436px | ||
| + | | y3 = 749px | ||
| + | | area4 = Boat Rentals | ||
| + | | x4 = 377px | ||
| + | | y4 = 750px | ||
| + | | area5 = Maintance | ||
| + | | x5 = 240px | ||
| + | | y5 = 745px | ||
| + | | area6 = Boat dock | ||
| + | | x6 = 152px | ||
| + | | y6 = 570px | ||
| + | | area7 = Bonfire | ||
| + | | x7 = 230px | ||
| + | | y7 = 575px | ||
| + | | area8 = Supply Shed | ||
| + | | x8 = 284px | ||
| + | | y8 = 581px | ||
| + | | area9 = Ramps | ||
| + | | x9 = 370px | ||
| + | | y9 = 623px | ||
| + | | area10 = Ranger Lodge | ||
| + | | x10 = 544px | ||
| + | | y10 = 577px | ||
| + | }} | ||
| + | |||
| + | ===Suijin=== | ||
| + | {{User:Wookipan/Map overview | ||
| + | | title = Suijin - overview indicators | ||
| + | | image = Suijin Overview 1.png | ||
| + | | - | ||
| + | | spawn1 = RED spawn | ||
| + | | spawn-color1 = red | ||
| + | | xA = 485px | ||
| + | | yA = 905px | ||
| + | | spawn2 = BLU spawn | ||
| + | | spawn-color2 = blu | ||
| + | | xB = 499px | ||
| + | | yB = 94px | ||
| + | | - | ||
| + | | area1 = Far Islands | ||
| + | | x1 = 45px | ||
| + | | y1 = 870px | ||
| + | | area2 = Cliffside Temple | ||
| + | | x2 = 90px | ||
| + | | y2 = 509px | ||
| + | | area3 = Bamboo Buildings | ||
| + | | x3 = 416px | ||
| + | | y3 = 745px | ||
| + | | area4 = Temple Tower | ||
| + | | x4 = 460px | ||
| + | | y4 = 505px | ||
| + | | area5 = Calligraphy Temple | ||
| + | | x5 = 655px | ||
| + | | y5 = 598px | ||
| + | }} | ||
| + | |||
| + | ===Viaduct=== | ||
| + | {{User:Wookipan/Map overview | ||
| + | | title = Viaduct - overview indicators | ||
| + | | image = Viaduct overview.png | ||
| + | | - | ||
| + | | spawn1 = RED spawn | ||
| + | | spawn-color1 = red | ||
| + | | xA = 435px | ||
| + | | yA = 120px | ||
| + | | spawn2 = BLU spawn | ||
| + | | spawn-color2 = blu | ||
| + | | xB = 435px | ||
| + | | yB = 710px | ||
| + | | - | ||
| + | | area1 = Spawn Yard | ||
| + | | x1 = 450px | ||
| + | | y1 = 190px | ||
| + | | area2 = Transition building | ||
| + | | x2 = 424px | ||
| + | | y2 = 254px | ||
| + | | area3 = Valley | ||
| + | | x3 = 390px | ||
| + | | y3 = 300px | ||
| + | | area4 = Scullery (House) | ||
| + | | x4 = 440px | ||
| + | | y4 = 320px | ||
| + | | area5 = Stairs | ||
| + | | x5 = 380px | ||
| + | | y5 = 359px | ||
| + | | area6 = Hills | ||
| + | | x6 = 509px | ||
| + | | y6 = 370px | ||
| + | | area7 = Summit with the point | ||
| + | | x7 = 440px | ||
| + | | y7 = 415px | ||
| + | }} | ||
| + | |||
| + | ===Sinthetic=== | ||
| + | {{User:Wookipan/Map overview | ||
| + | | title = Sinthetic - overview indicatros | ||
| + | | image = Sinthetic overview.png | ||
| + | | - | ||
| + | | spawn1 = RED spawn | ||
| + | | spawn-color1 = red | ||
| + | | xA = 100px | ||
| + | | yA = 180px | ||
| + | | spawn2 = BLU spawn | ||
| + | | spawn-color2 = blu | ||
| + | | xB = 705px | ||
| + | | yB = 210px | ||
| + | | - | ||
| + | | area1 = Spawn Yard | ||
| + | | x1 = 160px | ||
| + | | y1 = 200px | ||
| + | | area2 = Transitional Building | ||
| + | | x2 = 195px | ||
| + | | y2 = 227px | ||
| + | | area3 = Valley | ||
| + | | x3 = 255px | ||
| + | | y3 = 240px | ||
| + | | area4 = House | ||
| + | | x4 = 293px | ||
| + | | y4 = 222px | ||
| + | | area5 = Flanks | ||
| + | | x5 = 370px | ||
| + | | y5 = 273px | ||
| + | | area6 = Tunnels | ||
| + | | x6 = 420px | ||
| + | | y6 = 230px | ||
| + | }} | ||
| + | |||
| + | ===Los Muertos=== | ||
| + | {{User:Wookipan/Map overview | ||
| + | | title = Los Muertos - overview indicators | ||
| + | | image = Los Muertos overview.png | ||
| + | | - | ||
| + | | spawn1 = RED spawn | ||
| + | | spawn-color1 = red | ||
| + | | xA = 90px | ||
| + | | yA = 220px | ||
| + | | spawn2 = BLU spawn | ||
| + | | spawn-color2 = blu | ||
| + | | xB = 680px | ||
| + | | yB = 220px | ||
| + | |- | ||
| + | | area1 = Bus | ||
| + | | x1 = 195px | ||
| + | | y1 = 220px | ||
| + | | area2 = Terminal | ||
| + | | x2 = 200px | ||
| + | | y2 = 175px | ||
| + | | area3 = Bakery | ||
| + | | x3 = 229px | ||
| + | | y3 = 150px | ||
| + | | area4 = Alley (And the Balcony) | ||
| + | | x4 = 270px | ||
| + | | y4 = 210px | ||
| + | | area5 = House | ||
| + | | x5 = 240px | ||
| + | | y5 = 275px | ||
| + | | area6 = Street | ||
| + | | x6 = 250px | ||
| + | | y6 = 360px | ||
| + | | area7 = Belltower | ||
| + | | x7 = 300px | ||
| + | | y7 = 339px | ||
| + | | area8 = Cathedral (And the Sarcophagus (Tomb)) | ||
| + | | x8 = 385px | ||
| + | | y8 = 348px | ||
| + | | area9 = Entrance | ||
| + | | x9 = 384px | ||
| + | | y9 = 279px | ||
| + | | area10 = Town Square | ||
| + | | x10 = 383px | ||
| + | | y10 = 217px | ||
| + | | area11 = Planters | ||
| + | | x11 = 437px | ||
| + | | y11 = 210px | ||
| + | | area12 = Crypt | ||
| + | | x12 = 390px | ||
| + | | y12 = 130px | ||
| + | | area13 = Church | ||
| + | | x13 = 387px | ||
| + | | y13 = 37px | ||
| + | }} | ||
| + | |||
| + | ==Capture the Flag== | ||
| + | ===2Fort=== | ||
| + | {{User:Wookipan/Map overview | ||
| + | | title = 2Fort - overview indicators | ||
| + | | image = 2Fort overview.png | ||
| + | | - | ||
| + | | spawn1 = BLU spawn | ||
| + | | spawn-color1 = blu | ||
| + | | xA = 230px | ||
| + | | yA = 386px | ||
| + | | spawn2 = BLU spawn | ||
| + | | spawn-color2 = blu | ||
| + | | xB = 260px | ||
| + | | yB = 174px | ||
| + | | spawn3 = RED spawn | ||
| + | | spawn-color3 = red | ||
| + | | xC = 542px | ||
| + | | yC = 201px | ||
| + | | spawn4 = RED spawn | ||
| + | | spawn-color4 = red | ||
| + | | xD = 503px | ||
| + | | yD = 426px | ||
| + | | - | ||
| + | | area1 = Bridge | ||
| + | | x1 = 390px | ||
| + | | y1 = 300px | ||
| + | | area2 = Entrance | ||
| + | | x2 = 450px | ||
| + | | y2 = 265px | ||
| + | | area3 = Battlements | ||
| + | | x3 = 470px | ||
| + | | y3 = 294px | ||
| + | | area11 = Sewer exit | ||
| + | | x11 = 512px | ||
| + | | y11= 182px | ||
| + | | area4 = Grate | ||
| + | | x4 = 510px | ||
| + | | y4 = 296px | ||
| + | | area5 = Entrance side room | ||
| + | | x5 = 512px | ||
| + | | y5 = 357px | ||
| + | | area6 = Courtyard | ||
| + | | x6 = 555px | ||
| + | | y6 = 383px | ||
| + | | area7 = Stairs | ||
| + | | x7 = 615px | ||
| + | | y7 = 390px | ||
| + | | area8 = Basement | ||
| + | | x8 = 630px | ||
| + | | y8 = 340px | ||
| + | | area9 = Spiral | ||
| + | | x9 = 595px | ||
| + | | y9 = 290px | ||
| + | | area10 = Intelligence Room | ||
| + | | x10 = 665px | ||
| + | | y10 = 252px | ||
| + | }} | ||
| + | |||
| + | ===2Fort Invasion=== | ||
| + | {{User:Wookipan/Map overview | ||
| + | | title = 2Fort Invasion - overview indicators | ||
| + | | image = 2Fort Invasion overview.png | ||
| + | | - | ||
| + | | spawn1 = BLU spawn | ||
| + | | spawn-color1 = blu | ||
| + | | xA = 495px | ||
| + | | yA = 595px | ||
| + | | spawn2 = BLU spawn | ||
| + | | spawn-color2 = blu | ||
| + | | xB = 250px | ||
| + | | yB = 546px | ||
| + | | spawn3 = RED spawn | ||
| + | | spawn-color3 = red | ||
| + | | xC = 276px | ||
| + | | yC = 186px | ||
| + | | spawn4 = RED spawn | ||
| + | | spawn-color4 = red | ||
| + | | xD = 527px | ||
| + | | yD = 229px | ||
| + | | - | ||
| + | | area1 = Bridge | ||
| + | | x1 = 389px | ||
| + | | y1 = 394px | ||
| + | | area2 = Entrance | ||
| + | | x2 = 423px | ||
| + | | y2 = 473px | ||
| + | | area3 = Battlements | ||
| + | | x3 = 387px | ||
| + | | y3 = 503px | ||
| + | | area11 = Sewer exit | ||
| + | | x11 = 540px | ||
| + | | y11 = 570px | ||
| + | | area4 = Grate | ||
| + | | x4 = 387px | ||
| + | | y4 = 547px | ||
| + | | area5 = Entrance side room | ||
| + | | x5 = 322px | ||
| + | | y5 = 567px | ||
| + | | area6 = Courtyard | ||
| + | | x6 = 276px | ||
| + | | y6 = 611px | ||
| + | | area7 = Stairs | ||
| + | | x7 = 263px | ||
| + | | y7 = 692px | ||
| + | | area8 = Basement | ||
| + | | x8 = 320px | ||
| + | | y8 = 762px | ||
| + | | area9 = Spiral | ||
| + | | x9 = 384px | ||
| + | | y9 = 685px | ||
| + | | area10 = Intelligence Room | ||
| + | | x10 = 445px | ||
| + | | y10 = 769px | ||
| + | }} | ||
| + | |||
| + | ===Double Cross=== | ||
| + | {{User:Wookipan/Map overview | ||
| + | | title = Double Cross - overview indicators | ||
| + | | image = Double Cross overview.png | ||
| + | | - | ||
| + | | spawn1 = RED spawn | ||
| + | | spawn-color1 = red | ||
| + | | xA = 263px | ||
| + | | yA = 413px | ||
| + | | spawn2 = BLU spawn | ||
| + | | spawn-color2 = blu | ||
| + | | xB = 510px | ||
| + | | yB = 123px | ||
| + | | - | ||
| + | | area1 = Main Bridge | ||
| + | | x1 = 393px | ||
| + | | y1 = 285px | ||
| + | | area2 = Train Bridge | ||
| + | | x2 = 393px | ||
| + | | y2 = 336px | ||
| + | | area3 = Battlements | ||
| + | | x3 = 354px | ||
| + | | y3 = 380px | ||
| + | | area4 = Courtyard | ||
| + | | x4 = 334px | ||
| + | | y4 = 445px | ||
| + | | area5 = Intelligence room | ||
| + | | x5 = 276px | ||
| + | | y5 = 478px | ||
| + | }} | ||
| + | |||
| + | ===Landfall=== | ||
| + | {{User:Wookipan/Map overview | ||
| + | | title = Landfall - overview indicators | ||
| + | | image = Landfall overview.png | ||
| + | | - | ||
| + | | spawn1 = RED spawn | ||
| + | | spawn-color1 = red | ||
| + | | xA = 90px | ||
| + | | yA = 350px | ||
| + | | spawn2 = BLU spawn | ||
| + | | spawn-color2 = blu | ||
| + | | xB = 620px | ||
| + | | yB = 90px | ||
| + | | - | ||
| + | | area1 = Tree | ||
| + | | x1 = 378px | ||
| + | | y1 = 188px | ||
| + | | area2 = Resources deck | ||
| + | | x2 = 479px | ||
| + | | y2 = 151px | ||
| + | | area3 = Lumber Building | ||
| + | | x3 = 520px | ||
| + | | y3 = 230px | ||
| + | | area4 = Side route | ||
| + | | x4 = 524px | ||
| + | | y4 = 338px | ||
| + | | area5 = Shack | ||
| + | | x5 = 583px | ||
| + | | y5 = 370px | ||
| + | | area6 = Courtyard | ||
| + | | x6 = 611px | ||
| + | | y6 = 283px | ||
| + | | area7 = Rooftops | ||
| + | | x7 = 695px | ||
| + | | y7 = 220px | ||
| + | }} | ||
| + | |||
| + | ===Snowfall=== | ||
| + | {{User:Wookipan/Map overview | ||
| + | | title = Snowfall - overview indicators | ||
| + | | image = Snowfall overview.png | ||
| + | | - | ||
| + | | spawn1 = BLU spawn | ||
| + | | spawn-color1 = blu | ||
| + | | xA = 70px | ||
| + | | yA = 275px | ||
| + | | spawn2 = RED spawn | ||
| + | | spawn-color2 = red | ||
| + | | xB = 700px | ||
| + | | yB = 820px | ||
| + | | - | ||
| + | | area1 = Tree | ||
| + | | x1 = 385px | ||
| + | | y1 = 561px | ||
| + | | area2 = Resources deck | ||
| + | | x2 = 498px | ||
| + | | y2 = 608px | ||
| + | | area3 = Lumber Building | ||
| + | | x3 = 416px | ||
| + | | y3 = 700px | ||
| + | | area4 = Side route | ||
| + | | x4 = 335px | ||
| + | | y4 = 783px | ||
| + | | area5 = Shack | ||
| + | | x5 = 303px | ||
| + | | y5 = 854px | ||
| + | | area6 = Courtyard | ||
| + | | x6 = 493px | ||
| + | | y6 = 853px | ||
| + | | area7 = Rooftops | ||
| + | | x7 = 530px | ||
| + | | y7 = 965px | ||
| + | }} | ||
| + | |||
| + | ===Sawmill (Capture the Flag)=== | ||
| + | {{User:Wookipan/Map overview | ||
| + | | title = Sawmill (Capture the Flag) - overview indicators | ||
| + | | image = Sawmill (Capture the Flag) overview.png | ||
| + | | - | ||
| + | | spawn1 = BLU spawn | ||
| + | | spawn-color1 = blu | ||
| + | | xA = 260px | ||
| + | | yA = 332px | ||
| + | | spawn2 = RED spawn | ||
| + | | spawn-color2 = red | ||
| + | | xB = 543px | ||
| + | | yB = 82px | ||
| + | | - | ||
| + | | area1 = Rooftops | ||
| + | | x1 = 275px | ||
| + | | y1 = 249px | ||
| + | | area2 = Cave | ||
| + | | x2 = 280px | ||
| + | | y2 = 121px | ||
| + | | area3 = Watterfall | ||
| + | | x3 = 318px | ||
| + | | y3 = 144px | ||
| + | | area4 = Alcoves | ||
| + | | x4 = 377px | ||
| + | | y4 = 200px | ||
| + | | area5 = Center Shed | ||
| + | | x5 = 410px | ||
| + | | y5 = 220px | ||
| + | | area6 = Log Shed | ||
| + | | x6 = 508px | ||
| + | | y6 = 303px | ||
| + | }} | ||
| + | |||
| + | ===Turbine=== | ||
| + | {{User:Wookipan/Map overview | ||
| + | | title = Turbine - overview indicators | ||
| + | | image = Turbine overview.png | ||
| + | | - | ||
| + | | spawn1 = BLU spawn | ||
| + | | spawn-color1 = blu | ||
| + | | xA = 70px | ||
| + | | yA = 90px | ||
| + | | spawn2 = RED spawn | ||
| + | | spawn-color2 = red | ||
| + | | xB = 697px | ||
| + | | yB = 215px | ||
| + | | - | ||
| + | | area1 = Turbines | ||
| + | | x1 = 387px | ||
| + | | y1 = 168px | ||
| + | | area2 = Alcoves | ||
| + | | x2 = 422px | ||
| + | | y2 = 249px | ||
| + | | area3 = Balcony | ||
| + | | x3 = 451px | ||
| + | | y3 = 192px | ||
| + | | area4 = Vents | ||
| + | | x4 = 484px | ||
| + | | y4 = 164px | ||
| + | | area5 = Main Hallway | ||
| + | | x5 = 516px | ||
| + | | y5 = 109px | ||
| + | | area6 = Raised Platform | ||
| + | | x6 = 550px | ||
| + | | y6 = 36px | ||
| + | }} | ||
| + | |||
| + | ===Well (Capture the Flag)=== | ||
| + | {{User:Wookipan/Map overview | ||
| + | | title = Well (Control point) - overview indicators | ||
| + | | image = Well (Control Point) overview.png | ||
| + | |- | ||
| + | | spawn1 = RED first spawn | ||
| + | | xA = 13px | ||
| + | | yA = 189px | ||
| + | | spawn2 = RED second spawn | ||
| + | | xB = 180px | ||
| + | | yB = 238px | ||
| + | | spawn3 = RED third spawn | ||
| + | | xC = 352px | ||
| + | | yC = 220px | ||
| + | | - | ||
| + | | area1 = Main building | ||
| + | | x1 = 385px | ||
| + | | y1 = 228px | ||
| + | | area2 = Yard | ||
| + | | x2 = 329px | ||
| + | | y2 = 200px | ||
| + | | area3 = Swing door | ||
| + | | x3 = 275px | ||
| + | | y3 = 184px | ||
| + | | area4 = Swing door | ||
| + | | x4 = 275px | ||
| + | | y4 = 234px | ||
| + | | area5 = Battlements | ||
| + | | x5 = 254px | ||
| + | | y5 = 209px | ||
| + | | area6 = Inner lobby | ||
| + | | x6 = 200px | ||
| + | | y6 = 201px | ||
| + | | area7 = Command room | ||
| + | | x7 = 174px | ||
| + | | y7 = 201px | ||
| + | | area8 = Catwalks | ||
| + | | x8 = 145px | ||
| + | | y8 = 201px | ||
| + | }} | ||
| + | |||
| + | ==Player Destruction== | ||
| + | ===Farmagddon=== | ||
| + | {{User:Wookipan/Map overview | ||
| + | | title = Farmageddon - overview indicators | ||
| + | | image = Farmageddon overview.png | ||
| + | | - | ||
| + | | spawn1 = RED spawn | ||
| + | | spawn-color1 = red | ||
| + | | xA = 70px | ||
| + | | yA = 200px | ||
| + | | spawn2 = BLU spawn | ||
| + | | spawn-color2 = blu | ||
| + | | xB = 710px | ||
| + | | yB = 200px | ||
| + | | - | ||
| + | | area1 = Grain Shed | ||
| + | | x1 = 235px | ||
| + | | y1 = 220px | ||
| + | | area2 = Road | ||
| + | | x2 = 290px | ||
| + | | y2 = 245px | ||
| + | | area3 = Hayrack Ride | ||
| + | | x3 = 255px | ||
| + | | y3 = 310px | ||
| + | | area5 = Machine Shed | ||
| + | | x5 = 385px | ||
| + | | y5 = 190px | ||
| + | | area4 = Combine | ||
| + | | x4 = 385px | ||
| + | | y4 = 225px | ||
| + | | area6 = Machine room | ||
| + | | x6 = 385px | ||
| + | | y6 = 145px | ||
| + | }} | ||
| + | |||
| + | ===SnowVille=== | ||
| + | {{User:Wookipan/Map overview | ||
| + | | title = SnowVille . overview indicators | ||
| + | | image = SnowVille overview.png | ||
| + | |- | ||
| + | | spawn1 = RED spawn | ||
| + | | spawn-color1 = red | ||
| + | | xA = 20px | ||
| + | | yA = 260px | ||
| + | | spawn2 = BLU spawn | ||
| + | | spawn-color2 = blu | ||
| + | | xB = 747px | ||
| + | | yB = 815px | ||
| + | | - | ||
| + | | area2 = Rooftops | ||
| + | | x2 = 250px | ||
| + | | y2 = 260px | ||
| + | | area3 = Garage | ||
| + | | x3 = 325px | ||
| + | | y3 = 305px | ||
| + | | area8 = Small Delivery Zone | ||
| + | | x8 = 230px | ||
| + | | y8 = 675px | ||
| + | | area4 = Coal Shed | ||
| + | | x4 = 555px | ||
| + | | y4 = 350px | ||
| + | | area1 = Wood Shed | ||
| + | | x1 = 140px | ||
| + | | y1 = 395px | ||
| + | | area6 = Center Shed | ||
| + | | x6 = 385px | ||
| + | | y6 = 550px | ||
| + | | area5 = Alcoves | ||
| + | | x5 = 380px | ||
| + | | y5 = 490px | ||
| + | | area7 = Sewers | ||
| + | | x7 = 230px | ||
| + | | y7 = 620px | ||
| + | | area9 = Cave | ||
| + | | x9 = 135px | ||
| + | | y9 = 775px | ||
| + | }} | ||
| + | |||
| + | ===Cursed Cove=== | ||
| + | {{User:Wookipan/Map overview | ||
| + | | title = Cursed Cove - overview indicators | ||
| + | | image = Cursed Cove overview.png | ||
| + | | - | ||
| + | | spawn1 = BLU spawn | ||
| + | | spawn-color1 = blu | ||
| + | | xA = 100px | ||
| + | | yA = 280px | ||
| + | | spawn2 = RED spawn | ||
| + | | spawn-color2 = red | ||
| + | | xB = 660px | ||
| + | | yB = 280px | ||
| + | | - | ||
| + | | area1 = Beach | ||
| + | | x1 = 225px | ||
| + | | y1 = 40px | ||
| + | | area2 = Docks | ||
| + | | x2 = 380px | ||
| + | | y2 = 60px | ||
| + | | area3 = Port | ||
| + | | x3 = 380px | ||
| + | | y3 = 170px | ||
| + | | area4 = Gate | ||
| + | | x4 = 380px | ||
| + | | y4 = 240px | ||
| + | | area5 = Courtyard | ||
| + | | x5 = 380px | ||
| + | | y5 = 330px | ||
| + | }} | ||
| + | |||
| + | ===Monster Bash=== | ||
| + | {{User:Wookipan/Map overview | ||
| + | | title = Monster Bash - overview indicators | ||
| + | | image = Monster Bash overview.png | ||
| + | | - | ||
| + | | spawn1 = BLU spawn | ||
| + | | xA = 150px | ||
| + | | yA = 410px | ||
| + | | spawn-color1 = blu | ||
| + | | spawn2 = RED spawn | ||
| + | | spawn-color2 = red | ||
| + | | xB = 670px | ||
| + | | yB = 410px | ||
| + | | - | ||
| + | | area3 = Causeway | ||
| + | | x3 = 540px | ||
| + | | y3 = 530px | ||
| + | | area2 = Courtyard | ||
| + | | x2 = 545px | ||
| + | | y2 = 430px | ||
| + | | area1 = Chemicals | ||
| + | | x1 = 520px | ||
| + | | y1 = 335px | ||
| + | | area4 = Grand Foyer | ||
| + | | x4 = 395px | ||
| + | | y4 = 560px | ||
| + | | area5 = Lab | ||
| + | | x5 = 395px | ||
| + | | y5 = 400px | ||
| + | | area6 = Ballroom | ||
| + | | x6 = 395px | ||
| + | | y6 = 295px | ||
| + | | area7 = Balcony | ||
| + | | x7 = 395px | ||
| + | | y7 = 240px | ||
| + | | area8 = Patio | ||
| + | | x8 = 295px | ||
| + | | y8 = 335px | ||
| + | | area10 = Library | ||
| + | | x10 = 240px | ||
| + | | y10 = 530px | ||
| + | | area9 = Gallery | ||
| + | | x9 = 255px | ||
| + | | y9 = 430px | ||
| + | }} | ||
| + | |||
| + | ===Pit of Death=== | ||
| + | {{User:Wookipan/Map overview | ||
| + | | title = Pit of Death - overview indicators | ||
| + | | image = Pit of Death overview.png | ||
| + | | - | ||
| + | | spawn1 = RED spawn | ||
| + | | spawn-color1 = red | ||
| + | | xA = 290px | ||
| + | | yA = 25px | ||
| + | | spawn2 = BLU spawn | ||
| + | | spawn-color2 = blu | ||
| + | | xB = 290px | ||
| + | | yB = 690px | ||
| + | |- | ||
| + | | area1 = Courtyard | ||
| + | | x1 = 280px | ||
| + | | y1 = 630px | ||
| + | | area2 = Bridge Route | ||
| + | | x2 = 350px | ||
| + | | y2 = 580px | ||
| + | | area3 = Dock Route | ||
| + | | x3 = 230px | ||
| + | | y3 = 545px | ||
| + | | area4 = Staircase | ||
| + | | x4 = 240px | ||
| + | | y4 = 480px | ||
| + | | area5 = Rooftops (Above)/Hallway (Below) | ||
| + | | x5 = 280px | ||
| + | | y5 = 465px | ||
| + | | area7 = Pit Access | ||
| + | | x7 = 205px | ||
| + | | y7 = 375px | ||
| + | | area8 = Basemenet | ||
| + | | x8 = 245px | ||
| + | | y8 = 375px | ||
| + | | area6 = Ledges | ||
| + | | x6 = 240px | ||
| + | | y6 = 435px | ||
| + | | area9 = Pit Flanks | ||
| + | | x9 = 310px | ||
| + | | y9 = 400px | ||
| + | | area10 = Overlook Building | ||
| + | | x10 = 385px | ||
| + | | y10 = 375px | ||
| + | | area11 = Broken Bridge | ||
| + | | x11 = 415px | ||
| + | | y11 = 375px | ||
| + | }} | ||
| + | |||
| + | ===Watergate=== | ||
| + | {{User:Wookipan/Map overview | ||
| + | | title = Watergate - overview indicators | ||
| + | | image = Watergate overview.png | ||
| + | | - | ||
| + | | spawn1 = RED spawn | ||
| + | | spawn-color1 = red | ||
| + | | xA = 60px | ||
| + | | yA = 215px | ||
| + | | spawn2 = BLU spawn | ||
| + | | spawn-color2 = blu | ||
| + | | xB = 705px | ||
| + | | yB = 215px | ||
| + | | - | ||
| + | | area1 = Open Alley | ||
| + | | x1 = 115px | ||
| + | | y1 = 280px | ||
| + | | area2 = Catwalk | ||
| + | | x2 = 185px | ||
| + | | y2 = 310px | ||
| + | | area4 = Dropoff | ||
| + | | x4 = 295px | ||
| + | | y4 = 325px | ||
| + | | area5 = Central Corridors | ||
| + | | x5 = 245px | ||
| + | | y5 = 200px | ||
| + | | area3 = Gatehouse | ||
| + | | x3 = 250px | ||
| + | | y3 = 380px | ||
| + | | area6 = Cellars (Entrance) | ||
| + | | x6 = 285px | ||
| + | | y6 = 145px | ||
| + | | area7 = Sewers | ||
| + | | x7 = 335px | ||
| + | | y7 = 190px | ||
| + | | area9 = Dilapidated Boat | ||
| + | | x9 = 385px | ||
| + | | y9 = 275px | ||
| + | | area8 = Overhead Bar (Above)/Central Sewer (Below) | ||
| + | | x8 = 385px | ||
| + | | y8 = 160px | ||
| + | | area10 = Overhead Catwalks | ||
| + | | x10 = 385px | ||
| + | | y10 = 400px | ||
| + | }} | ||
| + | |||
| + | ==Arena== | ||
| + | ===Lumberyard=== | ||
| + | {{User:Wookipan/Map overview | ||
| + | | title = Lumberyard - overview indicators | ||
| + | | image = Lumberyard overview.png | ||
| + | | - | ||
| + | | area3 = Mountain Side | ||
| + | | x3 = 515px | ||
| + | | y3 = 330px | ||
| + | | area2 = Central Building | ||
| + | | x2 = 361px | ||
| + | | y2 = 330px | ||
| + | | area1 = Cliff Side | ||
| + | | x1 = 225px | ||
| + | | y1 = 330px | ||
| + | }} | ||
| + | |||
| + | ===Graveyard=== | ||
| + | {{User:Wookipan/Map overview | ||
| + | | title = Graveyard - overview indicators | ||
| + | | image = Graveyard overview.png | ||
| + | | - | ||
| + | | spawn1 = RED spawn | ||
| + | | spawn-color1 = red | ||
| + | | xA = 250px | ||
| + | | yA = 195px | ||
| + | | spawn2 = BLU spawn | ||
| + | | spawn-color2 = blu | ||
| + | | xB = 520px | ||
| + | | yB = 195px | ||
| + | | - | ||
| + | | area1 = Cliff Side | ||
| + | | x1 = 385px | ||
| + | | y1 = 90px | ||
| + | | area2 = Charnel Church | ||
| + | | x2 = 385px | ||
| + | | y2 = 210px | ||
| + | | area3 = Mountain Side | ||
| + | | x3 = 385px | ||
| + | | y3 = 340px | ||
| + | }} | ||
| + | |||
| + | ===Badlands (Arena)=== | ||
| + | {{User:Wookipan/Map overview | ||
| + | | title = Badlands (Arena) - overview indicators | ||
| + | | image = Badlands (Arena) overview.png | ||
| + | | - | ||
| + | | area3 = Bridge | ||
| + | | x3 = 383px | ||
| + | | y3 = 485px | ||
| + | | area2 = Rail Cars | ||
| + | | x2 = 383px | ||
| + | | y2 = 535px | ||
| + | | area1 = Closet | ||
| + | | x1 = 355px | ||
| + | | y1 = 565px | ||
| + | | area5 = House | ||
| + | | x5 = 325px | ||
| + | | y5 = 400px | ||
| + | | area4 = Pillars | ||
| + | | x4 = 345px | ||
| + | | y4 = 470px | ||
| + | | area6 = Valley | ||
| + | | x6 = 265px | ||
| + | | y6 = 470px | ||
| + | | area7 = Well | ||
| + | | x7 = 210px | ||
| + | | y7 = 360px | ||
| + | | area8 = Spire (Blocked off) | ||
| + | | x8 = 220px | ||
| + | | y8 = 300px | ||
| + | }} | ||
| + | |||
| + | ===Byre=== | ||
| + | {{User:Wookipan/Map overview | ||
| + | | title = Byre - overview indicators | ||
| + | | image = Byre Overview 1.png | ||
| + | | - | ||
| + | | spawn1 = RED spawn | ||
| + | | spawn-color1 = red | ||
| + | | xA = 97px | ||
| + | | yA = 275px | ||
| + | | spawn2 = BLU spawn | ||
| + | | spawn-color2 = blu | ||
| + | | xB = 657px | ||
| + | | yB = 160px | ||
| + | | - | ||
| + | | area1 = Ditch | ||
| + | | x1 = 230px | ||
| + | | y1 = 70px | ||
| + | | area2 = Tool Barn | ||
| + | | x2 = 310px | ||
| + | | y2 = 120px | ||
| + | | area3 = Tool Shed | ||
| + | | x3 = 283px | ||
| + | | y3 = 280px | ||
| + | | area4 = Death ray | ||
| + | | x4 = 390px | ||
| + | | y4 = 230px | ||
| + | }} | ||
| + | |||
| + | ===Watchtower=== | ||
| + | {{User:Wookipan/Map overview | ||
| + | | title = Watchtower - overview indicators | ||
| + | | image = Watchtower overview.png | ||
| + | | - | ||
| + | | area1 = Tower Shack | ||
| + | | x1 = 378px | ||
| + | | y1 = 302px | ||
| + | | area2 = Lower Pipe | ||
| + | | x2 = 380px | ||
| + | | y2 = 240px | ||
| + | | area3 = Higher Pipe | ||
| + | | x3 = 280px | ||
| + | | y3 = 300px | ||
| + | | area4 = Center Valley | ||
| + | | x4 = 310px | ||
| + | | y4 = 235px | ||
| + | | area5 = External Ring | ||
| + | | x5 = 230px | ||
| + | | y5 = 190px | ||
| + | }} | ||
| + | |||
| + | ===Granary (Arena)=== | ||
| + | {{User:Wookipan/Map overview | ||
| + | | title = Granary (Arena) - overview indicators | ||
| + | | image = Granary (Arena) overview.png | ||
| + | | - | ||
| + | | area1 = Ledge | ||
| + | | x1 = 305px | ||
| + | | y1 = 425px | ||
| + | | area2 = Choke | ||
| + | | x2 = 255px | ||
| + | | y2 = 390px | ||
| + | | area3 = Garage | ||
| + | | x3 = 400px | ||
| + | | y3 = 390px | ||
| + | | area4 = Catwalks | ||
| + | | x4 = 330px | ||
| + | | y4 = 365px | ||
| + | | area5 = Crates | ||
| + | | x5 = 295px | ||
| + | | y5 = 315px | ||
| + | }} | ||
| + | |||
| + | ===Nucleus (Arena)=== | ||
| + | {{User:Wookipan/Map overview | ||
| + | | title = Nucleus (Arena) - overview indicators | ||
| + | | image = Nucleus (Arena) overview.png | ||
| + | | - | ||
| + | | area1 = Perimiter | ||
| + | | x1 = 243px | ||
| + | | y1 = 499px | ||
| + | | area2 = Roofs | ||
| + | | x2 = 388px | ||
| + | | y2 = 455px | ||
| + | | area3 = Bridges | ||
| + | | x3 = 385px | ||
| + | | y3 = 347px | ||
| + | | area4 = Flank buildings | ||
| + | | x4 = 281px | ||
| + | | y4 = 165px | ||
| + | | area5 = Access Building | ||
| + | | x5 = 390px | ||
| + | | y5 = 84px | ||
| + | }} | ||
| + | |||
| + | ===Offblast=== | ||
| + | {{User:Wookipan/Map overview | ||
| + | | title = Offblast - overview indicators | ||
| + | | image = Offblast overview.png | ||
| + | | - | ||
| + | | area2 = Cliff-Side | ||
| + | | x2 = 330px | ||
| + | | y2 = 235px | ||
| + | | area1 = House | ||
| + | | x1 = 397px | ||
| + | | y1 = 135px | ||
| + | | area3 = Top Floor | ||
| + | | x3 = 325px | ||
| + | | y3 = 310px | ||
| + | | area4 = Main Floor | ||
| + | | x4 = 397px | ||
| + | | y4 = 373px | ||
| + | | area5 = Top Floor | ||
| + | | x5 = 360px | ||
| + | | y5 = 405px | ||
| + | }} | ||
| + | |||
| + | ===Ravine=== | ||
| + | {{User:Wookipan/Map overview | ||
| + | | title = Ravine - overview indicators | ||
| + | | image = Ravine overview.png | ||
| + | | - | ||
| + | | area1 = Yard | ||
| + | | x1 = 360px | ||
| + | | y1 = 185px | ||
| + | | area2 = House | ||
| + | | x2 = 270px | ||
| + | | y2 = 305px | ||
| + | | area4 = Well | ||
| + | | x4 = 530px | ||
| + | | y4 = 305px | ||
| + | | area3 = Shack | ||
| + | | x3 = 427px | ||
| + | | y3 = 305px | ||
| + | }} | ||
| + | |||
| + | ===Sawmill (Arena)=== | ||
| + | {{User:Wookipan/Map overview | ||
| + | | title = Sawmill (Arena) - overview indicators | ||
| + | | image = Sawmill (Arena) overview.png | ||
| + | | - | ||
| + | | spawn1 = RED spawn | ||
| + | | spawn-color1 = red | ||
| + | | xA = 590px | ||
| + | | yA = 24px | ||
| + | | spawn2 = BLU spawn | ||
| + | | spawn-color2 = blu | ||
| + | | xB = 200px | ||
| + | | yB = 525px | ||
| + | | - | ||
| + | | area1 = Rooftops | ||
| + | | x1 = 235px | ||
| + | | y1 = 335px | ||
| + | | area2 = Cave | ||
| + | | x2 = 225px | ||
| + | | y2 = 140px | ||
| + | | area3 = Waterfall | ||
| + | | x3 = 274px | ||
| + | | y3 = 198px | ||
| + | | area4 = Alcoves | ||
| + | | x4 = 354px | ||
| + | | y4 = 290px | ||
| + | | area5 = Center Shed | ||
| + | | x5 = 390px | ||
| + | | y5 = 290px | ||
| + | | area6 = Log Shed | ||
| + | | x6 = 525px | ||
| + | | y6 = 410px | ||
| + | }} | ||
| + | |||
| + | ===Well (Arena)=== | ||
| + | {{User:Wookipan/Map overview | ||
| + | | title = Well (Arena) - overview indicators | ||
| + | | image = Well (Arena) overview.png | ||
| + | | - | ||
| + | | spawn1 = BLU spawn | ||
| + | | spawn-color1 = blu | ||
| + | | xA = 380px | ||
| + | | yA = 45px | ||
| + | | spawn2 = RED spawn | ||
| + | | spawn-color2 = red | ||
| + | | xB = 380px | ||
| + | | yB = 485px | ||
| + | | - | ||
| + | | area1 = Boxcars | ||
| + | | x1 = 295px | ||
| + | | y1 = 423px | ||
| + | | area2 = Waterways | ||
| + | | x2 = 385px | ||
| + | | y2 = 380px | ||
| + | | area3 = Battlements | ||
| + | | x3 = 355px | ||
| + | | y3 = 355px | ||
| + | | area4 = Train Rails | ||
| + | | x4 = 330px | ||
| + | | y4 = 300px | ||
| + | | area5 = Catwalk | ||
| + | | x5 = 385px | ||
| + | | y5 = 270px | ||
| + | }} | ||
| + | |||
| + | ==Mann versus Machine== | ||
| + | ===Big Rock=== | ||
| + | {{User:Wookipan/Map overview | ||
| + | | title = Big Rock - overview indicators | ||
| + | | image = Bigrock overview.png | ||
| + | | - | ||
| + | | spawn1 = RED spawn | ||
| + | | spawn-color1 = red | ||
| + | | xA = 490px | ||
| + | | yA = 870px | ||
| + | | spawn2 = Robot spawn | ||
| + | | spawn-color2 = blu | ||
| + | | xB = 250px | ||
| + | | yB = 130px | ||
| + | | spawn3 = Tank spawn | ||
| + | | spawn-color3 = blu | ||
| + | | xC = 470px | ||
| + | | yC = 100px | ||
| + | | - | ||
| + | | area2 = Center Bridge | ||
| + | | x2 = 415px | ||
| + | | y2 = 710px | ||
| + | | area1 = Left Catwalk | ||
| + | | x1 = 290px | ||
| + | | y1 = 765px | ||
| + | | area3 = Right Catwalk | ||
| + | | x3 = 530px | ||
| + | | y3 = 720px | ||
| + | | area4 = Right Lane | ||
| + | | x4 = 505px | ||
| + | | y4 = 610px | ||
| + | | area5 = Casali Shafting Co. | ||
| + | | x5 = 415px | ||
| + | | y5 = 590px | ||
| + | | area6 = Left Lane | ||
| + | | x6 = 315px | ||
| + | | y6 = 575px | ||
| + | | area7 = Entrance | ||
| + | | x7 = 420px | ||
| + | | y7 = 420px | ||
| + | | area8 = Robot Cave | ||
| + | | x8 = 390px | ||
| + | | y8 = 205px | ||
| + | }} | ||
| + | |||
| + | ===Coal Town=== | ||
| + | {{User:Wookipan/Map overview | ||
| + | | title = Coal Town - overview indicators | ||
| + | | image = Coal Town overview.png | ||
| + | | - | ||
| + | | spawn1 = RED spawn | ||
| + | | spawn-color1 = red | ||
| + | | xA = 270px | ||
| + | | yA = 1020px | ||
| + | | spawn2 = RED spawn | ||
| + | | spawn-color2 = red | ||
| + | | xB = 460px | ||
| + | | yB = 1020px | ||
| + | | spawn3 = Robot/Tank spawn | ||
| + | | spawn-color3 = blu | ||
| + | | xC = 380px | ||
| + | | yC = 370px | ||
| + | | - | ||
| + | | area1 = Left Side Hotel | ||
| + | | x1 = 220px | ||
| + | | y1 = 950px | ||
| + | | area3 = Right Side Mann Mining | ||
| + | | x3 = 570px | ||
| + | | y3 = 770px | ||
| + | | area2 = Mining Accident Simulator | ||
| + | | x2 = 380px | ||
| + | | y2 = 875px | ||
| + | | area4 = Right Lane | ||
| + | | x4 = 505px | ||
| + | | y4 = 770px | ||
| + | | area5 = Salt Rock Interior | ||
| + | | x5 = 320px | ||
| + | | y5 = 780px | ||
| + | | area6 = Rooftop | ||
| + | | x6 = 375px | ||
| + | | y6 = 700px | ||
| + | | area7 = Left Lane | ||
| + | | x7 = 275px | ||
| + | | y7 = 685px | ||
| + | }} | ||
| + | |||
| + | ===Ghost Town=== | ||
| + | {{User:Wookipan/Map overview | ||
| + | | title = Ghost Town - overview indicators | ||
| + | | image = Ghost Town overview.png | ||
| + | | - | ||
| + | | spawn1 = RED spawn | ||
| + | | spawn-color1 = red | ||
| + | | xA = 270px | ||
| + | | yA = 1035px | ||
| + | | spawn2 = RED spawn | ||
| + | | spawn-color2 = red | ||
| + | | xB = 460px | ||
| + | | yB = 1035px | ||
| + | | spawn3 = Robot/Tank spawn | ||
| + | | spawn-color3 = blu | ||
| + | | xC = 380px | ||
| + | | yC = 370px | ||
| + | | - | ||
| + | | area1 = Left Side Hotel | ||
| + | | x1 = 210px | ||
| + | | y1 = 965px | ||
| + | | area3 = Right Side Mann Mining | ||
| + | | x3 = 560px | ||
| + | | y3 = 785px | ||
| + | | area2 = Mining Accident Simulator | ||
| + | | x2 = 370px | ||
| + | | y2 = 890px | ||
| + | | area4 = Right Lane | ||
| + | | x4 = 495px | ||
| + | | y4 = 785px | ||
| + | | area5 = Salt Rock Interior | ||
| + | | x5 = 315px | ||
| + | | y5 = 795px | ||
| + | | area6 = Rooftop | ||
| + | | x6 = 365px | ||
| + | | y6 = 710px | ||
| + | | area7 = Left Lane | ||
| + | | x7 = 265px | ||
| + | | y7 = 695px | ||
| + | }} | ||
| + | |||
| + | ===Decoy=== | ||
| + | {{User:Wookipan/Map overview | ||
| + | | title = Decoy - overview indicators | ||
| + | | image = Decoy overview.png | ||
| + | | - | ||
| + | | spawn1 = RED spawn | ||
| + | | spawn-color1 = red | ||
| + | | xA = 290px | ||
| + | | yA = 1170px | ||
| + | | spawn2 = RED spawn | ||
| + | | spawn-color2 = red | ||
| + | | xB = 510px | ||
| + | | yB = 1170px | ||
| + | | spawn3 = Robot spawn | ||
| + | | spawn-color3 = blu | ||
| + | | xC = 424.5px | ||
| + | | yC = 515px | ||
| + | | - | ||
| + | | area1 = Mann Co. Hatch of Great Importance | ||
| + | | x1 = 411px | ||
| + | | y1 = 1117px | ||
| + | | area2 = Base Bridge | ||
| + | | x2 = 505px | ||
| + | | y2 = 1020px | ||
| + | | area3 = Base Bridge | ||
| + | | x3 = 315px | ||
| + | | y3 = 1020px | ||
| + | | area4 = Left Cliff | ||
| + | | x4 = 235px | ||
| + | | y4 = 920px | ||
| + | | area5 = Center Structure | ||
| + | | x5 = 420px | ||
| + | | y5 = 875px | ||
| + | | area6 = Right Structure | ||
| + | | x6 = 535px | ||
| + | | y6 = 690px | ||
| + | | area7 = Structure Bridge | ||
| + | | x7 = 430px | ||
| + | | y7 = 630px | ||
| + | | area8 = Left Structure | ||
| + | | x8 = 340px | ||
| + | | y8 = 675px | ||
| + | }} | ||
| + | |||
| + | ===Rottenburg=== | ||
| + | {{User:Wookipan/Map overview | ||
| + | | title = Rottenburg - overview indicators | ||
| + | | image = Rottenburg overview.png | ||
| + | | - | ||
| + | | spawn1 = RED spawn | ||
| + | | spawn-color1 = red | ||
| + | | xA = 265px | ||
| + | | yA = 305px | ||
| + | | spawn2 = RED spawn | ||
| + | | spawn-color2 = red | ||
| + | | xB = 230px | ||
| + | | yB = 450px | ||
| + | | spawn3 = Robot spawn | ||
| + | | spawn-color3 = blu | ||
| + | | xC = 410px | ||
| + | | yC = 725px | ||
| + | | spawn4 = Robot/Tank spawn | ||
| + | | spawn-color4 = blu | ||
| + | | xD = 615px | ||
| + | | yD = 720px | ||
| + | | - | ||
| + | | area1 = Hatch Area | ||
| + | | x1 = 247px | ||
| + | | y1 = 400px | ||
| + | | area2 = Tank Path | ||
| + | | x2 = 230px | ||
| + | | y2 = 270px | ||
| + | | area3 = Overhead Platform | ||
| + | | x3 = 310px | ||
| + | | y3 = 270px | ||
| + | | area4 = Catwalks | ||
| + | | x4 = 355px | ||
| + | | y4 = 350px | ||
| + | | area5 = Tunnel Entrance | ||
| + | | x5 = 355px | ||
| + | | y5 = 395px | ||
| + | | area6 = Stone Tower | ||
| + | | x6 = 510px | ||
| + | | y6 = 450px | ||
| + | | area8 = City Gates | ||
| + | | x8 = 505px | ||
| + | | y8 = 555px | ||
| + | | area7 = Pitchfork checkpoint | ||
| + | | x7 = 540px | ||
| + | | y7 = 555px | ||
| + | | area9 = Barricade | ||
| + | | x9 = 505px | ||
| + | | y9 = 635px | ||
| + | | area10 = Field | ||
| + | | x10 = 500px | ||
| + | | y10 = 690px | ||
| + | | area11 = Rightside Cliff | ||
| + | | x11 = 485px | ||
| + | | y11 = 745px | ||
| + | }} | ||
| + | |||
| + | ===Mannhattan=== | ||
| + | {{User:Wookipan/Map overview | ||
| + | | title = Mannhattan - overview indicators | ||
| + | | image = Mannhattan overview.png | ||
| + | | - | ||
| + | | spawn1 = Robot spawn #1 | ||
| + | | spawn-color1 = blu | ||
| + | | xA = 225px | ||
| + | | yA = 530px | ||
| + | | spawn2 = Robot spawn #2 | ||
| + | | spawn-color2 = blu | ||
| + | | xB = 430px | ||
| + | | yB = 430px | ||
| + | | spawn3 = Robot spawn #3 | ||
| + | | spawn-color3 = blu | ||
| + | | xC = 180px | ||
| + | | yC = 380px | ||
| + | | spawn4 = RED spawn | ||
| + | | spawn-color4 = red | ||
| + | | xD = 315px | ||
| + | | yD = 115px | ||
| + | | - | ||
| + | | area1 = Warehouse | ||
| + | | x1 = 300px | ||
| + | | y1 = 505px | ||
| + | | area3 = Grinder | ||
| + | | x3 = 363px | ||
| + | | y3 = 375px | ||
| + | | area2 = Shipping Containers | ||
| + | | x2 = 305px | ||
| + | | y2 = 420px | ||
| + | | area5 = Old Railway Ditch | ||
| + | | x5 = 270px | ||
| + | | y5 = 265px | ||
| + | | area4 = Mannhattan Used Fireworks (And Repair) | ||
| + | | x4 = 375px | ||
| + | | y4 = 265px | ||
}} | }} | ||
| − | === | + | ===Mannworks=== |
{{User:Wookipan/Map overview | {{User:Wookipan/Map overview | ||
| − | | title = | + | | title = Mannworks - overview indicators |
| − | | image = | + | | image = Mannworks overview.png |
| - | | - | ||
| spawn1 = RED spawn | | spawn1 = RED spawn | ||
| spawn-color1 = red | | spawn-color1 = red | ||
| − | | xA = | + | | xA = 423px |
| − | | yA = | + | | yA = 830px |
| − | | spawn2 = | + | | spawn2 = Robot spawn |
| spawn-color2 = blu | | spawn-color2 = blu | ||
| − | | xB = | + | | xB = 450px |
| − | | yB = | + | | yB = 255px |
| - | | - | ||
| − | | area1 = | + | | area1 = Central Hatch |
| − | | x1 = | + | | x1 = 367px |
| − | | y1 = | + | | y1 = 749px |
| − | | area2 = | + | | area2 = Dual Structures |
| − | | x2 = | + | | x2 = 310px |
| − | | y2 = | + | | y2 = 635px |
| − | | area3 = | + | | area3 = Red Structure |
| − | | x3 = | + | | x3 = 270px |
| − | | y3 = | + | | y3 = 510px |
| − | | area4 = | + | | area4 = Center Structure |
| − | | x4 = | + | | x4 = 420px |
| − | | y4 = | + | | y4 = 455px |
| − | | area5 = | + | | area5 = Valley |
| − | | x5 = | + | | x5 = 440px |
| − | | y5 = | + | | y5 = 345px |
| − | |||
| − | |||
| − | |||
}} | }} | ||
Latest revision as of 18:56, 13 January 2022
Contents
- 1 Payload
- 2 Payload Race
- 3 Attack'n'Defend
- 4 Control Points
- 5 King of the Hill
- 5.1 Badlands
- 5.2 Brazil
- 5.3 Cauldron
- 5.4 Harvest
- 5.5 Harvest Event
- 5.6 Highpass
- 5.7 Kong King
- 5.8 Lakeside
- 5.9 Ghost Fort
- 5.10 Laughter
- 5.11 Lazarus
- 5.12 Maple Ridge Event
- 5.13 Megalo
- 5.14 Moldergrove
- 5.15 Moonshine Event
- 5.16 Nucleus (King of the Hill)
- 5.17 Probed
- 5.18 Sawmill (King of the Hill)
- 5.19 Slasher
- 5.20 Suijin
- 5.21 Viaduct
- 5.22 Sinthetic
- 5.23 Los Muertos
- 6 Capture the Flag
- 7 Player Destruction
- 8 Arena
- 9 Mann versus Machine
Payload
Badwater
| Badwater - overview indicators |
|---|
|
Mouseover the markers to see the name of the location
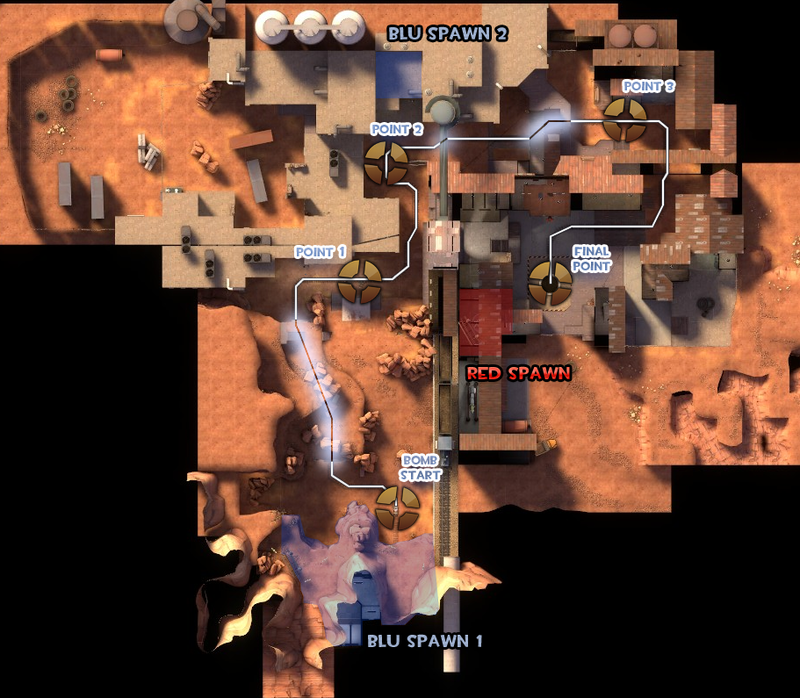
1 Side path 2 Cliffs 3 Rocks 4 Bunker 5 Front steps 6 Backroof 7 Yard 8 Backsteps 9 Roof 10 Side room 11 Bridge 12 Attic 13 Alley 14 Chicken wire room 15 Sniper's hut 16 Back Yard 17 Platforms 18 Pit 19 Map room
|
Barnblitz
| Barnblitz - overview indicators |
|---|
|
Mouseover the markers to see the name of the location

1 Attacker's Yard 2 Approach 3 Left shed 4 Platform 5 Defender's yard 6 Entrance 7 Dropdown 8 Upper level 9 House entrance 10 Second story 11 Third story 12 Roof 13 Left entrance 14 Main entrance 15 Right entrance A BLU first spawn B BLU second spawn C RED first spawn D RED second spawn E RED final spawn
|
Bloodwater
| Bloodwater - overview indicators |
|---|
|
Mouseover the markers to see the name of the location
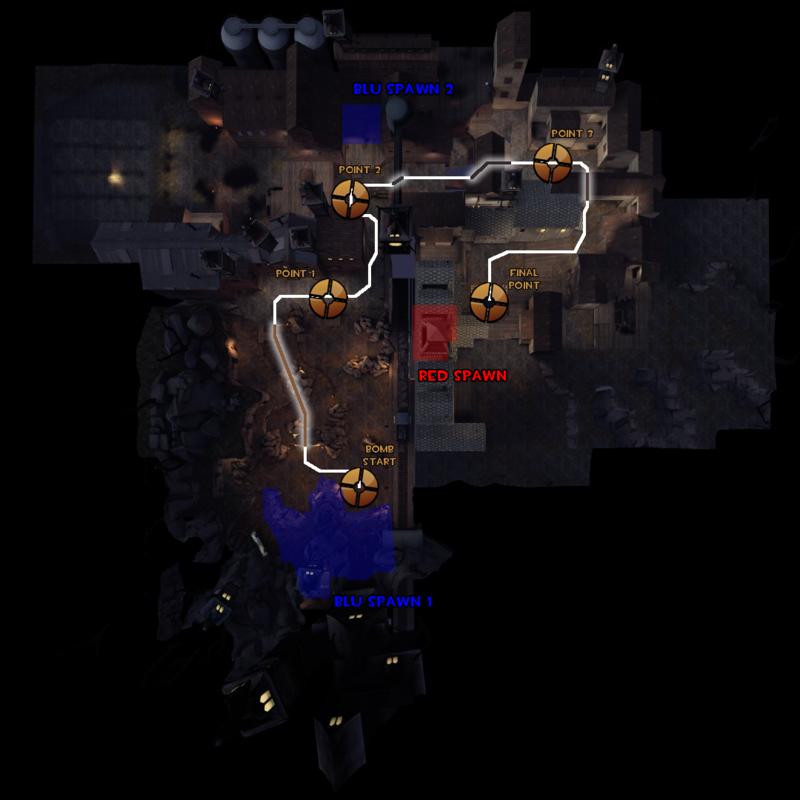
1 Side path 2 Cliffs 3 Rocks 4 Bunker 5 Front steps 6 Backroof 7 Yard 8 Backsteps 9 Roof 10 Side room 11 Bridge 12 Attic 13 Alley 14 Chicken wire room 15 Sniper's hut 16 Back Yard 17 Platforms 18 Pit 19 Map room
|
Borneo
| Borneo - overview indicators |
|---|
|
Mouseover the markers to see the name of the location
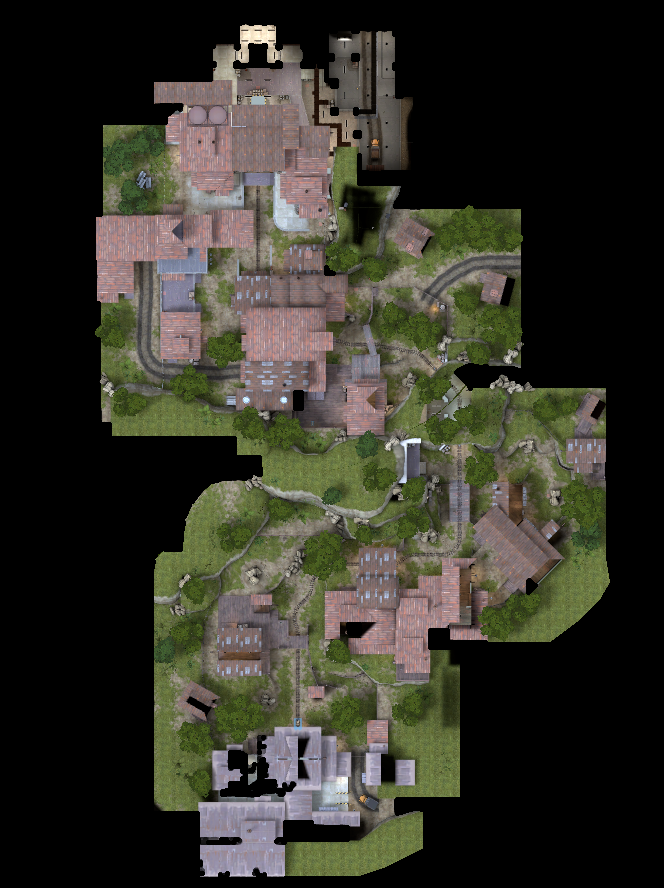
1 Shed 2 Small house 3 Maintenance building 4 Grey structure 5 Bridge 6 Hill interior 7 Tunnel 8 Giant garage 9 Casali building A BLU first spawn B BLU second spawn C BLU third spawn D RED first spawn E RED second spawn
|
Brimstone
| Brimstone - overview indicators |
|---|
|
Mouseover the markers to see the name of the location
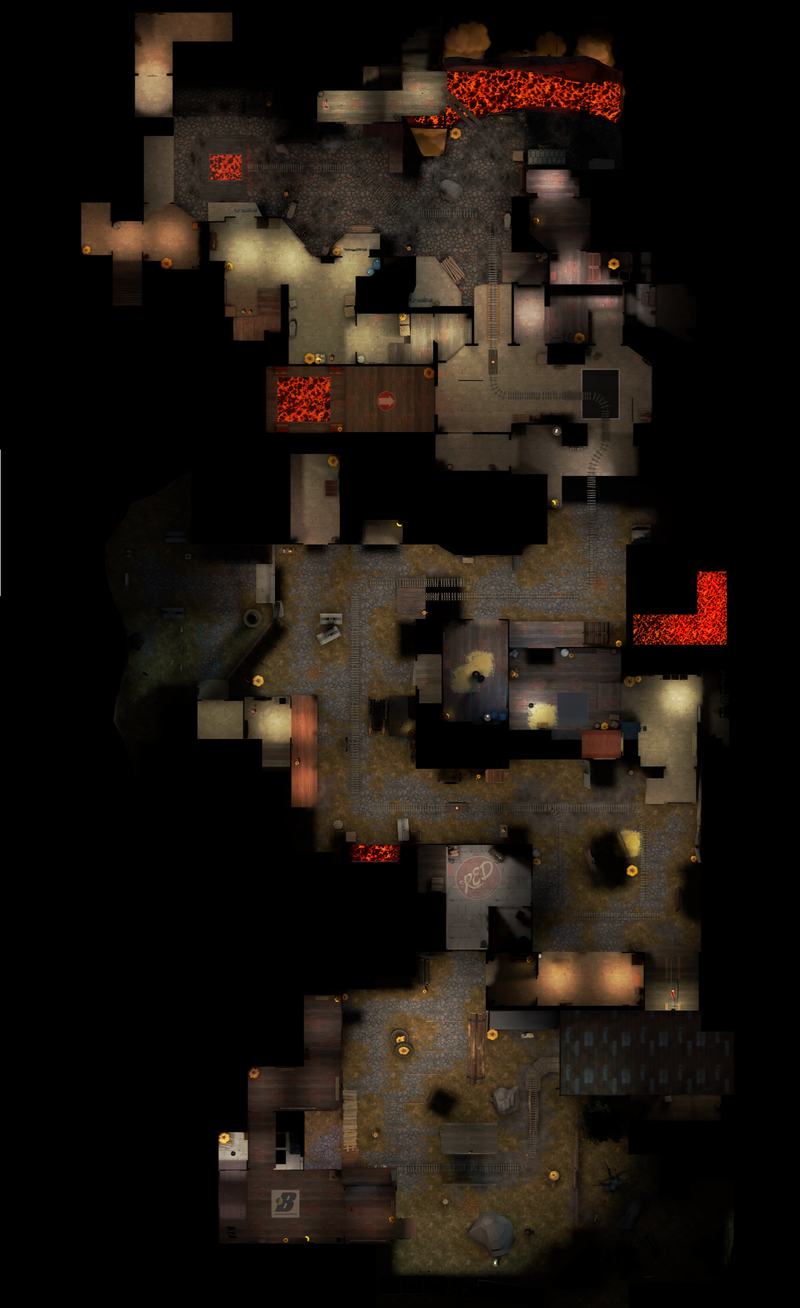
1 Lumber mill 2 Garage 3 Wet paint! 4 Shortcut to B 5 Library 6 Dump truck 7 Brick building 8 Warehouse 9 Sniper's nest A BLU first spawn B BLU second spawn C RED first spawn D RED second spawn E RED third spawn
|
Goldrush
Stage 1
| Goldrush, stage 1 - overview indicators |
|---|
|
Mouseover the markers to see the name of the location
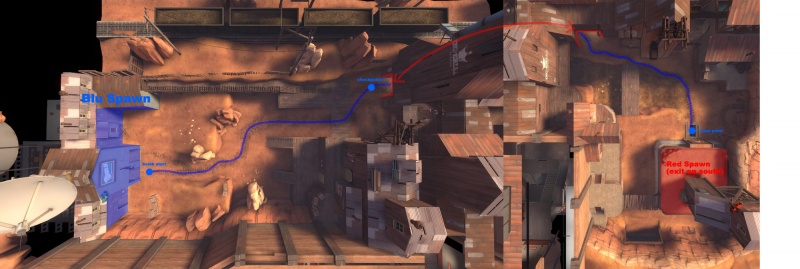
1 Elevated tracks 2 Cliffs 3 Hut 4 Tunnel 5 Imperial building 6 Red deck 7 Ditch 8 Attic 9 Mine shaft
|
Stage 2
| Goldrush, stage 2 - overview indicators |
|---|
|
Mouseover the markers to see the name of the location
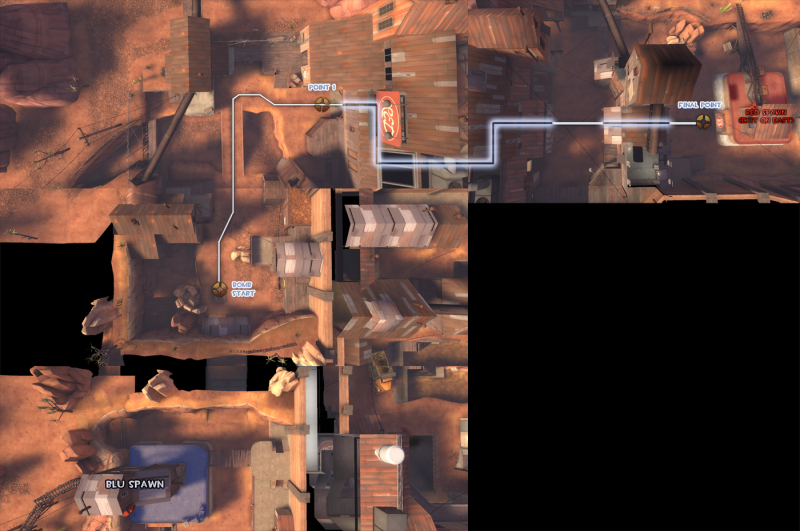
1 Watchtower 2 House 3 Bridge 4 Sniper's ledge 5 Battlement 6 Choke area 7 Main buildings 8 Sentry deck
|
Stage 3
| Goldrush, stage3 - overview indicators |
|---|
|
Mouseover the markers to see the name of the location
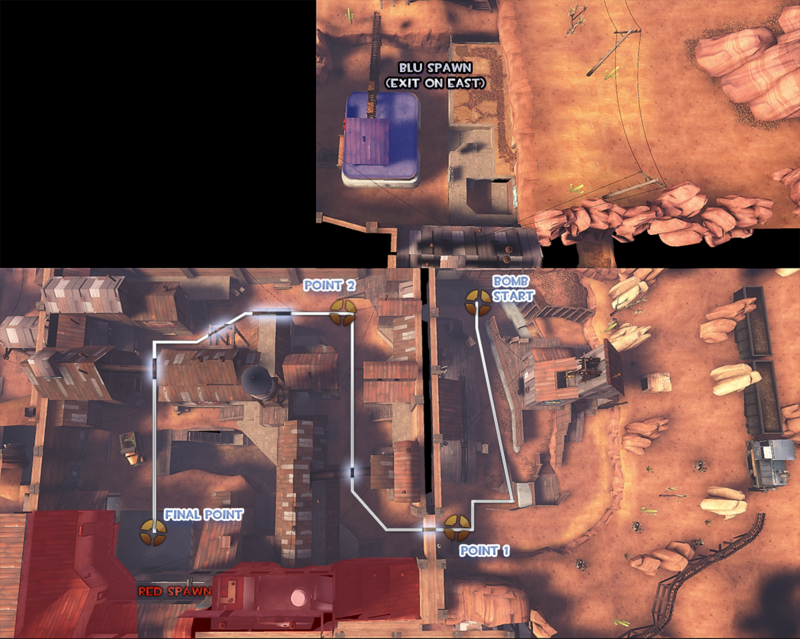
1 Truck house 2 Basin 3 Platform 4 Main deck 5 Main hallway 6 Sentry deck 7 Sniper's deck 8 Valley 9 Narrow building 10 Chokepoint 11 House 12 Battlements
|
Gravestone
| Gravestone - overview indicators |
|---|
|
Mouseover the markers to see the name of the location
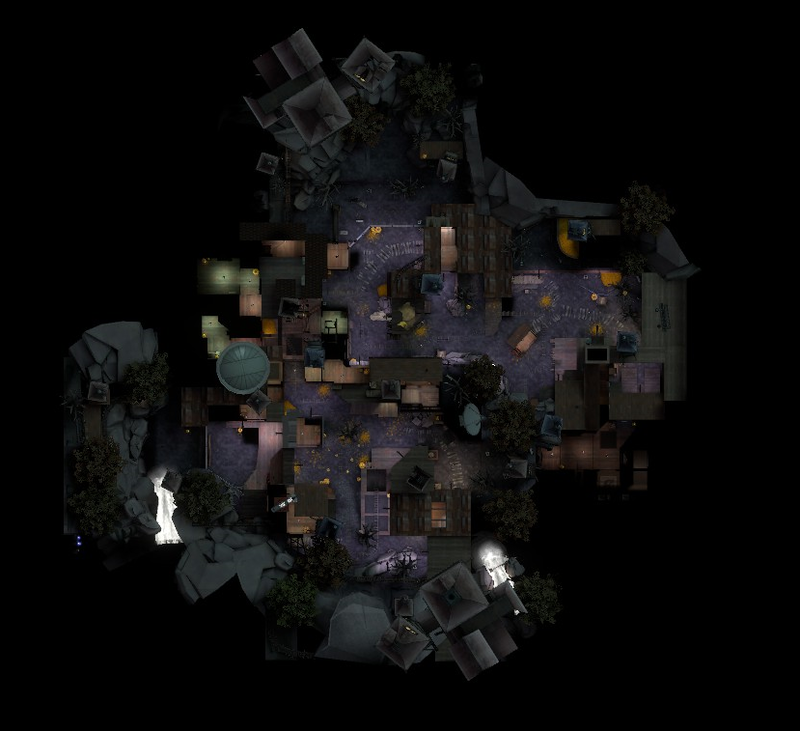
1 Shack 2 Shortcut 3 Red barn 4 Jimi Jam 5 Kitchen 6 Binski logging sawmill 7 Backyard A BLU first spawn B BLU second spawn C RED's only spawn
|
Hellstone
| Hellstone - overview indicators |
|---|
|
Mouseover the markers to see the name of the location
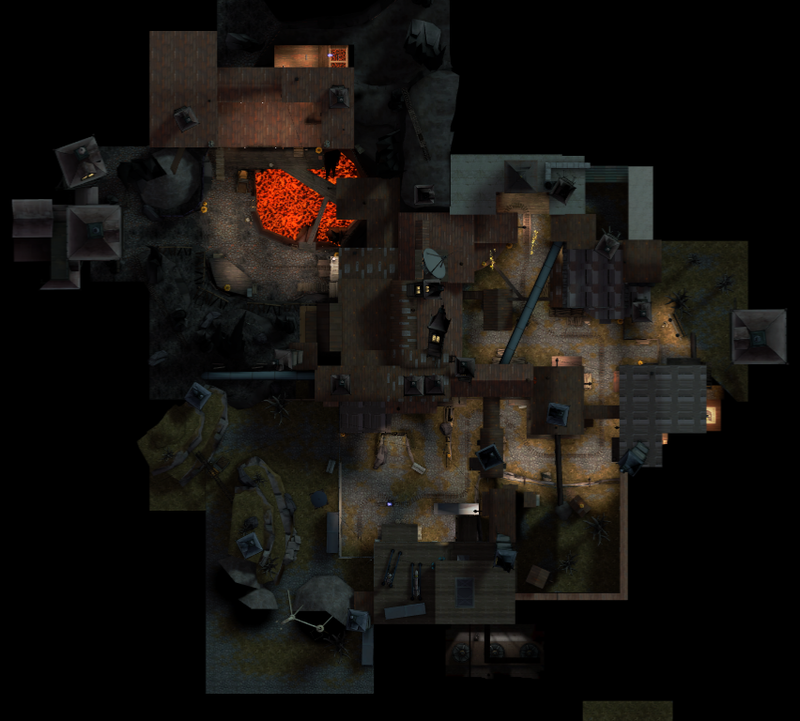
1 Freight House 2 Cubby hole 3 Mine shack 4 Horsemann's house 5 Yard 6 Hells bells A BLU first spawn B BLU second spawn C BLU third spawn D RED first spawn E RED final spawn
|
Pier
| Pier - location indicators |
|---|
|
Mouseover the markers to see the name of the location
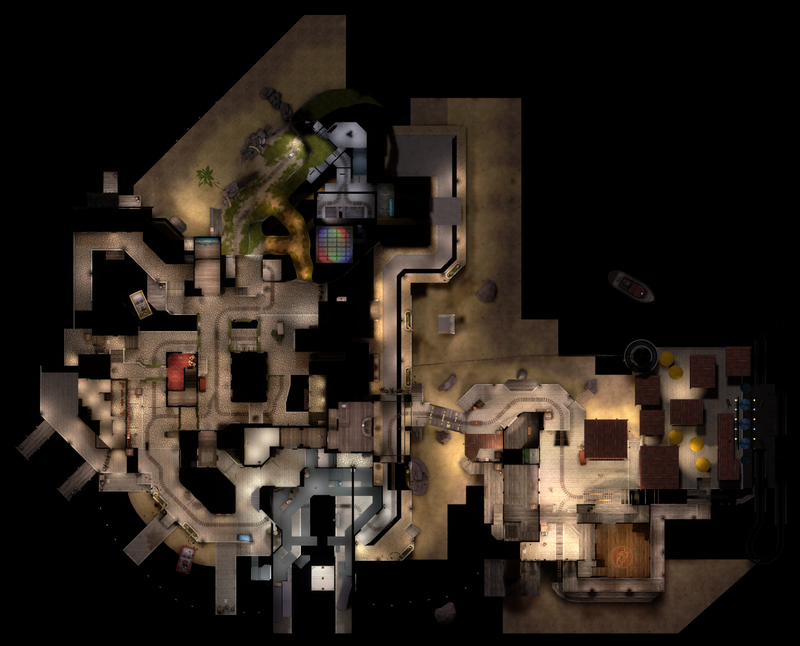
1 Beach 2 Caves 3 Minivan parking space 4 Cliff 5 Bridge 6 Red carpet building 7 Wine cellar 8 Docks 9 Warehouse 10 Kitchen 11 Sandy beach 12 Barn bridge 13 Small barn 14 Building adjacent to the barn 15 Target range A BLU first spawn B BLU second spawn C RED first spawn / BLU third spawn D RED final spawn
|
Precipice
| Precipice - overview indicators |
|---|
|
Mouseover the markers to see the name of the location
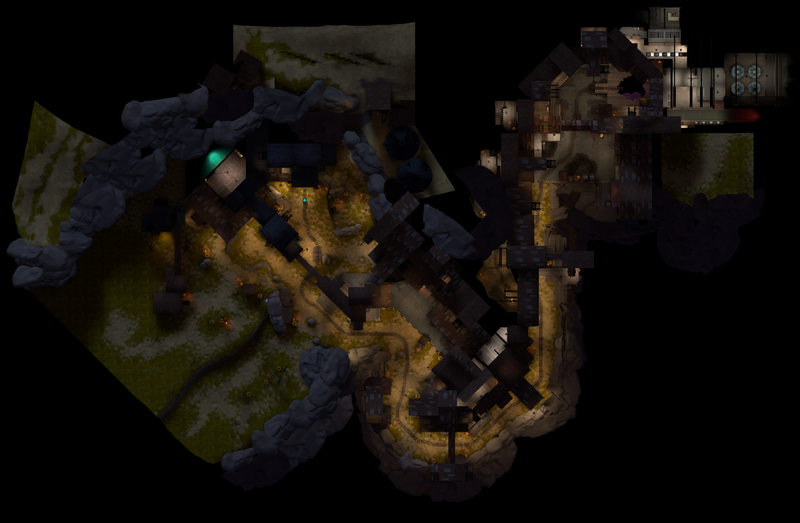
1 Courtyard 2 Buildings 3 Loading zone 4 Shack A 5 Shack B 6 Caves 7 Flank 8 Shipping yard 9 Hidden room A BLU first spawn B BLU second spawn C BLU third spawn D RED first spawn E RED final spawn
|
Snowycoast
| Snowycoast - overview indicators |
|---|
|
Mouseover the markers to see the name of the location
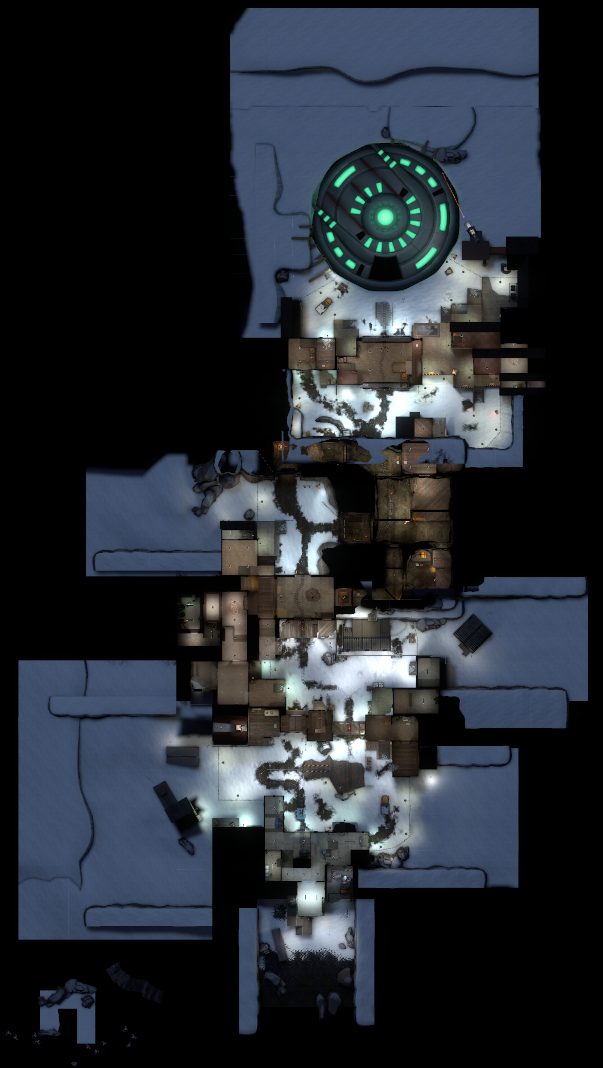
1 Side structure 2 Quonset hut 3 Kennels 4 Mines 5 Shutter gate 6 Excavation site A BLU first spawn B BLU second spawn C BLU third spawn D RED first spawn E RED second spawn
|
Swiftwater
| Swiftwater - overview indicators |
|---|
|
Mouseover the markers to see the name of the location
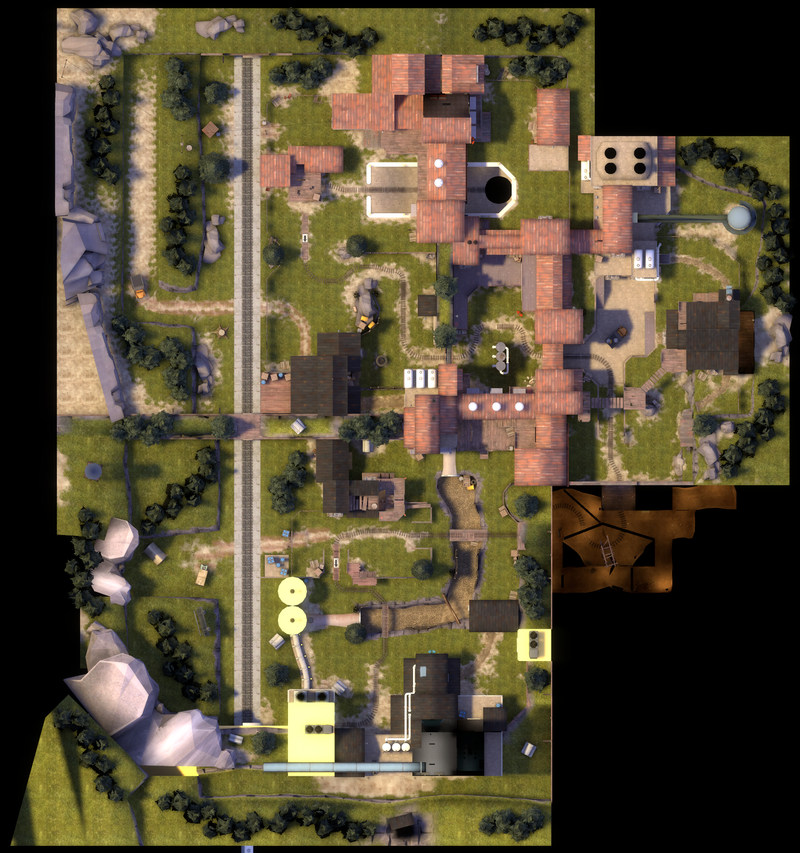
1 Front yard 2 Main house 3 Ditch 4 Shifty's Quick Shot shack 5 Tunnel 6 Sawmill 7 Catwalks 8 Barn 9 Silos 10 Front area 11 Railway building 12 Corner house 13 Steep decline 14 Battlements 15 Cliff A BLU first spawn B BLU second spawn C RED first spawn D RED second spawn E RED final spawn
|
Upward
| Upward - overview indicators |
|---|
|
Mouseover the markers to see the name of the location
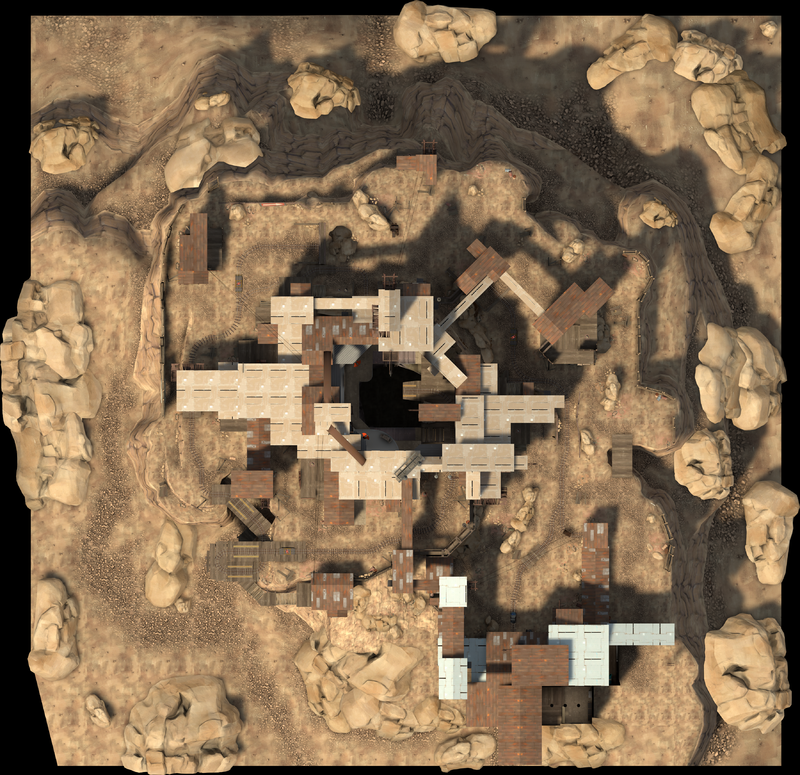
1 Roof 2 Behind roof 3 Slope 4 House 5 Cliff 6 Hill 7 Rocks 8 Flanking cliff 9 B hut 10 Apartments 11 Platform 12 Balcony 13 Spiraling bridge 14 Under bridge 15 C hut 16 Valley 17 Across buildings A BLU first spawn B BLU second spawn C RED first spawn/ BLU third spawn D RED second spawn
|
Hassle Castle
| Hassle Castle - overview indicators |
|---|
|
Mouseover the markers to see the name of the location
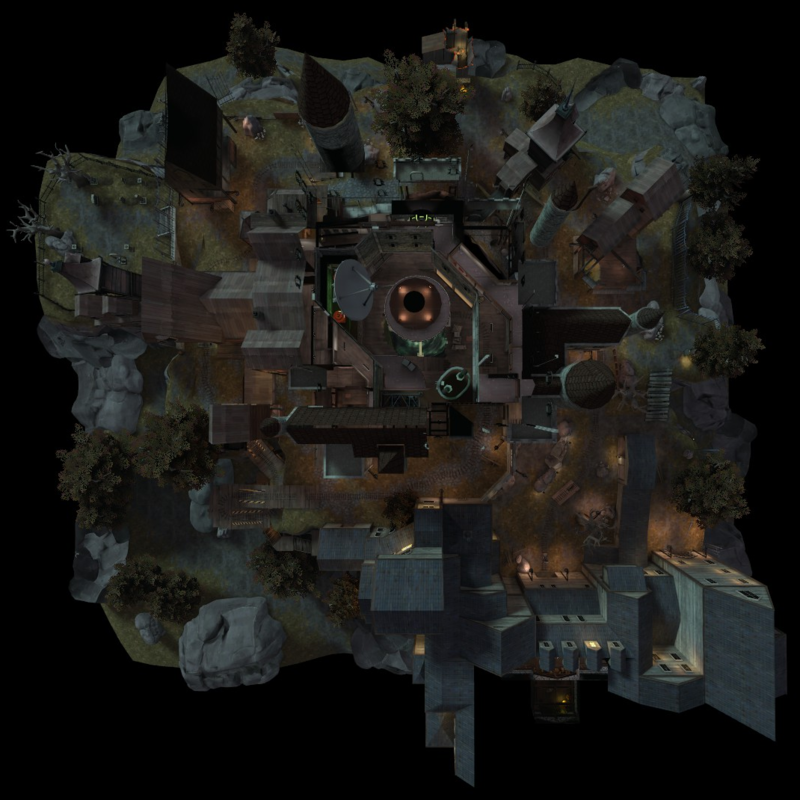
1 Roof 2 Behind roof 3 Slope 4 House 5 Cliff 6 Hill 7 Rocks 8 Flanking cliff 9 B hut 10 Apartments 11 Platform 12 Balcony 13 Spiraling bridge 14 Under bridge 15 C hut 16 Valley 17 Across buildings A BLU first spawn B BLU second spawn C RED first spawn/ BLU third spawn D RED second spawn
|
Wutville
| Wutville - overview indicators |
|---|
|
Mouseover the markers to see the name of the location
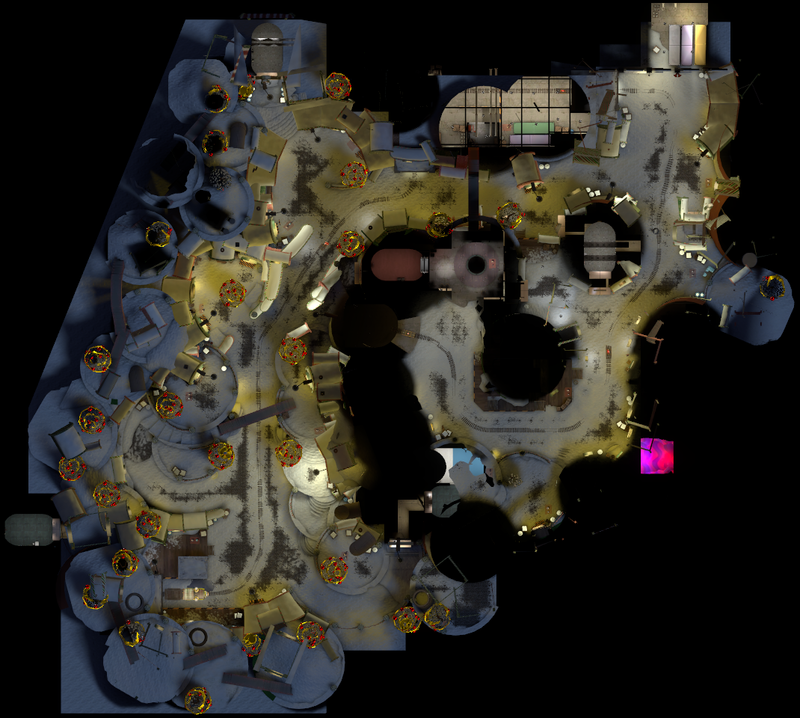
1 RÜDY's station 2 Arch 3 Plaza 4 Alleyway 5 Wooden path 6 Side path A BLU first spawn B BLU second spawn/RED first spawn C BLU third spawn/RED second spawn D RED third spawn
|
Terror
| Terror - overview indicators |
|---|
|
Mouseover the markers to see the name of the location
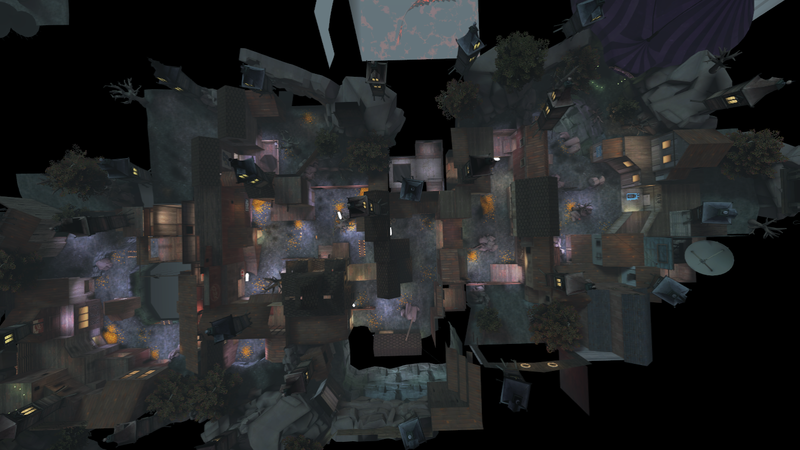
1 Front Yard 2 Low Hanging Roof 3 RED shed 4 Rocks 5 Crossing 6 Slope 7 Cliffside Shed 8 Old Geeser 9 Bridge 10 Mann Mannor 11 Tree 12 Casali Shafting 13 Flank House 14 Pit 15 Outhouse A BLU first spawn B BLU second spawn C RED first spawn D RED second spawn E RED third spawn
|
Chilly
| Chilly - overview indicators |
|---|
|
Mouseover the markers to see the name of the location
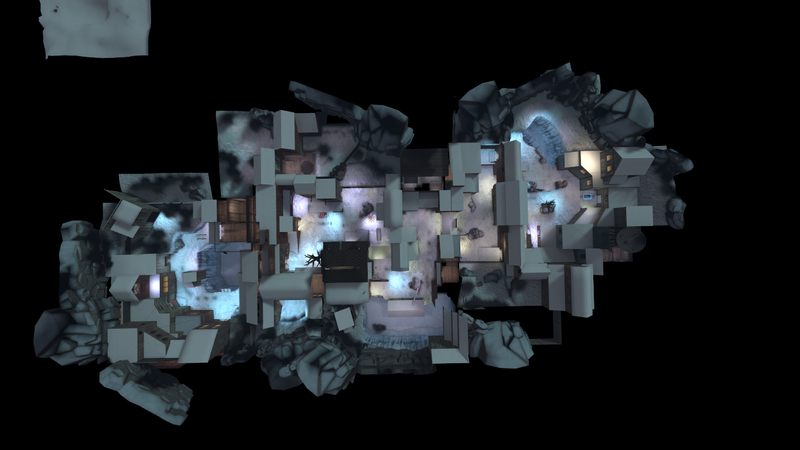
1 Front Yard 2 Low Hanging Roof 3 RED shed 4 Rocks 5 Crossing 6 Slope 7 Cliffside Shed 8 Old Geeser 9 Bridge 10 Mann Mannor 11 Tree 12 Casali Shafting 13 Flank House 14 Pit 15 Outhouse A BLU first spawn B BLU second spawn C RED first spawn D RED second spawn E RED third spawn
|
Payload Race
Banana Bay
| Banana Bay - overview indicators |
|---|
|
Mouseover the markers to see the name of the location
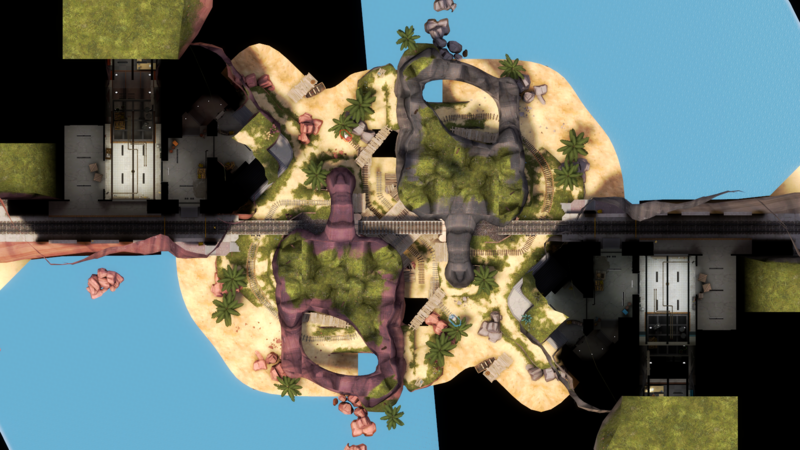
1 Highline 2 Incline 3 Platform 4 Deck 5 Sally Port 6 Docks 7 Start point 8 Siphon A RED spawn B BLU spawn
|
Helltower
| Helltower - overview indicators |
|---|
|
Mouseover the markers to see the name of the location
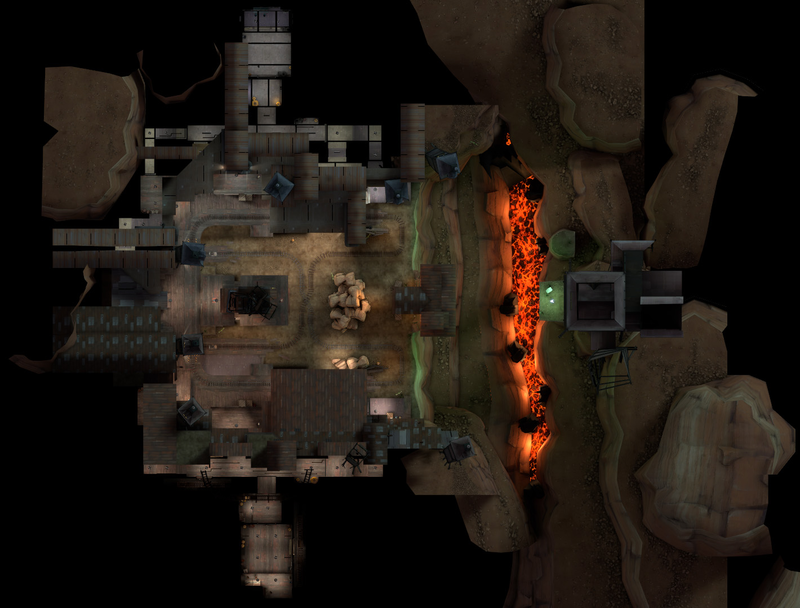
1 Tower Corridor 2 Balconies 3 Central Tower 4 Crossing 5 The Ramp 6 Cliff House 7 Clocktower A RED spawn B BLU spawn
|
Attack'n'Defend
DeGroot Keep
| DeGroot Keep - overview indicators |
|---|
|
Mouseover the markers to see the name of the location
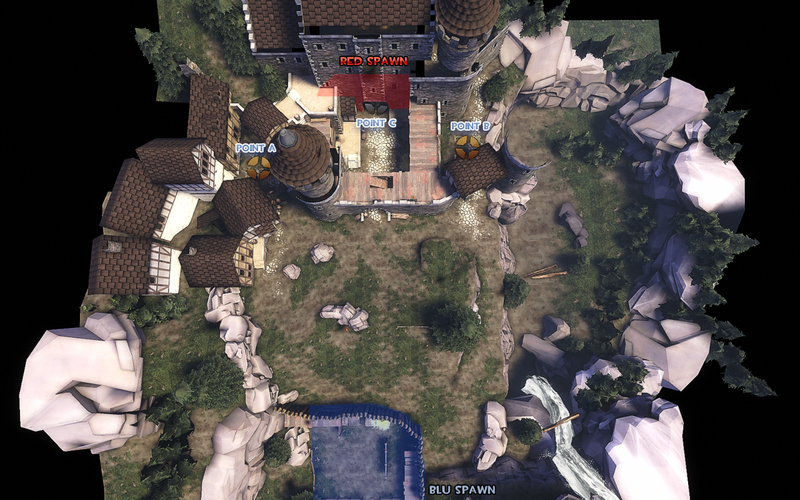
1 Rock 2 Main battlefield 3 Battlements 4 Castle halls
|
Dustbowl
| Dustbowl - overview indicators |
|---|
|
Mouseover the markers to see the name of the location
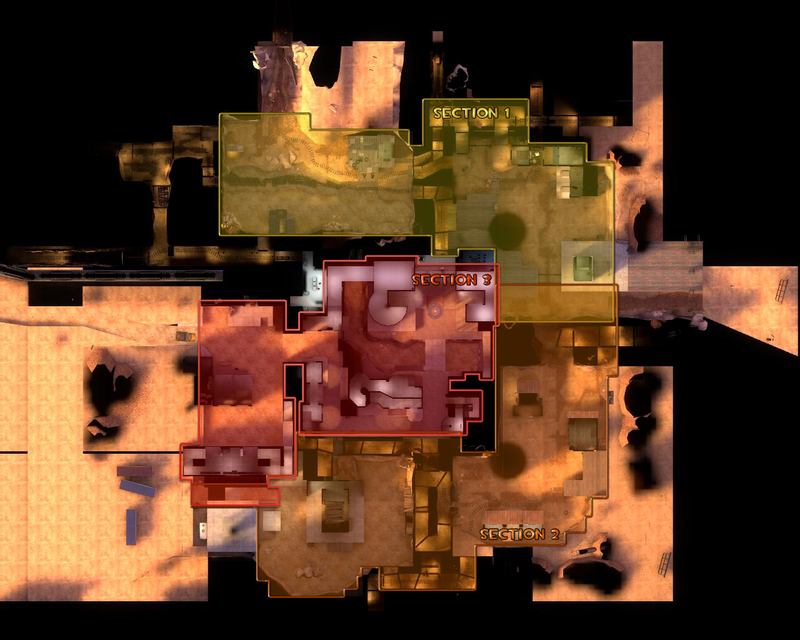
1 Right exit shed 2 Canyon 3 Left exit shed 4 Tunnels 5 Bridge 6 Platform 7 Dugout 8 Large shed 9 Control point building 10 Office 11 Mining tunnel 12 Double tunnels 13 Gated tunnel 14 Courtyard 15 Middle building 16 Loading dock 17 Ledge 18 Alleys 19 Valley A BLU first spawn B BLU second spawn/RED first spawn C BLU third spawn/RED second spawn D RED final spawn
|
Egypt
| Egypt - overview indicators |
|---|
|
Mouseover the markers to see the name of the location
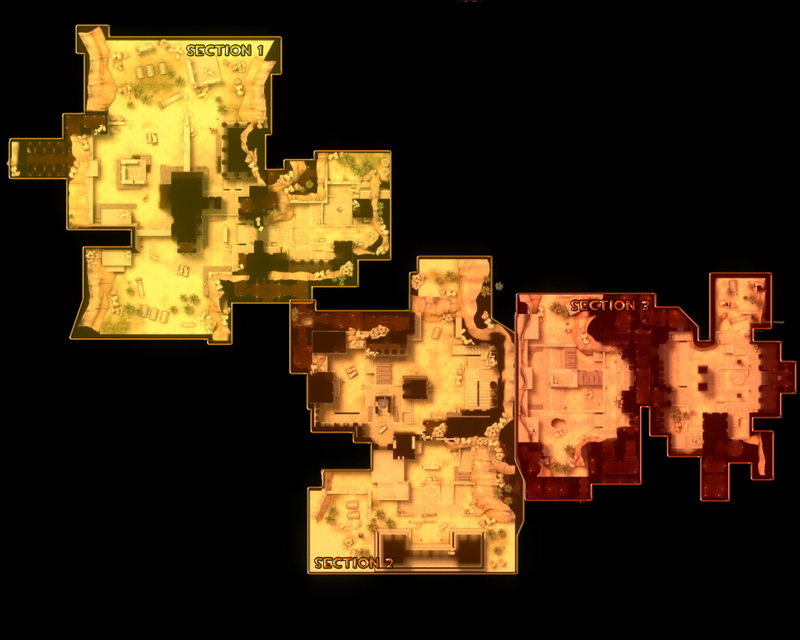
1 Ledges 2 Large courtyard 3 Small courtyard 4 Tunnels 5 Point courtyard 6 Stairs 7 Main building 8 Side path 9 Flank 10 Opening 11 Valley 12 Central pillar 13 Caves 14 Open courtyard A BLU first spawn B BLU second spawn C BLU final spawn D RED first spawn E RED second spawn
|
Erebus
Stage 1
| Erebus, stage 1 - overview indicators |
|---|
|
Mouseover the markers to see the name of the location
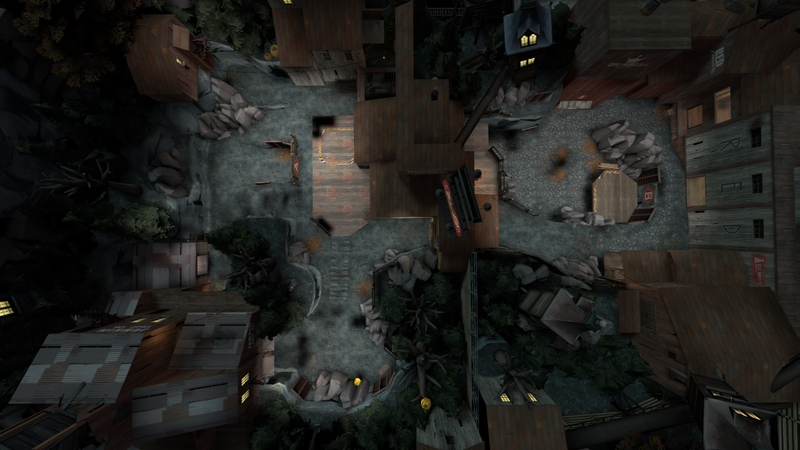
1 Tree Stunps 2 Lower area 3 Lumber Yard 4 Sawmill 5 Mineshafts A BLU spawn B RED spawn
|
Stage 2
| Erebus, stage 2 - overview indicators |
|---|
|
Mouseover the markers to see the name of the location
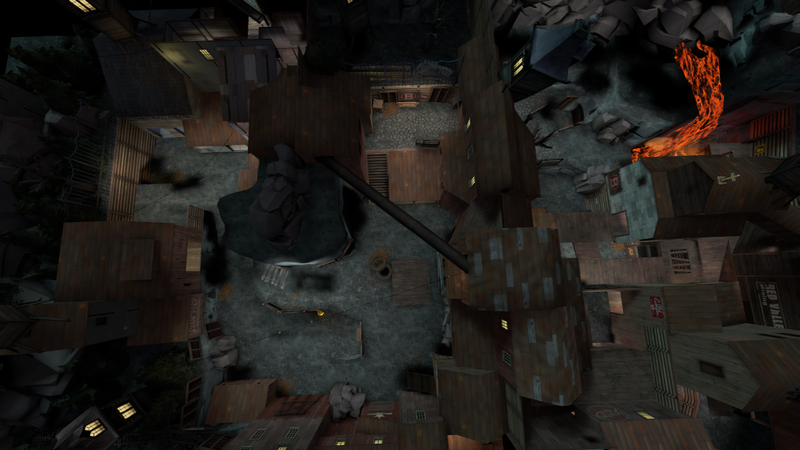
1 Ravine 2 Cliff 3 Cave 4 Sniper's Deck 5 Shed 6 Left Flank 7 Central area 8 Church A BLU spawn B RED spawn
|
Stage 3
| Scout - Locations |
|---|
|
Mouseover the markers to see the name of the location
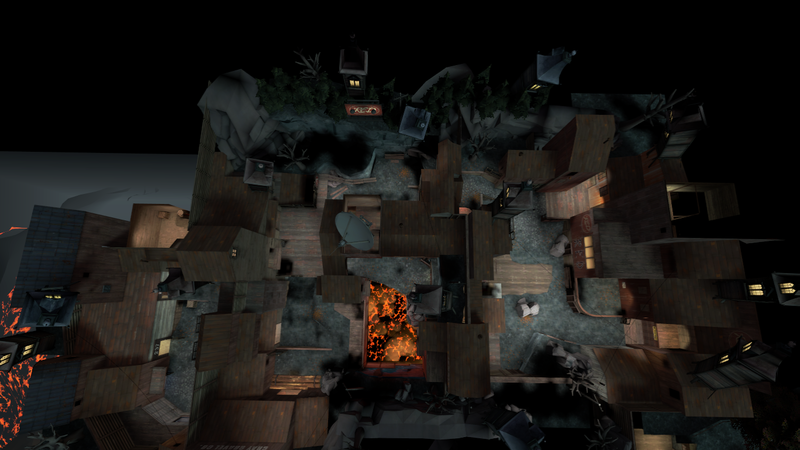
1 Building 237 2 Yard 3 Elevation 4 Computer room 5 Under Flank 6 Propane Yard 7 Red Shed A BLU spawn B RED spawn
|
Gorge
| Gorge - overview indicators |
|---|
|
Mouseover the markers to see the name of the location
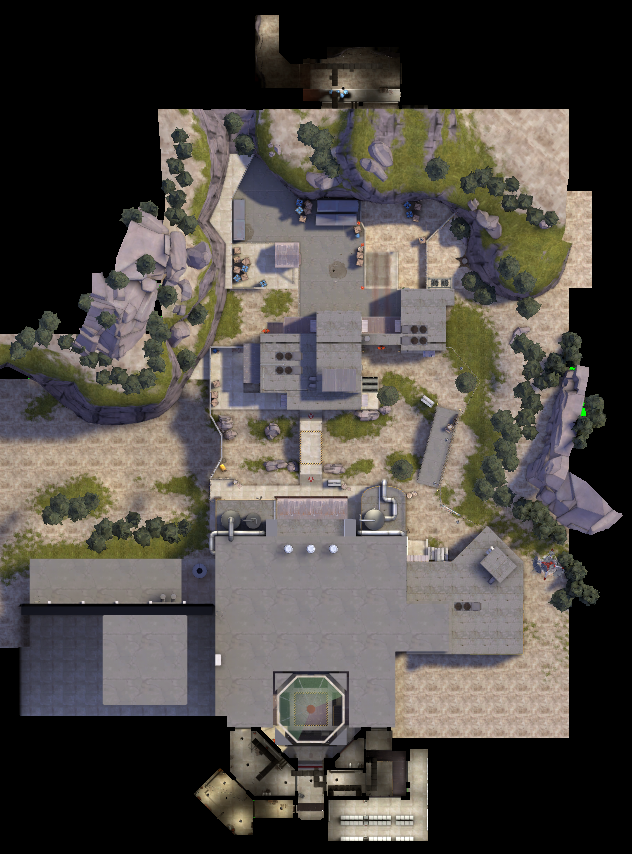
1 Entrance yard 2 Toll both 3 Upper deck 4 Checkpoint building 5 Gorge (valley) 6 Flank hallway 7 Main hallway 8 Second floor 9 Flank room A BLU first spawn B BLU second spawn C RED only spawn
|
Gorge Event
| Gorge Event - overview indicators |
|---|
|
Mouseover the markers to see the name of the location
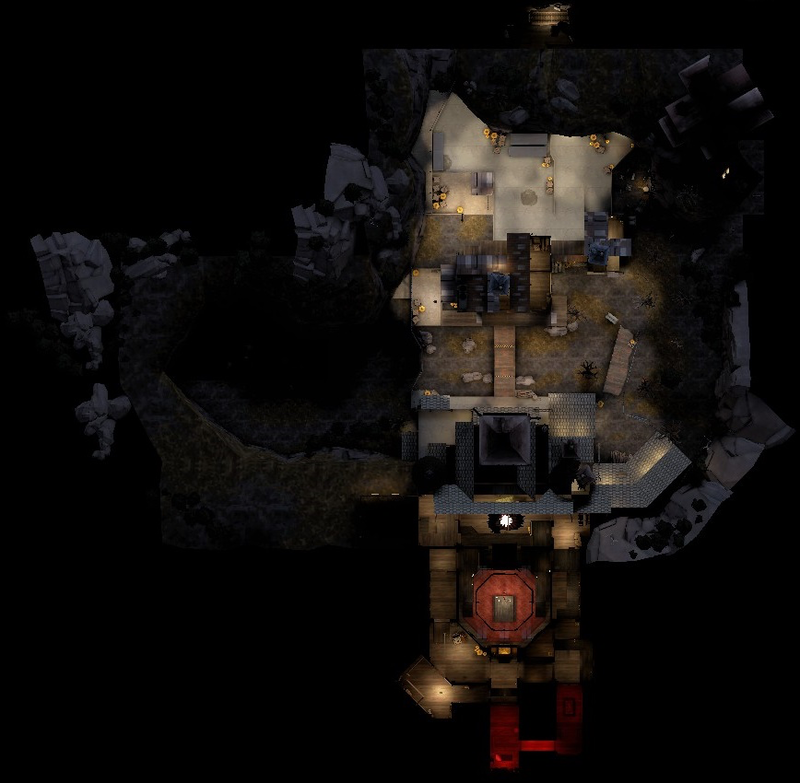
1 Entrance yard 2 Toll both 3 Upper deck 4 Checkpoint building 5 Gorge (valley) 6 Flank hallway 7 Main hallway 8 Second floor 9 Flank room A BLU first spawn B BLU second spawn C RED only spawn
|
Gravel Pit
| Gravel Pit - overview indicators |
|---|
|
Mouseover the markers to see the name of the location
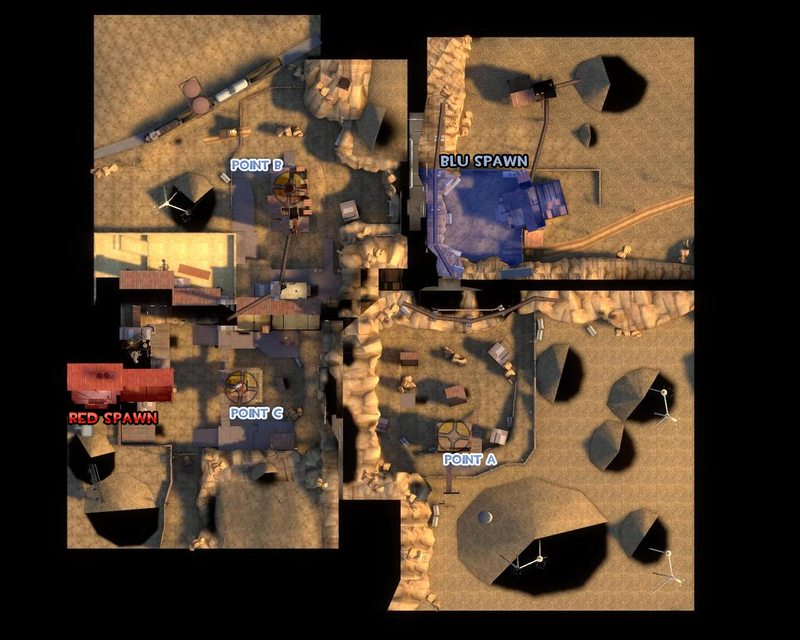
1 B side tunnel 2 Radar building 3 Shadow side 4 Balcony 5 A/B connector 6 A side tunnel 7 Path 8 Valley 9 Radio tower 10 Laser tower 11 Ground level A BLU spawn B RED spawn
|
Junction
| Junction - overview indicators |
|---|
|
Mouseover the markers to see the name of the location
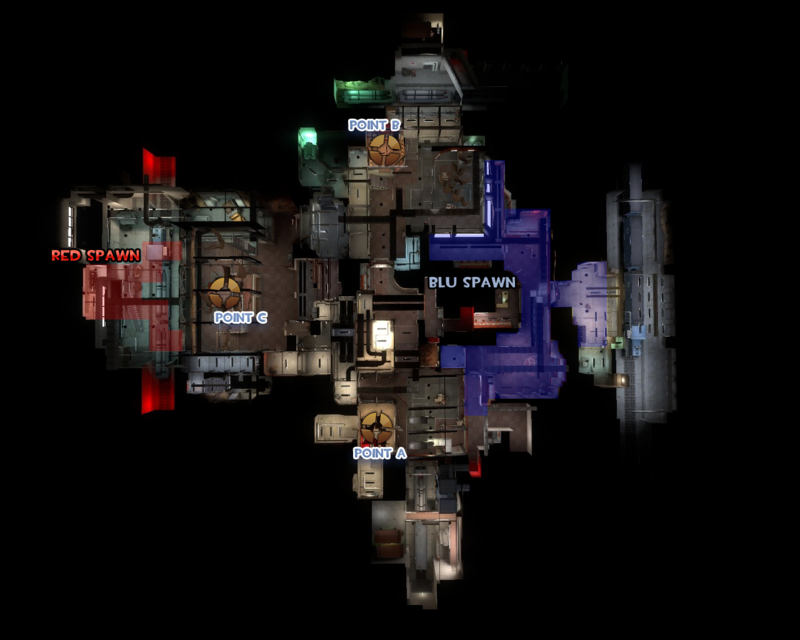
1 Balconies 2 B lobby 3 Balconies 4 B/C flank 5 Platform 6 A/C flank 7 A/B route 8 A lobby 9 Stairs A BLU spawn B RED spawn
|
Mercenary Park
| Mercenary Park - overview indicators |
|---|
|
Mouseover the markers to see the name of the location
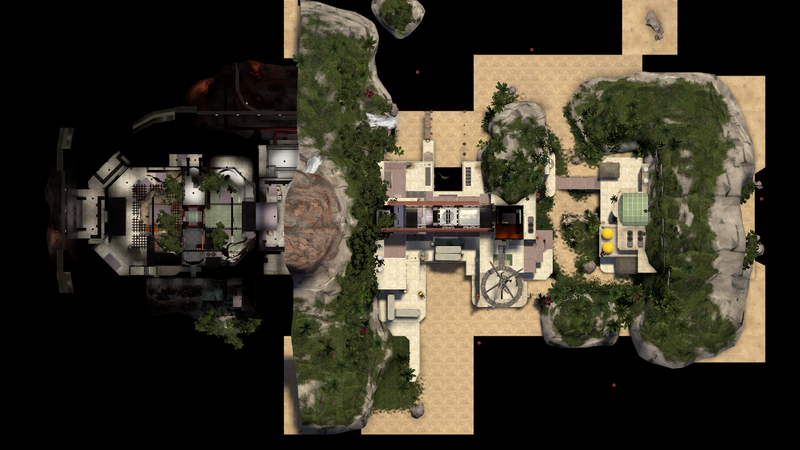
1 Gift shop 2 Playground 3 Mann.Co building 4 Transport cages 5 Catwalks 6 Server room 7 Elevator shaft 8 Institute for Research and Development (YTI Room) 9 Ventilation shaft 10 Side stairs 11 Platform A BLU first spawn B BLU second spawn C BLU third spawn D RED first spawn E RED final spawn
|
Mossrock
| Mossrock - overview indicators |
|---|
|
Mouseover the markers to see the name of the location
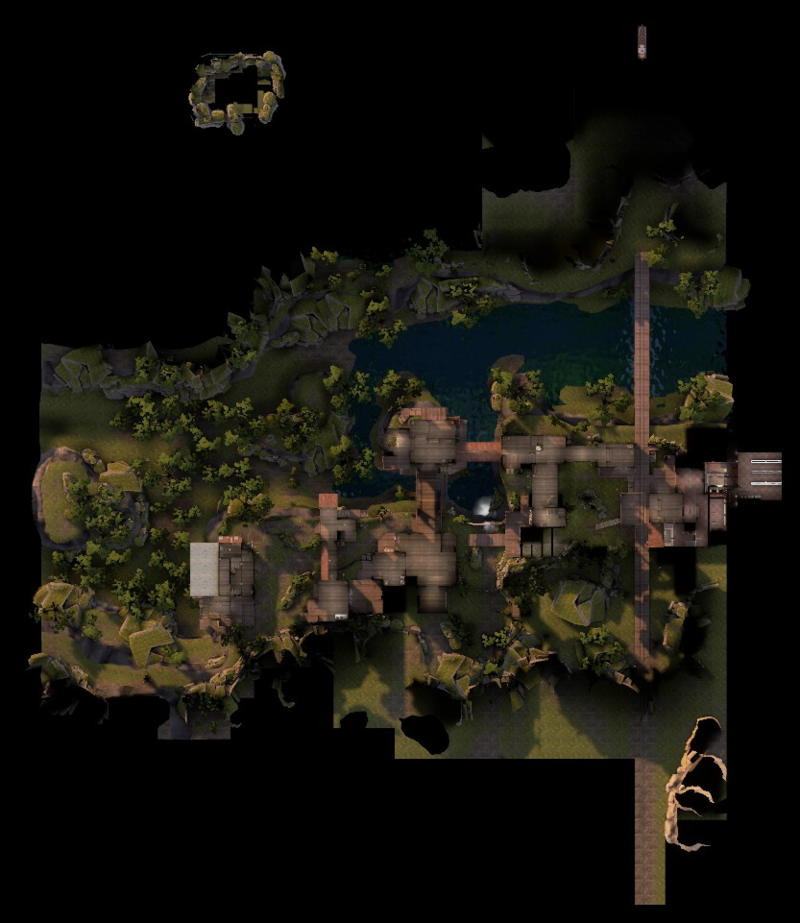
1 Captain Dan's Wood pulp 2 Casali Shafting Co. 3 Riverwalk 4 Radio Shack with Radio Room 5 Island flank 6 Jenkin Coal Co. 7 Shipping 8 One tree hill 9 Trestle A BLU first spawn B BLU second spawn C RED spawn
|
Mountain Lab
| Mountain Lab - overview indicators |
|---|
|
Mouseover the markers to see the name of the location
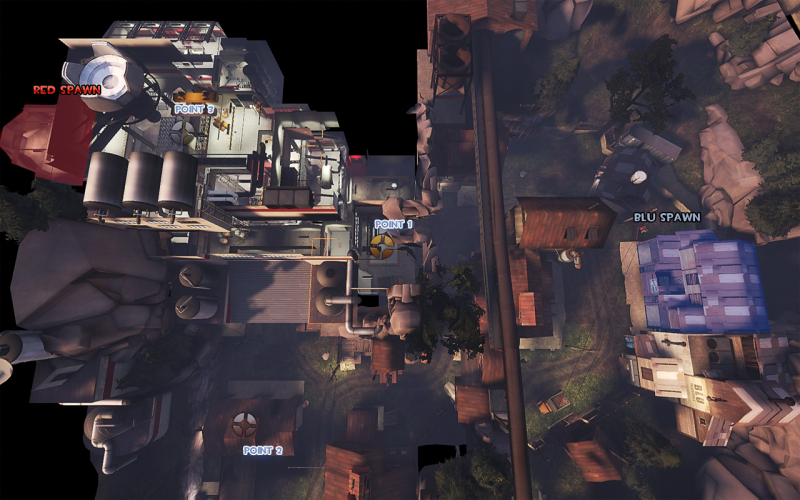
1 Yard 2 Warehouse 3 Shed 4 Tunnel 5 Small house 6 Cliffs 7 Upper entrance tunnels 8 Lower entrance tunnels 9 Top floor A BLU spawn B RED spawn
|
Mann Manor
| Mann Manor - overview indicators |
|---|
|
Mouseover the markers to see the name of the location
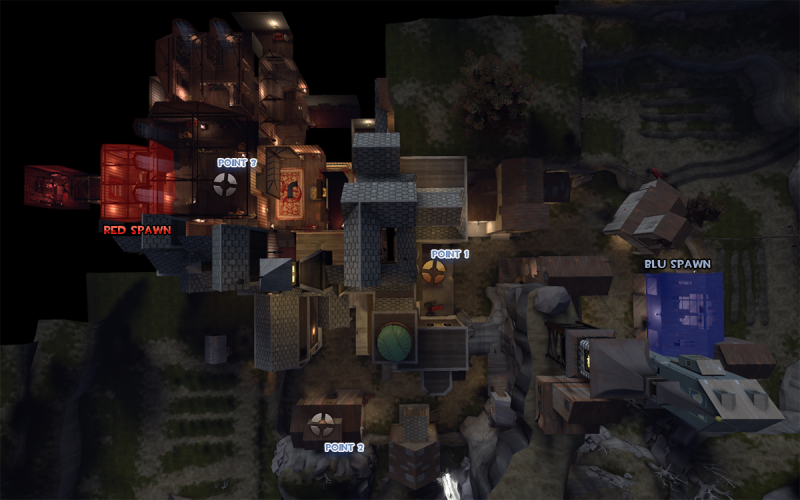
1 Yard 2 Warehouse 3 Shed 4 Tunnel 5 Small house 6 Cliffs 7 Upper entrance tunnels 8 Lower entrance tunnels 9 Top floor A BLU spawn B RED spawn
|
Snowplow
Stage 1
| Snowplow, stage 1 - overview indicators |
|---|
|
Mouseover the markers to see the name of the location
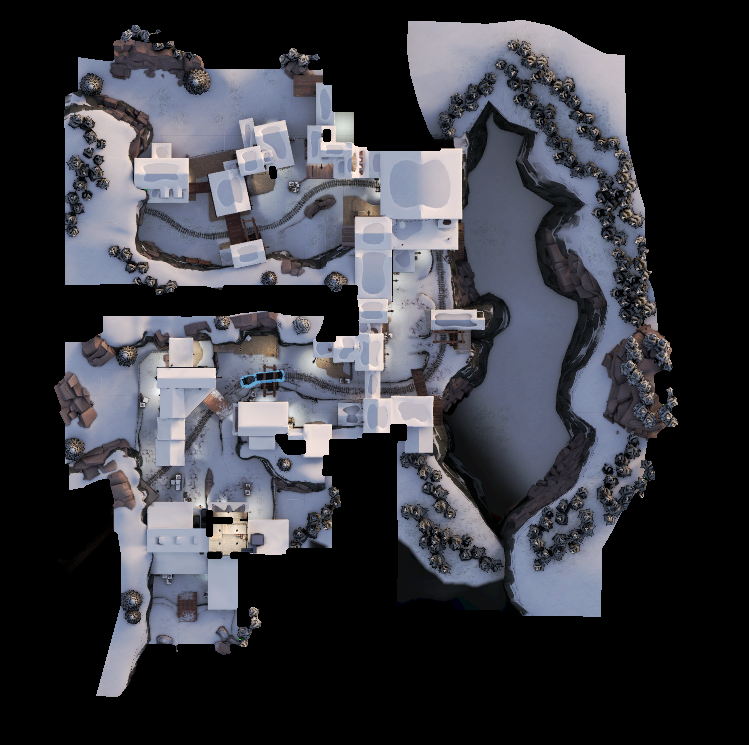
1 Left exit building 2 Right side building 3 Right side structure 4 Structural path 5 Warehouse 6 Wooden tower A BLU first spawn B BLU second spawn C RED first spawn D RED second spawn
|
Stage 2
| Snowplow, stage 2 - overview indicators |
|---|
|
Mouseover the markers to see the name of the location
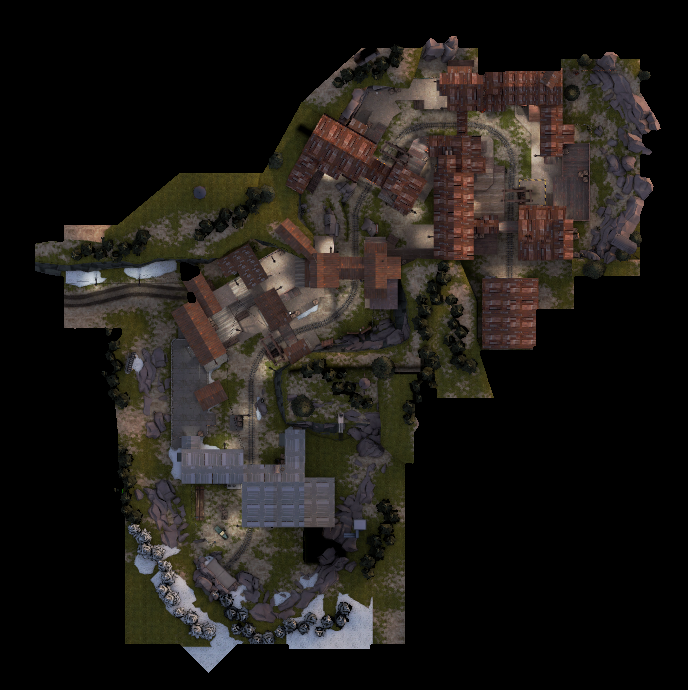
1 Supply shed 2 Left house 3 Battlements 4 Left path structure A BLU first spawn B BLU second spawn C RED spawn
|
Steel
| Steel - overview indicators |
|---|
|
Mouseover the markers to see the name of the location
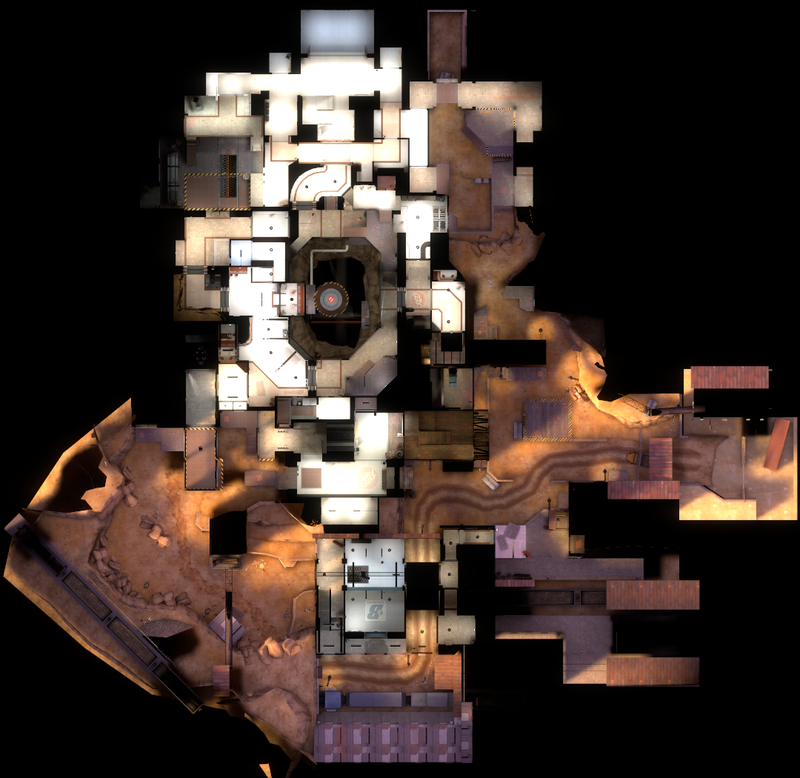
1 Hill 2 Cliffs 3 Shipping dock 4 Launch room 5 Storehouse 6 Canyon 7 Rocks 8 Truck yard 9 Wooden building 10 narrow building A BLU spawn B RED spawn
|
Control Points
5Gorge
| 5Gorge = overview indicators |
|---|
|
Mouseover the markers to see the name of the location
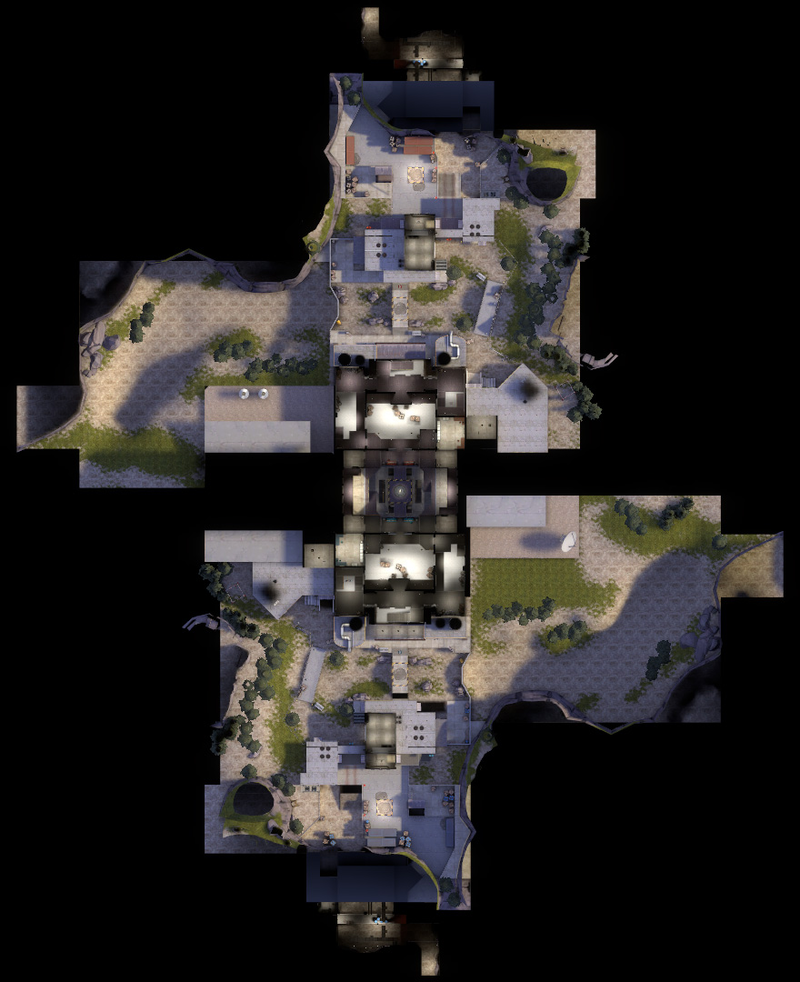
1 Pit 2 Upper ring 3 Lobby 4 Main hallway 5 Flank hallway 6 Valley (Gorge) 7 Main building 8 Second floor 9 Small shed 10 Crates A RED first spawn B RED second spawn C RED third spawn
|
Badlands
| Badlands (Control point) - overview indicators |
|---|
|
Mouseover the markers to see the name of the location
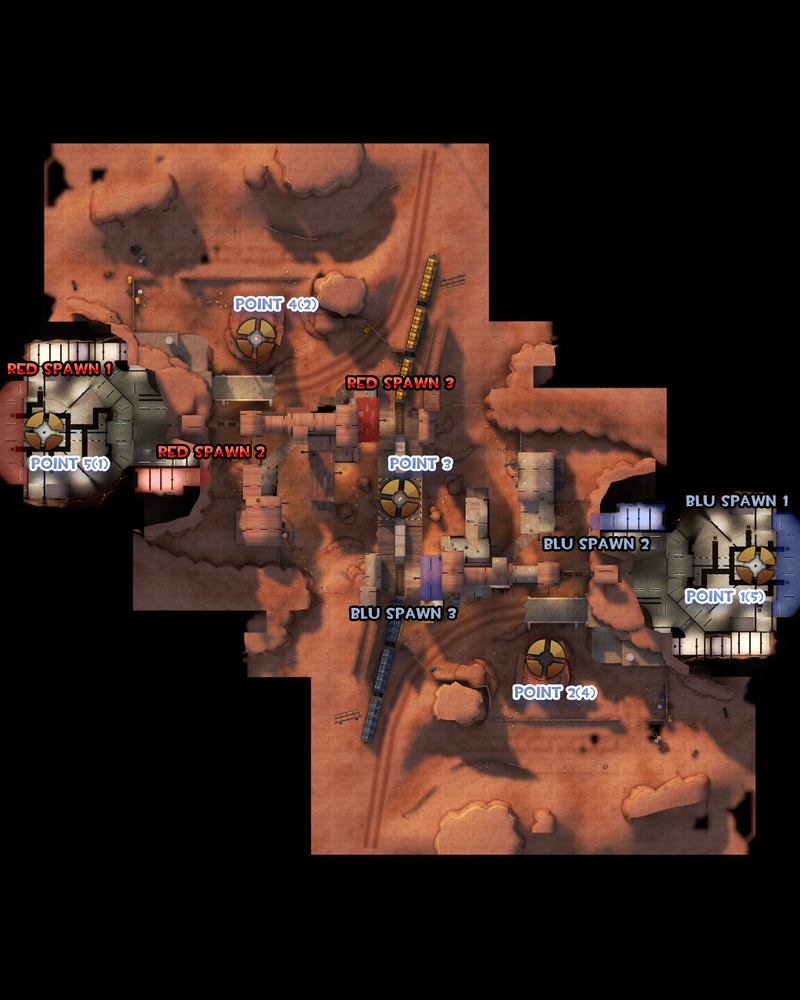
1 Rail cars 2 Pillars 3 Window and the Balcony 4 Valley 5 Ledge 6 Bridge 7 Battlements 8 Lower left entrance
|
Coldfront
| Coldfront - overview indicators |
|---|
|
Mouseover the markers to see the name of the location
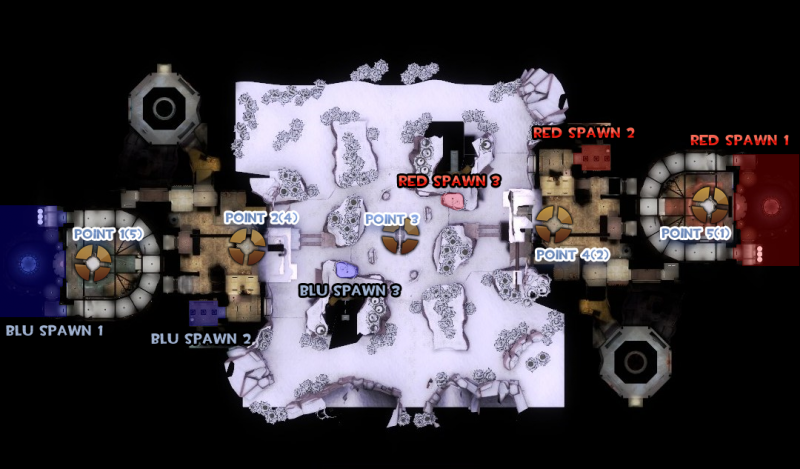
1 Rocks 2 High cliff 3 Yard 4 Garage 5 Platform 6 Silo 7 Outer ring 8 Side entrance A RED first spawn B RED second spawn C RED third spawn
|
Fastlane
| Fastlane - overview indicators |
|---|
|
Mouseover the markers to see the name of the location
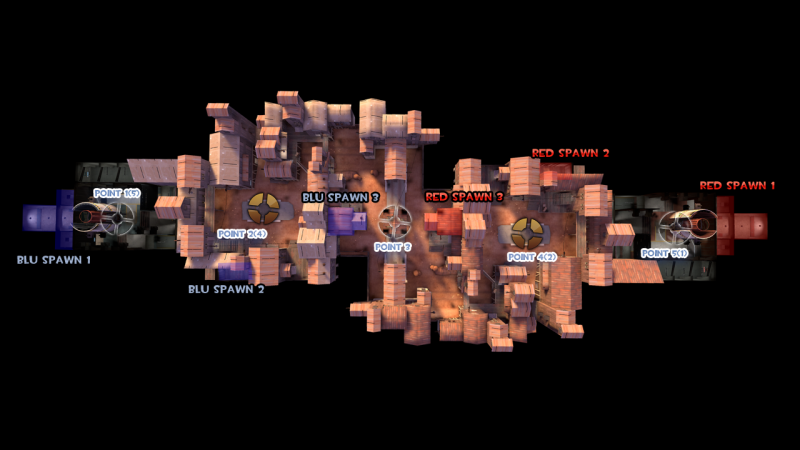
1 Shacks 2 Valley 3 House 4 Bridge 5 Lobby 6 Upper hallway A RED first spawn B RED second spawn C RED third spawn
|
Foundry
| Foundry - overview indicators |
|---|
|
Mouseover the markers to see the name of the location
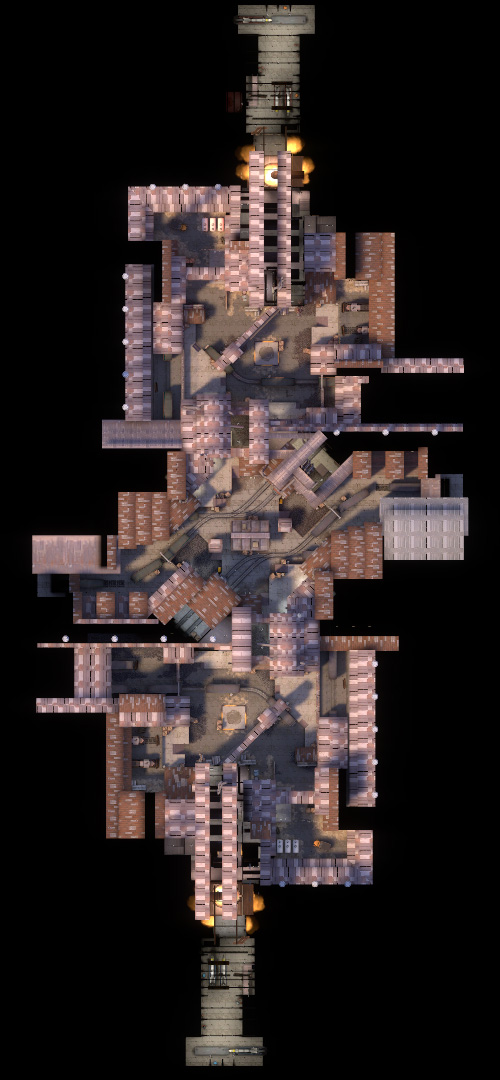
1 Roof and the central platform 2 Transition building 3 Platform 4 Yard 5 Side path 6 Upper walkway 7 Stairs 8 Foundry room A RED first spawn B RED second spawn C RED third spawn
|
Freight
| Freight - overview indicatotors |
|---|
|
Mouseover the markers to see the name of the location
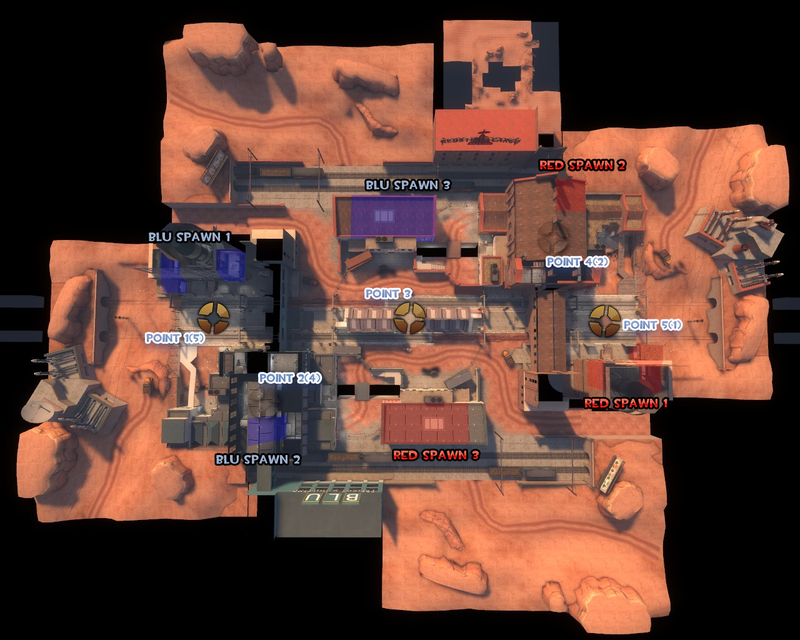
1 Central building 2 Yard 3 Stairs 4 Water 5 Main entrance 6 Flank entrance 7 Yard exit 8 Stairs to the second floor 9 Tracks A RED first spawn B RED second spawn C RED third spawn
|
Granary
| Granary - overview indicators |
|---|
|
Mouseover the markers to see the name of the location
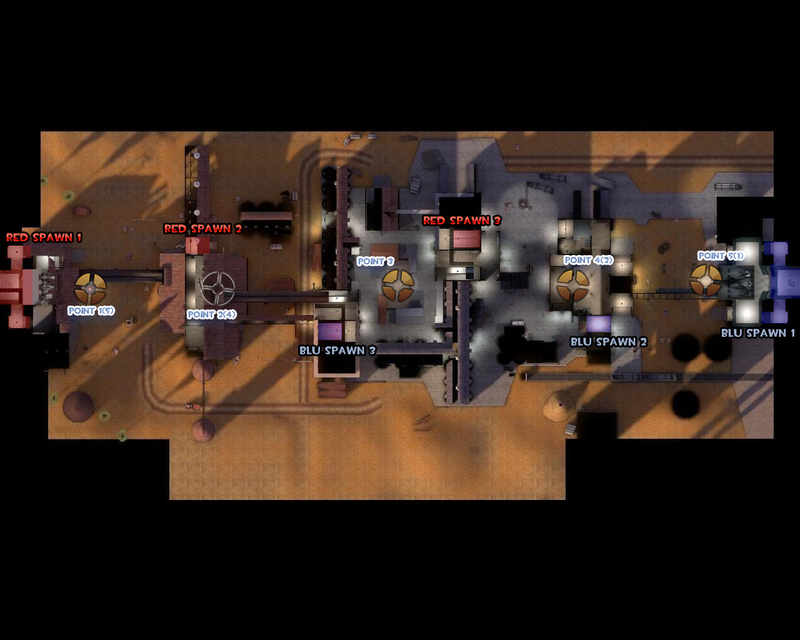
1 Crates 2 Garage 3 Choke 4 Left yard 5 Chute hallway 6 Right yard 7 Granary mill 8 Yard 9 Pipes 10 Yard 11 Headquarters
|
Metalworks
| Metalworks - overview indicators |
|---|
|
Mouseover the markers to see the name of the location
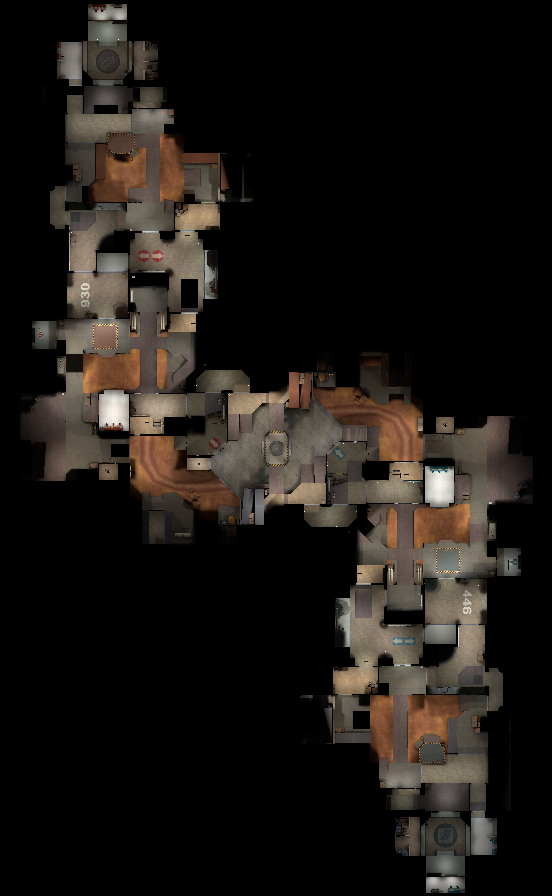
1 Control point bridge 2 Choke 3 Pipe room 4 Yard 5 Flank 6 bridge 7 Main building 8 Walkway 9 Front yard A RED first spawn B RED second spawn C RED third spawn
|
Powerhouse
| Powerhouse - overview indicators |
|---|
|
Mouseover the markers to see the name of the location
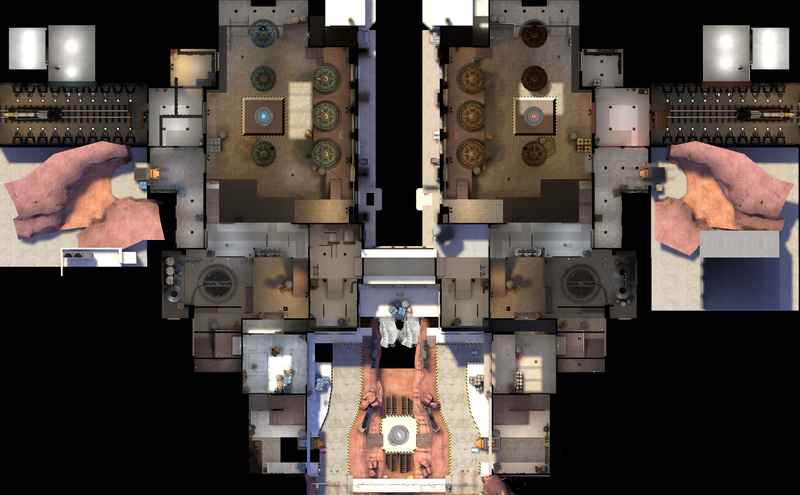
1 End of paths 2 Team sides 3 Water 4 Chokepoint 5 Launch pad room 6 Control room A RED spawn B BLU spawn
|
Process
| Process - overview indicators |
|---|
|
Mouseover the markers to see the name of the location
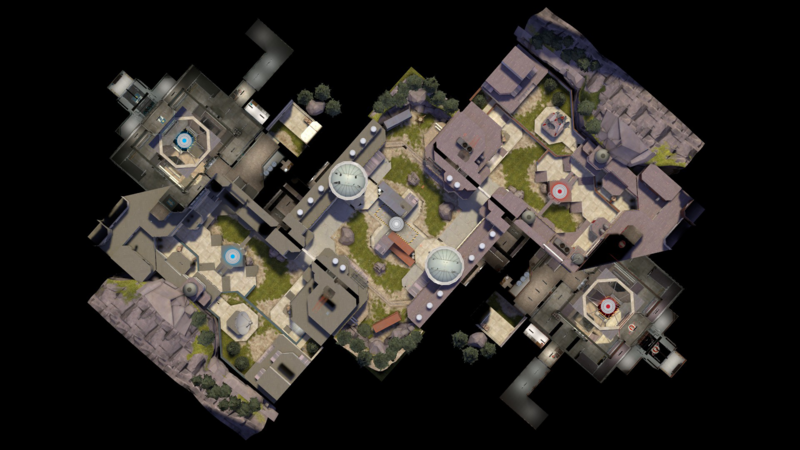
1 Platform 2 Behind 3 Sewers 4 Choke 5 IT/PC 6 Spiral 7 Balcony 8 Rollout 9 Tunnel 10 Upper A RED first spawn B RED second spawn C RED third spawn
|
Sunshine
| Sunshine - overview indicators |
|---|
|
Mouseover the markers to see the name of the location
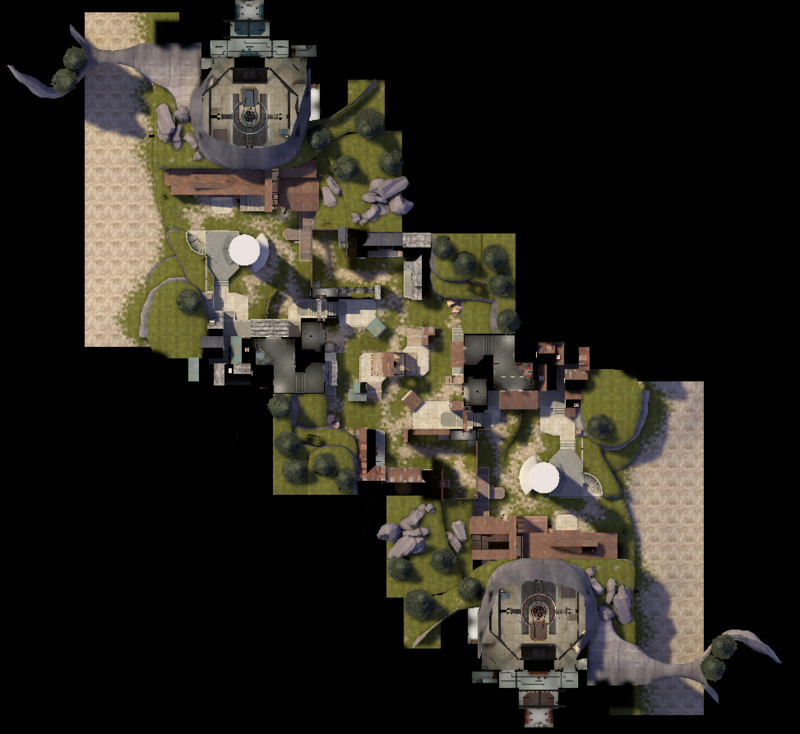
1 Shacks 2 Cafe 3 Chokepoint 4 Valley 5 Platform 6 Staircase 7 Wooden warehouse 8 Elevation 9 Wall 10 Crates A RED first spawn B RED second spawn C RED third spawn
|
Sinshine
| Sinshine - overview indicators |
|---|
|
Mouseover the markers to see the name of the location
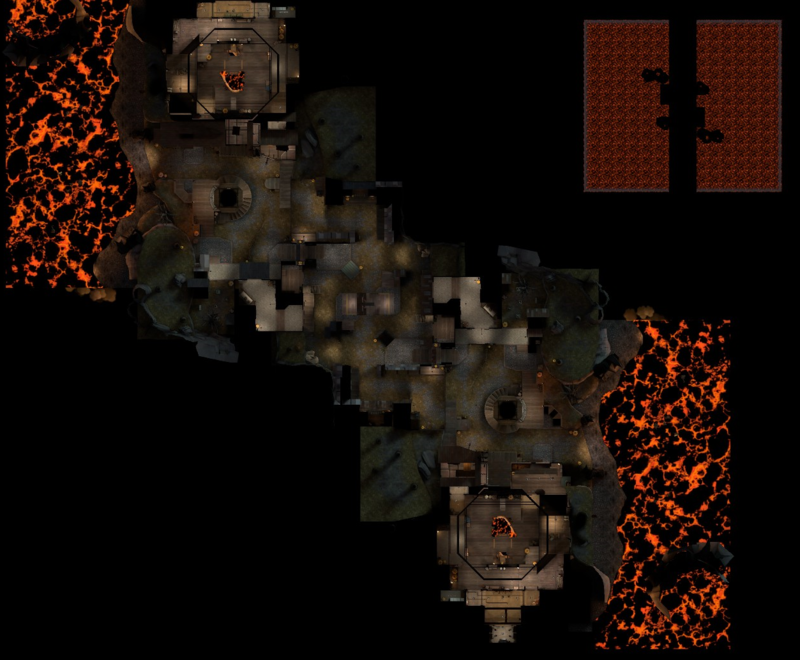
1 Shacks 2 Cafe 3 Chokepoint 4 Valley 5 Platform 6 Staircase 7 Wooden warehouse 8 Elevation 9 Wall 10 Crates A RED first spawn B RED second spawn C RED third spawn
|
Snakewater
| Snakewater - overview indicators |
|---|
|
Mouseover the markers to see the name of the location
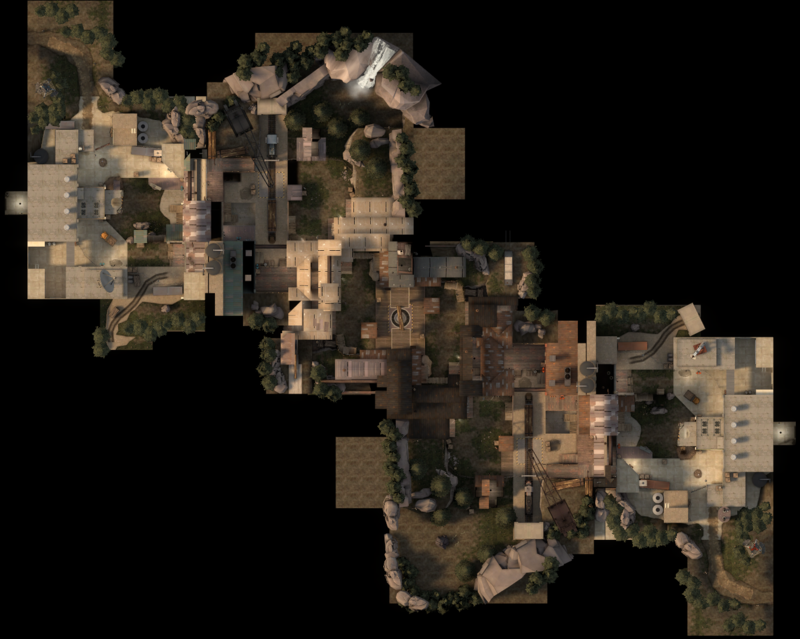
1 Kitchen/Shed 2 House 3 Buildings 4 Main 5 Cliff 6 Lobby 7 Right flank 8 Lower/Main 9 Left flank A RED first spawn B RED second spawn C RED third spawn
|
Vanguard
| Vanguard - overview indicators |
|---|
|
Mouseover the markers to see the name of the location
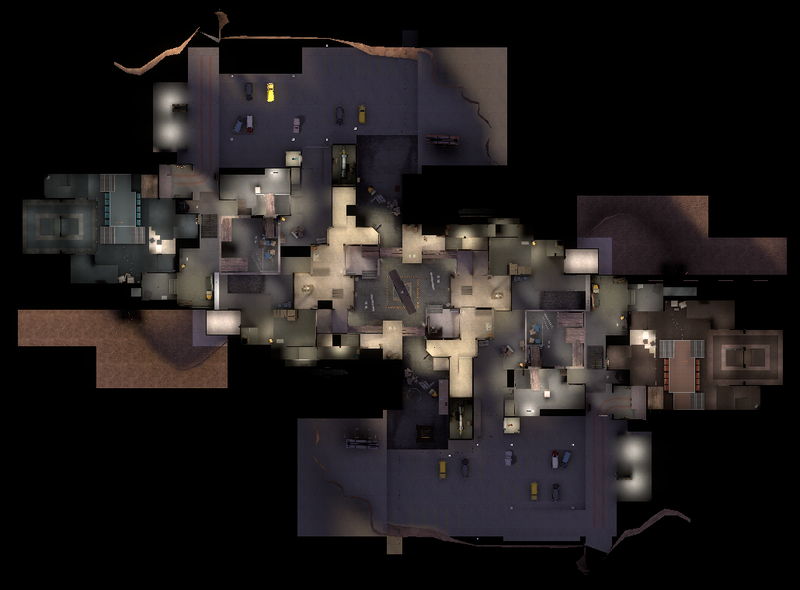
1 Center yard 2 Scaffoldings 3 Right balcony 4 Center Scaffoldings 5 Elevator 6 Left building 7 Observation room 8 Air vent A RED first spawn B RED second spawn C RED third spawn
|
Well (Control point)
| Well (Control point) - overview indicators |
|---|
|
Mouseover the markers to see the name of the location
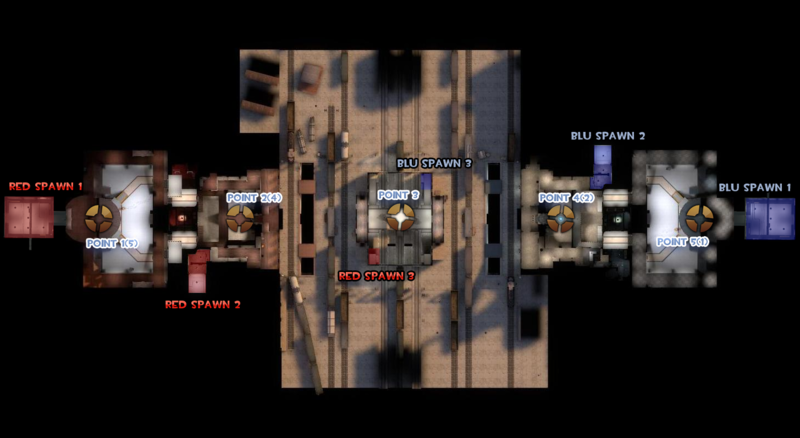
1 Main building 2 Yard 3 Swing door 4 Swing door 5 Battlements 6 Inner lobby 7 Command room 8 Catwalks A RED first spawn B RED second spawn C RED third spawn
|
Yukon
| Yukon - overview indicators |
|---|
|
Mouseover the markers to see the name of the location
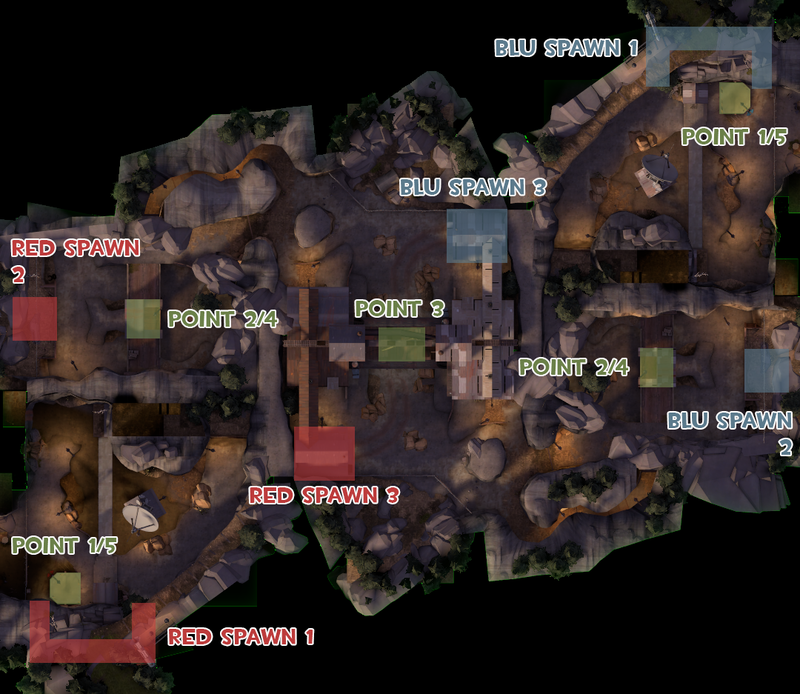
1 Bridge valley 2 Valley 3 Back path 4 Main path 5 Lower tunnel 6 Side tunnel 7 Bridge 8 Basin 9 Right path A RED first spawn B RED second spawn C RED third spawn
|
King of the Hill
Badlands
| Badlands (King of the Hill) - overview indicators |
|---|
|
Mouseover the markers to see the name of the location
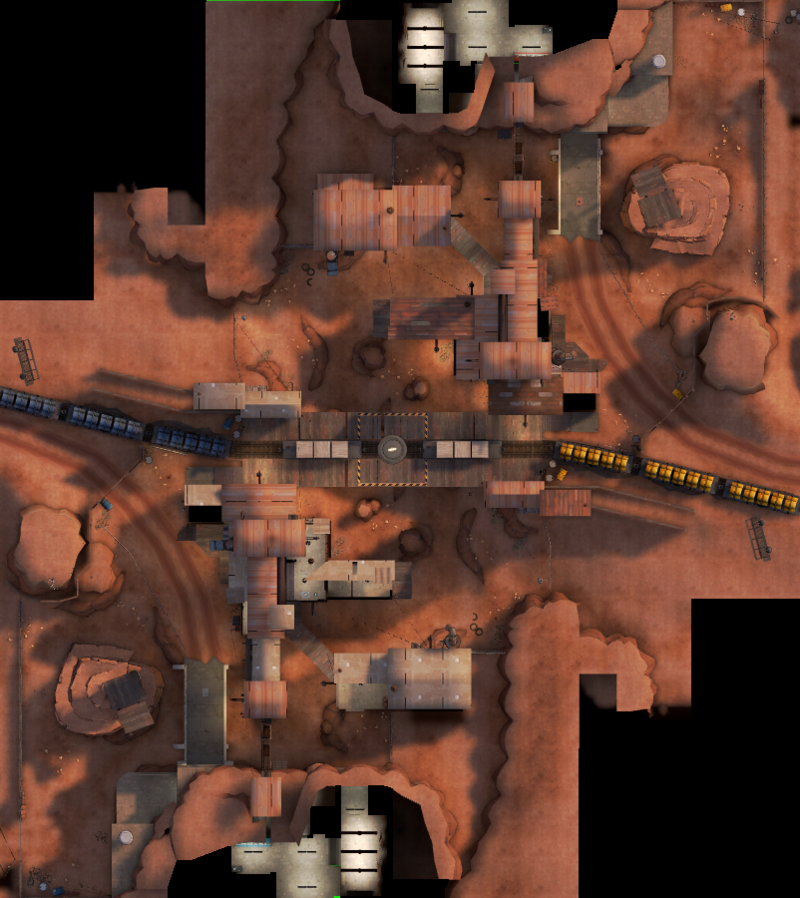
1 Rail cars 2 Rocky pillars 3 Balcony 4 Valley A RED spawn B BLU spawn
|
Brazil
| Brazil - overview indicators |
|---|
|
Mouseover the markers to see the name of the location
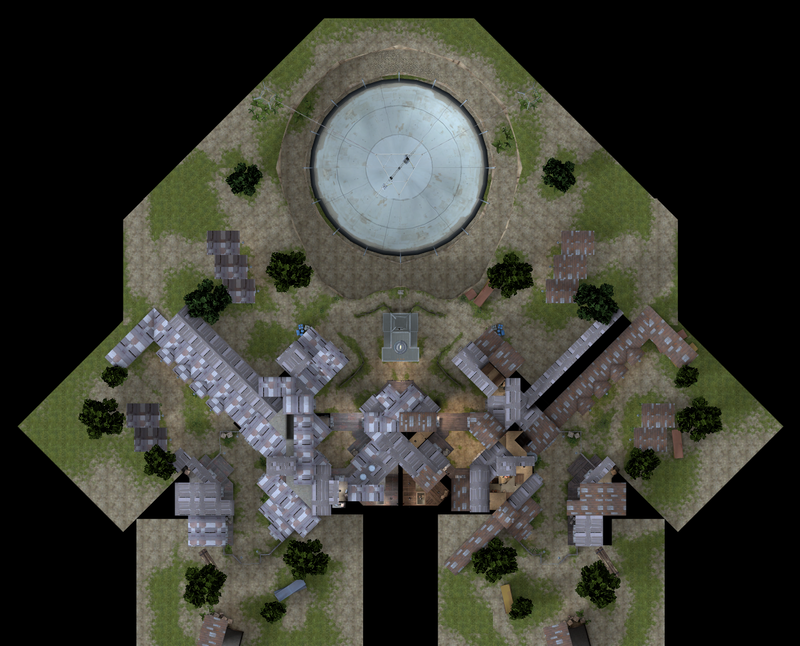
1 Spawn yard 2 Outside route 3 Middle route 4 Inside route 5 Vault room (Above the Alley) 6 Alley 7 Stairwell 8 Hurg perch 9 Coal house 10 Back road A BLU spawn B RED spawn
|
Cauldron
| Cauldron - overview indicators |
|---|
|
Mouseover the markers to see the name of the location
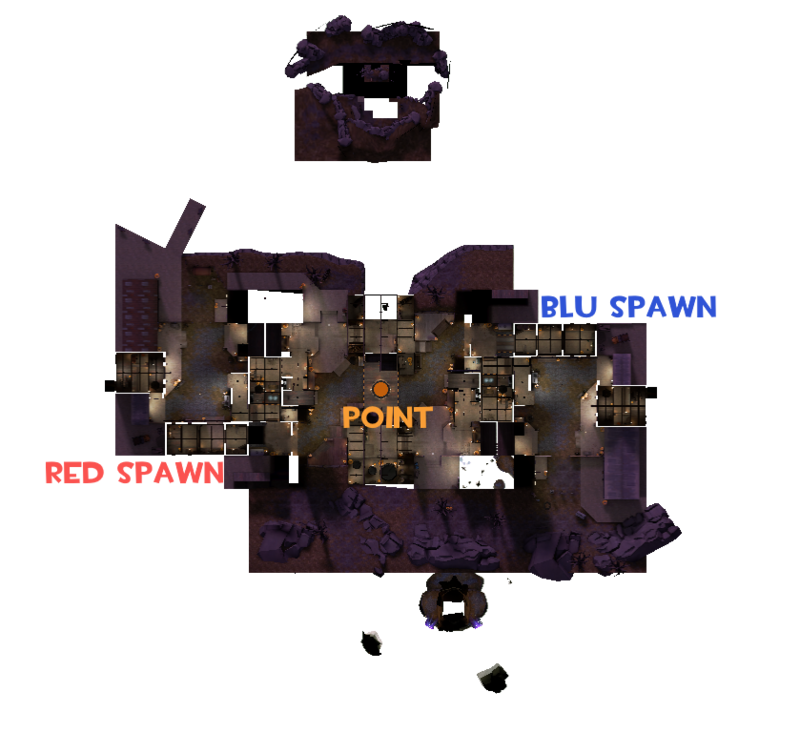
1 Spawn areas 2 Tracks/Ramp 3 Battlements 4 High ground 5 Side buildings A RED spawn B BLU spawn
|
Harvest
| Harvest - overview indicators |
|---|
|
Mouseover the markers to see the name of the location

1 Center shed 2 Farmhouse 3 Side sheds A RED spawn B BLU spawn
|
Harvest Event
| Harvest event - overview indicators |
|---|
|
Mouseover the markers to see the name of the location
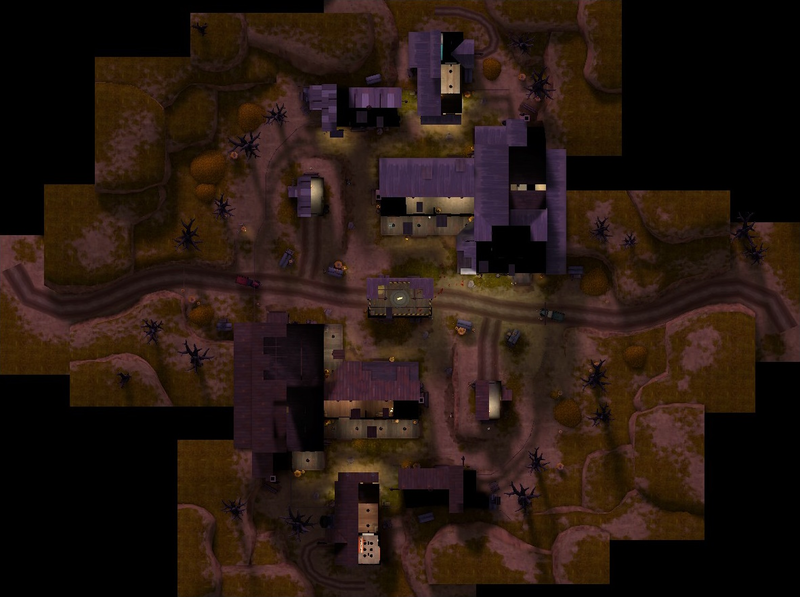
1 Center shed 2 Farmhouse 3 Side sheds A RED spawn B BLU spawn
|
Highpass
| Highpass - overview indicators |
|---|
|
Mouseover the markers to see the name of the location
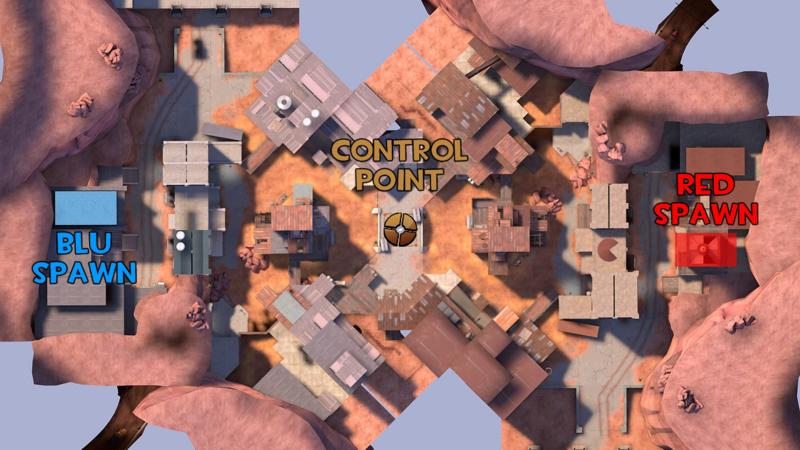
1 Bridge 2 Yard 3 Industrial houses A BLU spawn B RED spawn
|
Kong King
| Kong King - overview indicators |
|---|
|
Mouseover the markers to see the name of the location
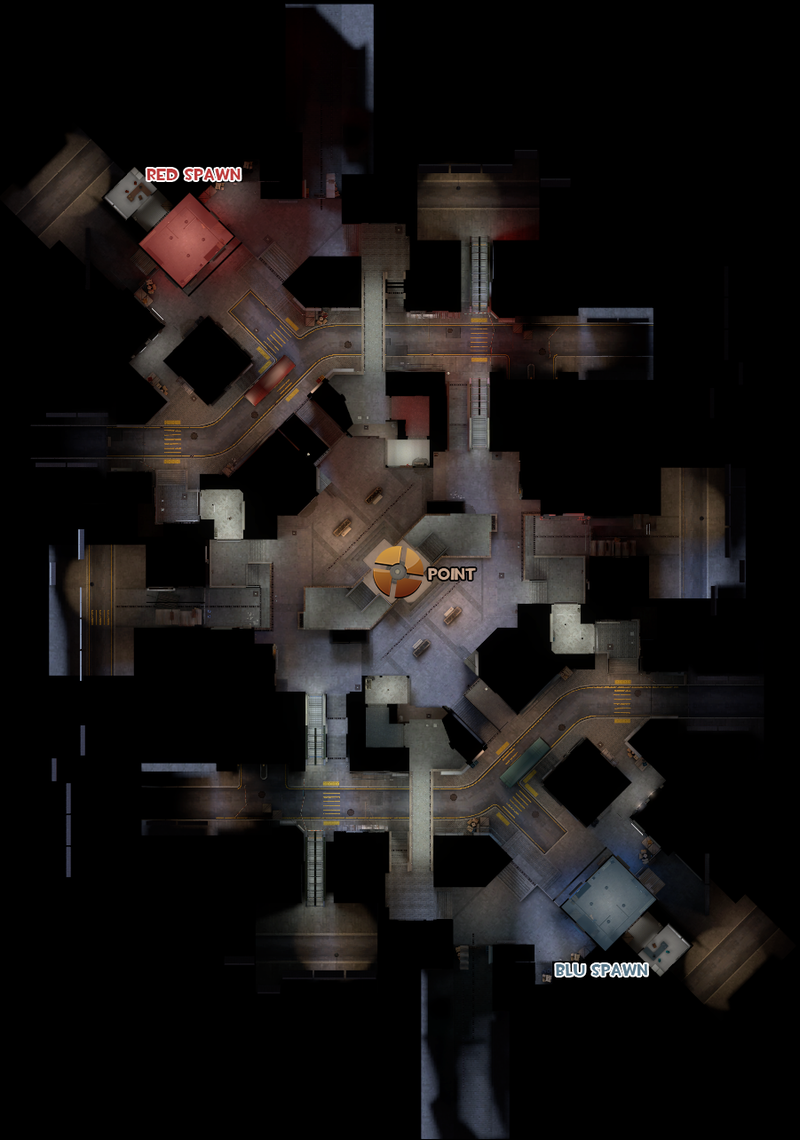
1 Alleyways 2 Buses 3 Covered bridges 4 Double stairs 5 Short stairs 6 Side stairs 7 Pillar rooms A RED spawn B BLU spawn
|
Lakeside
| Lakeside - overview indicators |
|---|
|
Mouseover the markers to see the name of the location
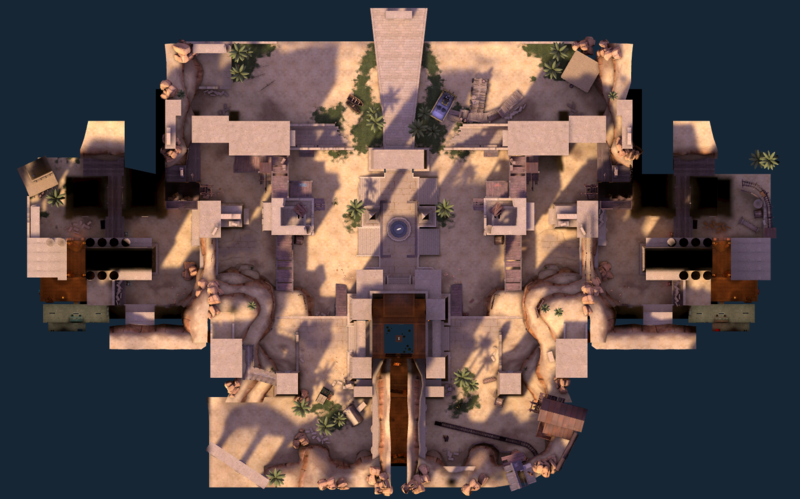
1 Team courtyards 2 Small wooden structure 3 Sandstone archway 4 Winding tunnel 5 Forts 6 Health room 7 Ammunition archway 8 Obelisk 9 Water temple A RED spawn B BLU spawn
|
Ghost Fort
| Ghost Fort - overview images |
|---|
|
Mouseover the markers to see the name of the location
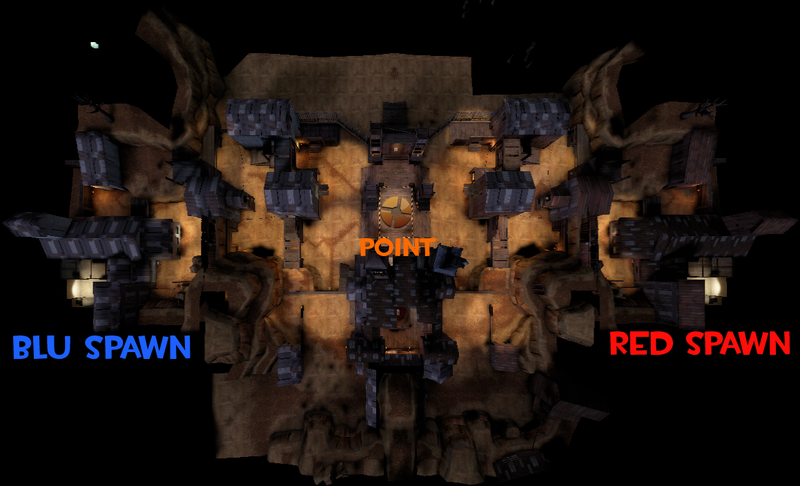
1 Team courtyards 2 Small wooden structure 3 Catwalks archway 4 Winding tunnel 5 Forts 6 Health room 7 Ammunition archway 8 Tower 9 Pit temple A RED spawn B BLU spawn
|
Laughter
| Laughter - overview indicators |
|---|
|
Mouseover the markers to see the name of the location
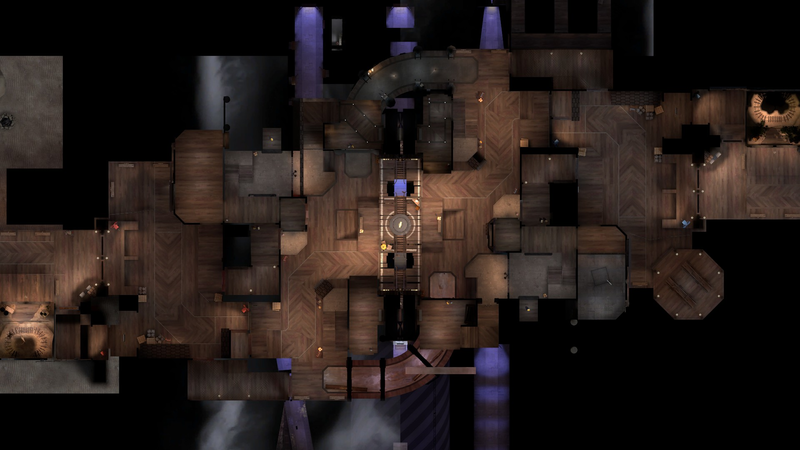
1 Badlands Bandito/Pirate's Blunder 2 Bottle Buster/Pumpkin Smash 3 Spawn Yard 4 Gift Shop/Arcade 5 Robotic Sideshow/Real Live Crocodiles 6 Stairs 7 Mike Toss/Hall of Mirrors 8 Balcony 9 Sawmill of Love/Mad Mansion A BLU spawn B RED spawn
|
Lazarus
| Lazarus - overview indicators |
|---|
|
Mouseover the markers to see the name of the location
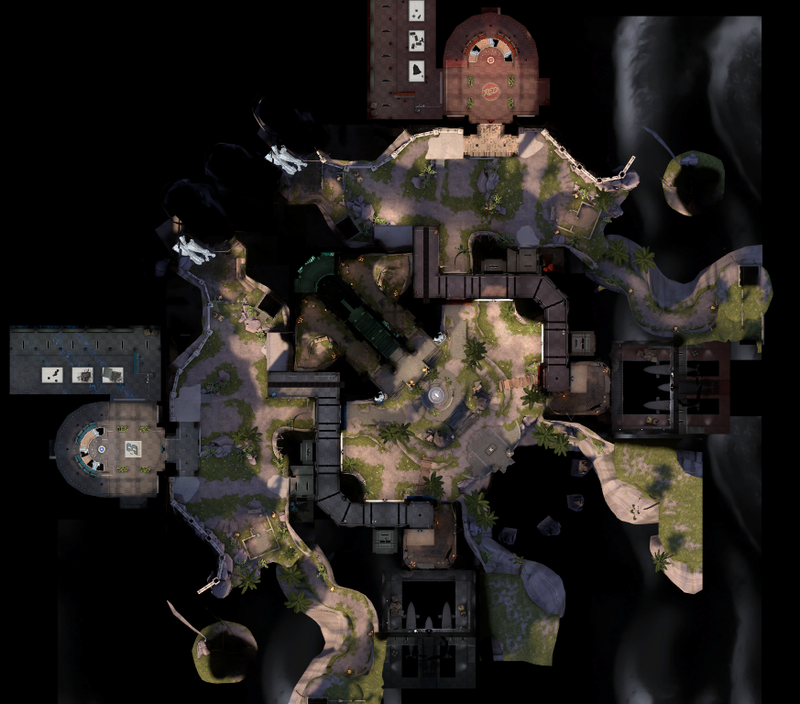
1 Yard 2 Outside exit 3 Low route 4 High rout 5 Digs 6 Corridor 7 Stairs 8 Garage 9 Altar A BLU spawn B RED spawn
|
Maple Ridge Event
| Maple Ridge Event - overview indicators |
|---|
|
Mouseover the markers to see the name of the location

1 Yard 2 Hall 3 Flank fence 4 Library 5 Patio 6 Chapel 7 Pipes 8 Ramp 9 Redmond's house A RED spawn B BLU spawn
|
Megalo
| Megalo - overview indicators |
|---|
|
Mouseover the markers to see the name of the location
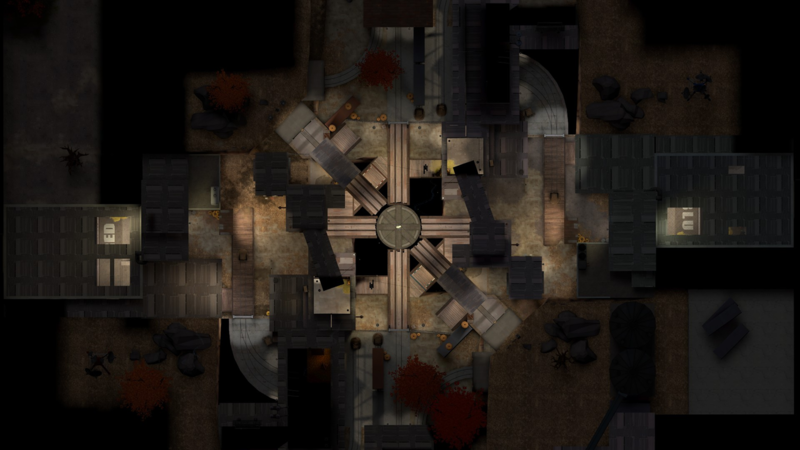
1 Yard 2 Valley 3 Factories A RED spawn B BLU spawn
|
Moldergrove
| Moldergrove - overview indicators |
|---|
|
Mouseover the markers to see the name of the location
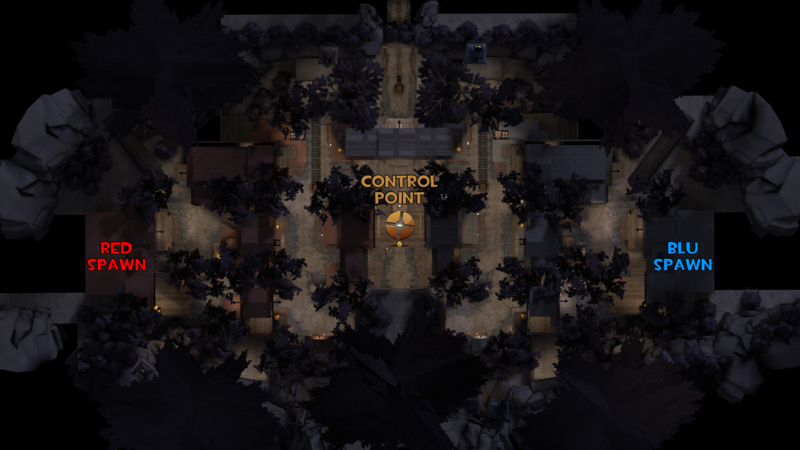
1 Spawn yard 2 Blinski Logging 3 End of the Line 4 Central building 5 Mine Pit 6 Red valley Mountain A RED spawn B BLU spawn
|
Moonshine Event
| Moonshine Event - overview indicators |
|---|
|
Mouseover the markers to see the name of the location
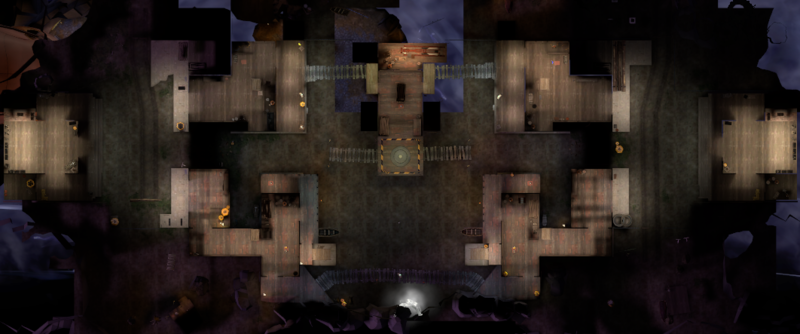
1 Spawn yard 2 Industrial Houses 3 Bayou Shipping House A RED spawn B BLU spawn
|
Nucleus (King of the Hill)
| Nucleus (King of the Hill) - overview indicators |
|---|
|
Mouseover the markers to see the name of the location
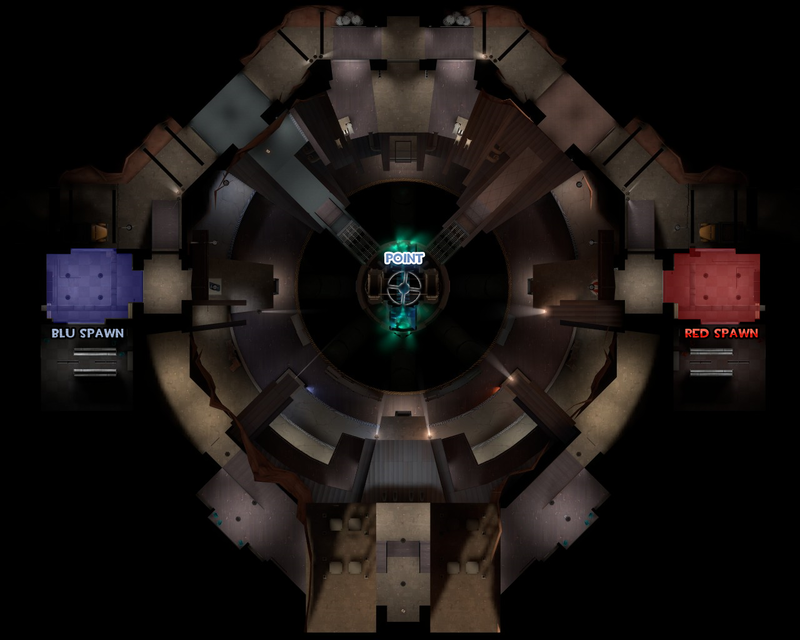
1 Perimiter 2 Roofs 3 Bridges 4 Flank buildings 5 Access Building A RED spawn B BLU spawn
|
Probed
| Probed - overview indicators |
|---|
|
Mouseover the markers to see the name of the location
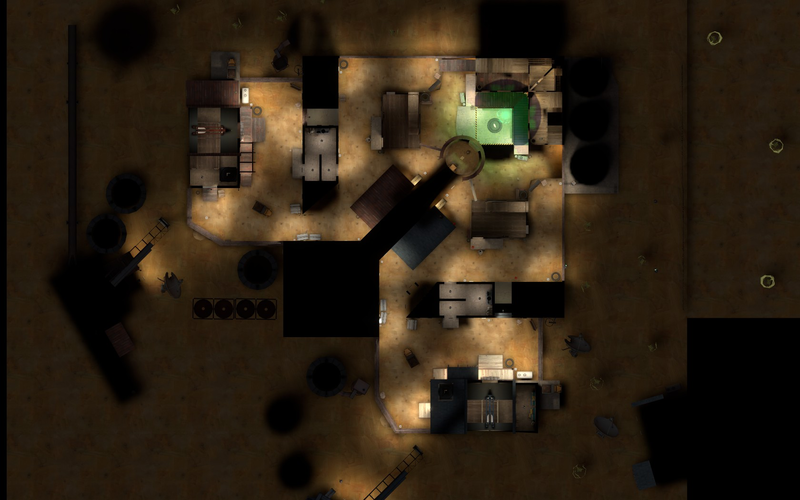
1 Spawn yard 2 Transition Building 3 Sheds 4 Grain Silo A RED spawn B BLU spawn
|
Sawmill (King of the Hill)
| Sawmill (King of the Hill) - overview indicators |
|---|
|
Mouseover the markers to see the name of the location
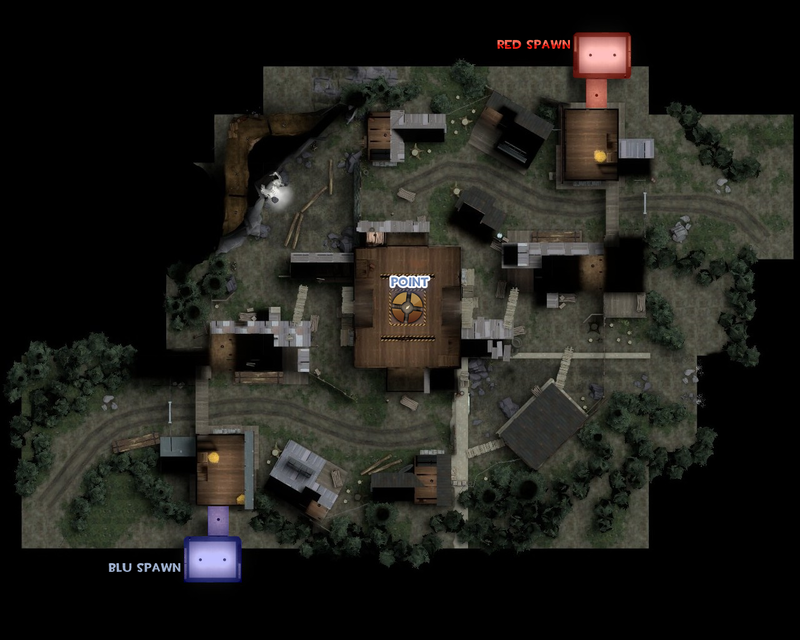
1 Rooftops 2 Cave 3 Waterfall 4 Alcoves 5 Center Shed 6 Log Shed A RED spawn B BLU spawn
|
Slasher
| Slasher - overview indicators |
|---|
|
Mouseover the markers to see the name of the location
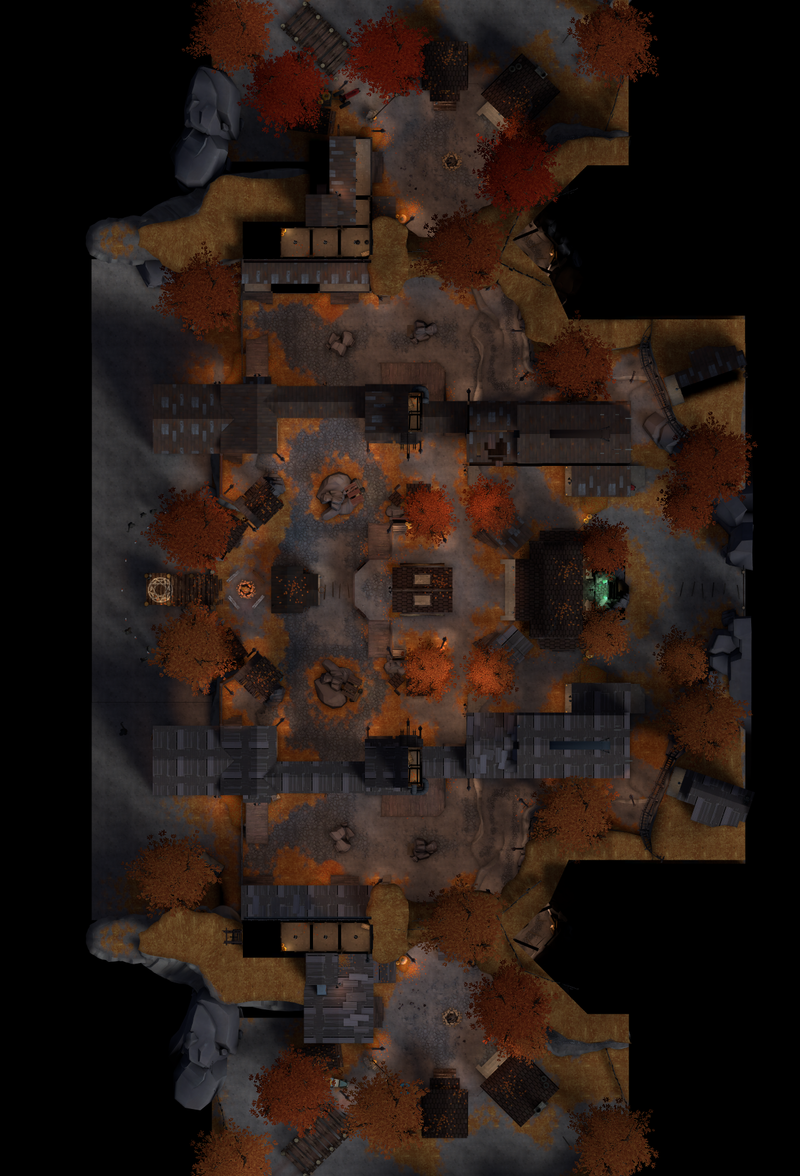
1 Campfire 2 Mines 3 Middle Entrance 4 Boat Rentals 5 Maintance 6 Boat dock 7 Bonfire 8 Supply Shed 9 Ramps 10 Ranger Lodge A RED spawn B BLU spawn
|
Suijin
| Suijin - overview indicators |
|---|
|
Mouseover the markers to see the name of the location
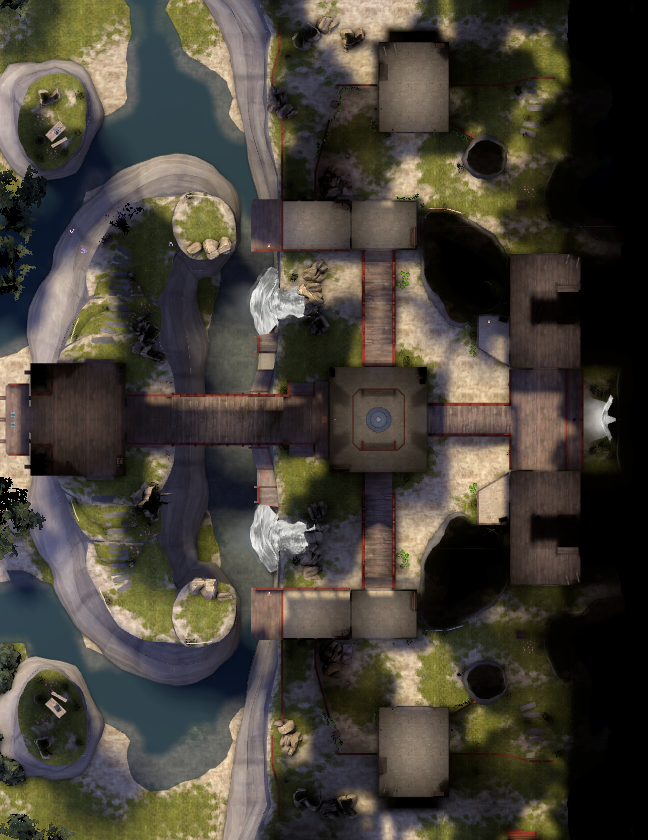
1 Far Islands 2 Cliffside Temple 3 Bamboo Buildings 4 Temple Tower 5 Calligraphy Temple A RED spawn B BLU spawn
|
Viaduct
| Viaduct - overview indicators |
|---|
|
Mouseover the markers to see the name of the location
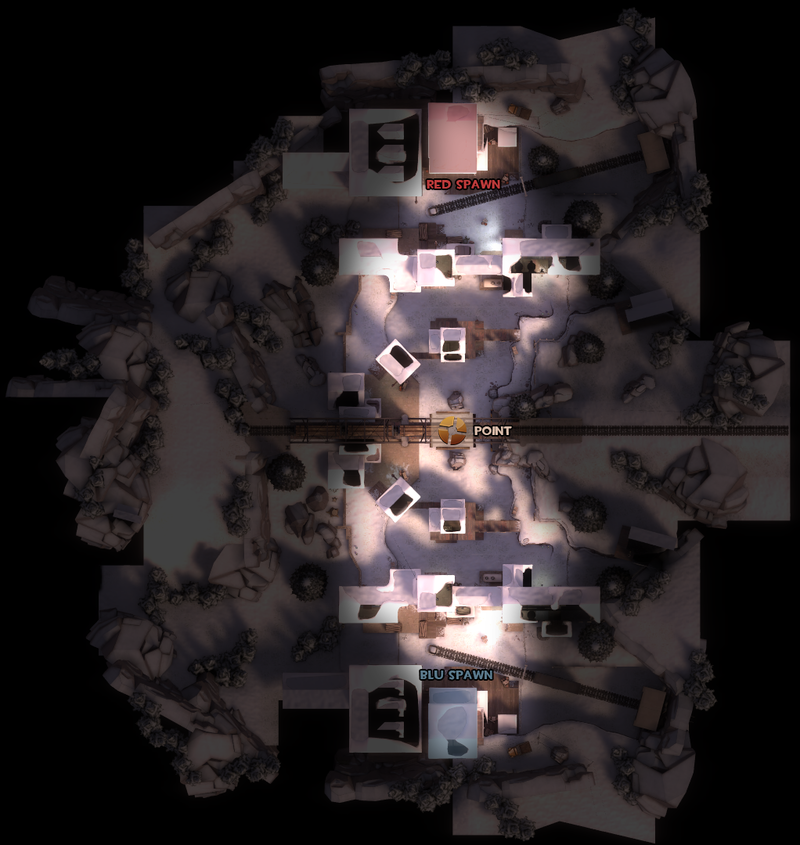
1 Spawn Yard 2 Transition building 3 Valley 4 Scullery (House) 5 Stairs 6 Hills 7 Summit with the point A RED spawn B BLU spawn
|
Sinthetic
| Sinthetic - overview indicatros |
|---|
|
Mouseover the markers to see the name of the location
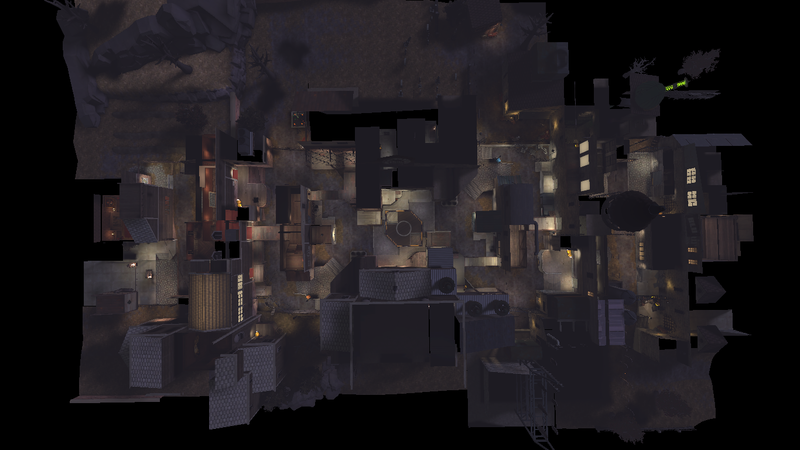
1 Spawn Yard 2 Transitional Building 3 Valley 4 House 5 Flanks 6 Tunnels A RED spawn B BLU spawn
|
Los Muertos
| Los Muertos - overview indicators |
|---|
|
Mouseover the markers to see the name of the location
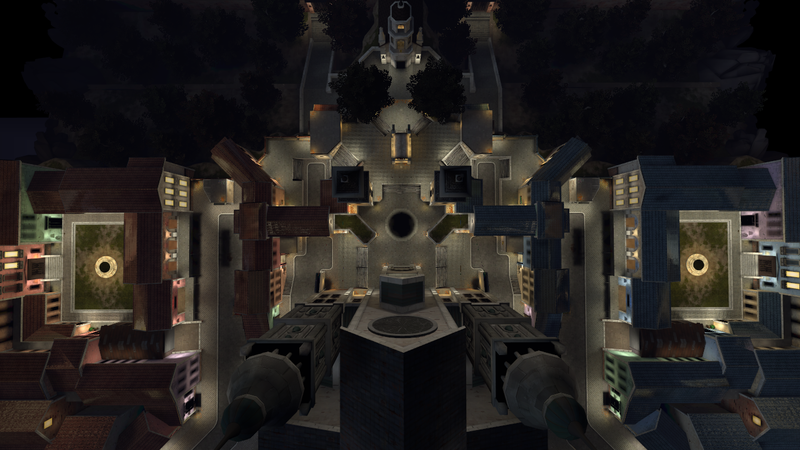
1 Bus 2 Terminal 3 Bakery 4 Alley (And the Balcony) 5 House 6 Street 7 Belltower 8 Cathedral (And the Sarcophagus (Tomb)) 9 Entrance 10 Town Square 11 Planters 12 Crypt 13 Church A RED spawn B BLU spawn
|
Capture the Flag
2Fort
| 2Fort - overview indicators |
|---|
|
Mouseover the markers to see the name of the location

1 Bridge 2 Entrance 3 Battlements 4 Grate 5 Entrance side room 6 Courtyard 7 Stairs 8 Basement 9 Spiral 10 Intelligence Room 11 Sewer exit A BLU spawn B BLU spawn C RED spawn D RED spawn
|
2Fort Invasion
| 2Fort Invasion - overview indicators |
|---|
|
Mouseover the markers to see the name of the location
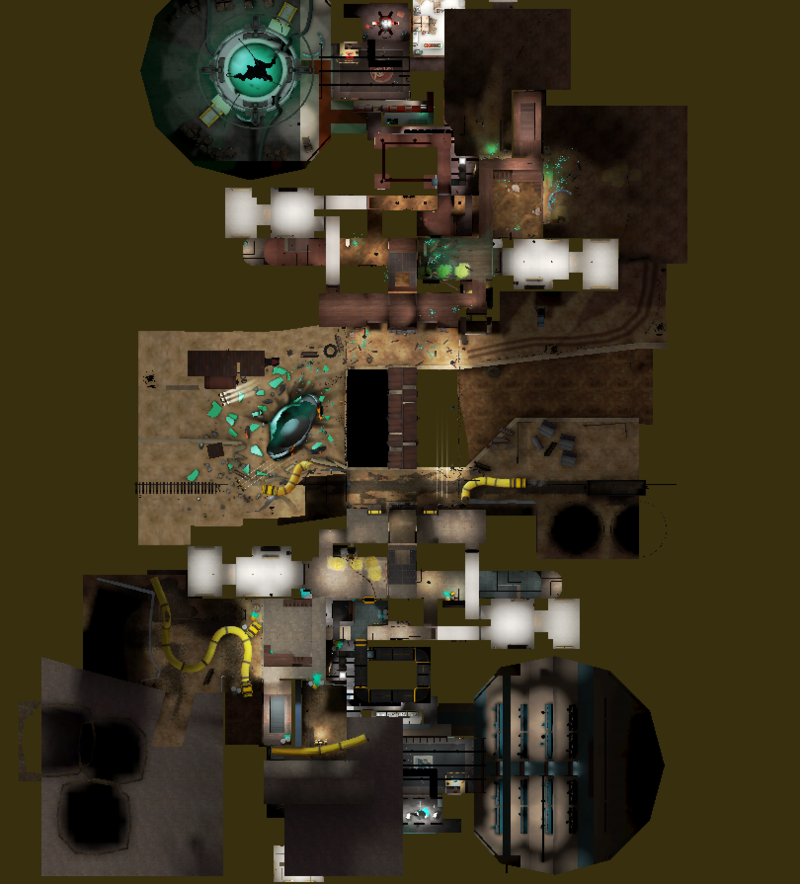
1 Bridge 2 Entrance 3 Battlements 4 Grate 5 Entrance side room 6 Courtyard 7 Stairs 8 Basement 9 Spiral 10 Intelligence Room 11 Sewer exit A BLU spawn B BLU spawn C RED spawn D RED spawn
|
Double Cross
| Double Cross - overview indicators |
|---|
|
Mouseover the markers to see the name of the location
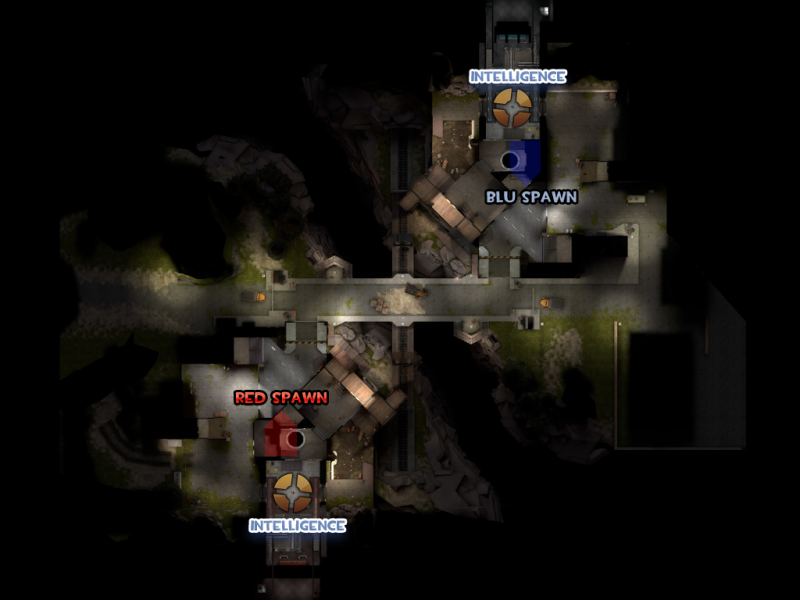
1 Main Bridge 2 Train Bridge 3 Battlements 4 Courtyard 5 Intelligence room A RED spawn B BLU spawn
|
Landfall
| Landfall - overview indicators |
|---|
|
Mouseover the markers to see the name of the location
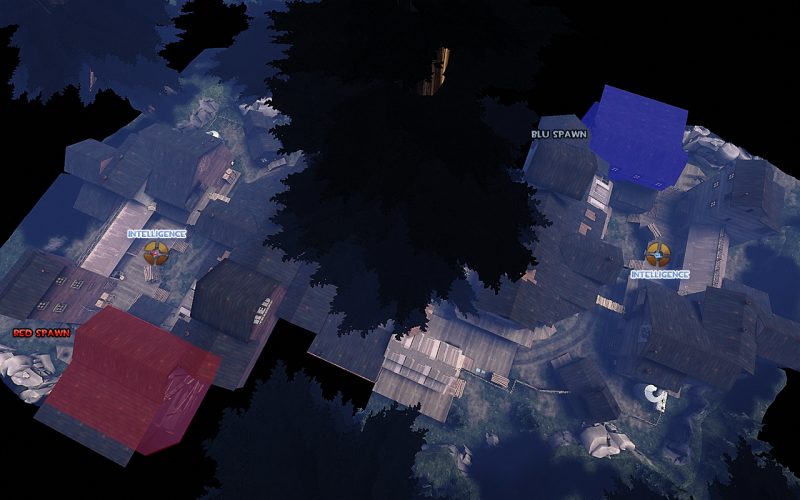
1 Tree 2 Resources deck 3 Lumber Building 4 Side route 5 Shack 6 Courtyard 7 Rooftops A RED spawn B BLU spawn
|
Snowfall
| Snowfall - overview indicators |
|---|
|
Mouseover the markers to see the name of the location
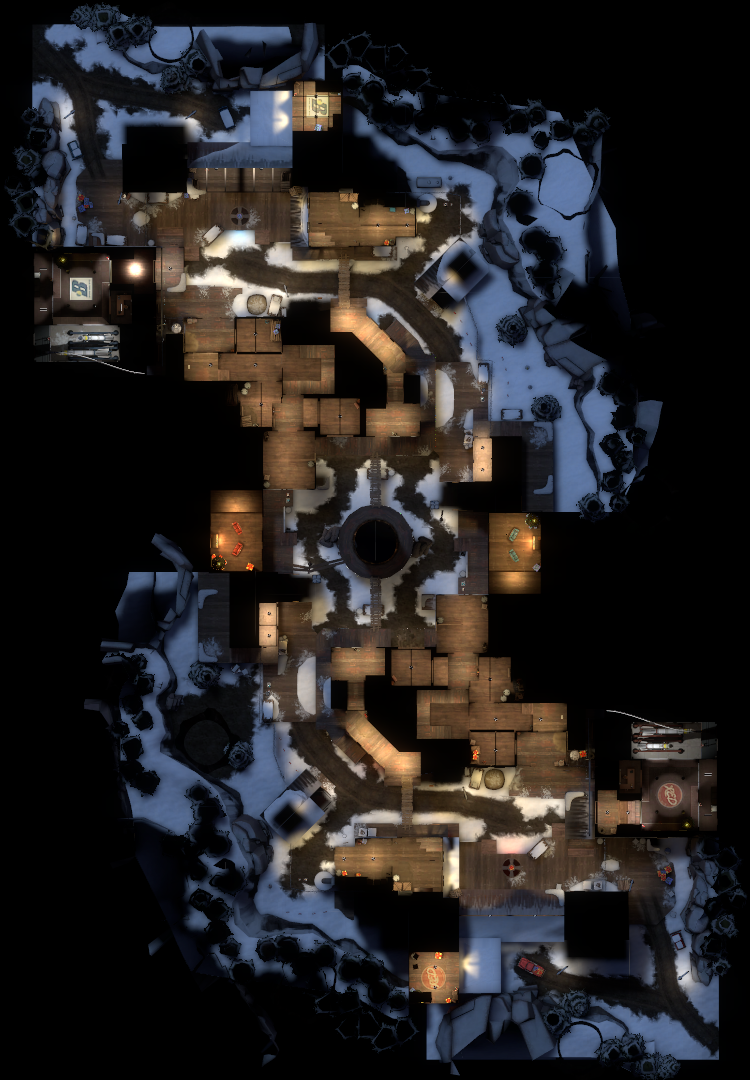
1 Tree 2 Resources deck 3 Lumber Building 4 Side route 5 Shack 6 Courtyard 7 Rooftops A BLU spawn B RED spawn
|
Sawmill (Capture the Flag)
| Sawmill (Capture the Flag) - overview indicators |
|---|
|
Mouseover the markers to see the name of the location
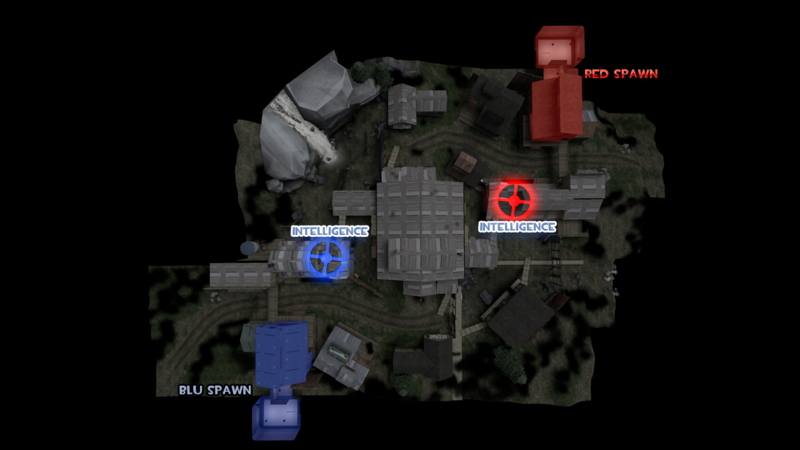
1 Rooftops 2 Cave 3 Watterfall 4 Alcoves 5 Center Shed 6 Log Shed A BLU spawn B RED spawn
|
Turbine
| Turbine - overview indicators |
|---|
|
Mouseover the markers to see the name of the location
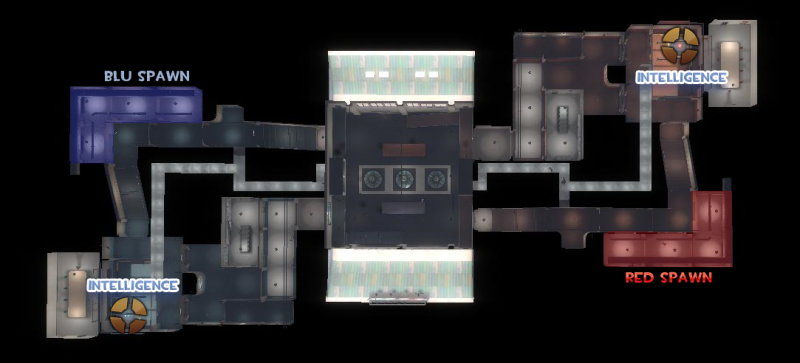
1 Turbines 2 Alcoves 3 Balcony 4 Vents 5 Main Hallway 6 Raised Platform A BLU spawn B RED spawn
|
Well (Capture the Flag)
| Well (Control point) - overview indicators |
|---|
|
Mouseover the markers to see the name of the location
1 Main building 2 Yard 3 Swing door 4 Swing door 5 Battlements 6 Inner lobby 7 Command room 8 Catwalks A RED first spawn B RED second spawn C RED third spawn
|
Player Destruction
Farmagddon
| Farmageddon - overview indicators |
|---|
|
Mouseover the markers to see the name of the location
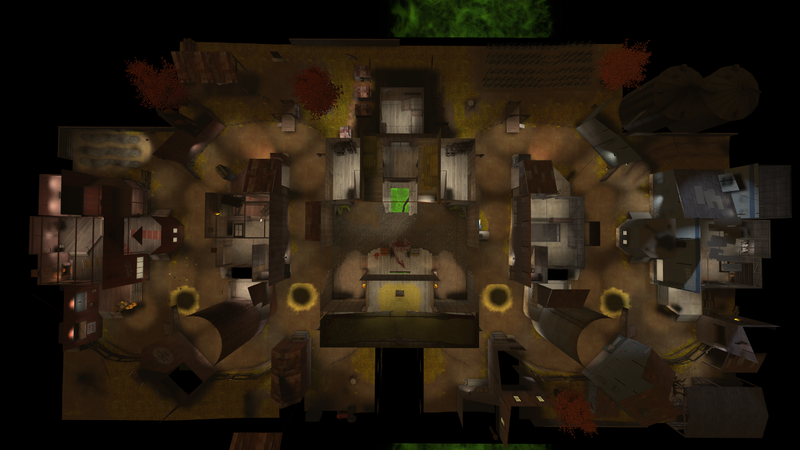
1 Grain Shed 2 Road 3 Hayrack Ride 4 Combine 5 Machine Shed 6 Machine room A RED spawn B BLU spawn
|
SnowVille
| SnowVille . overview indicators |
|---|
|
Mouseover the markers to see the name of the location
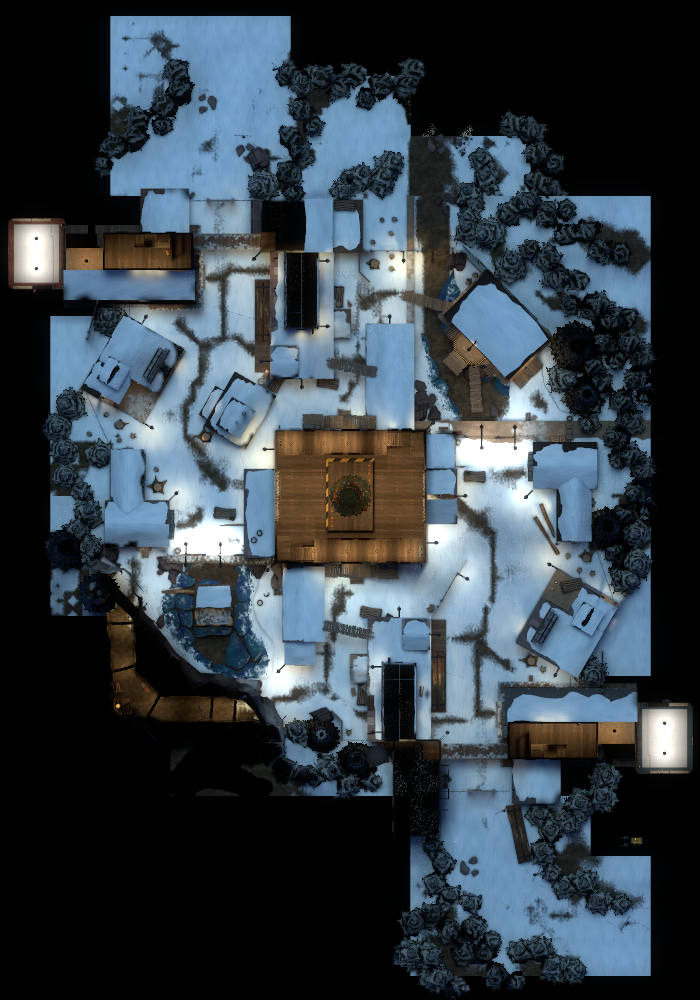
1 Wood Shed 2 Rooftops 3 Garage 4 Coal Shed 5 Alcoves 6 Center Shed 7 Sewers 8 Small Delivery Zone 9 Cave A RED spawn B BLU spawn
|
Cursed Cove
| Cursed Cove - overview indicators |
|---|
|
Mouseover the markers to see the name of the location
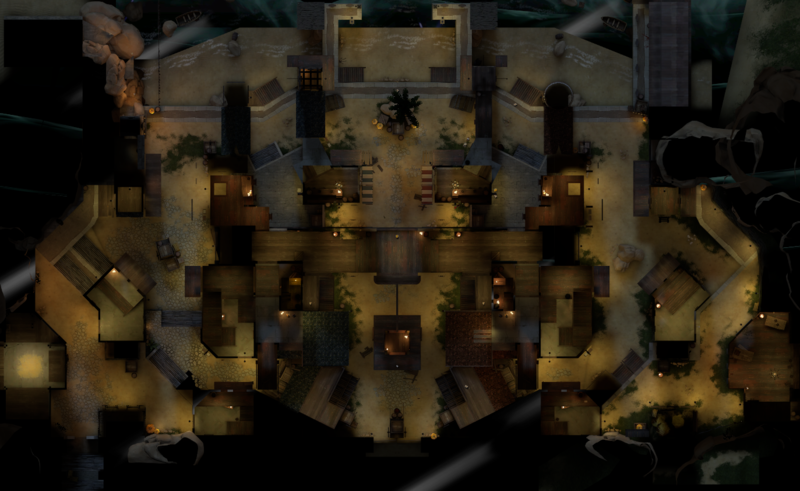
1 Beach 2 Docks 3 Port 4 Gate 5 Courtyard A BLU spawn B RED spawn
|
Monster Bash
| Monster Bash - overview indicators |
|---|
|
Mouseover the markers to see the name of the location
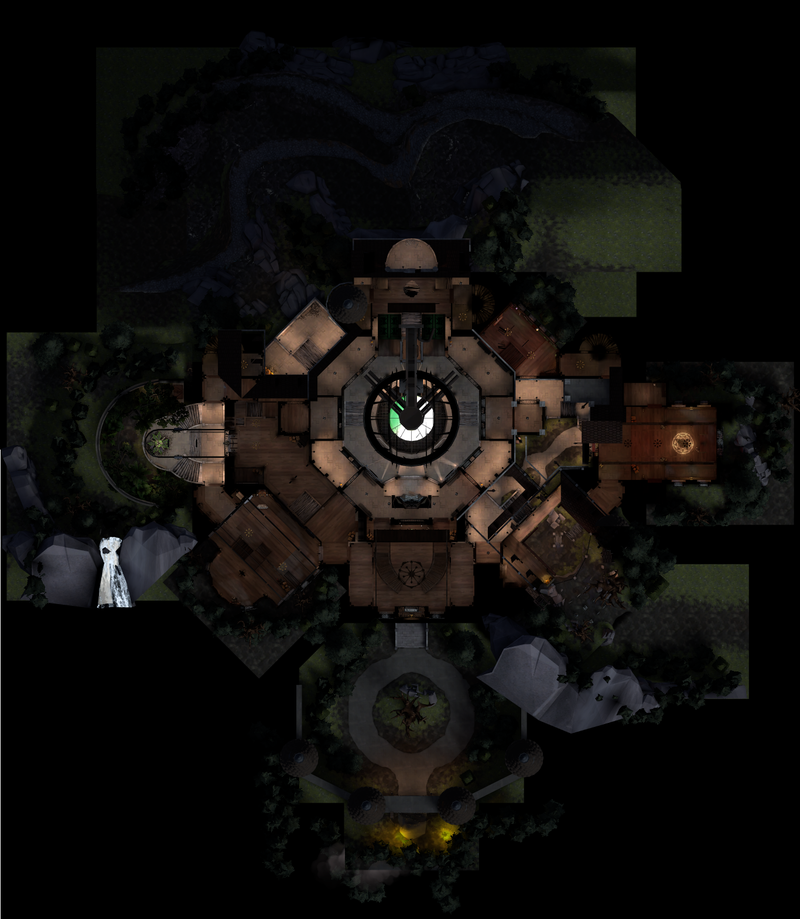
1 Chemicals 2 Courtyard 3 Causeway 4 Grand Foyer 5 Lab 6 Ballroom 7 Balcony 8 Patio 9 Gallery 10 Library A BLU spawn B RED spawn
|
Pit of Death
| Pit of Death - overview indicators |
|---|
|
Mouseover the markers to see the name of the location
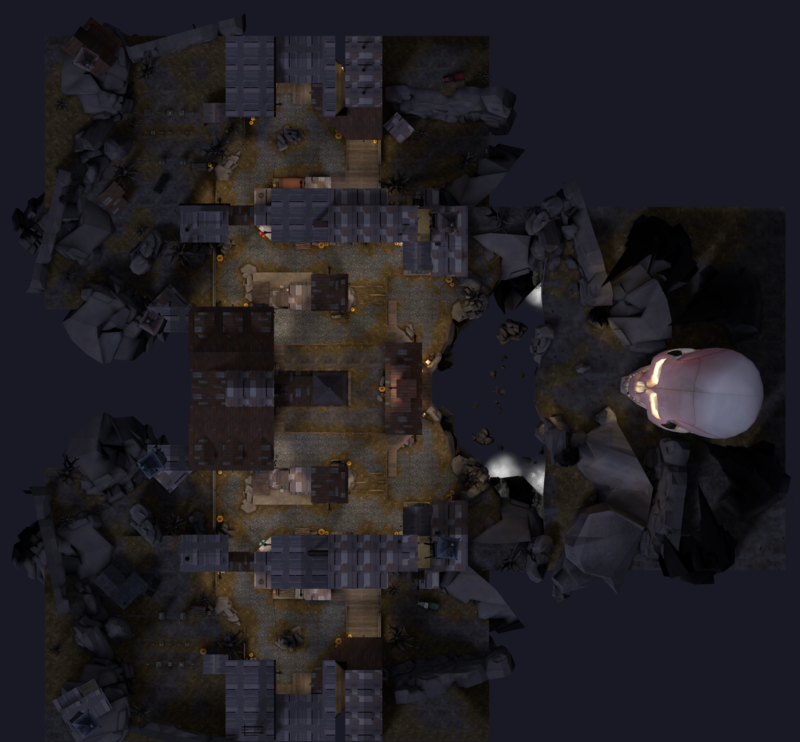
1 Courtyard 2 Bridge Route 3 Dock Route 4 Staircase 5 Rooftops (Above)/Hallway (Below) 6 Ledges 7 Pit Access 8 Basemenet 9 Pit Flanks 10 Overlook Building 11 Broken Bridge A RED spawn B BLU spawn
|
Watergate
| Watergate - overview indicators |
|---|
|
Mouseover the markers to see the name of the location
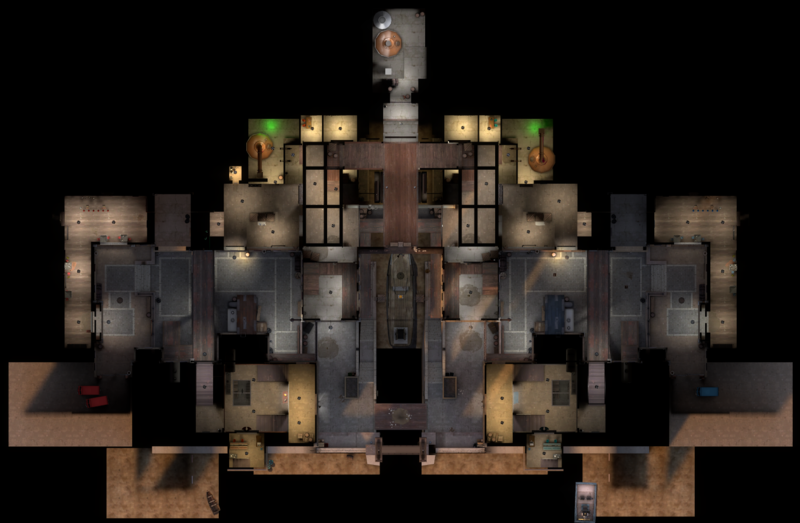
1 Open Alley 2 Catwalk 3 Gatehouse 4 Dropoff 5 Central Corridors 6 Cellars (Entrance) 7 Sewers 8 Overhead Bar (Above)/Central Sewer (Below) 9 Dilapidated Boat 10 Overhead Catwalks A RED spawn B BLU spawn
|
Arena
Lumberyard
| Lumberyard - overview indicators |
|---|
|
Mouseover the markers to see the name of the location

1 Cliff Side 2 Central Building 3 Mountain Side
|
Graveyard
| Graveyard - overview indicators |
|---|
|
Mouseover the markers to see the name of the location
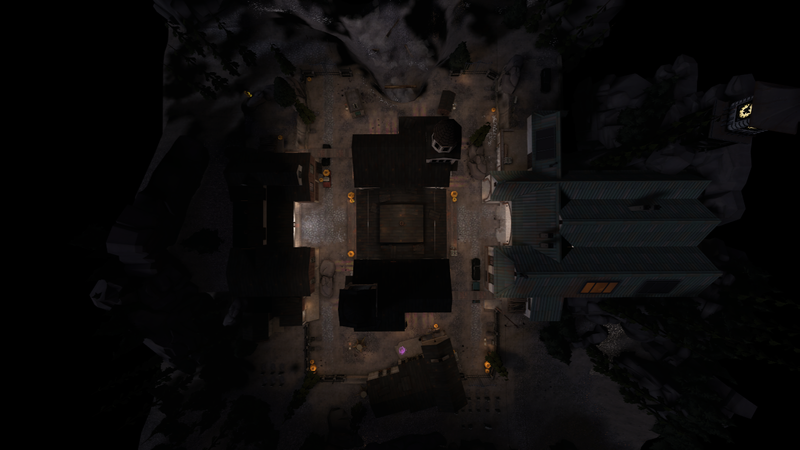
1 Cliff Side 2 Charnel Church 3 Mountain Side A RED spawn B BLU spawn
|
Badlands (Arena)
| Badlands (Arena) - overview indicators |
|---|
|
Mouseover the markers to see the name of the location
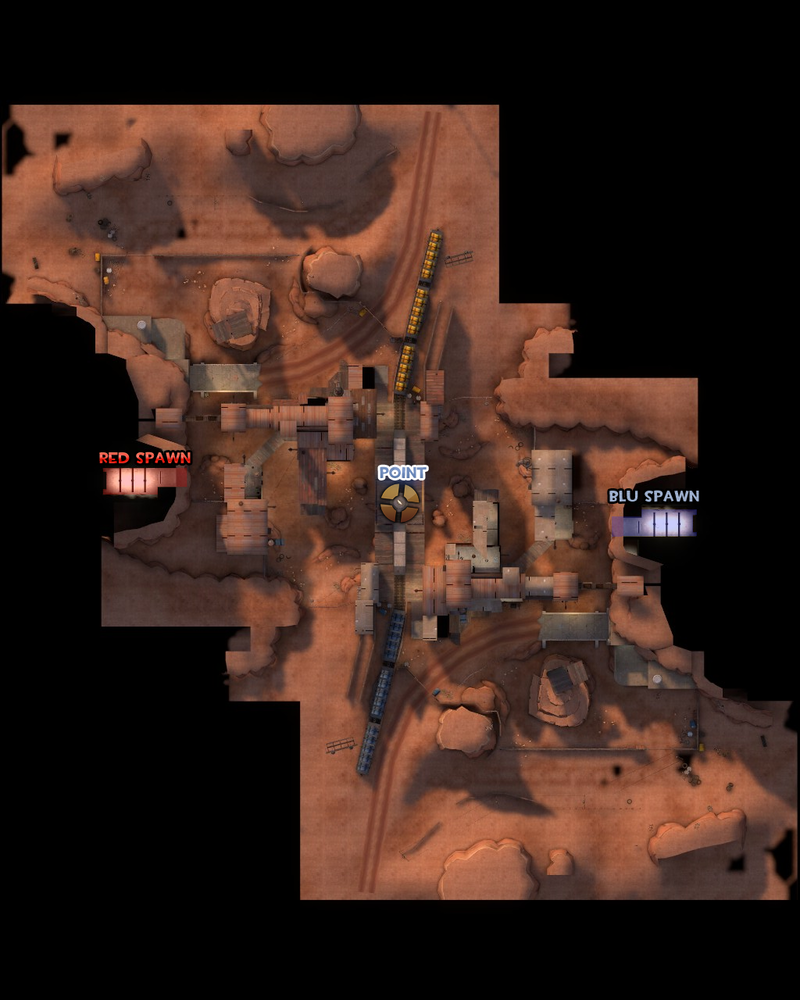
1 Closet 2 Rail Cars 3 Bridge 4 Pillars 5 House 6 Valley 7 Well 8 Spire (Blocked off)
|
Byre
| Byre - overview indicators |
|---|
|
Mouseover the markers to see the name of the location
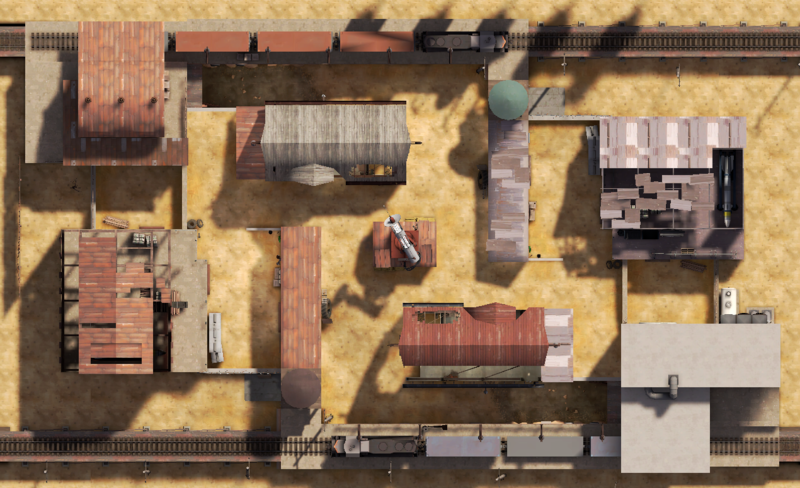
1 Ditch 2 Tool Barn 3 Tool Shed 4 Death ray A RED spawn B BLU spawn
|
Watchtower
| Watchtower - overview indicators |
|---|
|
Mouseover the markers to see the name of the location
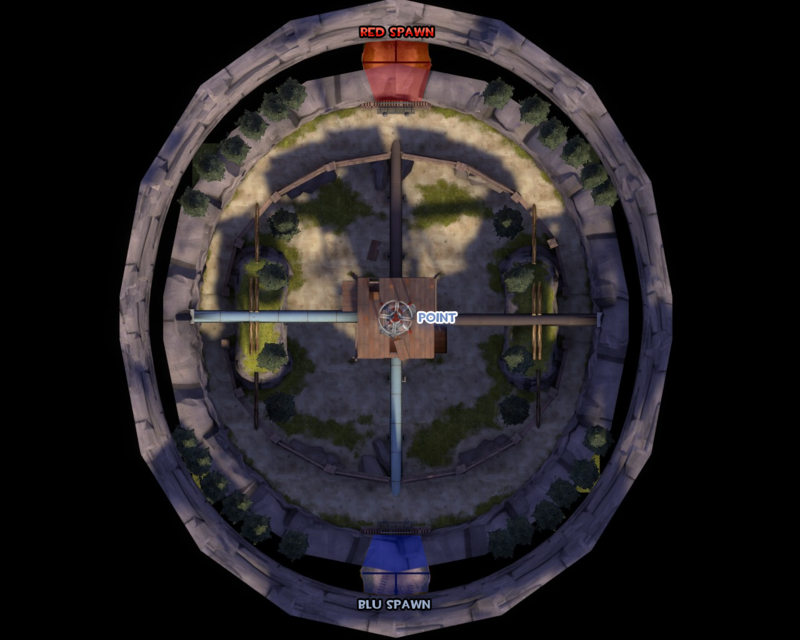
1 Tower Shack 2 Lower Pipe 3 Higher Pipe 4 Center Valley 5 External Ring
|
Granary (Arena)
| Granary (Arena) - overview indicators |
|---|
|
Mouseover the markers to see the name of the location
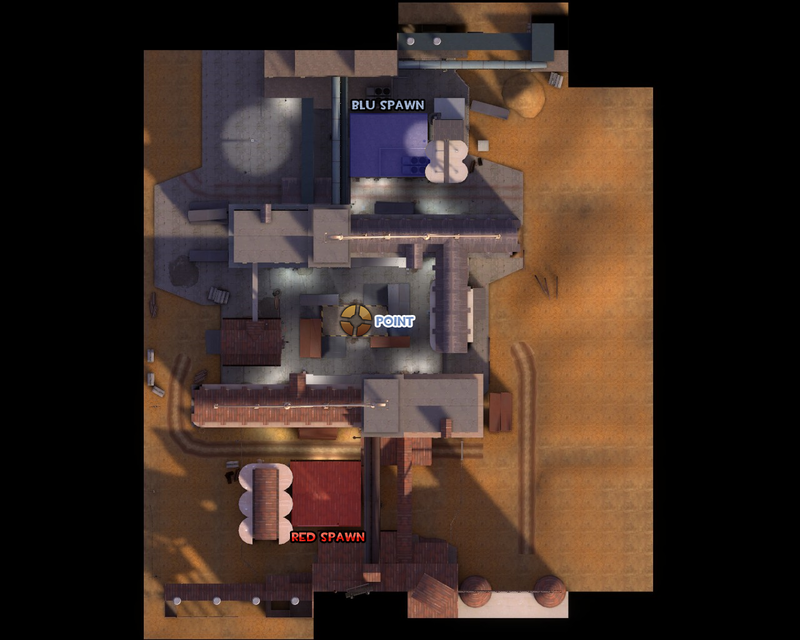
1 Ledge 2 Choke 3 Garage 4 Catwalks 5 Crates
|
Nucleus (Arena)
| Nucleus (Arena) - overview indicators |
|---|
|
Mouseover the markers to see the name of the location
1 Perimiter 2 Roofs 3 Bridges 4 Flank buildings 5 Access Building
|
Offblast
| Offblast - overview indicators |
|---|
|
Mouseover the markers to see the name of the location
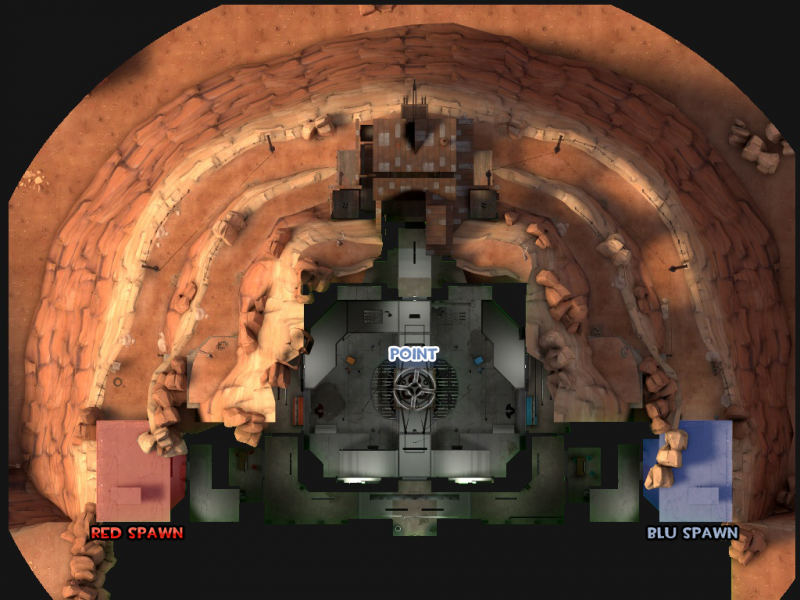
1 House 2 Cliff-Side 3 Top Floor 4 Main Floor 5 Top Floor
|
Ravine
| Ravine - overview indicators |
|---|
|
Mouseover the markers to see the name of the location
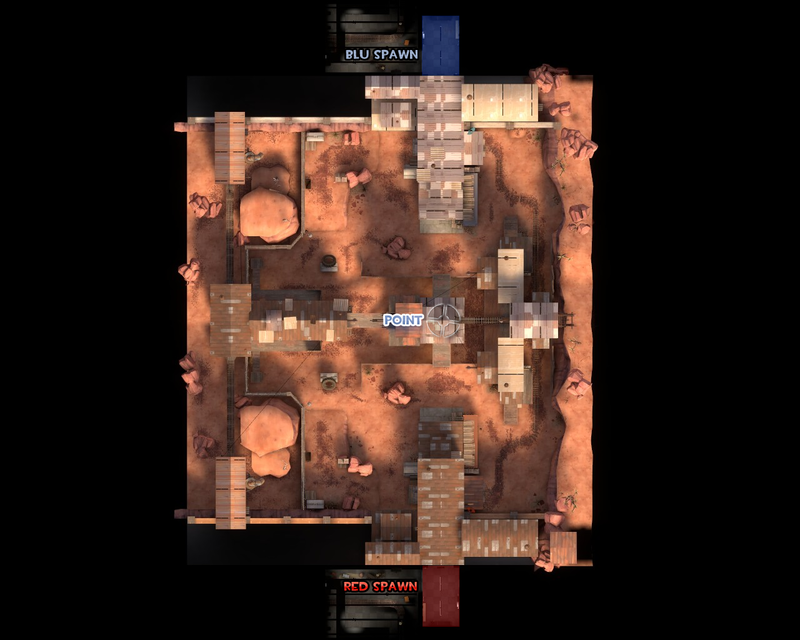
1 Yard 2 House 3 Shack 4 Well
|
Sawmill (Arena)
| Sawmill (Arena) - overview indicators |
|---|
|
Mouseover the markers to see the name of the location
1 Rooftops 2 Cave 3 Waterfall 4 Alcoves 5 Center Shed 6 Log Shed A RED spawn B BLU spawn
|
Well (Arena)
| Well (Arena) - overview indicators |
|---|
|
Mouseover the markers to see the name of the location
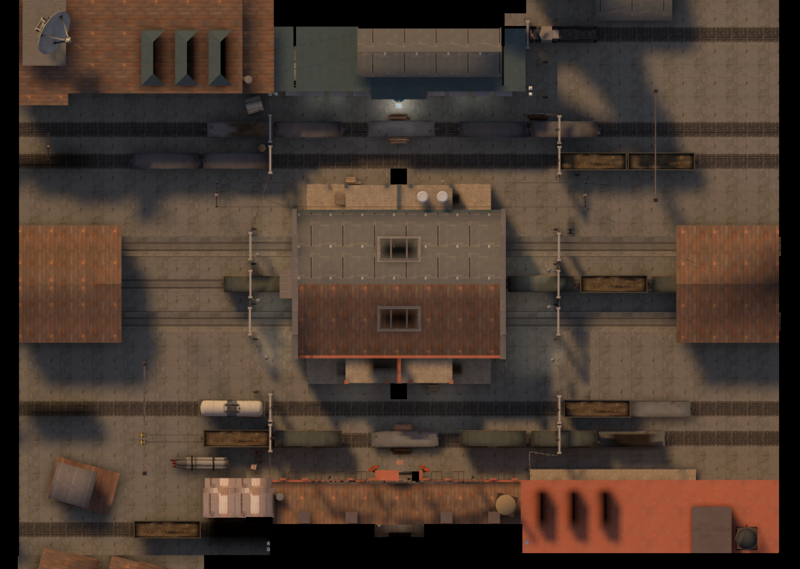
1 Boxcars 2 Waterways 3 Battlements 4 Train Rails 5 Catwalk A BLU spawn B RED spawn
|
Mann versus Machine
Big Rock
| Big Rock - overview indicators |
|---|
|
Mouseover the markers to see the name of the location
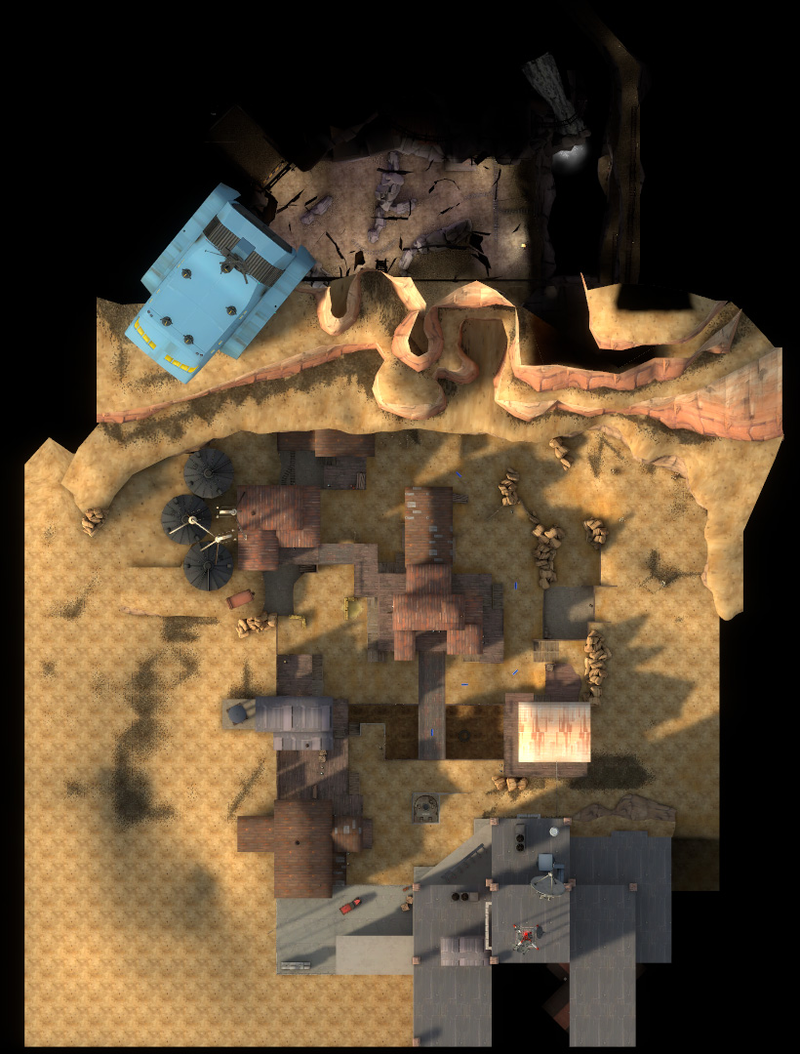
1 Left Catwalk 2 Center Bridge 3 Right Catwalk 4 Right Lane 5 Casali Shafting Co. 6 Left Lane 7 Entrance 8 Robot Cave A RED spawn B Robot spawn C Tank spawn
|
Coal Town
| Coal Town - overview indicators |
|---|
|
Mouseover the markers to see the name of the location

1 Left Side Hotel 2 Mining Accident Simulator 3 Right Side Mann Mining 4 Right Lane 5 Salt Rock Interior 6 Rooftop 7 Left Lane A RED spawn B RED spawn C Robot/Tank spawn
|
Ghost Town
| Ghost Town - overview indicators |
|---|
|
Mouseover the markers to see the name of the location
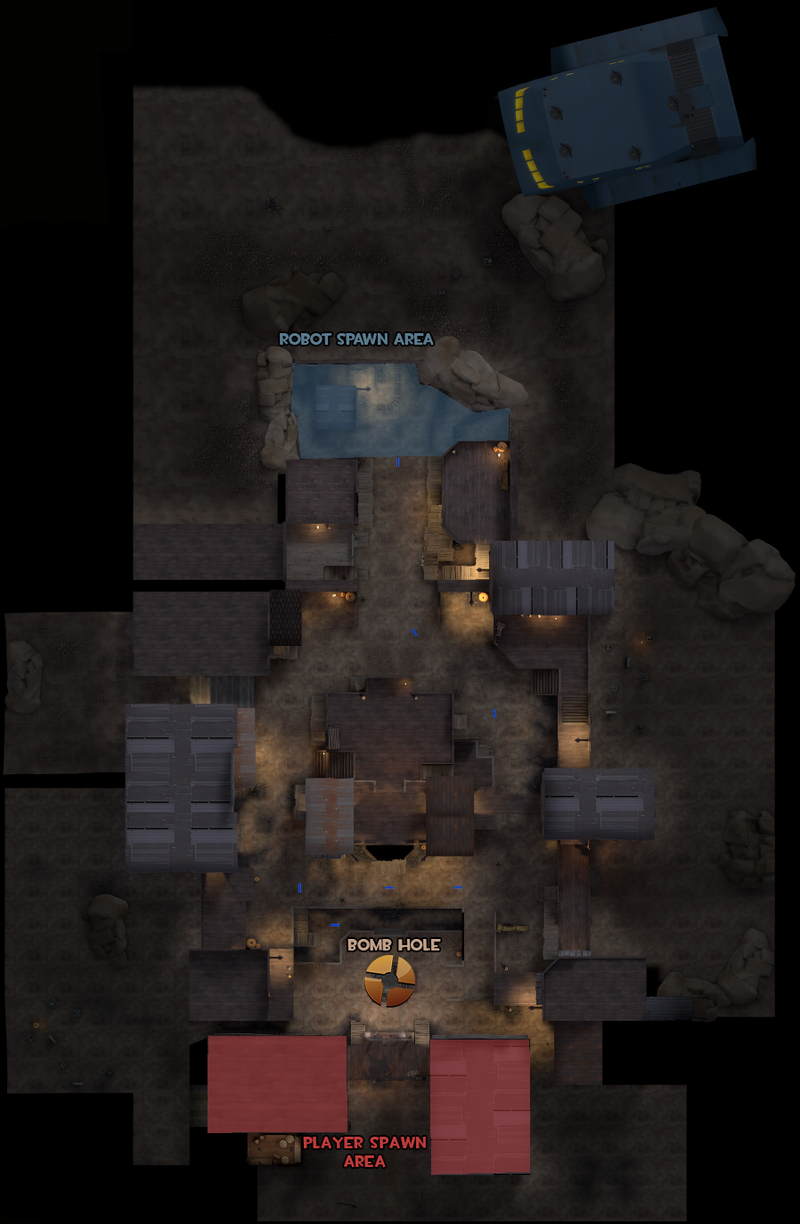
1 Left Side Hotel 2 Mining Accident Simulator 3 Right Side Mann Mining 4 Right Lane 5 Salt Rock Interior 6 Rooftop 7 Left Lane A RED spawn B RED spawn C Robot/Tank spawn
|
Decoy
| Decoy - overview indicators |
|---|
|
Mouseover the markers to see the name of the location
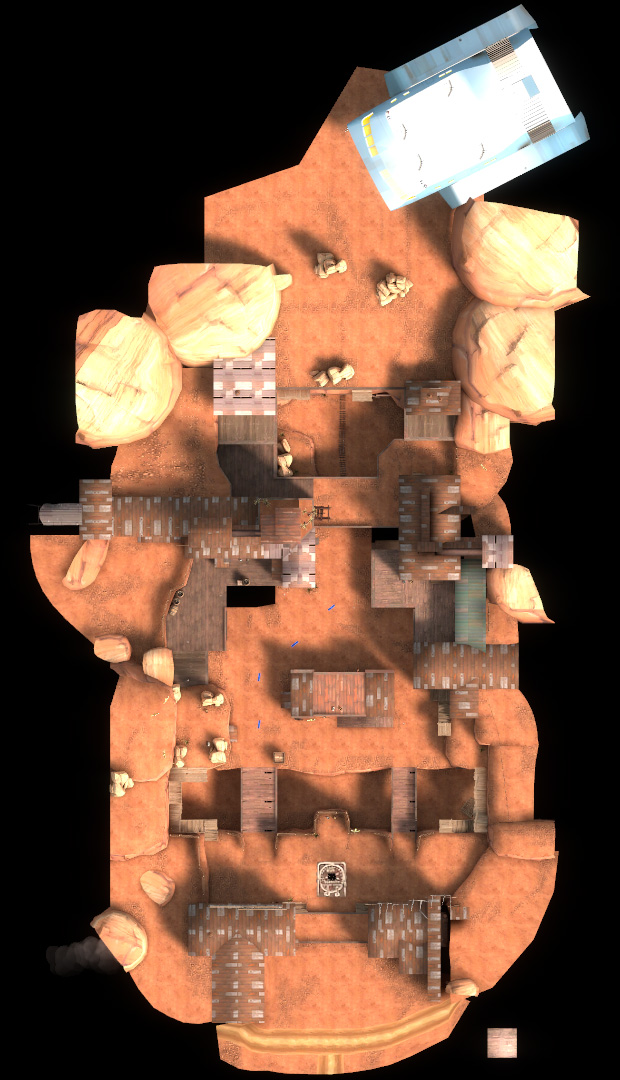
1 Mann Co. Hatch of Great Importance 2 Base Bridge 3 Base Bridge 4 Left Cliff 5 Center Structure 6 Right Structure 7 Structure Bridge 8 Left Structure A RED spawn B RED spawn C Robot spawn
|
Rottenburg
| Rottenburg - overview indicators |
|---|
|
Mouseover the markers to see the name of the location
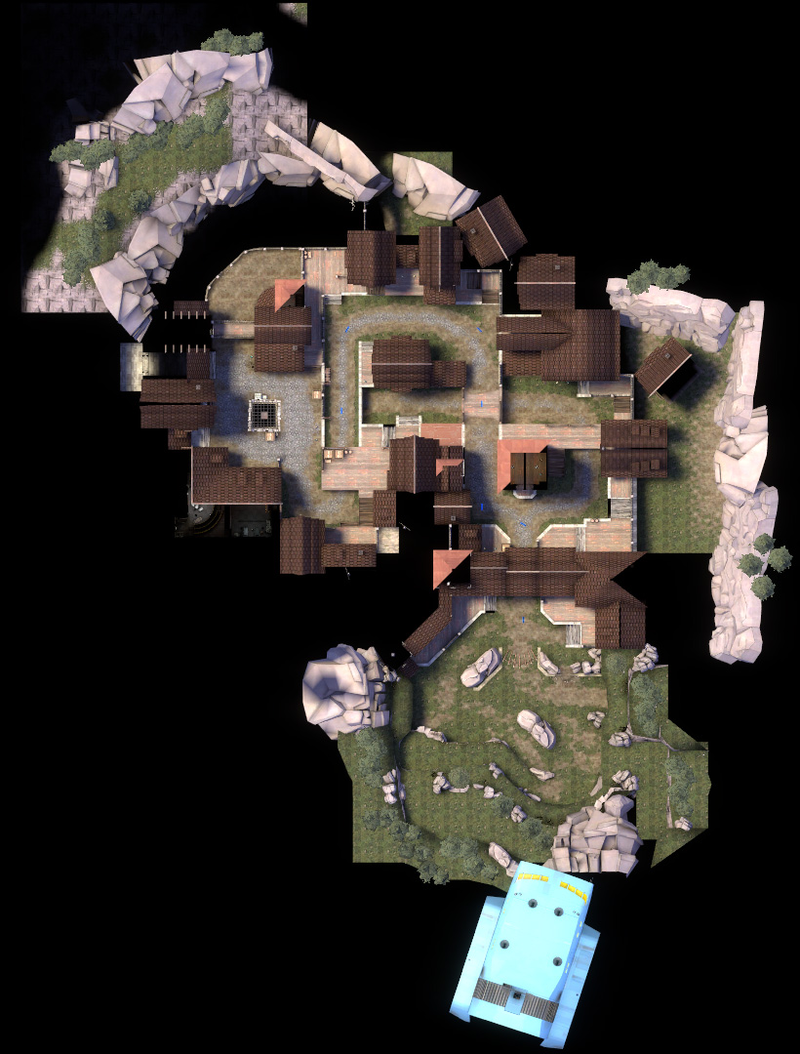
1 Hatch Area 2 Tank Path 3 Overhead Platform 4 Catwalks 5 Tunnel Entrance 6 Stone Tower 7 Pitchfork checkpoint 8 City Gates 9 Barricade 10 Field 11 Rightside Cliff A RED spawn B RED spawn C Robot spawn D Robot/Tank spawn
|
Mannhattan
| Mannhattan - overview indicators |
|---|
|
Mouseover the markers to see the name of the location
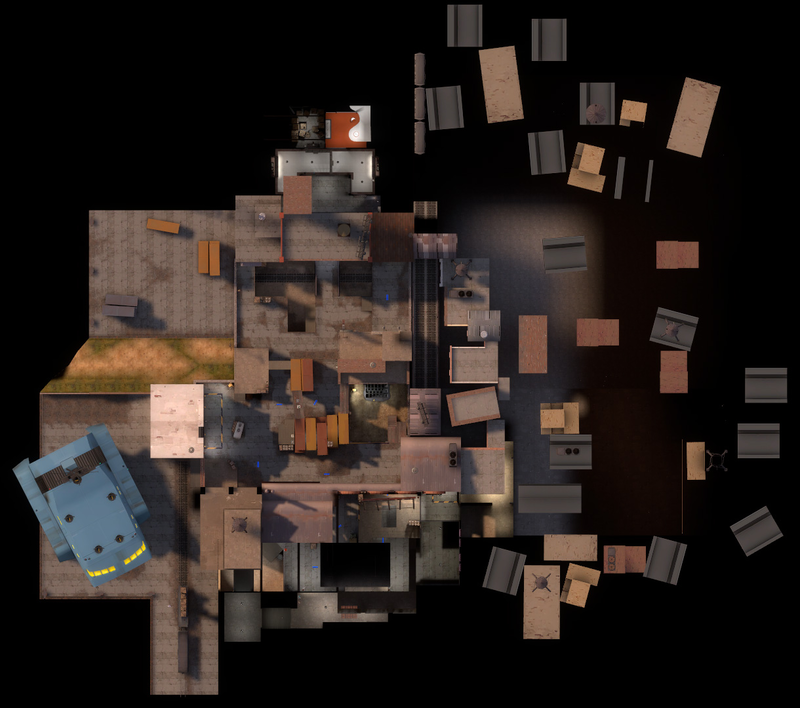
1 Warehouse 2 Shipping Containers 3 Grinder 4 Mannhattan Used Fireworks (And Repair) 5 Old Railway Ditch A Robot spawn #1 B Robot spawn #2 C Robot spawn #3 D RED spawn
|
Mannworks
| Mannworks - overview indicators |
|---|
|
Mouseover the markers to see the name of the location
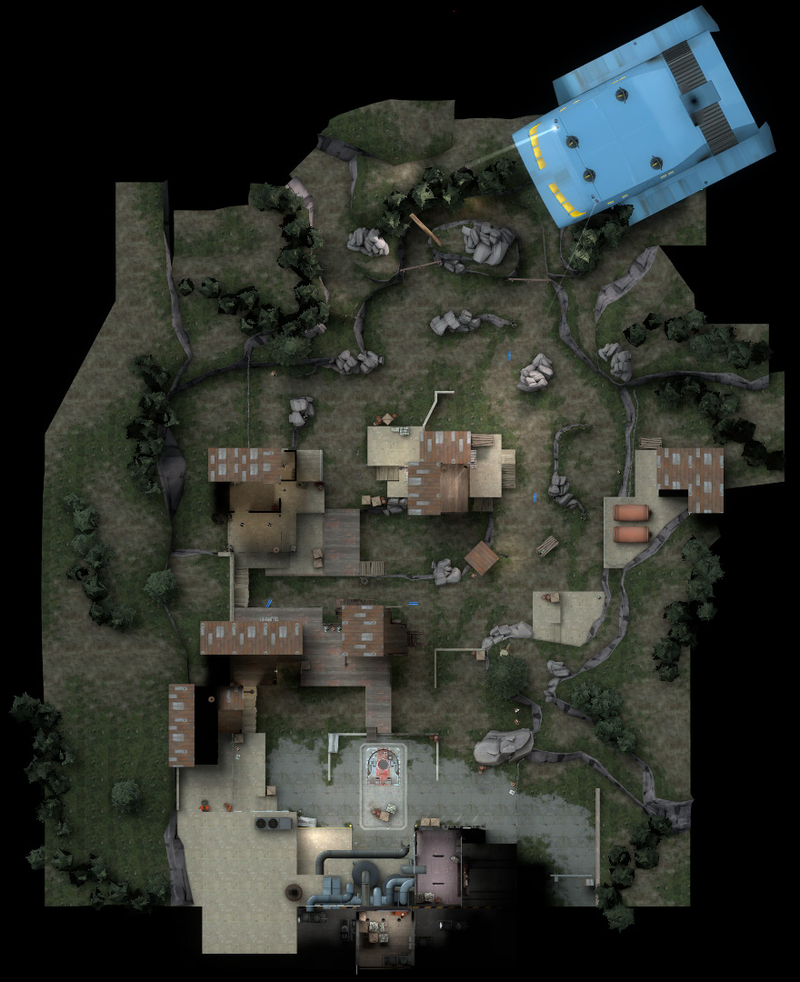
1 Central Hatch 2 Dual Structures 3 Red Structure 4 Center Structure 5 Valley A RED spawn B Robot spawn
|