Snakewater (competitive)
The community competitive scene changes frequently. Some or all info may be outdated.
| Snakewater | |
|---|---|

| |
| Basic Information | |
| Map type: | Control Point |
| File name: | cp_snakewater_final1
|
| Developer(s): | Toivo "chojje" Sawen |
| Map Info | |
| Environment: | Alpine |
| Setting: | Daylight, cloudy |
| Map Items | |
| Map Photos | |
 | |
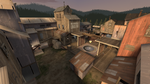
| Map Overview | |
 | |
Snakewater is a Standard Control Point map created by chojje and tovilovan, cp_snakewater was made an official map in the Two Cities Update. It consists of a base for each team, an open second point for each team, and a center point.
The objective of Snakewater is to control all five capture points. Each team starts with their second and final control points locked, leaving only the middle point available.
Snakewater remains very popular in 6v6, in league games, pickup matches, and lobbies.
Contents
Introduction Video
Video made by Lucky Luke.
Place names
All place names are given from the perspective of defense as their primary name (in terms of left and right), except obviously for the middle control point.
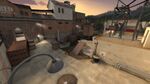
Control Points 1/5
- Left: One of two main paths that the combo will push, the other being right. There is a raised plank allowing for cover from snipers and heavies as well as a fence located further up.
- Lower/Main: This is the area where the scouts and possibly the demo or roamer will push while the combo takes right or left. This area is lower down and has a large path to the point. It's not possible to take this area if there is a heavy standing on the point, however. There is a staircase that leads up to the right area for a quick getaway as well.
- Right: This is the other main path that the combo can push from. There is a large rock and an elevated house, which is useful for the defending team to watch any area that the offending team may push from.
- Drop Down: This area is to the far left, and is a small, one man door on top of a long crate with stairs made of boxes. This area is mostly only useful for the defending team to push out, or for a spy to come in.
- Lobby: This is the main area where the attacking team stands and it has access to all of the paths for attacking.
Final Point

Main / Lower

Main Lobby
Lower Lobby


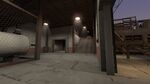
Control Points 2/4
Some people refer to this control point as "Yard" because of its open area.
- Ramp: One main area that allows access into the lobby, it's located in the middle area of the yard.
- Cliff/Drop Down/Cheese: This area is covered behind a fence, as well as having access to the lobby. This area is called drop down because a player can go through the lobby and go through the pit at the top, getting easy access behind the opposing team. The medic will typically stand in this area with his pocket.
- Control Point: The control point itself is located more to the left of the whole area. The cliff is located above it, so the combo can drop down to defend it. A train cart is located to the right of the point. A fence and a house protect the team from direct spam, however they can both be jumped over.
- Flank: The flank is located to the far right. This area is not so much of a flank, as it does not take the attackers directly behind the defenders, however this spot is hard to guard directly, but is less open.
- Main: This is the main area where most combos will push into the point. It is located right in front of the team and acts as a push area.
- House/Window: This area is mostly used as a sniping area for attacking snipers. It is located above the main area. Players can drop down from it, but it is difficult to get back up.
Yard

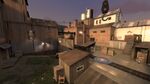
Control Point 3
Because of the symmetrical style of Snakewater (and almost all 5 Point Control Point maps), each team share a similar landmark/location on their respective sides of the middle point. A popular method to counteract this is to add the prefix "our" or "their", e.g. "their Choke". Some players may also refer the middle point as "Mid".
- Control Point: The middle point is comprised of two sheds with outstretched planks, containing a log that connects the two. This log hangs directly over the middle point.
- Kitchen/Chicken/Shed: These buildings are located to the left and right of the point. Inside both of the buildings are areas that lead to either team's respective right area.
- Choke: This is the area where the combo typically emerges from. It is straight behind the little house vertical to the point.
- Right: The area that is directly to the right of the choke. Players can go through the sheds to get to this area for each respective team. Teams will typically push through right instead of through choke because of its tactical advantages.
- Houses: These areas are located somewhat behind the planks on top of the shed and are often used to spam down on the point and sheds. Within these buildings are two rooms; the lower room is "Saw Room" and the upper room is "Window Room".
Middle Point
Tactics
Midfight
As you are approaching mid, try not to stay at the best of the hill leading up to the middle control point. It is very easy for the enemy Demoman to kill you because all of his grenades roll down the hill right on to you. It is very easy to be "spammed" out by him. It is recommended that you send at least one of your scouts and roaming soldier up onto the platforms above mid, so that they have a height advantage. Make sure your demoman keeps putting pressure on the other team, if they stay at the base of the hill, it is very easy to get picks with your grenade launcher. Watch out for Scouts that try and flank your team through kitchen, that is where most roaming scouts go to get picks. Being very aggressive at midfights is very common on Snakewater, and many teams will bomb two soldiers into your team. The easiest way to counter this is by simply counter-aggressing, and sending your scouts up top and bombing your two soldiers into them.
Holding Last
Holding the last point on Snakewater is generally very easy. When you fall back into last, having a Scout go Heavy and stand above the point is a good idea. The combo should hold on the left side, and the roaming soldier should stand up on the house on the right. That way, if they are unaware enough to push from your right, you can spam them out very easily, force them to pop very early and deny their push. Due to the difficulty of pushing last, many teams will run a sniper or a spy, so constantly be aware of offclasses. Once the other team has a pick, or their offclass has been shut down, they will attempt to push in. Generally, teams will push from the left side, or occasionally from lower. The demoman should always have stickies on the left roller door, to force them to pop uber as early as possible. You can afford to hold pretty far back, and counter-uber very late since the enemy team has to walk quite a distance from where they pop uber to the point. If you don't have uber yet, you can often just kite the uber and then go back into them.
Pushing Last
Pushing the last point on Snakewater can be very challenging, as there is a very long distance from lobby to the point. It is also very easy to get spammed out. Running a utility such a sniper or spy can often make it a lot easier to push in. Once you have an advantage, you should begin pushing immediately. Pushing from your left is usually an easy way to fail your push, since it is very easy to get spammed. It is a good idea to uber your demo and scout through right roller door, and have your roamer try to pop them as quickly as possible. Ubering the demo and scout allows the scout to close distance very quickly, and the demoman can deal a lot of damage at a further range than a soldier can.
Rollouts
Video of the Demoman Rollout by ZeroSk1ll:
Video of the Soldier Rollout by =(eGO)= Nik:
Demoman
The usual route for the Demoman will see him Sticky jump out of spawn, and going into lobby. After reaching lobby, he can jump from the Ramp into the house. This can be a tricky manoeuvre to perform, so an alternate route would be to go into the main area below house instead. You'll lose your height advantage, however you might be really weak if you go through the house.
Soldier
The Snakewater rollout is comparably easier than Badlands' rollouts. The Soldier should jump out of spawn and go right into lobby from the right side. Once reaching the lobby, he should continue to go right and drop down into the flank area. After that, there are two routes that the Soldier can go. For pocket Soldiers, go right and you reach the Mid from there. For the roaming Soldiers, take the left route, and jump to the bridge above the house on Mid.
| |||||||||||||||||||||||||||||||