Foundry (competitive)
| “You are so small! Is funny to me!” This article is a stub. As such, it is not complete. You can help Team Fortress Wiki by expanding it. Notes: Tactics need to be written, videos for rollouts need to be put up, and pictures with captions of the locations need to be put up. |
The community competitive scene changes frequently. Some or all info may be outdated.
| Foundry | |
|---|---|

| |
| Basic Information | |
| Map type: | Control Point |
| File name: | cp_foundry
|
| Developer(s): | Valve |
| Map Info | |
| Environment: | Industrial |
| Setting: | Dusk, cloudy |
| Hazards: | Cauldron Fire |
| Map Items | |
| Map Photos | |
 | |
| Map Overview | |
 | |
Foundry is a 5CP map that is set in an industrial setting. The map was released in the Australian Christmas 2011 update and was created by Valve. The objective in Foundry is to be the first team to capture all of the Controls Points in the time limit given, which is 8 minutes. Both teams start with their last and Stockyard points captured, with the mid point open for capture. On each team's last points, there are Cauldron Fires which, when entered, will kill you on impact. In the North American competitive scene, Foundry is very rarely played in 6v6 or Highlander, but is played every now and then in EU Leagues.
Contents
Locations
All place names are given from the perspective of defense as their primary name (in terms of left and right), except obviously for the middle control point.
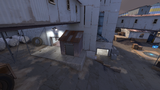
Control Point 3
Due to Foundry being a mirrored map, terms can be prefixed as our or their.
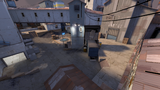
Patio: The Patio is where you would expect most classes to be at. When you do your rollout, it is located on your right, and the enemies will be on the left. The Engineer will usually build in this location since he is given cover from a wall that is covering a certain area of the Patio. This is also a common Sniper spot.
Gravel Pit: The Gravel Pit is where you may see classes like Demoman, Spies, Scouts, and Roamers come out of. This is because when you exit the Gravel Pit, you have full access to the enemy's Patio. The Demoman is able to provide spam with his Grenade Launcher so he can weaken the enemies so that the Roamer can finish anyone off that comes though that area.
Roof: The roof is located right above the mid point. A Soldier that can get to this location is able to spam rockets down towards the Train, Patio, and Gravel Pit. Scouts and Demoman can get up to this location easily, while classes like the Sniper and Spy have to strafe onto the top of it with the help of the Trains and the shack.
Train: The Train is the middle entrance from where you do your rollout. On the back of the train is another very good spot of the Sniper to go to since he can escape from there easily with the door to his right. Demoman are able to go through this area in order to spam in all three locations, while getting good escapes as well. You may also see the combo come through this area as well, but they can easily be spammed out if not careful.
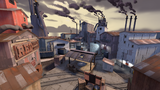
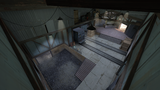
Overview of Central Control Point.
Central Control Point and the Roof.

Entraces from RED.
Entrance from BLU.


Control Point 2/4
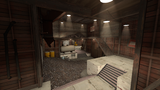
Shack: While in the house, the Shack is located on the left hand side, towards the right of the train. This area controls the choke for the offensive team, providing a good area for spam. This is a very nice Sniper spot since he is able to look at the other team's Patio from here. Engineers will usually build their Teleporters in this area due to the train blocking the vision. This can be a good spot as well for a Dispenser and a Sentry Gun.
Patio: The Patio is located on the left of this area. Engineers and Snipers have great vision of the point here and Pyros can be given enough time to airblast any projectiles that come towards the guns way. This spot can be easily spammed if too many players are in that area. The shack is a great counter to this due to the Sniper being in that area, but spam can also be provided where the Health Pack and Full Ammo Pack are located.
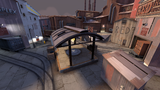
Overview of BLU's second Control Point.
One side of the BLU Transition Building.
One side of the RED Transition Building.
The BLU Side Path.


Control Point 1/5
Small staircase: This is located to the left of the last point. In this area, you will probably find a Sniper looking onto the last point. This isn't the most ideal spot for most classes to be at because it can be spammed very easily if you're at the bottom of the staircase. A Spy can travel through this area easily if they are carrying an Invisibility Watch.
Window: All classes can come from the window in order to provide spam for the team. The Demoman, Sniper, and Soldier are very valuable in these locations. The Demoman can put pipes and stickies onto the point, the Soldier can put out damage with all of his rockets, and the Sniper can look around the point for anyone to pick. This can be spammed back by a well placed Sentry Gun and another Demoman and Soldier combo.
Large Staircase: The Large Staircase gives vision of the right door, the Window, and the last point. Engineers can use this location to build a well covered Sentry Gun that can cover the last point. Snipers can also look into the Window and back to the boxes from this location. Since that area is a common spot for an Ubercharge, the Sniper can wait for the moment when the Medic walks out in order to get a quick Headshot or fully charged bodyshot.
Cauldron Fire: Cauldron Fire is located right behind the last point. This is another common spot for Snipers and Engineers to wait at for the enemy team. If placed correctly, the Sentry Gun will have vision of anyone that is inside of the Window, but this spot can be easily spammed by rockets from Small Staircase. This spot is difficult for Spies to get to because if they do misstep, they will either fall into the fire or their disguise will be found. This is arguably the best spot for Eningeers to wait at.
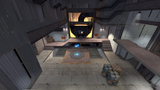
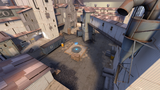
Overview of BLU's Foundry Room.
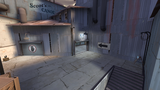
Entrances to the BLU Entry Rooms.

Entrance to one of the RED Entry Rooms.
RED Upper Walkway and the Entry Room.


Tactics
Tactics will be written here at a later date.
Rollouts
Video of the Demoman Rollout:
Demoman
- If starting left, place a sticky at the end of the slanted path. The jump should bring you over the Catwalk and you should land right in front of the Small Staircase entrance. Once you walk out, place a sticky on the Patio your jump should let you land right over the train and in front of the left door. Walk over to the HP pack and you can choose to either go out through Gravel Pit or Train. You are able to beat the Scouts to mid with this path.
- If starting right, place a sticky at the end of the slanted path. Your jump should put you at the front of the right door. Pick up the HP pack (if needed) and place your sticky right outside of choke and jump over the Train that is located around the Shack. You should land right in front of the right door. Pick up the HP pack and head outside to the Patio. If done fast enough, you should be able to meet up with the Scouts when you go through here.
Soldier
- Start out by going left and time your first jump as you're going up the slanted path. If done correctly, you should be able to dodge the catwalk right above your head. Head over to the Patio and hit your Rocket on the boxes to your right and then do a Pogo off of the stacked boxes. This should put you right in front of the left door. Jump off of the right edge and make your way towards Gravel Pit if you want to synchronize damage with your Demoman. Otherwise, wait for the Medic to buff you to about 250 and jump onto the Roof.
Scout
- Start by going to the left. Try timing your jump at second so you can rise off of the crate stack for a small advantage in distance. Exit by the train box car as this seems to be the fastest way to mid.
| |||||||||||||||||||||||||||||||