Community Graveyard strategy
Revision as of 17:23, 20 October 2021 by ProfessorHeavy (talk | contribs) (Halloween Pumpkin is not used here.)
| Community Graveyard strategy | |
|---|---|

| |
| Basic Information | |
| Developer(s): | {{{map-developer}}} |
| Map Info | |
| Environment: | Halloween |
| Setting: | Night |
| Hazards: | Pitfall, Pumpkin bombs |
| Map Photos | |
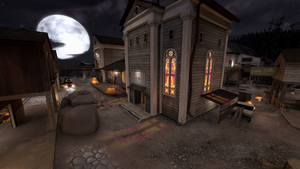
This article is about Community Graveyard strategy.
Note: It is recommended to read the main Graveyard article first to become familiar with the names of key map locations used in this article.
Contents
General strategy
- Teams will usually circle around one side and force their way to the back, in somewhat of a yin-yang dynamic. The key is to obtain proper defense of your team’s area and gain control of the rooftop and the indoors. The spawns are relatively useless, and are usually forgone by either team.
- The ghosts make the gameplay tighten as the round goes on, and remaining players will typically be on guard thanks to overheal. Use this to try and single out specific players rather than taking on the whole team.
- Capturing the objective will force the enemy team to come to you or risk losing, prepare yourself for advancing players at either of the 2 side doors that open when the control point unlocks.
- The periodically spawning Super Spells can turn the tide. Keep an eye out for the purple beacons and get them if you can!
- The Skeleton King is a bigger threat than he looks, keep an eye out and make sure he comes to you so you can grab the super spell.
- Even when reduced to one man, a lone surviving team member can still be a threat with ghosts and mini-crits. Be careful not to underestimate them.
Class-specific strategy
Scout
- While a Scout can benefit from an increased capture speed for the central control point, this can leave them very vulnerable unless their capture is covered by teammates.
- Scouts can make it to spell spawns fast, and can secure the area around it.
Soldier
- Banners with a passive survival effect such as the Battalion's Backup or the Concheror are good options since it can help you survive a lot of battles, but their effects will be used very rarely.
- The small and flat nature of the terrain means that rocket jumping is limited, but is viable when trying to maneuver through or over the central building.
Pyro
- Pyro's airblast can be used to great effect to repel projectiles and placed Stickybombs, allowing their team to go on the offensive.
- The limited ammo scattered around the map should be enough to last a Pyro through a single round, but repeated airblasts can drain it quickly as well. The Manmelter can be used to extinguish teammates in place of airblasts.
- There are many ambush points from the indoor areas. The Backburner can be used for a devastating sneak attack.
Demoman
- The Stickybomb Launcher and Scottish Resistance are good options because it can both deal with Sentry nests and defend the control point.
- For Demoknight playstyles, shields like the Chargin' Targe can increase survivability. The Eyelander may not be able to benefit from its full effect, so the Scotsman's Skullcutter can be used to avoid the health penalty.
Heavy
- Heavy is a powerful class on this map because of his high damage and health, the latter of which can be increased further with the Sandvich.
- Stick around the middle building to have a better chance of killing the enemy in close quarters. There are many hiding spots for a Heavy, and they can even jump down the staircases while revved up as a surprise attack.
Engineer
- Normal Engineer is very hard to pull off in this map because you don’t get much room to set up buildings. So either use the Jag or play battle Engineer.
- A full ammo crate outside of the spawn doors can be used to replenish metal reserves immediately, but it can still be tricky to build without team support.
- If a Engineer is able to set up a Sentry nest, they can use it to surprise the enemy team when the control point doors open.
Medic
- In the early stages of a round, Medics are vital to team survival by keeping teammates alive. Medics can even work alongside Dispenser-ghosts to keep the team fighting.
- The Vaccinator is very effective in this map. Not only can it be used to get more out of the Ubercharge's effect, but when the enemy is reduced to a single damage type, such as Soldiers/Demomen, changing the resistance type can make it easier to respond.
- The Amputator's taunt can be useful inside the capture building if the team is gathered, and the Ubersaw can be a high-risk, high-reward method to build Ubercharge, which is very difficult to build with such quick rounds.
Sniper
- Sniper is quite harder to play on this map compared to others, but he can be used to watch the outside of the building as an anti-flank.
- Huntsman Snipers can contribute more in isolated spaces.
- A well placed Jarate throw can allow a team to overwhelm even a target who is being healed by many ghosts.
Spy
- Spies can dispatch more powerful classes with backstabs, no matter how many ghosts are supporting them.
- Ghosts are a double-edged sword with Spies, as friendly ghosts could give away your position, while enemy ghosts can heal you.
Dispenser-ghost
- Even when dead, ghosts can still heal teammates and replenish ammo.
- Search for teammates using the "MEDIC!" voice command, especially if they are low on health.
- Heavies, Pyros, and Engineers can benefit the most from the ammo regenerating effects.
- Stacking on the most powerful person on a team can turn the tide. A Heavy can easily survive a firefight with sustained healing.
- It is possible to heal enemy Spies or even give away friendly Spies. Ghosts must always be wary of who to heal.
