Difference between revisions of "Gullywash/ko"
| Line 20: | Line 20: | ||
== 장소 == | == 장소 == | ||
=== 세번째 점령 지점 === | === 세번째 점령 지점 === | ||
| − | + | 이 점령지점은 다리와 연결된 발코니, 그리고 그 아래의 골짜기로 구성되어 있습니다.. | |
| − | *''' | + | *'''출입구:''' 각각의 팀은 다리로 가는 길이 두 개가 있습니다. 하나는 다리에서 멀리 떨어져 있는 적군 기지의 발코니로 통합니다. 각각의 팀은 다리 오른쪽에 골짜기로 통하는 길이 있습니다. |
| − | *''' | + | *'''경사로:''' 양쪽 다 두개씩의 경사로가 있으며, 골짜기에서 발코니로 올라가는 길입니다. |
| − | *''' | + | *'''엄폐물:''' 주 발코니 입구의 왼쪽에 상자가있으며, 적의 공격으로부터 보호해줍니다. |
| − | *''' | + | *'''점령 지점:''' 점령 지점은 땅에서 부터 떨어져 있으며, [[Scout/ko|스카웃]], [[Soldier/ko|솔져]] 그리고 [[Demoman/ko|데모맨]] 만이 갈 수 있습니다. 하지만 점령 구역이 넓게 퍼져있기 때문에 어느 클래스든지 점령할 수 있습니다. 올라간 곳은 방어에 이점을 제공해줍니다.. |
| − | [[Image:Gullywash overview.png|thumb|top| | + | [[Image:Gullywash overview.png|thumb|top|맵의 전경(큰 파일)]] |
=== 두번째 & 네번째 점령 지점 === | === 두번째 & 네번째 점령 지점 === | ||
| − | + | 두번째 점령 지점은 높이가 높은 저격 지점이 많은 뻥 뚫린 지역입니다. 점령 구역은 땅 높이와 이 지역을 둘러싸는 높은 발코니와 같은 높이, 두 부분으로 나뉘어져 있습니다. | |
| − | *''' | + | *'''세번째 점령 지점 출입구:''' 세번째 점령 지점으로부터의 출입구는 두개가 있습니다. 주 발코니는 점령 지점으로부터 멀리 떨어진 뻥 뚫린 지역으로 통합니다. 골짜기 쪽 출입구는 점령 지점의 오른쪽으로 통합니다(방어자만 갈 수 있음). |
| − | *''' | + | *'''점령 지점:''' 나눠진 점령 지점의 오른쪽에는 더 높이 갈 수 있도록 경사로가 있습니다(공격자만 갈 수 있음). 위쪽 지점도 점령 지점이 있기 때문에, 공격자들은 공격에 이점을 얻게 됩니다. |
| − | *''' | + | *'''발코니:''' 점령 지점의 왼쪽에는 방어자들이 점령 지점을 방어할 수 있도록 올려진 발코니가 있습니다(방어자만 갈 수 있음). 이 발코니는 위쪽 점령 지점에서 갈 수 있습니다.. |
=== 첫번째 & 다섯번째 점령 지점 === | === 첫번째 & 다섯번째 점령 지점 === | ||
Revision as of 13:38, 18 October 2011
| Gullywash | |
|---|---|
| 300px | |
| 기본 정보 | |
| 제작: | {{{map-developer}}} |
| 맵 정보 | |
| 환경: | Desert |
| 설정: | Daylight, sunny |
| 맵 사진 | |
 | |
| 맵 전경 | |
 | |
| 맵 후원 우표 | |
| 지원자 목록이 적용됨 | |
Gullywash 는 점령 지점 맵입니다. 이 맵은 사막 환경에서 시작되며, 이 맵의 특징은 레드팀과 블루 팀이 물의 원천을 가지기 위해 싸웁니다. 승리하려면 팀은 5개의 점령 지점을 점령해야 합니다.
이 맵은 일반적으로 ETF2L, AsiaFortress, ESEA 및 ozfortress 대회에서 6대6 매치에 사용됩니다. 다른 맵은 Badlands, Granary, Gravel Pit, Freight 그리고 Obscure. 를 포함합니다.
목차
장소
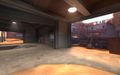
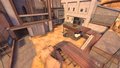
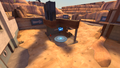
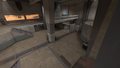
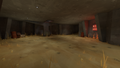
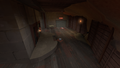
세번째 점령 지점
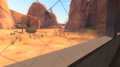
이 점령지점은 다리와 연결된 발코니, 그리고 그 아래의 골짜기로 구성되어 있습니다..
- 출입구: 각각의 팀은 다리로 가는 길이 두 개가 있습니다. 하나는 다리에서 멀리 떨어져 있는 적군 기지의 발코니로 통합니다. 각각의 팀은 다리 오른쪽에 골짜기로 통하는 길이 있습니다.
- 경사로: 양쪽 다 두개씩의 경사로가 있으며, 골짜기에서 발코니로 올라가는 길입니다.
- 엄폐물: 주 발코니 입구의 왼쪽에 상자가있으며, 적의 공격으로부터 보호해줍니다.
- 점령 지점: 점령 지점은 땅에서 부터 떨어져 있으며, 스카웃, 솔져 그리고 데모맨 만이 갈 수 있습니다. 하지만 점령 구역이 넓게 퍼져있기 때문에 어느 클래스든지 점령할 수 있습니다. 올라간 곳은 방어에 이점을 제공해줍니다..
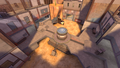
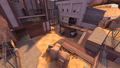
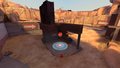
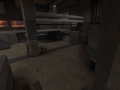
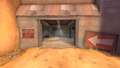
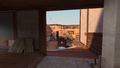
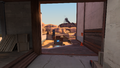
두번째 & 네번째 점령 지점
두번째 점령 지점은 높이가 높은 저격 지점이 많은 뻥 뚫린 지역입니다. 점령 구역은 땅 높이와 이 지역을 둘러싸는 높은 발코니와 같은 높이, 두 부분으로 나뉘어져 있습니다.
- 세번째 점령 지점 출입구: 세번째 점령 지점으로부터의 출입구는 두개가 있습니다. 주 발코니는 점령 지점으로부터 멀리 떨어진 뻥 뚫린 지역으로 통합니다. 골짜기 쪽 출입구는 점령 지점의 오른쪽으로 통합니다(방어자만 갈 수 있음).
- 점령 지점: 나눠진 점령 지점의 오른쪽에는 더 높이 갈 수 있도록 경사로가 있습니다(공격자만 갈 수 있음). 위쪽 지점도 점령 지점이 있기 때문에, 공격자들은 공격에 이점을 얻게 됩니다.
- 발코니: 점령 지점의 왼쪽에는 방어자들이 점령 지점을 방어할 수 있도록 올려진 발코니가 있습니다(방어자만 갈 수 있음). 이 발코니는 위쪽 점령 지점에서 갈 수 있습니다..
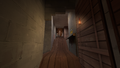
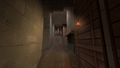
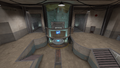
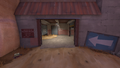
첫번째 & 다섯번째 점령 지점
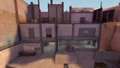
The final control points are located inside the complexes at either end of the map. The layout of the final point is similar to that of Badlands.
- Entrances From Control Point 2 & 4: There are three paths to the final control point from the second or forth control point. Two entrances are on the ground level, and lead into a lobby area before the room housing the final capture point. The other route goes down the side to the final control point, acting as a flanking route.
- Lobby: The two ground level routes access a lobby area before the final room. This lobby area has 3 entrances into the final room, two raised and one at ground level. All the entrances to the final room from the lobby area are located at the far end of the room from the capture point.
- Flanking Route: The route from the raised balcony enters the final room on the right side (for defenders). The entrance itself is a ramp that leads to the ground level. This flanking route also provides access to an underground area.
- Undergound Area: Under the final room there is an underground section, it has exits on the flanking route and directly behind the final capture point.
업데이트 기록
- cp_gullywash 가 게임에 추가되었습니다.
점령 지점 장악 속도
| 지점 점령 | 인원수 | 초 | ||
|---|---|---|---|---|
| 지점 점령 1 및 5 | ×1 |
| ||
| ×2 |
| |||
| ×3 |
| |||
| ×4 |
| |||
| 지점 점령 2 및 4 | ×1 |
| ||
| ×2 |
| |||
| ×3 |
| |||
| ×4 |
| |||
| 지점 점령 3 | ×1 |
| ||
| ×2 |
| |||
| ×3 |
| |||
| ×4 |
|
스크린샷
- CP Gullywash 1.jpg
- CP Gullywash 3.jpg


노트
- Gullywash is particularly similar to Badlands in both appearance and layout.
이스터 에그
모자
- A Tyrant's Helm can be found on the balcony near BLU second point.
- A Pyro's Beanie can be found on top of some lockers just past RED first spawn.
- A Ye Olde Baker Boy can be found at capture point 3, very high above the BLU main entrance on top of a box.
- A Professional's Panama can be found just outside BLU first spawn, on the right ontop of a barrel.
- A Texas Ten Gallon can be found on a crate behind a wire fence near capture point 3.
- A Respectless Rubber Glove can be found at capture point 3 on an over-hanging sheet of metal high above the lower RED entrance
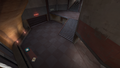
- In both RED and BLU first spawn there is a Stainless Pot in the dressing cabinet on the left.
무기
- A bottle of Jarate can be found outside RED first spawn, outside the window on the side path to the right.
- There are two of the second rejected Scottish Resistance sticky models in the map, which can be moved around.
Rubber Ducks and a Frog
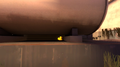
- The first Rubber Ducky is under the water tank on next to BLU Control Point 4(2). It is possible to move this duck around with weapons.
- A group of three Rubber Duckies can be seen behind a window to the left of BLU first spawn, right next to the Professional's Panama.
- There are Rubber Duckies hidden in the vents in the ceiling of both final points.
- There is a slightly opened window on the RED side of the middle point where a duck can be seen sitting on a box.
- High above the balcony at the second point on RED, there is a Rubber Ducky sitting on a box near a small ladder
- The Frog can be found at the base of the waterfall outside RED first spawn, however, it can only be seen using noclip.
외부 링크
- Development thread: http://forums.tf2maps.net/showthread.php?t=6254
| ||||||||||||||||||||||||||||||||